This article describes how to obtain and use the Distribution Package of the Android-based OpenSTDroid embedded software for any development platform of the STM32MP25x lines ![]() (STM32MP25 boards), in order to modify or add pieces of software, and to create the right Android™ distribution for the targeted product.
(STM32MP25 boards), in order to modify or add pieces of software, and to create the right Android™ distribution for the targeted product.
It lists some prerequisites in terms of knowledge and development environment and gives step-by-step instructions to download and install this Distribution Package.
1. Distribution Package content[edit | edit source]
If you are not familiar with the Android-based OpenSTDroid embedded software and its packages, it is recommanded to read the following articles:
- Which STM32MPU Embedded Software Package for Android better suits_your_needs (and especially the Distribution Package chapter)
- Android-based OpenSTDroid embedded software
In summary, this Distribution Package provides:
- An Android build framework (also known as a distribution builder)
- For the OpenSTDroid distribution (development on Arm® Cortex-A processor):
- The BSP (Linux® kernel, U-Boot, TF-A, Trusty TEE) pieces in binary (prebuilt). Several scripts are provided to load source code and re-build them.
- The application frameworks (including hardware abstraction code) pieces in source code.
- For the FwST-M Packages (development on Arm® Cortex-M processor),
- The BSP (MCUboot, TF-M) pieces in binary (prebuilt). Several scripts are provided to load source code and re-build them.
- For the STM32Cube MPU Package (development on Arm Cortex-M processor), all pieces of software in source code: BSP, HAL, middlewares and applications.
- A toolset to tune the system for your needs and to handle the built image (for example STM32CubeProgrammer to install the built image on the board).
2. Prerequisites[edit | edit source]
2.1. Knowledge[edit | edit source]
The STM32MPU Distribution Package aims to create an Android distribution for the targeted product: solid knowledge of Linux and Android are recommended to make the most of this Package.
The STM32MPU distribution for Android is an Android distribution based on the Android build framework: a short introduction about Android is available in AOSP[1].
Reading the Android-based OpenSTDroid software architecture overview is also highly recommended.
2.2. Development setup[edit | edit source]
The recommended setup for the development PC (host) is specified in the following article: PC prerequisites.
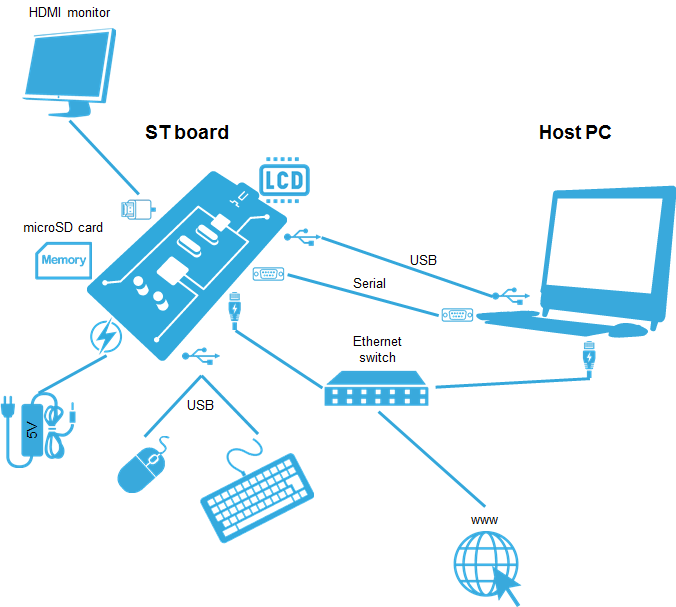
Whatever the development platform (board) and development PC (host) used, the range of possible development setups is illustrated by the picture below.
The following components are mandatory:
- Host PC for cross-compilation and cross-debugging, installed as specified above
- Board assembled and configured as specified in the associated Starter Package article
- Mass storage device (for example, microSD card) to load and update the software images (binaries)
The following components are optional, but recommended:
- A serial link between the host PC (through Terminal program) and the board for traces (even early boot traces), and access to the board from the remote PC (command lines)
- An Ethernet link between the host PC and the board for cross-development and cross-debugging through a local network. This is an alternative or a complement to the serial (or USB) link
- A display connected to the board, depending on the technologies available on the board: DSI LCD display, HDMI monitor (or TV) and so on
- A mouse and a keyboard connected through USB ports
Additional optional components can be added by means of the connectivity capabilities of the board: cameras, displays, JTAG, sensors, actuators, and much more.
3. Installing the OpenSTDroid distribution[edit | edit source]
The installation relies on the repo command. If the Repo tool (a Google-built repository management tool that runs on top of Git) is not already installed and configured on the host PC, refer to the PC prerequisites article.
Create a working directory for the distribution (we recommended using the distribution name):
mkdir <working directory>
cd <working directory>
1- Initialize repo in the working directory:
repo init -u https://github.com/STMicroelectronics/android-manifest -b refs/tags/<Tag> -m stm32mp2droid.xml
With
- <Tag> = tag selecting the required version of the STM32MPU distribution for Android (see following table)
| OpenSTDroid distribution | ||
| Tag | android-<version> | Release note |
| st-android-16.0.0-2026-05-26 | android-16.0.0_r4 | st-android-16.0.0-2026-05-26 release note (v6.2.0) |
2- Synchronize the local project directories with the remote repositories specified in the manifest:
repo sync
This may take time to retrieve all sources.
4. Local mirror[edit | edit source]
It can be of interest to create a local mirror of the different repositories used.
There are two possible kinds of cache:
- REPO mirror: mirror of list of modules in repositories based on the provided manifest (for example: Android AOSP)
- GIT mirror: mirror of one module (for example: Linux kernel)
4.1. REPO mirror[edit | edit source]
The REPO mirror is mainly used to mirror the Android AOSP sources.
1- Create and go to the cache directory
mkdir <PathToRepoCacheDir>
cd <PathToRepoCacheDir>
2- Mirror the required sources
case AOSP sources needed for the required version (recommended)
repo init -u https://android.googlesource.com/platform/manifest -b <Tag> --mirror
repo sync -q
case full AOSP sources
repo init -u https://android.googlesource.com/platform/manifest --mirror
repo sync -q
3- Create environment variable for this cache directory
export CACHE_DIR=<PathToRepoCacheDir>
It is recommended to add this line in your .bashrc file available in your HOME directory
|
4- Use the cache directory
Add --reference=$CACHE_DIR option to your repo init command.
repo init --reference=$CACHE_DIR -u https://github.com/STMicroelectronics/android-manifest -b refs/tags/<Tag> -m stm32mp2droid.xml
4.2. GIT mirror[edit | edit source]
While the distribution has been installed, a helper script cachesetup is available for this purpose, which creates / updates the mirrors based on the configuration file device/stm/<STM32Series>/scripts/cache/android_cache.config.
Make sure that if you change the environment variable name, you also update the associated load_xxxx scripts available in device/stm/<STM32Series>-xxxx/source directory.
Create the mirrors by executing the following commands:
source build/envsetup.sh
cachesetup --new
Regular updating of your mirror is recommended by executing:
cachesetup
For more information on how to use this command, refer to the cache setup usage (execute cachesetup -h).
It is possible to update the AOSP or the Android REPO mirror using the command cachesetup aosp or cachesetup android
|
5. Building the OpenSTDroid distribution[edit | edit source]
When the installation is complete, refer to the How to build OpenSTDroid distribution page to learn how to build it.
6. Flashing the built image[edit | edit source]
When the distribution has been built, refer to the How to populate boards for Android page to learn how to flash your device.
7. References[edit | edit source]
Arm® is a registered trademark of Arm Limited (or its subsidiaries) in the US and/or elsewhere. ![]()
Arm® is a registered trademark of Arm Limited (or its subsidiaries) in the US and/or elsewhere. ![]()