1. Article purpose[edit | edit source]
This article provides the basic information needed to start using the gdbgui[1] host PC tool.
2. Introduction[edit | edit source]
The following table provides a brief description of the tool, as well as its availability depending on the software packages:
![]() : this tool is either present (ready to use or to be activated), or can be integrated and activated on the software package.
: this tool is either present (ready to use or to be activated), or can be integrated and activated on the software package.
![]() : this tool is not present and cannot be integrated, or it is present but cannot be activated on the software package.
: this tool is not present and cannot be integrated, or it is present but cannot be activated on the software package.
| Tool | STM32MPU Embedded Software distribution | STM32MPU Embedded Software distribution for Android™ | ||||||
|---|---|---|---|---|---|---|---|---|
| Name | Category | Purpose | Starter Package | Developer Package | Distribution Package | Starter Package | Developer Package | Distribution Package |
| gdbgui | Debugging tools | gdbgui[1] runs GDB in the background to build an easy-to-use graphical user interface. It is a browser-based debugger that operates through a web browser page. Since it is based on GDB, it can be used through a JTAG or an ethernet link with gdbserver. |
||||||
| *: The Developer Package is required to run a GDB debug session that includes all dependencies. | ||||||||
3. Installing the trace and debug tool on your host PC (Ubuntu Linux distribution)[edit | edit source]
If it is not present on your Ubuntu Linux® machine, install gdbgui via the Python package installer (pip):
pip install --trusted-host pypi.python.org --cert /etc/ssl/certs/ --proxy $https_proxy --upgrade gdbgui
Note1: If pip is not already installed, install it as follows:
sudo apt-get install python-pip
Note2: Depending on your environment, the --proxy option is not mandatory; if required, please check that $https_proxy is well defined, or replace it by your environment variable in the command line.
The gdbgui binary is then installed under $HOME/.local/bin/gdbgui. You can check it by using ths following command:
which gdbgui
4. Getting started with gdbgui[edit | edit source]
4.1. Running gdbgui using gdbserver[edit | edit source]
This environment is mainly used to debug applications. The Developer Package context (SDK) is used for setup.
- Start gdbserver on your target board for the userland program you want to debug:
gdbserver host:1234 hello_world_example
- Go to the source directory path:
cd <source_file_folder_path>
- Set the SDK environment and start gdbgui:
source <Your_SDK_path>/environment-setup-cortexa7t2hf-neon-vfpv4-ostl-linux-gnueabi
gdbgui -g $GDB
Note: In case of issue when starting gdbgui, please refer to the Error cases chapter.
- Then:
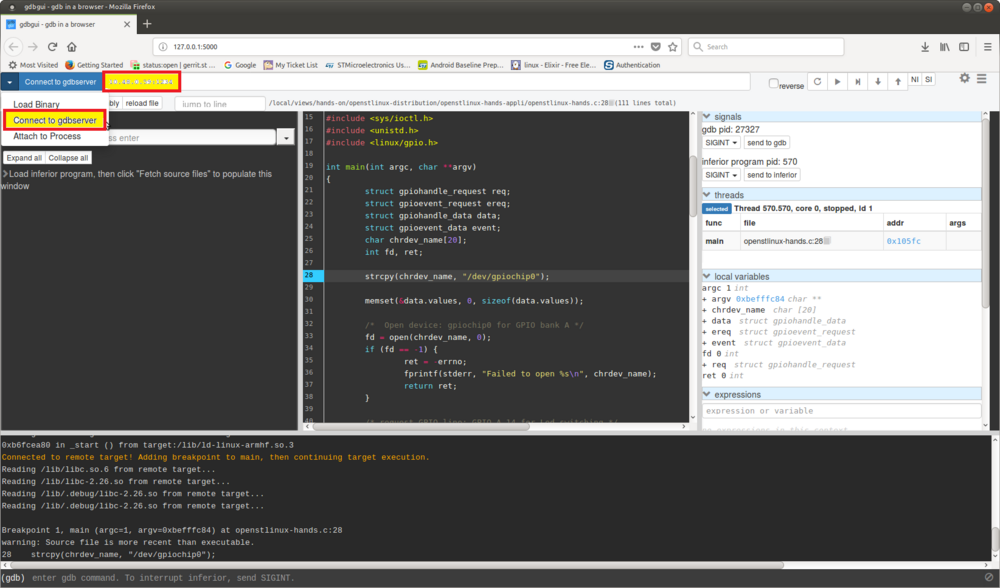
- Select the "Connect to gdbserver" option from the top left menu.
- Fill in the ip address of the remote target including the port.
4.2. Running gdbgui using ST-LINK[edit | edit source]
In that case, GDB with openOCD environment is used in a Developer Package context (SDK). Please refer to Running OpenOCD and GDB.
Only GDB console command will be changed:
- OpenOCD console
- No change for OpenOCD. Please refer to the command described in the above link.
- GDB console
- gdbgui must be started with an argument providing the path to the GDB version available on your target board, as well as the config setup file:
source <Your_SDK_path>/environment-setup-cortexa7t2hf-neon-vfpv4-ostl-linux-gnueabi
gdbgui -g "$GDB -x <Your_full_path_to>/Setup.gdb"
Note: Please refer to GDB page for information on Setup.gdb file and how to configure it: Attach on running target or Attach on boot.
5. To go further[edit | edit source]
5.1. Execution and debug[edit | edit source]
A button to program the execution (continue, step, next), and a panel showing all debug information (signals, thread, variables, memory) can be found on the top right of the gdbgui web page.
Please refer to the gdbgui[1] web page for details.
5.2. Error cases[edit | edit source]
- socket.error: [Errno 98] Address already in use: ('127.0.0.1', 5000)
- This error occurs when an instance of gdbgui is already running in background.
- In that case, the connection to the gdbserver fails in gdbgui, and the message "remote 'g' packet reply is too long" is displayed.
- Just kill the gdbgui instance running in background to solve the issue.
6. References[edit | edit source]