This article describes how to get and use the Developer Package of the STM32MPU Embedded Software for any development platform of the STM32MP1 series (STM32MP15 boards and STM32MP13 boards) and STM32MP2 series (STM32MP21 boards, STM32MP23 boards and STM32MP25 boards), in order to modify some of its pieces of software, or to add applications on top of it.
It lists some prerequisites in terms of knowledge and development environment, and gives the step-by-step approach to download and install the STM32MPU Embedded Software components for this Package.
Finally, it proposes some guidelines to upgrade (add, remove, configure, improve...) any piece of software.

1. Developer Package content[edit | edit source]
If you are not yet familiar with the STM32MPU Embedded Software distribution and its Packages, read the following articles:
- Which STM32MPU Embedded Software Package better suits your needs (and especially the Developer Package chapter)
- STM32MPU Embedded Software distribution
If you are already familiar with the Developer Package for the STM32MPU Embedded Software distribution, the fast links to essential commands might interest you.
To sum up, this Developer Package provides:
- for the OpenSTLinux distribution (development on Arm® Cortex®-A processor):
- the software development kit (SDK), based on Yocto SDK, for cross-development on a host PC
- the following pieces of software in source code:
- Linux® kernel
- gcnano-driver
- U-Boot
- Trusted Firmware-A (TF-A)
- Open source Trusted Execution Environment (OP-TEE)
- External device tree
- for the Cortex®-M processor firmware development (only for STM32MP15x lines
 and STM32MP2 series with both A35-TD flavor
  and M33-TD flavor when supported):
- the integrated development environment (IDE) (STM32CubeIDE)
- the STM32CubeMPU Package including all pieces of software (BSP, HAL, middlewares, and applications) in source code
- the Trusted Firmware-M (TF-M) in source code (for STM32MP2 series only)
Note that the application frameworks for the OpenSTLinux distribution are not available as source code in this Package.

TF-M is available only for STM32MP2 series
2. Developer Package step-by-step overview[edit | edit source]
The steps to get the STM32MPU Embedded Software Developer Package ready for your developments are:
☐ Checking the prerequisites
☐ Installing the Starter Package for your board and the debug symbol files
☐ Installing the components to develop software running Arm Cortex-M (STM32CubeMPU Package)
- ☐ Installing STM32CubeIDE (mandatory for any development on Arm® Cortex®-M)
- ☐ Installing the STM32CubeMPU Package (mandatory only if you plan to modify the STM32Cube firmware)
☐ Installing the components to develop software running on Arm® Cortex®-A (OpenSTLinux distribution)
- ☐ Installing the SDK (mandatory for any development on Arm® Cortex®-A)
- ☐ Installing the OpenSTLinux BSP package (mandatory only if you plan to modify the Linux kernel, to add external out-of-tree Linux kernel modules, to modify U-Boot, TF-A and/or OP-TEE OS)
Once these steps are achieved, you are able to:
- develop software running on Arm Cortex-A
- develop software running on Arm Cortex-M (only on STM32MP15x lines and STM32MP2 series)
3. Checking the prerequisites[edit | edit source]
3.1. Knowledge[edit | edit source]
The STM32MPU Developer Package aims at enriching a Linux-based software for the targeted product: basic knowledge about Linux are recommended to make the most of this Package.
Having a look at the STM32MPU Embedded Software architecture overview is also highly recommended.
3.2. Development setup[edit | edit source]
The recommended setup for the development PC (host) is specified in the following article: PC prerequisites.
Whatever the development platform (board) and development PC (host) used, the range of possible development setups is illustrated by the picture below.
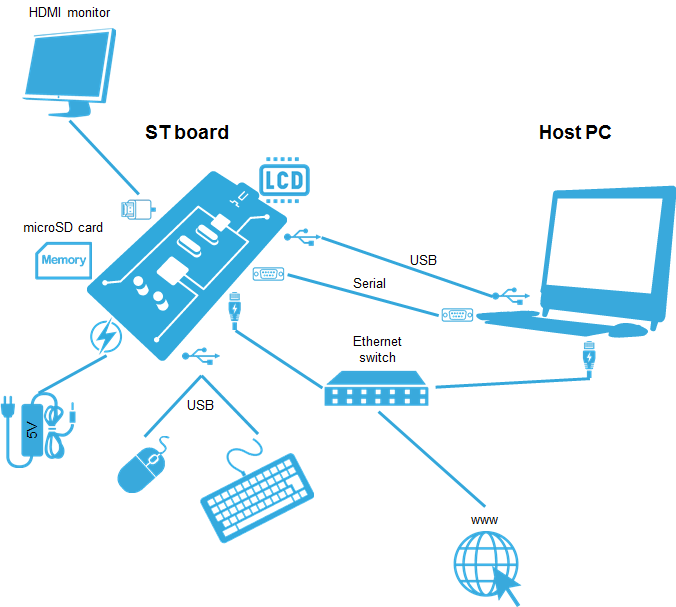
The following components are mandatory:
- Host PC for cross-compilation and cross-debugging, installed as specified above
- Board assembled and configured as specified in the associated Starter Package article
- Mass storage device (for example, microSD card) to load and update the software images (binaries)
The following components are optional, but recommended:
- A serial link between the host PC (through Terminal program) and the board for traces (even early boot traces), and access to the board from the remote PC (command lines)
- An Ethernet link between the host PC and the board for cross-development and cross-debugging through a local network. This is an alternative or a complement to the serial (or USB) link
- A display connected to the board, depending on the technologies available on the board: DSI LCD display, HDMI monitor (or TV) and so on
- A mouse and a keyboard connected through USB ports
Additional optional components can be added by means of the connectivity capabilities of the board: cameras, displays, JTAG, sensors, actuators, and much more.
4. Installing the Starter Package[edit | edit source]
Before developing with the Developer Package, it is essential to start up your board thanks to its Starter Package. All articles relative to Starter Packages are found in Category:Starter Package: find the one that corresponds to your board, and follow the installation instructions (if not yet done), before going further.
In brief, it means that:
- your board boots successfully
- the flashed image comes from the same release of the STM32MPU Embedded Software distribution as the components that will be downloaded in this article
- the debug symbol files from the flashed image are available in Starter Package image folder
Thanks to the Starter Package,all Flash partitions are populated.
Then, with the Developer Package, it is possible to modify or to upgrade the partitions independently one from the others.
For example, if you only want to modify the Linux kernel (part of bootfs partition), installing the SDK and the Linux kernel are enough; no need to install anything else.
With the debug symbol files, it is also possible to debug the Linux® kernel, U-Boot, OP-TEE, or TF-A with GDB. Especially, the Debug OpenSTLinux BSP components chapter explains how to load the debug symbol files in GDB.
5. Installing the components to develop software running on Arm Cortex-A (OpenSTLinux distribution)[edit | edit source]
5.1. Installing the SDK[edit | edit source]
Optional step: it is mandatory only if you want to modify or add software running on Arm Cortex-A (for example Linux kernel, Linux user space applications...).
The SDK for OpenSTLinux distribution provides a stand-alone cross-development toolchain and libraries tailored to the contents of the specific image flashed in the board. If you want to know more about this SDK, read the SDK for OpenSTLinux distribution article.
For STM32MP1 series
The STM32MP1 SDK is delivered through two tarball file named :
- SDK-x86_64-stm32mp1-openstlinux-6.6-yocto-scarthgap-mpu-v26.06.10.tar.gz for x86_64 host architecture
- SDK-aarch64-stm32mp1-openstlinux-6.6-yocto-scarthgap-mpu-v26.06.10.tar.gz for arm64 host architecture
Download and install the STM32MP1 SDK. The software package is provided AS IS, and by downloading it, you agree to be bound to the terms of the software license agreement (SLA0048). The detailed content licenses can be found here.
| STM32MP1 Developer Package SDK - STM32MP1-Ecosystem-v6.2.1 release | |
|---|---|
| Download |
|
| Installation | For x86_64 host architecture
tar xvf SDK-x86_64-stm32mp1-openstlinux-6.6-yocto-scarthgap-mpu-v26.06.10.tar.gz
chmod +x stm32mp1-openstlinux-6.6-yocto-scarthgap-mpu-v26.06.10/sdk/st-image-weston-openstlinux-weston-stm32mp1.rootfs-x86_64-toolchain-5.0.17-openstlinux-6.6-yocto-scarthgap-mpu-v26.06.10.sh
./stm32mp1-openstlinux-6.6-yocto-scarthgap-mpu-v26.06.10/sdk/st-image-weston-openstlinux-weston-stm32mp1.rootfs-x86_64-toolchain-5.0.17-openstlinux-6.6-yocto-scarthgap-mpu-v26.06.10.sh -d <working directory absolute path>/Developer-Package/SDK
ST OpenSTLinux - Weston - (A Yocto Project Based Distro) SDK installer version 5.0.17-openstlinux-6.6-yocto-scarthgap-mpu-v26.06.10 =================================================================================================================================== You are about to install the SDK to "<working directory absolute path>/Developer-Package/SDK". Proceed [Y/n]? Extracting SDK.........................................................................................................................................................................................................................done Setting it up...done SDK has been successfully set up and is ready to be used. Each time you wish to use the SDK in a new shell session, you need to source the environment setup script e.g. $ . <working directory absolute path>/Developer-Package/SDK/environment-setup-cortexa7t2hf-neon-vfpv4-ostl-linux-gnueabi |
For arm64 host architecture tar xvf SDK-aarch64-stm32mp1-openstlinux-6.6-yocto-scarthgap-mpu-v26.06.10.tar.gz
chmod +x stm32mp1-openstlinux-6.6-yocto-scarthgap-mpu-v26.06.10/st-image-weston-openstlinux-weston-stm32mp1.rootfs-aarch64-toolchain-5.0.17-openstlinux-6.6-yocto-scarthgap-mpu-v26.06.10.sh
./stm32mp1-openstlinux-6.6-yocto-scarthgap-mpu-v26.06.10/st-image-weston-openstlinux-weston-stm32mp1.rootfs-aarch64-toolchain-5.0.17-openstlinux-6.6-yocto-scarthgap-mpu-v26.06.10.sh -d <working directory absolute path>/Developer-Package/SDK
ST OpenSTLinux - Weston - (A Yocto Project Based Distro) SDK installer version 4.2.1-openstlinux-6.1-yocto-mickledore-mp1-v23.06.21 =================================================================================================================================== You are about to install the SDK to "<working directory absolute path>/Developer-Package/SDK". Proceed [Y/n]? Extracting SDK.........................................................................................................................................................................................................................done Setting it up...done SDK has been successfully set up and is ready to be used. Each time you wish to use the SDK in a new shell session, you need to source the environment setup script e.g. $ . <working directory absolute path>/Developer-Package/SDK/environment-setup-cortexa7t2hf-neon-vfpv4-ostl-linux-gnueabi | |
| Release note |
Details about the content of the SDK are available in the associated Yocto-based OpenSTLinux ecosystem release note.
|
- The SDK is in the <SDK installation directory>:
<SDK installation directory>                                      SDK for OpenSTLinux distribution: details in Standard SDK directory structure article
├── environment-setup                                             Environment setup script for Developer Package
├── environment-setup-cortexa7t2hf-neon-vfpv4-ostl-linux-gnueabi  Environment setup script for Developer Package
├── site-config-cortexa7t2hf-neon-vfpv4-ostl-linux-gnueabi
├── sysroots
│   ├── cortexa7t2hf-neon-vfpv4-ostl-linux-gnueabi                Target sysroot (libraries, headers, and symbols)
│   │   └── [...]
│   └── x86_64-ostl_sdk-linux                                     Native sysroot (libraries, headers, and symbols)
│       └── [...]
└── version-cortexa7t2hf-neon-vfpv4-ostl-linux-gnueabi
For arm64 host architecture
<SDK installation directory>                                      SDK for OpenSTLinux distribution: details in Standard SDK directory structure article
├── environment-setup                                             Environment setup script for Developer Package
├── environment-setup-cortexa7t2hf-neon-vfpv4-ostl-linux-gnueabi  Environment setup script for Developer Package
├── site-config-cortexa7t2hf-neon-vfpv4-ostl-linux-gnueabi
├── sysroots
│   ├── cortexa7t2hf-neon-vfpv4-ostl-linux-gnueabi                Target sysroot (libraries, headers, and symbols)
│   │   └── [...]
│   └── aarch64-ostl_sdk-linux                                    Native sysroot (libraries, headers, and symbols)
│       └── [...]
└── version-cortexa7t2hf-neon-vfpv4-ostl-linux-gnueabi
For STM32MP2 series
The STM32MP2 SDK is delivered through two tarball file named :
- SDK-x86_64-stm32mp2-openstlinux-6.6-yocto-scarthgap-mpu-v26.06.10.tar.gz for x86_64 host architecture
- SDK-aarch64-stm32mp2-openstlinux-6.6-yocto-scarthgap-mpu-v26.06.10.tar.gz for arm64 host architecture
Download and install the STM32MP2 SDK. The software package is provided AS IS, and by downloading it, you agree to be bound to the terms of the software license agreement (SLA0048). The detailed content licenses can be found here.
| STM32MP2 Developer Package SDK - STM32MP2-Ecosystem-v6.2.1 release | |
|---|---|
| Download |
|
| Installation | For x86_64 host architecture
tar xvf SDK-x86_64-stm32mp2-openstlinux-6.6-yocto-scarthgap-mpu-v26.06.10.tar.gz
chmod +x stm32mp2-openstlinux-6.6-yocto-scarthgap-mpu-v26.06.10/sdk/st-image-weston-openstlinux-weston-stm32mp2.rootfs-x86_64-toolchain-5.0.17-openstlinux-6.6-yocto-scarthgap-mpu-v26.06.10.sh
./stm32mp2-openstlinux-6.6-yocto-scarthgap-mpu-v26.06.10/sdk/st-image-weston-openstlinux-weston-stm32mp2.rootfs-x86_64-toolchain-5.0.17-openstlinux-6.6-yocto-scarthgap-mpu-v26.06.10.sh -d <working directory absolute path>/Developer-Package/SDK
ST OpenSTLinux - Weston - (A Yocto Project Based Distro) SDK installer version 5.0.17-openstlinux-6.6-yocto-scarthgap-mpu-v26.06.10 =================================================================================================================================== You are about to install the SDK to "<working directory absolute path>/Developer-Package/SDK". Proceed [Y/n]? Extracting SDK.........................................................................................................................................................................................................................done Setting it up...done SDK has been successfully set up and is ready to be used. Each time you wish to use the SDK in a new shell session, you need to source the environment setup script e.g. $ . <working directory absolute path>/Developer-Package/SDK/environment-setup-cortexa35-ostl-linux |
For arm64 host architecture tar xvf SDK-aarch64-stm32mp2-openstlinux-6.6-yocto-scarthgap-mpu-v26.06.10.tar.gz
chmod +x stm32mp2-openstlinux-6.6-yocto-scarthgap-mpu-v26.06.10/st-image-weston-openstlinux-weston-stm32mp2.rootfs-aarch64-toolchain-5.0.17-openstlinux-6.6-yocto-scarthgap-mpu-v26.06.10.sh
./stm32mp2-openstlinux-6.6-yocto-scarthgap-mpu-v26.06.10/st-image-weston-openstlinux-weston-stm32mp2.rootfs-aarch64-toolchain-5.0.17-openstlinux-6.6-yocto-scarthgap-mpu-v26.06.10.sh -d <working directory absolute path>/Developer-Package/SDK
ST OpenSTLinux - Weston - (A Yocto Project Based Distro) SDK installer version 5.0.17-openstlinux-6.6-yocto-scarthgap-mpu-v26.06.10 =================================================================================================================================== You are about to install the SDK to "<working directory absolute path>/Developer-Package/SDK". Proceed [Y/n]? Extracting SDK.........................................................................................................................................................................................................................done Setting it up...done SDK has been successfully set up and is ready to be used. Each time you wish to use the SDK in a new shell session, you need to source the environment setup script e.g. $ . <working directory absolute path>/Developer-Package/SDK/environment-setup-cortexa35-ostl-linux | |
| Release note |
Details about the content of the SDK are available in the associated Yocto-based OpenSTLinux ecosystem release note.
|
- The SDK is in the <SDK installation directory>:
<SDK installation directory>	SDK for OpenSTLinux distribution: details in Standard SDK directory structure article
├── environment-setup				Environment setup script for Developer Package
├── environment-setup-cortexa35-ostl-linux	Environment setup script for Developer Package
├── site-config-cortexa35-ostl-linux
├── sysroots
│   ├── cortexa35-ostl-linux			Target sysroot (libraries, headers, and symbols)
│   │   └── [...]
│   └── x86_64-ostl_sdk-linux			Native sysroot (libraries, headers, and symbols)
│       └── [...]
└── version-cortexa35-ostl-linux
For arm64 host architecture
<SDK installation directory>	SDK for OpenSTLinux distribution: details in Standard SDK directory structure article
├── environment-setup				Environment setup script for Developer Package
├── environment-setup-cortexa35-ostl-linux	Environment setup script for Developer Package
├── site-config-cortexa35-ostl-linux
├── sysroots
│   ├── cortexa35-ostl-linux			Target sysroot (libraries, headers, and symbols)
│   │   └── [...]
│   └── aarch64-ostl_sdk-linux			Native sysroot (libraries, headers, and symbols)
│       └── [...]
└── version-cortexa35-ostl-linux
5.2. Installing the OpenSTLinux BSP packages[edit | edit source]
Optional step: it is mandatory only if you want to modify the BSP (Linux kernel, TF-A, U-Boot, OP-TEE OS...), or to add external out-of-tree Linux kernel modules.
OpenSTLinux BSP packages installation instructions:
The software package is provided AS IS, and by downloading it, you agree to be bound to the terms of the software license agreement (SLA0048). The detailed content licenses can be found here.
- The OpenSTLinux BSP package is delivered through a tarball file named SOURCES-stm32mp-openstlinux-6.6-yocto-scarthgap-mpu-v26.06.10.tar.gz applicable for all STM32 microprocessor series.
- Download and install the STM32MPU OpenSTLinux BSP package.
| STM32MPU Developer Package - STM32MPU ecosystem v6.2.1 release | |
|---|---|
| Download |
MPx-DEV-SRC).
|
| Installation |
cd <working directory path>/Developer-Package
tar xvf SOURCES-stm32mp-openstlinux-6.6-yocto-scarthgap-mpu-v26.06.10.tar.gz |
| Release note |
Details about the content of the OpenSTLinux BSP package are available in the associated STM32 MPU OpenSTLinux release note.
|
- In sub-directories from <Developer Package installation directory>/stm32mp-openstlinux-6.6-yocto-scarthgap-mpu-v26.06.10/sources/ostl-linux, several tarball archive of the OpenSTLinux BSP components can be found.
- The external device tree directory is named external-dt-<ext-dt version>:
external-dt-v6.0-stm32mp-r3.1-r0	external device tree installation directory
├── external-dt-v6.0-stm32mp-r3.1-r0.tar.xz		Tarball file of the external device tree source code
├── README.HOW_TO.txt.stm32mp1		Helper file for external device tree management: reference for stm32mp1 external device tree usage
├── README.HOW_TO.txt.stm32mp2		Helper file for external device tree management: reference for stm32mp2 external device tree usage
└── README.HOW_TO.txt.stm32mp2-m33td	Helper file for external device tree management: reference for stm32mp2 M33TD flavor external device tree usage
- The Linux kernel installation directory is named linux-stm32mp-<kernel version>:
linux-stm32mp-6.6.129-stm32mp-r3.1-r0	Linux kernel installation directory
├── [*].patch				ST patches to apply during the Linux kernel preparation (see next chapter)
├── fragment-[*].config			ST configuration fragments to apply during the Linux kernel configuration (see next chapter)
├── optional-fragment-[*].config	Optional ST configuration fragments to apply during the Linux kernel configuration depending on your needs (SMP or not, signature or not, ...)
├── linux-6.6.129.tar.xz		Tarball file of the Linux kernel source code
├── README.HOW_TO.txt.stm32mp1		Helper file for Linux kernel management: reference for stm32mp1 Linux kernel build
├── README.HOW_TO.txt.stm32mp2		Helper file for Linux kernel management: reference for stm32mp2 Linux kernel build
├── README.HOW_TO.txt.stm32mp2-m33td	Helper file for Linux kernel management: reference for stm32mp2 M33TD flavor Linux kernel build
├── series                              List of all ST patches to apply
├── stm32mp1-snd.conf			ST sound configuration for stm32mp1 Linux kernel build
└── stm32mp2_ucsi.conf			ST ucsi configuration for stm32mp2 Linux kernel build
- The gcnano driver installation directory is named gcnano-driver-stm32mp-<gcnano driver version>:
gcnano-driver-stm32mp-6.4.21-r1-r0	gcnano-driver installation directory
├── gcnano-driver-stm32mp-6.4.21-r1-r0.tar.xz	Tarball file of the gcnano-driver source code
├── README.HOW_TO.txt.stm32mp1			Helper file for gcnano-driver management: reference for stm32mp1 gcnano-driver build
├── README.HOW_TO.txt.stm32mp2			Helper file for gcnano-driver management: reference for stm32mp2 gcnano-driver build
└── README.HOW_TO.txt.stm32mp2-m33td		Helper file for gcnano-driver management: reference for stm32mp2 M33TD flavor gcnano-driver build
- The ddr phy installation directory is named stm32mp-ddr-phy-<ddr phy version>:
stm32mp-ddr-phy-A2022.11-r0	ddr-phy installation directory
├── README.HOW_TO.txt.stm32mp1		Helper file for ddr phy management: reference for stm32mp1 ddr-phy use
├── README.HOW_TO.txt.stm32mp2		Helper file for ddr phy management: reference for stm32mp2 ddr-phy use
├── README.HOW_TO.txt.stm32mp2-m33td	Helper file for ddr phy management: reference for stm32mp2 M33TD flavor ddr-phy use
└── stm32mp-ddr-phy-A2022.11-r0.tar.xz	Tarball file of the stm32mp-ddr-phy binaries
- The OP-TEE installation directory is named optee-os-stm32mp-<OP-TEE version>:
optee-os-stm32mp-4.0.0-stm32mp-r3.1-r0	OP-TEE installation directory
├── [*].patch						ST patches to apply during the OP-TEE preparation (see next chapter)
├── fiptool-stm32mp.stm32mp1				Tool for stm32mp1 fip generation
├── fiptool-stm32mp.stm32mp2				Tool for stm32mp2 fip generation
├── fiptool-stm32mp.stm32mp2-m33td			Tool for stm32mp2 M33TD flavor fip generation
├── fonts.tar.gz					fonts for OPTEE-OS
├── Makefile.sdk.stm32mp1				Makefile for the stm32mp1 OP-TEE compilation
├── Makefile.sdk.stm32mp2				Makefile for the stm32mp2 OP-TEE compilation
├── Makefile.sdk.stm32mp2-m33td				Makefile for the stm32mp2 M33TD flavor OP-TEE compilation
├── optee-os-stm32mp-4.0.0-stm32mp-r3.1-r0.tar.xz		Tarball file of the OP-TEE source code
├── README.HOW_TO.txt.stm32mp1				Helper file for OP-TEE management: reference for stm32mp1 OP-TEE build
├── README.HOW_TO.txt.stm32mp2				Helper file for OP-TEE management: reference for stm32mp2 OP-TEE build
├── README.HOW_TO.txt.stm32mp2-m33td			Helper file for OP-TEE management: reference for stm32mp2 M33TD flavor OP-TEE build
└── series						List of all ST patches to apply
- The U-Boot installation directory is named u-boot-stm32mp-<U-Boot version>:
u-boot-stm32mp-v2023.10-stm32mp-r3.1-r0	U-Boot installation directory
├── [*].patch						ST patches to apply during the U-Boot preparation (see next chapter)
├── fiptool-stm32mp.stm32mp1				Tool for stm32mp1 fip generation
├── fiptool-stm32mp.stm32mp2				Tool for stm32mp2 fip generation
├── fiptool-stm32mp.stm32mp2-m33td			Tool for stm32mp2 M33TD flavor fip generation
├── fragment-[*].fb_cfg					ST configuration fragments to apply during the U-Boot configuration to support fastboot
├── Makefile.sdk.stm32mp1				Makefile for the stm32mp1 U-Boot compilation
├── Makefile.sdk.stm32mp2				Makefile for the stm32mp2 U-Boot compilation
├── Makefile.sdk.stm32mp2-m33td				Makefile for the stm32mp2 M33TD flavor U-Boot compilation
├── README.HOW_TO.txt.stm32mp1				Helper file for U-Boot management: reference for stm32mp1 U-Boot build
├── README.HOW_TO.txt.stm32mp2				Helper file for U-Boot management: reference for stm32mp2 U-Boot build
├── README.HOW_TO.txt.stm32mp2-m33td			Helper file for U-Boot management: reference for stm32mp2 M33TD flavor U-Boot build
├── series						List of all ST patches to apply
└── u-boot-stm32mp-v2023.10-stm32mp-r3.1-r0.tar.xz	Tarball file of the U-Boot source code
- The TF-A installation directory is named tf-a-stm32mp-<TF-A version>:
tf-a-stm32mp-v2.10.24-stm32mp-r3.1-r0	TF-A installation directory
├── [*].patch					ST patches to apply during the TF-A preparation (see next chapter)
├── fiptool-stm32mp.stm32mp1			Tool for stm32mp1 fip generation
├── fiptool-stm32mp.stm32mp2			Tool for stm32mp2 fip generation
├── fiptool-stm32mp.stm32mp2-m33td		Tool for stm32mp2 M33TD flavor fip generation
├── Makefile.sdk.stm32mp1			Makefile for the stm32mp1 TF-A compilation
├── Makefile.sdk.stm32mp2			Makefile for the stm32mp2 TF-A compilation
├── Makefile.sdk.stm32mp2-m33td			Makefile for the stm32mp2 M33TD flavor TF-A compilation
├── README.HOW_TO.txt.stm32mp1			Helper file for TF-A management: reference for stm32mp1 TF-A build
├── README.HOW_TO.txt.stm32mp2			Helper file for TF-A management: reference for stm32mp2 TF-A build
├── README.HOW_TO.txt.stm32mp2-m33td		Helper file for TF-A management: reference for stm32mp2 M33TD flavor TF-A build
├── series					List of all ST patches to apply
└── tf-a-stm32mp-v2.10.24-stm32mp-r3.1-r0.tar.xz	Tarball file of the TF-A source code
- The TF-M-TESTS installation directory is named tf-m-tests-<TF-M-TESTS version>:
tf-m-tests-stm32mp-v2.1.4-stm32mp-r2.1-r0	TF-M-TESTS installation directory
├── [*].patch						ST patches to apply during the TF-M-TESTS preparation (see next chapter)
├── README.HOW_TO.txt.stm32mp2-m33td			Helper file for TF-M-TESTS management: reference for stm32mp2 M33TD flavor TF-M-TESTS build
├── series						List of all ST patches to apply
└── tf-m-tests-stm32mp-v2.1.4-stm32mp-r2.1-r0.tar.xz	Tarball file of the TF-M-TESTS source code
- The TF-M installation directory is named tf-m-<TF-M version>:
tf-m-stm32mp-v2.1.4-stm32mp-r2.1-r0	TF-M installation directory
├── m33fwtool-stm32mp.stm32mp2-m33td		Tool for m33 firmware assemble and sign
├── Makefile.sdk.stm32mp2-m33td			Makefile for the stm32mp2 M33TD flavor TF-M compilation
├── README.HOW_TO.txt.stm32mp2-m33td		Helper file for TF-M management: reference for stm32mp2 M33TD flavor TF-M build
├── series					List of all ST patches to apply
├── tf-m-stm32mp-v2.1.4-stm32mp-r2.1-r0-diff.gz	ST patches applied on top of TF-M community source code reference
└── tf-m-stm32mp-v2.1.4-stm32mp-r2.1-r0.tar.xz	Tarball file of the TF-M source code
- The M33TD PROJECTS installation directory is named m33tdprojectst-starter-stm32mp2-<M33TD PROJECTS version>:
m33tdprojects-starter-stm32mp2-1.3.1-r0	M33TD PROJECTS installation directory
├── m33fwtool-stm32mp.stm32mp2-m33td			Tool for m33 firmware assemble and sign
├── m33tdprojects-starter-stm32mp2-1.3.1-r0.tar.xz	Tarball file of the M33TD PROJECTS source code
├── Makefile.sdk.stm32mp2-m33td				Makefile for the stm32mp2 M33TD flavor TF-M compilation
└── README.HOW_TO.txt.stm32mp2-m33td			Helper file for M33TD PROJECTS management: reference for stm32mp2 M33TD flavor M33TD PROJECTS build
- The sdk infos installation directory is named sdk-infos-<sdk infos version>:
sdk-infos-1.1-r0	sdk infos installation directory
├── examples/				Folder that contains SDK compilation configuration examples for supported boards
├── generated_build_script-stm32mpx.sh	Tool for source code compilation under SDK
├── README.HOW_TO.txt.stm32mp1		Helper file for sdk infos management: reference for stm32mp1 sdk infos use
├── README.HOW_TO.txt.stm32mp2		Helper file for sdk infos management: reference for stm32mp2 sdk infos use
└── README.HOW_TO.txt.stm32mp2-m33td	Helper file for sdk infos management: reference for stm32mp2 M33TD flavor sdk infos use
5.2.1. Deploying OpenSTLinux BSP packages component per component[edit | edit source]
5.2.1.1. Deploying the external device tree[edit | edit source]
Open the <external device tree installation directory>/README.HOW_TO.txt.<board flavor>[1] helper file, and execute its instructions to:
☐ setup a software configuration management (SCM) system (git) for the external device tree (optional but recommended)
☐ export the path of external device tree directory into the variable EXTDT_DIR
The external device tree is now set-up and can be used during compilation.
5.2.1.2. Deploying the ddr firmware[edit | edit source]
Open the <ddr firmware installation directory>/README.HOW_TO.txt.<board flavor>[1] helper file, and execute its instructions to:
☐ export the path of ddr firmware tree directory into the variable FWDDR_DIR
The ddr firmware path is now set-up and can be used during compilation.
5.2.1.3. Deploying the Linux kernel[edit | edit source]
Open the <Linux kernel installation directory>/README.HOW_TO.txt.<board flavor>[1] helper file, and execute its instructions to:
☐ setup a software configuration management (SCM) system (git) for the Linux kernel (optional but recommended)
☐ prepare the Linux kernel (applying the ST patches)
☐ configure the Linux kernel (applying the ST fragments)
The Linux kernel is now installed: let's modify the Linux kernel.
5.2.1.4. Deploying the gcnano-driver (only on STM32MP15x lines , STM32MP23x lines and STM32MP25x lines )[edit | edit source]
Open the <gcnano-driver installation directory>/README.HOW_TO.txt.<board flavor>[1] helper file, and execute its instructions to:
☐ setup a software configuration management (SCM) system (git) for the gcnano-driver (optional but recommended)
The gcnano-driver is now installed.
5.2.1.5. Deploying the U-Boot[edit | edit source]
Open the <U-Boot installation directory>/README.HOW_TO.txt.<board flavor>[1] helper file, and execute its instructions to:
☐ setup a software configuration management (SCM) system (git) for the U-Boot (optional but recommended)
☐ prepare the U-Boot (applying the ST patches)
The U-Boot is now installed: let's modify the U-Boot.
5.2.1.6. Deploying the TF-A[edit | edit source]
Open the <TF-A installation directory>/README.HOW_TO.txt.<board flavor>[1] helper file, and execute its instructions to:
☐ setup a software configuration management (SCM) system (git) for the TF-A (optional but recommended)
☐ prepare the TF-A (applying the ST patches)
The TF-A is now installed: let's modify the TF-A.
5.2.1.7. Deploying the OP-TEE[edit | edit source]
Open the <OP-TEE installation directory>/README.HOW_TO.txt.<board flavor>[1] helper file, and execute its instructions to:
☐ setup a software configuration management (SCM) system (git) for the OP-TEE (optional but recommended)
☐ prepare the OP-TEE (applying the ST patches)
The OP-TEE is now installed: let's modify the OP-TEE.
5.2.1.8. Deploying the TF-M-TESTS for the M33-TD flavor of the STM32MP2 series[edit | edit source]
Open the <TF-M-TESTS installation directory>/README.HOW_TO.txt.stm32mp2-m33td helper file, and execute its instructions to:
☐ setup a software configuration management (SCM) system (git) for the TF-M-TESTS (optional but recommended)
☐ prepare the TF-M-TESTS (applying the ST patches)
☐ export the path of TF-M-TESTS directory into the variable TFM_TESTS_DIR
The TF-M-TESTS path is now set-up and can be used during compilation.
5.2.1.9. Deploying the TF-M for the M33-TD flavor of the STM32MP2 series[edit | edit source]
Open the <TF-M installation directory>/README.HOW_TO.txt.stm32mp2-m33td helper file, and execute its instructions to:
☐ setup a software configuration management (SCM) system (git) for the TF-M: mandatory for TF-M build
The TF-M is now installed: let's modify the m33 firmware application.
5.2.1.10. Deploying the m33tdprojects Starter for the M33-TD flavor of the STM32MP2 series[edit | edit source]
Open the <m33tdprojects Starter installation directory>/README.HOW_TO.txt.stm32mp2-m33td helper file, and execute its instructions to:
☐ setup a software configuration management (SCM) system (git) for the m33tdprojects Starter (optional but recommended)
☐ prepare the m33tdprojects Starter (applying the ST patches)
The m33tdprojects Starter is now installed: let's modify the m33 firmware application.
5.2.2. Deploying the OpensSTLinux BSP packages using SDK-info utilities[edit | edit source]
SDK-infos is an optional component that facilitates the extraction, configuration and build for the OpenSTLinux BSP packages. This directory contents a script and a README to help user to generate a build environment adapted to its needs and to manage OpenSTLinux components diversity.
Open the <SDK-infos installation directory>/README.HOW_TO.txt.<board flavor>[1] helper file, and execute its instructions to:
☐ generate a helper script for one of STM32MP1 series' boards ![]() , STM32MP2 series' boards
, STM32MP2 series' boards ![]() for A35-TD flavor
for A35-TD flavor ![]() and STM32MP2 series' boards
and STM32MP2 series' boards ![]() for M33-TD flavor
for M33-TD flavor ![]()
☐ extract BSP source code according to the seleted board
The OpenSTLinux BSP source code is now deployed: let's modify OpenSTLinux BSP.
6. Installing STM32CubeMPU Package to develop software running on Arm Cortex-M (only on STM32MP15x lines and STM32MP2 series)[edit | edit source]
6.1. Installing STM32CubeIDE[edit | edit source]
Optional step: it is needed if you want to modify or add software running on Arm Cortex-M.
The table below explains how to download and install STM32CubeIDE which addresses STM32 MCU, and also provides support for Cortex-M inside STM32 MPU.
STM32 MPU support, inside STM32CubeIDE, is available on Linux® and Windows® host PCs, but it is NOT on macOS®.
| STM32CubeIDE for Linux® host PC | STM32CubeIDE for Windows® host PC | |
|---|---|---|
| Download |
Version v2.2.0
|
Version v2.2.0
|
| Installation guide | ||
| User manual | ||
| Detailed release note |
| |
| Restrictions | Main restrictions are identified in this chapter
| |
Minor releases may be available from the update site. Check chapter 10 in (UM2609) for more information on how to update STM32CubeIDE.
STM32 MPU support, inside STM32CubeIDE, is available on Linux® and Windows® host PCs, but
it is NOT on macOS®.
| STM32CubeIDE for Linux® host PC | STM32CubeIDE for Windows® host PC | |
|---|---|---|
| Download |
Version v2.1.0
|
Version v2.1.0
|
| Installation guide | ||
| User manual | ||
| Detailed release note |
| |
| Restrictions | Main restrictions are identified in this chapter
| |
Minor releases may be available from the update site. Check chapter 10 in (UM2609) for more information on how to update STM32CubeIDE.
6.2. STM32CubeIDE v2.0.0 - MPU support[edit | edit source]
6.2.1. Supported features[edit | edit source]
Same features than #STM32CubeIDE v1.19.0 - MPU support
6.2.2. Main changes[edit | edit source]
- STM32CubeIDE is now independent from STM32CubeMX.
With this release, device configuration, previously handled within STM32CubeIDE via STM32CubeMX, is now exclusively available through the stand-alone STM32CubeMX tool.
Users must configure microcontroller peripherals and generate initialization code separately in STM32CubeMX, then import the generated projects into STM32CubeIDE for coding and debugging.
STM32CubeIDE, is now a stand-alone tool, offers the possibility to create empty project through its own processor and board selectors now present inside.
- What does this change mean for developers?
- Separate download and installation: STM32CubeMX is no more integrated in STM32CubeIDE, requiring separate download alongside STM32CubeIDE 2.0.0 for configuration and code generation.
- Tool update flexibility: Developers can update and freeze STM32CubeMX and STM32CubeIDE independently, with multiple versions of each installed side-by-side.
- Memory footprint and performance: Removing STM32CubeMX integration reduces installation size (~3.7GB to 2.9GB) and lowers CPU/RAM usage, improving stability especially on Linux.
- For additional details, refer also to this link at:
- User authentication removed
- ST-MCU-FINDER-PC removed
- Support for ST-ARM-CLANG, STMicroelectronics LLVM-based toolchain for Arm®, through site update mechanism
- Support for GCC 14 toolchain through site update mechanism
- Support for bundled CMake/Ninja binaries
6.2.3. Main restrictions[edit | edit source]
If STM32CubeIDE v2.0.0 is installed from scratch and if the imported project in STM32CubeIDE v2.0.0 is a project generated with STM32CubeMX v6.16, then it is not possible to install the OpenSTLinux plugin, consequently, it is not possible neither to import OSTL Projects: Linux, Optee, TF-A, U-Boot.
In order to work around this, the following is recommended:
- Install STM32CubeIDE 1.19.0
- Install OpenSTLinux plugin v6.1.0 in STM32CubeIDE 1.19.0
- Import the concerned projects (Linux, Optee, TF-A, U-Boot)
Help>Check for updates> selectSTM32CubeIDE 2.0.0>Next>Finish- Then restart the STM32CubeIDE.
To have the full restrictions list, refer to STM32CubeIDE errata (This page is available in the stm32mcu wiki, be aware that, visiting this page, you will leave the stm32mpu wiki)
6.2.4. How to get STM32CubeIDE v2.0.0[edit | edit source]
STM32 MPU support, inside STM32CubeIDE, is available on Linux® and Windows® host PCs, but it is NOT on macOS®.
| STM32CubeIDE for Linux® host PC | STM32CubeIDE for Windows® host PC | |
|---|---|---|
| Download |
Version v2.0.0
|
Version v2.0.0
|
| Installation guide | ||
| User manual | ||
| Detailed release note |
| |
| Restrictions |
| |
Minor releases may be available from the update site. Check chapter 10 in (UM2609) for more information on how to update STM32CubeIDE.
6.3. STM32CubeIDE v1.19.0 - MPU support[edit | edit source]
6.3.1. Supported features[edit | edit source]
This version of STM32CubeIDE provides support:
- for the Arm® Cortex®-M core, contained in the STM32MP15x lines , STM32MP25x lines , STM32MP23x lines and STM32MP21x lines - NEW
- M33-TD flavor for STM32MP257x-EV1 Evaluation board and STM32MP215F-DK Discovery kit - NEW
- for OpenSTLinux-v6.1 and Linux® user space projects in 32-bit and 64-bit,
- and for projects running on Arm® Cortex®-A: STM32CubeMP13 MPU Package projects or Project Utilities.
- GCC 13.3 as a default toolchain
- Updated to Eclipse® 2024-09
6.3.1.1. For Arm® Cortex®-M core[edit | edit source]
It provides:
- STM32MP1 & STM32MP2 sample or board selection,
- Device configuration,
- Target Status widget, with visibility management,
- Console management with capability to manually set-up non-ST console instead of automatic detection,
- Arm®Cortex®-M project creation, compilation and debug in two modes:
- Engineering mode, with Arm®Cortex®-M firmware download via JTAG/SWD on STM32MP1,
- redirection of semi-hosting on TCP port with openOCD
- Production mode, with Arm® Cortex®-M firmware download:
- Via Ethernet link to the LAN or point to point,
- Via Ethernet-over-USB for point-to-point connection,
- Engineering mode, with Arm®Cortex®-M firmware download via JTAG/SWD on STM32MP1,
- Live variable watch view,
- System analysis and real-time tracing (SWV),
- Check of ST-LINK firmware version,
- SFRs view support for register access,
- Remote target path project property (for production mode),
- Remote system explorer configuration,
- TCP console for semihosting output
6.3.1.2. For Arm® Cortex®-A core[edit | edit source]
6.3.1.2.1. With OpenSTlinux distribution[edit | edit source]
STM32CubeIDE version 1.19.0 brings support for OpenSTLinux-v6.1 projects with two modes: 32-bit for STM32MP1 and 64-bit for STM32MP2, on Linux® workstation only, including:
- Installation of Yocto SDK in 32-bit or 64-bit, external to STM32CubeIDE only - no dedicated Eclipse plugin,
- Installation of OpenSTLinux projects sources for STM32MP1 (32-bit) or STM32MP2 (64-bit), two Eclipse plugins - sources external to STM32CubeIDE project, user to provide paths to OpenSTLinux projects sources, see STM32MPU Developer Package for installation
- Linux®, project with:
- Standard build target (such as all, dtb, module and others), including STM32CubeMX-generated device tree,
- Support for running target update via "STM32 Cortex-A Linux Deployment" running configuration,
- Support of GCNANO project with build target
- TF-A project with standard build target,
- U-boot project with standard build target,
- OP-TEE project with standard build target,
- Support for OP-TEE trusted application creation and debug,
- Linux®, project with:
- Support of creation, build and debug of Linux® user space project types including:
- executable,
- static library,
- shared library,
- Debug via "weston" user for executable using GTK library
6.3.1.2.2. With STM32CubeMP13 MPU Package[edit | edit source]
- Support of creation, build and debug of STM32CubeMP13 MPU Package projects project types including executable only
6.3.1.2.3. With Project Utilities[edit | edit source]
- Support of import, build and debug of STM32 Projects Utilities in 32-bit and 64-bit
6.3.2. Main changes coming with new release[edit | edit source]
- STM32MP21x lines
- M33-TD flavor support for STM32MP257x-EV1 Evaluation board and STM32MP215F-DK Discovery kit
6.3.3. Main restrictions[edit | edit source]
None
6.3.4. Release update[edit | edit source]
Some new update of release has been done to solve previous restrictions.
- The Bootloader project for STM32MP1 series is now functional,
- OpenSTLinux plugin for STM32MP2 series is now functional for any TD flavor (A35-TD or M33-TD) on any STM32 MPU boards .
Following steps must be followed to integrate the correction on top of STM32ubbeIDE already installed or project already created (No need to re-install STM32CubeIDE-v1.19.0):
In order to install new OSTL MP1 plugins you need to:
- uninstall the older OSTL plugin if you have already installed one.
- reload updatesite for OpenSTlinux Releases.
- restart STM32CubeIDE and install the new one with OSGI version 202507300701.
- Check that you are pointing to the newest one through help -> About STM32CubeIDE -> Installation Details.

In order to install new OSTL MP2 plugins you need to:
- uninstall the older OSTL plugin if you have already installed one.
- reload updatesite for OpenSTlinux Releases.
- restart STM32CubIDE and install the new one with OSGI version 202509081623.
- Check that you are pointing to the newest one through help -> About STM32CubeIDE -> Installation Details.

6.3.5. How to get STM32CubeIDE v1.19.0[edit | edit source]
STM32 MPU support, inside STM32CubeIDE, is available on Linux® and Windows® host PCs, but it is NOT on macOS®.
| STM32CubeIDE for Linux® host PC | STM32CubeIDE for Windows® host PC | |
|---|---|---|
| Download |
Version v1.19.0
|
Version v1.19.0
|
| Installation guide |
| |
| User manual | ||
| Detailed release note |
| |
| Restrictions |
| |
Minor releases may be available from the update site. Check chapter 10 in (UM2609) for more information on how to update STM32CubeIDE.
6.4. STM32CubeIDE v1.17.0 - MPU support[edit | edit source]
6.4.1. Supported features[edit | edit source]
This version of STM32CubeIDE provides support
- for the Arm® Cortex®-M core, contained in the STM32MP15x lines , STM32MP23x lines and STM32MP25x lines - NEW
- for OpenSTLinux-v6.0 and Linux® user space projects in 32-bit and 64-bit,
- and for projects running on Arm® Cortex®-A: STM32CubeMP13 MPU Package projects or Project Utilities.
- GCC 12.3 as a default toolchain
- Updated to Eclipse® 2023-12
6.4.1.1. For Arm® Cortex®-M core[edit | edit source]
It provides :
- STM32MP1 & STM32MP2 sample or board selection,
- Device configuration,
- Target Status widget, with visibility management,
- Console management with capability to manually set-up non-ST console instead of automatic detection,
- Arm®Cortex®-M project creation, compilation and debug in two modes:
- Engineering mode, with Arm®Cortex®-M firmware download via JTAG/SWD on STM32MP1,
- redirection of semi-hosting on TCP port with openOCD
- Production mode, with Arm® Cortex®-M firmware download :
- Via Ethernet link to the LAN or point to point,
- Via Ethernet-over-USB for point-to-point connection,
- Engineering mode, with Arm®Cortex®-M firmware download via JTAG/SWD on STM32MP1,
- Live variable watch view,
- System analysis and real-time tracing (SWV),
- Check of ST-LINK firmware version,
- SFRs view support for register access,
- Remote target path project property (for production mode),
- Remote system explorer configuration,
- TCP console for semihosting output
6.4.1.2. For Arm® Cortex®-A core[edit | edit source]
6.4.1.2.1. With OpenSTlinux distribution[edit | edit source]
STM32CubeIDE version v1.17.0 brings support for OpenSTLinux-v6.0 projects with two modes: 32-bit for STM32MP1 and 64-bit for STM32MP2, on Linux® workstation only, including:
- Installation of Yocto SDK in 32-bit or 64-bit, external to STM32CubeIDE only - no dedicated Eclipse plugin,
- Installation of OpenSTLinux projects sources for STM32MP1 (32-bit) or STM32MP2 (64-bit), two Eclipse plugins - sources external to STM32CubeIDE project, user to provide paths to OpenSTLinux projects sources, see STM32MPU Developer Package for installation - NEW
- Linux®, project with:
- Standard build target (such as all, dtb, module and others), including STM32CubeMX-generated device tree,
- Support for running target update via "STM32 Cortex-A Linux Deployment" running configuration,
- Support of GCNANO project with build target
- TF-A project with standard build target including FIP image generation,
- U-boot project with standard build target,
- OP-TEE project with standard build target,
- Support for OP-TEE trusted application creation and debug,
- Linux®, project with:
- Support of creation, build and debug of Linux® user space project types including:
- executable,
- static library,
- shared library,
- Debug via "weston" user for executable using GTK library
6.4.1.2.2. With STM32CubeMP13 MPU Package[edit | edit source]
- Support of creation, build and debug of STM32CubeMP13 MPU Package projects project types including executable only
6.4.1.2.3. With Project Utilities[edit | edit source]
- Support of import, build and debug of STM32 Projects Utilities in 32-bit and 64-bit
6.4.2. Main changes coming with new release[edit | edit source]
- STM32MP23x lines support
6.4.3. How to get STM32CubeIDE v1.17.0[edit | edit source]
STM32 MPU support, inside STM32CubeIDE, is available on Linux® and Windows® host PCs, but it is NOT on macOS®.
| STM32CubeIDE for Linux® host PC | STM32CubeIDE for Windows® host PC | |
|---|---|---|
| Download |
Version v1.17.0
|
Version v1.17.0
|
| Installation guide | ||
| User manual | ||
| Detailed release note |
| |
| Errata |
| |
Minor releases may be available from the update site. Check chapter 10 in (UM2609) for more information on how to update STM32CubeIDE.
6.5. Installing the STM32CubeMPU Package[edit | edit source]
Optional step: it is mandatory only if you want to modify the STM32CubeMPU Package.
Prerequisite: the STM32CubeIDE is installed.
For STM32MP1 series:
- The STM32CubeMP1 Package is delivered through an archive file named stm32cubemp1-v1-7-0.zip.
- Download and install the STM32CubeMP1 Package
The software package is provided AS IS, and by downloading it, you agree to be bound to the terms of the software license agreement (SLA0048). The detailed content licenses can be found here..
| STM32CubeMP1 Package - v1.7.0 | |
|---|---|
| Download |
|
| Installation |
cd <working directory path>/Developer-Package
unzip stm32cubemp1-v1-7-0.zip |
| Release note |
Details about the content of the STM32CubeMP1 Package are available in the STM32Cube_FW_MP1_V1.7.0/Release_Notes.html file.
|
- The STM32CubeMP1 Package installation directory is in the <Developer Package installation directory> directory, and is named STM32Cube_FW_MP1_V1.7.0:
STM32Cube_FW_MP1_V1.7.0			STM32CubeMP1 Package: details in STM32CubeMP15 Package content article
├── Drivers
│   ├── BSP				BSP drivers for the supported STM32MP1 boards
│   │   └── [...]
│   ├── CMSIS
│   │   └── [...]
│   └── STM32MP1xx_HAL_Driver		HAL drivers for the supported STM32MP1 devices
│       └── [...]
├── _htmresc
│   └── [...]
├── License.md
├── Middlewares
│   └── [...]
├── package.xml
├── Projects
│   ├── STM32CubeProjectsList.html	List of examples and applications for STM32CubeMP1 Package
│   ├── STM32MP157C-DK2			Set of examples and applications → STM32MP15 Discovery kits
│   │   └── [...]
│   └── STM32MP157C-EV1			Set of examples and applications → STM32MP15 Evaluation boards
│       └── [...]
├── Readme.md
├── Release_Notes.html			Release note for STM32CubeMP1 Package
└── Utilities
    └── [...]
6.6. STM32MP15-Ecosystem-v6.1.0 release[edit | edit source]
- The STM32CubeMP1 Package is delivered through an archive file named stm32cubemp1-v1-7-0.zip.
- Download and install the STM32CubeMP1 Package
The software package is provided AS IS, and by downloading it, you agree to be bound to the terms of the software license agreement (SLA0048). The detailed content licenses can be found here..
| STM32CubeMP1 Package - v1.7.0 | |
|---|---|
| Download |
|
| Installation |
cd <working directory path>/Developer-Package
unzip stm32cubemp1-v1-7-0.zip |
| Release note |
Details about the content of the STM32CubeMP1 Package are available in the STM32Cube_FW_MP1_V1.7.0/Release_Notes.html file.
|
- The STM32CubeMP1 Package installation directory is in the <Developer Package installation directory> directory, and is named STM32Cube_FW_MP1_V1.7.0:
STM32Cube_FW_MP1_V1.7.0			STM32CubeMP1 Package: details in STM32CubeMP15 Package content article
├── Drivers
│   ├── BSP				BSP drivers for the supported STM32MP1 boards
│   │   └── [...]
│   ├── CMSIS
│   │   └── [...]
│   └── STM32MP1xx_HAL_Driver		HAL drivers for the supported STM32MP1 devices
│       └── [...]
├── _htmresc
│   └── [...]
├── License.md
├── Middlewares
│   └── [...]
├── package.xml
├── Projects
│   ├── STM32CubeProjectsList.html	List of examples and applications for STM32CubeMP1 Package
│   ├── STM32MP157C-DK2			Set of examples and applications → STM32MP15 Discovery kits
│   │   └── [...]
│   └── STM32MP157C-EV1			Set of examples and applications → STM32MP15 Evaluation boards
│       └── [...]
├── Readme.md
├── Release_Notes.html			Release note for STM32CubeMP1 Package
└── Utilities
    └── [...]
6.7. STM32MP15-Ecosystem-v6.0.0 release[edit | edit source]
- The STM32CubeMP1 Package is delivered through an archive file named stm32cubemp1-v1-7-0.zip.
- Download and install the STM32CubeMP1 Package
The software package is provided AS IS, and by downloading it, you agree to be bound to the terms of the software license agreement (SLA0048). The detailed content licenses can be found here..
| STM32CubeMP1 Package - v1.7.0 | |
|---|---|
| Download |
|
| Installation |
cd <working directory path>/Developer-Package
unzip stm32cubemp1-v1-7-0.zip |
| Release note |
Details about the content of the STM32CubeMP1 Package are available in the STM32Cube_FW_MP1_V1.6.0/Release_Notes.html file. |
- The STM32CubeMP1 Package installation directory is in the <Developer Package installation directory> directory, and is named STM32Cube_FW_MP1_V1.7.0:
STM32Cube_FW_MP1_V1.7.0			STM32CubeMP1 Package: details in STM32CubeMP15 Package content article
├── Drivers
│   ├── BSP				BSP drivers for the supported STM32MP1 boards
│   │   └── [...]
│   ├── CMSIS
│   │   └── [...]
│   └── STM32MP1xx_HAL_Driver		HAL drivers for the supported STM32MP1 devices
│       └── [...]
├── _htmresc
│   └── [...]
├── License.md
├── Middlewares
│   └── [...]
├── package.xml
├── Projects
│   ├── STM32CubeProjectsList.html	List of examples and applications for STM32CubeMP1 Package
│   ├── STM32MP157C-DK2			Set of examples and applications → STM32MP15 Discovery kits
│   │   └── [...]
│   └── STM32MP157C-EV1			Set of examples and applications → STM32MP15 Evaluation boards
│       └── [...]
├── Readme.md
├── Release_Notes.html			Release note for STM32CubeMP1 Package
└── Utilities
    └── [...]
This wiki is for the v6 ecosystem releases. For information about the previous ecosystem releases, go through the Wiki archives.
</noinclude>
For STM32MP2 series:
- The STM32CubeMP2 Package is delivered through an archive file named stm32cubemp2-v1-3-1.zip.
- Download and install the STM32CubeMP2 Package
The software package is provided AS IS, and by downloading it, you agree to be bound to the terms of the software license agreement (SLA0048). The detailed content licenses can be found here.
| STM32CubeMP2 Package - v1.3.1 | |
|---|---|
| Download |
|
| Installation |
cd <working directory path>/Developer-Package
unzip stm32cubemp2-v1-3-1.zip |
| Release note |
Details about the content of the STM32CubeMP2Package are available in the STM32CubeMP2/Release_Notes.html file.
|
- The STM32CubeMP2 Package installation directory is in the <Developer Package installation directory> directory, and is named STM32Cube_FW_MP2_V1.3.1:
STM32Cube_FW_MP2_V1.3.1			STM32CubeMP2 Package: details in STM32CubeMP2 Package content article
├── _htmresc
│   └── [...]
├── Drivers
│   ├── BSP				BSP drivers for the supported STM32MP2 boards
│   │   └── [...]
│   ├── CMSIS
│   │   └── [...]
│   └── STM32MP2xx_HAL_Driver		HAL drivers for the supported STM32MP2 devices
│       └── [...]
├── Middlewares
│   └── [...]
├── Projects
│   ├── _htmresc
│   │   └── [...]
│   ├── STM32MP215F-DK			Set of examples and applications → STM32MP21 Discovery boards
│   │   └── [...]
│   ├── STM32MP235F-DK			Set of examples and applications → STM32MP23 Discovery boards
│   │   └── [...]
│   ├── STM32MP257F-DK			Set of examples and applications → STM32MP25 Discovery boards
│   │   └── [...]
│   ├── STM32MP257F-EV1			Set of examples and applications → STM32MP25 Evaluation boards
│   │   └── [...]
│   ├── Release_Notes.html
│   └── STM32CubeProjectsList.html	List of examples and applications for STM32CubeMP2 Package
├── Utilities
│   └── [...]
├── CODE_OF_CONDUCT.md
├── CONTRIBUTING.md
├── License.md
├── package.xml
├── Package_license.html
├── Package_license.md
├── README.md
├── Release_Notes.html			Release note for STM32CubeMP2 Package
├── sbom_cdx.json
└── SECURITY.md
The STM32CubeMPU Package is now installed: let's develop software running on Arm Cortex-M.
7. Developing software for OpenSTLinux release[edit | edit source]
- Developing software running on Arm Cortex-A:
- Use the OpenSTLinux SDK and the OpenSTLinux BSP packages
- Developing software running on Arm Cortex-M:
- For the STM32MP15x lines and for the A35-TD flavor of STM32MP2 series, use the STM32CubeMPU Package
- For the M33-TD flavor of the STM32MP2 series, use the OpenSTLinux SDK and the OpenSTLinux BSP packages
- For the STM32MP15x lines
7.1. Developing software with OpenSTLinux SDK and BSP packages[edit | edit source]
7.1.1. Starting up the SDK[edit | edit source]
The SDK environment setup script must be run once in each new working terminal in which you cross-compile:
For STM32MP1 series
source <SDK installation directory>/environment-setup-cortexa7t2hf-neon-vfpv4-ostl-linux-gnueabi
The following checkings allow to ensure that the environment is correctly setup:
- Check the target architecture
echo $ARCH
arm
- Check the toolchain binary prefix for the target tools
echo $CROSS_COMPILE
arm-ostl-linux-gnueabi-
- Check the C compiler version
$CC --version
arm-ostl-linux-gnueabi-gcc (GCC) <GCC version>
[...]
- Check that the SDK version is the expected one
echo $OECORE_SDK_VERSION
<expected SDK version>
For STM32MP2 series
source <SDK installation directory>/environment-setup-cortexa35-ostl-linux
The following checkings allow to ensure that the environment is correctly setup:
- Check the target architecture
echo $ARCH
arm64
- Check the toolchain binary prefix for the target tools
echo $CROSS_COMPILE
aarch64-ostl-linux-
- Check the C compiler version
$CC --version
aarch64-ostl-linux-gcc (GCC) <GCC version>
[...]
- Check that the SDK version is the expected one
echo $OECORE_SDK_VERSION
<expected SDK version>
If any of these commands fails or does not return the expected result, try to reinstall the SDK.
7.1.2. SDK-infos[edit | edit source]
Prerequisites:
SDK-infos is an optional component that facilitates build for the OpenSTLinux BSP packages. This directory contents a script and a README to help user to generate a build environment adapted to its needs and to manage OpenSTLinux components diversity.
The <SDK-infos installation directory>/README.HOW_TO.txt.<board flavor>[1] helper file gives instructions to:
☐ generate a helper script for one of STM32MP1 series' boards ![]() , STM32MP2 series' boards
, STM32MP2 series' boards ![]() for A35-TD flavor
for A35-TD flavor ![]() and STM32MP2 series' boards
and STM32MP2 series' boards ![]() for M33-TD flavor
for M33-TD flavor ![]()
☐ extract BSP source code according to the seleted board
☐ generate boot stage of Cortex-A
☐ generate binary to flashing via Cortex-A
☐ generate kernel and kernel modules
☐ generate m33 firmware for STM32MP2 series' boards ![]() for M33-TD flavor
for M33-TD flavor ![]()
It is mandatory to execute the build steps specified below.
The script "generated_build_script-stm32mpx.sh" uses the whole "README.HOW_TO.txt" files to generate a helper script to compile the component needed for your target.
- Different options are supported and can be accessed through script help:
$> ./generated_build_script-stm32mpx.sh help
generated_build_script <machine name>
<machine name>: name of the machine which can be use for sdk compilation
     - stm32mp1 or stm32mp1-mx: to compile STM32MP1 series' boards  either
       - via device tree from components themselves or external-dt source
       - or via device tree from components themselves or external board provided by STM32CubeMX
     - stm32mp2 or stm32mp2-mx: to compile STM32MP2 series' boards  for A35-TD flavor either
       - via device tree from components themselves or external-dt source
       - or via device tree from components themselves or external board provided by STM32CubeMX
     - stm32mp2-m33td or stm32mp2-m33td-mx: to compile STM32MP2 series' boards  for M33-TD flavor  either
       - via device tree from components themselves or external-dt source
       - or via device tree from components themselves or external board provided by STM32CubeMX
- To generate a helper script for ST board (ex.: stm32mp257f-dk):
$> ./sdk-infos/generated_build_script-stm32mpx.sh stm32mp2
This command generates a script on root directory for all source codes from Developer Package: sources/*/sdk_compilation-stm32mp2-my-custom-board.sh
- To generate a helper script for board with Cube MX device tree(ex.: stm32mp157f-mx-dk):
$> ./sdk-infos/generated_build_script-stm32mpx.sh stm32mp1-mx
This command generates a script, sources/*/sdk_compilation-stm32mp1-mx-my-custom-board.sh, on root directory for all source codes from Developer Package.
After the helper script was correctly filled with your configuration (see SDK-infos README for examples and explanation), you can start to use it.
Usage helper script, way of working (here we use a helper script named sdk_compilation-stm32mp-xxx.sh as example)
- To extract the sources codes of components
$> ./sdk_compilation-stm32mp-xxx.sh extract
- To generate boot stage of Cortex-A
$> ./sdk_compilation-stm32mp-xxx.sh compile-for-fip
$> ./sdk_compilation-stm32mp-xxx.sh deploy-for-fip
This command generates bl2 and fip binaries for Cortex-A
- To generate binary to flashing via Cortex-A
$> ./sdk_compilation-stm32mp-xxx.sh programmer
This command generates bl2 and fip binaries for flashing on Cortex-A
- To generate kernel and kernel modules:
$> ./sdk_compilation-stm32mp-xxx.sh linux-stm32mp-configure
$> ./sdk_compilation-stm32mp-xxx.sh linux-stm32mp-compile
$> ./sdk_compilation-stm32mp-xxx.sh linux-stm32mp-deploy
This command generates the kernel image and device tree and exports kernel modules. The Kernel modules can be found stripped and not stripped on deploy directory.
$> ./sdk_compilation-stm32mp-xxx.sh gcnano-driver-stm32mp-compile
$> ./sdk_compilation-stm32mp-xxx.sh gcnano-driver-stm32mp-deploy
- To generate m33 firmware for STM32MP2 series' boards for M33-TD flavor :
$> ./sdk_compilation-stm32mp-xxx.sh compile-for-m33fw
$> ./sdk_compilation-stm32mp-xxx.sh deploy-for-m33fw
This command generate all the component needed to generate m33fw
7.1.3. Modifying the Linux kernel[edit | edit source]
Prerequisites:
The partitions related to the Linux kernel are:
- the bootfs partition that contains the Linux kernel U-Boot image (uImage) and device tree
- the rootfs partition that contains the Linux kernel modules
The Linux kernel might be cross-compiled, either in the source code directory, or in a dedicated directory different from the source code directory.
This last method is recommended as it clearly separates the files generated by the cross-compilation from the source code files.
The <Linux kernel installation directory>/README.HOW_TO.txt.<board flavor>[1] helper file gives instructions to:
☐ configure the Linux kernel (applying the ST fragments)
☐ cross-compile the Linux kernel
☐ deploy the Linux kernel (that is, update the software on board)
You can also prefer using the SDK-infos script to easliy manage the above steps.
You can refer to the following simple examples:
- Modification of the kernel configuration
- Modification of the device tree
- Modification of a built-in device driver
- Modification of an external in-tree module
- Adding an external out-of-tree Linux kernel module
7.1.4. Adding Linux user space applications[edit | edit source]
Prerequisites:
- the SDK is installed
- the SDK is started up
Once a suitable cross-toolchain (OpenSTLinux SDK) is installed, it is easy to develop a project outside of the OpenEmbedded build system.
There are different ways to use the SDK toolchain directly, among which Makefile and Autotools.
Whatever the method, it relies on:
- the sysroot that is associated with the cross-toolchain, and that contains the header files and libraries needed for generating binaries (see target sysroot)
- the environment variables created by the SDK environment setup script (see SDK startup)
You can also prefer using the SDK-infos script to easliy manage the above steps.
You can refer to the following simple example:
7.1.5. Modifying the U-Boot[edit | edit source]
Prerequisites:
As explained in the boot chain overview, the trusted boot chain is the default solution delivered by STMicroelectronics. Within this scope, the partition related to the U-Boot is the ssbl one that contains the U-Boot and its device tree blob.
The <U-Boot installation directory>/README.HOW_TO.txt.<board flavor>[1] helper file gives instructions to:
☐ cross-compile the U-Boot
☐ deploy the U-Boot (that is, update the software on board)
You can also prefer using the SDK-infos script to easliy manage the above steps.
You can refer to the following simple example:
7.1.6. Modifying the TF-A[edit | edit source]
Prerequisites:
As explained in the boot chain overview, the trusted boot chain is the default solution delivered by STMicroelectronics. Within this scope, the partition related to the TF-A is the fsbl one.
The <TF-A installation directory>/README.HOW_TO.txt.<board flavor>[1] helper file gives instructions to:
☐ cross-compile the TF-A
☐ deploy the TF-A (that is, update the software on board)
You can also prefer using the SDK-infos script to easliy manage the above steps.
You can refer to the following simple example:
7.1.7. Modifying the OP-TEE[edit | edit source]
Prerequisites:
As explained in the boot chain overview, the trusted boot chain is the default solution delivered by STMicroelectronics. Within this scope, the partition related to the OP-TEE is the fsbl one.
The <OP-TEE installation directory>/README.HOW_TO.txt.<board flavor>[1] helper file gives instructions to:
☐ cross-compile the OP-TEE
☐ deploy the OP-TEE (that is, update the software on board)
You can also prefer using the SDK-infos script to easliy manage the above steps.
You can refer to the following simple example:
7.1.8. Modifying the TF-M[edit | edit source]
Prerequisites:
The <TF-M installation directory>/README.HOW_TO.txt.stm32mp2-m33td helper file gives instructions to:
☐ cross-compile the TF-M
☐ deploy the TF-M (that is, update the software on board)
You can also prefer using the SDK-infos script to easliy manage the above steps.
You can refer to the following simple example:
7.1.9. Modifying the m33tdprojects Starter[edit | edit source]
Prerequisites:
The <m33tdprojects Starter installation directory>/README.HOW_TO.txt.stm32mp2-m33td helper file gives instructions to:
☐ cross-compile the m33tdprojects Starter
☐ deploy the m33tdprojects Starter (that is, update the software on board)
You can also prefer using the SDK-infos script to easliy manage the above steps.
You can refer to the following simple example:
7.2. Developing software with STM32CubeMPU Package[edit | edit source]
This chapter gives information to develop software running on Arm Cortex-M only for STM32MP15x lines ![]() and STM32MP2 series.
and STM32MP2 series.
Prerequisites:
Refer to FwST-M_Packages articles to create a STM32CubeMPU project from scratch or open/modify an existing one from STM32CubeMPU package.
You can also refer directly to the following articles to:
8. Fast links to essential commands[edit | edit source]
If you are already familiar with the Developer Package for the STM32MPU Embedded Software distribution, fast links to the essential commands are listed below.
| With the links below, you will be redirected to other article; use the back button of your browser to come back to these fast links |
9. How to go further?[edit | edit source]
Now that your developments are ready, you might want to switch to the STM32MPU Distribution Package, in order to create your own distribution and to generate your own SDK and image.
10. References[edit | edit source]
- ↑ 1.00 1.01 1.02 1.03 1.04 1.05 1.06 1.07 1.08 1.09 1.10 1.11 1.12 The helper file name might be "README.HOW_TO.txt.stm32mp1" for the STM32MP1 series, "README.HOW_TO.txt.stm32mp2" for the A35-TD flavor of the STM32MP2 series, or "README.HOW_TO.txt.stm32mp2-m33td" for the M33-TD flavor of the STM32MP2 series
Arm® is a registered trademark of Arm Limited (or its subsidiaries) in the US and/or elsewhere. ![]()
Arm® is a registered trademark of Arm Limited (or its subsidiaries) in the US and/or elsewhere. ![]()