This article shows how to start up a STM32MP257x-DK ![]() Discovery kits with the software image for the Yocto-based OpenSTLinux embedded software. It is valid for the STM32MP257x-DK
Discovery kits with the software image for the Yocto-based OpenSTLinux embedded software. It is valid for the STM32MP257x-DK ![]() Discovery kit and STM32MP257F-DK Discovery kit
Discovery kit and STM32MP257F-DK Discovery kit ![]() for STM32MP23x lines evaluation
for STM32MP23x lines evaluation ![]() ; the part numbers are specified in the STM32MP25 microprocessor part numbers article and in the STM32MP23 microprocessor part numbers article.
; the part numbers are specified in the STM32MP25 microprocessor part numbers article and in the STM32MP23 microprocessor part numbers article.
It lists the required material, points to the board features description, and gives the step-by-step process to set up the system.
Finally, it proposes to run some basic use cases and to discover some of the board capabilities.

1. Starter Package content[edit | edit source]
If not yet familiar with the Yocto-based OpenSTLinux embedded software and its Packages, refer to the following articles:
- Which STM32MPU Embedded Software Package better suits your needs (and especially the Starter Package chapter)
- Yocto-based OpenSTLinux embedded software
If already familiar with the Starter Package for the Yocto-based OpenSTLinux embedded software, refer to the the fast links to essential commands.
To sum up, this Starter Package provides:
- the software image for the Yocto-based OpenSTLinux embedded software, which includes:
- the binaries for the OpenSTLinux distribution
- one or more firmware example(s) for the FwST-M Package
- the tool (STM32CubeProgrammer) to install this image on the STM32MP25 Discovery kit
2. Starter Package step-by-step overview[edit | edit source]
The following steps are required to get the STM32MP25 Discovery kits up and running:
☐ Checking the material
☐ Assembling the board
☐ Installing the tools
☐ Downloading the image and flashing it on the board
☐ Booting the board
Once these steps are achieved, it is possible to:
- check the boot sequence
- execute basic commands
- run basic use cases
- discover on your own the capabilities of the STM32MP25 Discovery kits
3. Checking the material[edit | edit source]
Mandatory
| PC | Linux or Windows operating systems. See PC prerequisites for more details on the required configurations |
| STM32MP257x-DK Discovery kit | Flexible and complete development platform for the STM32MP25 microprocessor device including:
|
| microSDTM card | It is populated with OpenSTLinux distribution (Linux software), and provides extra storage capacity. An 16-Gbyte minimum microSD card is needed. |
| USB type-C cable | It connects the STM32MP257x-DK Discovery kit to the PC through the USB type-C (ST-LINK/V3) connector. |
| USB type-C cable | It connects the STM32MP257x-DK Discovery kit to a USB OTG device through the USB type-C connector. |
Optional
| LCD screen - recommended | Two types of screen are possible: LVDS or HDMI |
| USB keyboard and mouse | Thanks to the USB type A connectors, the STM32MP257x-DK Discovery kit can be equipped with a full-size keyboard and mouse. |
| Ethernet cable | It can connect the STM32MP257x-DK Discovery kit to a network through the RJ45 connector. |
| Camera | MIPI CSI-2 Camera |
Optionally, devices and extension boards might be plugged to the STM32MP257x-DK Discovery kit thanks to connectors such as:
- GPIO expansion connector
- ...
4. Assembling the board[edit | edit source]
The STM32MP257x-DKx Discovery kit package (STM32MP257F-DK ![]() ) contains the items listed below.
) contains the items listed below.
| Position | Description |
|---|---|
| 1 | MB1605 motherboard |
| 2 | microSD™ card |

| LVDS displays and CSI cameras are available for purchase to complete this basic setup. |
The complete set contains:

| Position | Description |
|---|---|
| 1 | MB1605 main board |
| 2 | MicroSD card |
| 3 | LVDS display cable (provided via B-LVDS7-WSVGA package) (optional) |
| 4 | 7” LVDS WSVGA display with EDT ETML0700Z9NDHA panel touch panel provided with the B-LVDS7-WSVGA package (optional) |
| 5 | Camera board FFC (provided with the B-CAMS-IMX package) (optional) |
| 6 | MB1854 board AI camera provided with the B-CAMS-IMX package (optional) |

4.1. Connecting the LVDS display to the board (optional)[edit | edit source]
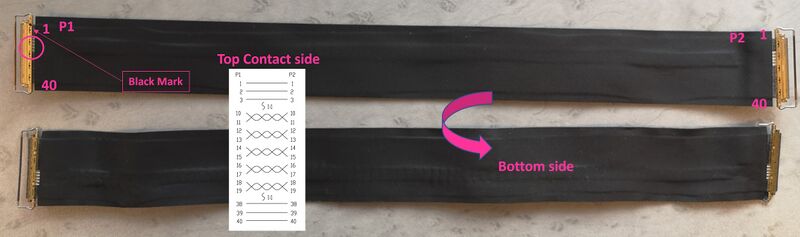
- Check the cable orientation shown above using the black mark and the white twisted pairs.
- Find the LVDS ports on the STM32MP257x-DK Discovery kit (CN2) and the display (CN1). The LVDS display box contains one cable.
- Insert the cable into each port as shown below:

4.2. Connecting the MB1854 camera board to the board (optional)[edit | edit source]
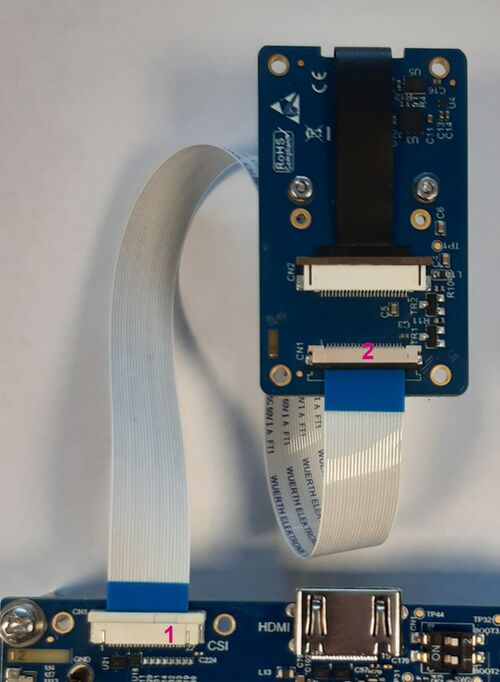
- Find the camera ports on the STM32MP257x-DK Discovery kit (CN8) (#1 in the image above) and MB1854 (CN1) (#2 in the image above). The camera box contains one FFC.
- For each port:
- Pull the black plastic (#1 in the image below) lightly to insert the contact side of the FFC towards the board (#2 in the image below).
- Push the black plastic carefully to hold the FFC (#3 in the image below).

4.3. STM32MP257x-DK Discovery kit assembled[edit | edit source]

5. Installing the tools[edit | edit source]
5.1. Installing the STM32CubeProgrammer tool[edit | edit source]
| STM32CubeProgrammer for Linux® host PC | STM32CubeProgrammer for Windows® host PC | |
|---|---|---|
| Download |
Version v2.23.0
unzip en.stm32cubeprog.zip | |
| Installation |
$> ./SetupSTM32CubeProgrammer-2.23.0.linux
$> export PATH=<my STM32CubeProgrammer install directory>/bin:$PATH
$> ln -s <my STM32CubeProgrammer install directory>/bin/STM32_Programmer_CLI /home/bin/STM32_Programmer_CLI |
|
| User manual |
| |
| Detailed release note |
| |
5.2. Preparing the USB serial link for flashing[edit | edit source]
It is recommended to use the USB (in DFU mode) for flashing rather than the UART, which is too slow.
Below indications on how to install the USB in DFU mode under Linux and Windows OS, respectively.
- For Linux host PC or Windows host PC with VMWare:
The libusb1.0 package (including USB DFU mode) must be installed to be able to connect to the board via the USB port. This is achieved by typing the following command from the host PC terminal:
sudo apt-get install libusb-1.0-0
To allow STM32CubeProgrammer to access the USB port through low-level commands, proceed as follows:
cd <your STM32CubeProgrammer install directory>/Drivers/rules

sudo cp *.* /etc/udev/rules.d/
- For Windows host PC:
Run the “STM32 Bootloader.bat” file to install the STM32CubeProgrammer DFU driver and activate the STM32 microprocessor device in USB DFU mode. This driver (installed by STM32 Bootloader.bat) is provided within the STM32CubeProgrammer release package. It is located in the DFU driver folder, \Drivers\DFU_Driver.
In case of issue, refer to How to proceed when the DFU driver installation fails on Windows host PC.
To validate the installation, the DFU driver functionality can be verified by following the FAQ instructions provided in how to check if the DFU driver is functional.
6. Downloading the image and flashing it on the board[edit | edit source]
6.1. Image download[edit | edit source]
6.1.1. A35-TD flavor  image download[edit | edit source]
- The STM32MP2 image (binaries) is delivered through one tarball file named FLASH-stm32mp2-openstlinux-6.6-yocto-scarthgap-mpu-v26.06.10.tar.gz applicable to STM32MP215F-DK , STM32MP257F-DK for STM32MP23x lines evaluation
 , STM32MP257x-DK and STM32MP257x-EV1
- Download and install the STM32MP2 image (binaries):
The software package is provided AS IS, and by downloading it, you agree to be bound to the terms of the software license agreement (SLA0048). The detailed content licenses can be found here.
| STM32MP2 Starter Package image - STM32MP2-Ecosystem-v6.2.1 release for A35-TD flavor | |
|---|---|
| Download |
Go on st.com to download the STM32MP2 Starter Package image, FLASH-stm32mp2-openstlinux-6.6-yocto-scarthgap-mpu-v26.06.10.tar.gz file. |
| Installation |
cd <working directory path>/Starter-Package
tar xvf FLASH-stm32mp2-openstlinux-6.6-yocto-scarthgap-mpu-v26.06.10.tar.gz |
| Release note |
Details of the content of this software package are available in the associated STM32 MPU OpenSTLinux release note. |
- The binaries and the Flash layout files are in the <Starter Package installation directory>/stm32mp2-openstlinux-6.6-yocto-scarthgap-mpu-v26.06.10/images/stm32mp2/ directory. The most important ones are:
stm32mp2
├── arm-trusted-firmware                                                               TF-A binaries for FSBL partitions and supported boot chains
│   ├── bl31                                                                           TF-A BL31 binary for FIP binaries creation
│   │   ├── debug                                                                      Debug binaries for BL31
│   │   │   ├── tf-a-bl31-<board name>-<hardware security>-<boot chain>-<storage>.elf      Debug symbol file for TF-A BL31
│   │   │   └── [...]
│   │   ├── <board name>-<hardware security>-<boot chain>-<storage>.dtb                TF-A BL31 device tree for FIP binaries creation
│   │   ├── tf-a-bl31-<board name>-<hardware security>-<boot chain>-<storage>.bin      TF-A BL31 binary for FIP binaries creation
│   │   └── [...]
│   ├── ddr                                                                            Trained DDR binary for FIP binaries creation
│   │   ├── ddr_pmu-<board name>-<hardware security>-<boot chain>-<storage>.bin
│   │   └── [...]
│   ├── debug                                                                          Debug binaries for TF-A
│   │   ├── debug-tf-a-<board name>-<hardware security>-<boot chain>-<storage>.stm32   Debug file for FSBL
│   │   ├── tf-a-bl2-<soc name>-<boot chain>-<storage>.elf                             Debug symbol file for TF-A
│   │   └── [...]
│   ├── fwconfig                                                                       TF-A device tree for FIP binaries creation
│   │   ├── <board name>-<hardware security>-fwconfig-<boot chain>-<storage>.dtb
│   │   └── [...]
│   ├── metadata.bin                                                                   Meta data binary for METADATA partition for the supported boards
│   ├── tf-a-<board name>-<hardware security>-<boot chain>-<storage>.stm32             TF-A binary for FSBL partition
│   └── [...]
├── arm-trusted-firmware-m                                                             TF-M binaries
│   ├── debug                                                                          Debug binaries for TF-M
│   │   ├── tfm-<board name>-<hardware security>_s.elf                                 Debug symbol file for TF-M
│   │   └── [...]
│   ├── tfm-<board name>-<hardware security>_s.bin                                    TF-M binary for m33 firmware as copro
│   └── [...]
├── fip                                                                                FIP binaries for FIP partitions and supported boot chains
│   ├── fip-<board name>-<hardware security>-ddr-<boot chain>-<storage>.bin            FIP binary for FIP DDR partition
│   ├── fip-<board name>-<hardware security>-<boot chain>-<storage>.bin                FIP binary for FIP partition
│   └── [...]
├── flashlayout_st-image-weston                                                        Flash layout files (description of the partitions) for the supported boot chains on supported boot devices and boards
│   ├── [...]
│   ├── extensible                                                                     Flash layout files for microSD card boot device with no userfs partition but a rootfs partition extended to microSD card size
│   │   ├── FlashLayout_sdcard_<board name>-<hardware security>-extensible.tsv         (recommended setup for package repository service) microSD card boot device with rootfs partition extended to microSD card size
│   │   └── [...]
│   ├── fastboot                                                                       Flash layout files for flashing via fastboot with optee boot chain
│   │   ├── FlashLayout_<boot device>_<board name>-<hardware security>-fastboot.tsv
│   │   └── [...]
│   ├── fastboot-opteemin                                                              Flash layout files for flashing via fastboot with opteemin boot chain
│   │   ├── FlashLayout_<boot device>_<board name>-<hardware security>-fastboot-opteemin.tsv
│   │   └── [...]
│   ├── optee                                                                          Flash layout files for optee boot chain
│   │   ├── FlashLayout_<boot device>_<board name>-<hardware security>-optee.tsv
│   │   └── [...]
│   └── opteemin                                                                       Flash layout files for opteemin boot chain
│       ├── FlashLayout_<boot device>_<board name>-<hardware security>-opteemin.tsv
│       └── [...]
├── Kernel                                                                             Debug binaries for Linux kernel
│   ├── config-6.6.129                                                              Reference config file for Linux kernel
│   └── vmlinux                                                                        Image of the Linux kernel
├── optee                                                                              OPTEE-OS binaries
│   ├── debug                                                                          Debug binaries for OPTEE-OS
│   │   ├── tee-<board name>-<hardware security>-<boot chain>.elf                      Debug symbol file for OPTEE-OS
│   │   ├── tee-<board name>-<hardware security>-<boot chain>-programmer.elf           Debug symbol file for OPTEE-OS configured for usb/serial
│   │   └── [...]
│   ├── tee-header_v2-<board name>-<hardware security>-<boot chain>.bin              OPTEE-OS binary for FIP binaries creation (FIP partition)
│   ├── tee-header_v2-<board name>-<hardware security>-<boot chain>-programmer.bin   OPTEE-OS binary for FIP binaries creation (FIP-BOOT partition)
│   ├── tee-pageable_v2-<board name>-<hardware security>-<boot chain>.bin            OPTEE-OS binary for FIP binaries creation (FIP partition)
│   ├── tee-pageable_v2-<board name>-<hardware security>-<boot chain>-programmer.bin OPTEE-OS binary for FIP binaries creation (FIP-BOOT partition)
│   ├── tee-pager_v2-<board name>-<hardware security>-<boot chain>.bin               OPTEE-OS binary for FIP binaries creation (FIP partition)
│   ├── tee-pager_v2-<board name>-<hardware security>-<boot chain>-programmer.bin    OPTEE-OS binary for FIP binaries creation (FIP-BOOT partition)
│   └── [...]
├── scripts
│   └── create_sdcard_from_flashlayout.sh
├── u-boot                                                                             U-BOOT binaries
│   ├── debug                                                                          Debug binaries for U-BOOT
│   │   ├── u-boot-<soc name>-<u-boot config>.elf                                      Debug symbol file for U-BOOT
│   │   └── [...]
│   ├── configuration-<soc name>-<u-boot config>_defconfig                             Reference configuration file for U-Boot
│   ├── u-boot-nodtb-<soc name>-<u-boot config>.bin                                  U-BOOT binary for FIP binaries creation
│   ├── u-boot-<board name>-<hardware security>-<u-boot config>.dtb                    U-BOOT device tree for FIP binaries creation
│   └── [...]
├── st-image-weston-openstlinux-weston-stm32mp2.rootfs.ext4                            Binary for full image content (no split of partition)
├── st-image-weston-openstlinux-weston-stm32mp2.rootfs.license
├── st-image-weston-openstlinux-weston-stm32mp2.rootfs-license_content.html            License summary for all packages needed to feed all partitions
├── st-image-weston-openstlinux-weston-stm32mp2.rootfs.manifest
├── st-image-weston-openstlinux-weston-stm32mp2.splitted-bootfs.ext4                    Binary for bootfs partition on eMMC and microSD card devices)
├── st-image-weston-openstlinux-weston-stm32mp2.splitted-vendorfs.ext4                  Binary for vendorfs partition on eMMC and microSD card devices)
├── st-image-weston-openstlinux-weston-stm32mp2.splitted-rootfs.ext4                    Binary for rootfs partition on eMMC and microSD card devices)
├── st-image-weston-openstlinux-weston-stm32mp2.splitted-userfs.ext4                    Binary for userfs partition on eMMC and microSD card devices)
└── [...]
Description:
<soc name>:
* stm32mp21
* stm32mp23
* stm32mp25
<board name>:
* stm32mp215-dk, stm32mp235f-dk, stm32mp257f-dk, stm32mp257f-ev1
<hardware security>:
* if nothing declared then there is a minimal hardware configuration for RIFF profile OPEN
* ca35tdcid-ostl                 custom hardware configuration (can be different following use-case and hardware) for RIFF profile  CUSTOM (CLOSED)
* ca35tdcid-ostl-m33-examples    custom hardware configuration (can be different following use-case and hardware) for RIFF profile CUSTOM (CLOSED)
<boot chain>:
* fastboot                  optee boot chain for flashing via fastboot
* fastboot-opteemin         opteemin boot chain for flashing via fastboot
* optee                     optee boot chain
* opteemin                  opteemin boot chain
<storage>:
* emmc                            eMMC storage
* nand                            NAND storage
* nor                             NOR storage
* programmer-uart                 storage programmation via UART
* programmer-usb                  storage programmation via USB
* sdcard                          microSD card storage
<boot device>:
* emmc                            boot via emmc storage
* nand-4-256-1024 (nand-x-y-z)    boot via nand storage
* nand-4-256-1024-sdcard          boot via nand storage for first stage (fsbl, fip) and files system are located on sdcard
* nor                             boot via nor storage
* nor-sdcard                      boot via nor storage for first stage (fsbl, fip) and files system are located on sdcard
* sdcard                          boot via sdcard storage
* sdcard-EFI                      boot via sdcard but bootfs is configurated on EFI
<u-boot config>:
* default
* fastboot-emmc             Fastboot config enabled with MMC_DEV Id for emmc
* fastboot-sdcard           Fastboot config enabled with MMC_DEV Id for sdcard
* programmer                Programmer config enabled
6.1.2. M33-TD flavor image download[edit | edit source]
- The STM32MP2 image (binaries) is delivered through one tarball file named FLASH-stm32mp2-m33td-openstlinux-6.6-yocto-scarthgap-mpu-v26.06.10.tar.gz applicable to STM32MP215F-DK and STM32MP257x-EV1
- Download and install the STM32MP2 image (binaries):
The software package is provided AS IS, and by downloading it, you agree to be bound to the terms of the software license agreement (SLA0048). The detailed content licenses can be found here.
| STM32MP2 Starter Package image - STM32MP2-Ecosystem-v6.2.1 release for M33-TD flavor | |
|---|---|
| Download |
Go on st.com to download the STM32MP2 Starter Package image, FLASH-stm32mp2-m33td-openstlinux-6.6-yocto-scarthgap-mpu-v26.06.10.tar.gz file. |
| Installation |
cd <working directory path>/Starter-Package
tar xvf FLASH-stm32mp2-m33td-openstlinux-6.6-yocto-scarthgap-mpu-v26.06.10.tar.gz |
| Release note |
Details of the content of this software package are available in the associated STM32 MPU OpenSTLinux release note. |
- The binaries and the Flash layout files are in the <Starter Package installation directory>/stm32mp2-m33td-openstlinux-6.6-yocto-scarthgap-mpu-v26.06.10/images/stm32mp2-m33td/ directory. The most important ones are:
stm32mp2-m33td
├── arm-trusted-firmware                                                                    TF-A binaries for FSBLa partitions and supported boot chains
│   ├── bl2                                                                                 TF-A BL2 binary for FIP binaries creation
│   │   ├── tf-a-<board name>-<hardware security>-<boot chain>-<storage>.bin
│   │   └── [...]
│   ├── bl31                                                                                TF-A BL31 binary for FIP binaries creation
│   │   ├── debug                                                                           Debug binaries for BL31
│   │   │   ├── tf-a-bl31-<board name>-<hardware security>-<boot chain>-<storage>.elf           Debug symbol file for TF-A BL31
│   │   │   └── [...]
│   │   ├── <board name>-<hardware security>-<boot chain>-<storage>.dtb                     TF-A BL31 device tree for FIP binaries creation
│   │   ├── tf-a-bl31-<board name>-<hardware security>-<boot chain>-<storage>.bin           TF-A BL31 binary for FIP binaries creation
│   │   └── [...]
│   ├── ddr                                                                                 Trained DDR binary for FIP binaries creation
│   │   ├── ddr_pmu-<board name>-<hardware security>-<boot chain>-<storage>.bin
│   │   └── [...]
│   ├── debug                                                                               Debug binaries for TF-A
│   │   ├── debug-tf-a-<board name>-<hardware security>-<boot chain>-<storage>.stm32        Debug file for FSBL
│   │   ├── tf-a-bl2-<soc name>-<boot chain>-<storage>.elf                                  Debug symbol file for TF-A
│   │   └── [...]
│   ├── fwconfig                                                                            TF-A device tree for FIP binaries creation
│   │   ├── <board name>-<hardware security>-fwconfig-<boot chain>-<storage>.dtb
│   │   └── [...]
│   ├── metadata.bin                                                                        Meta data binary for METADATA partition for the supported boards
│   ├── tf-a-<board name>-<hardware security>-<boot chain>-<storage>.stm32                  TF-A binary for FSBL partition
│   └── [...]
├── arm-trusted-firmware-m                                                                  TF-M binaries for FSBLm partitions and supported boot chains
│   ├── debug                                                                               Debug binaries for TF-M
│   │   ├── debug-bl2-<board name>-<hardware security>.stm32                                Debug file for FSBLm
│   │   ├── tfm-<board name>-<hardware security>-<storage m33>-<storage a35>_s.elf          Debug symbol file for TF-M
│   │   └── [...]
│   ├── key                                                                                 Security key used by TF-M
│   │   ├── image_ns_signing_public_key-<board name>-<hardware security>-<storage m33>.pem
│   │   ├── image_s_signing_private_key-<board name>-<hardware security>-<storage m33>.pem
│   │   ├── image_s_signing_public_key-<board name>-<hardware security>-<storage m33>.pem
│   │   └── [...]
│   ├── bl2-<board name>-<hardware security>-<storage m33>.stm32                            TF-M binary for FSBLm partition
│   ├── ddr_phy_signed-<board name>-<hardware security>-<storage m33>.bin                   TF-M binary for M33ddr partition
│   └── [...]
├── fip                                                                                     FIP binaries for FIP partitions and supported boot chains
│   ├── fip-<board name>-<hardware security>-ddr-<boot chain>-<storage>.bin                 FIP binary for FIP DDR partition
│   ├── fip-<board name>-<hardware security>-<boot chain>-<storage>.bin                     FIP binary for FIP partition
│   └── [...]
├── flashlayout_st-image-weston                                                             Flash layout files (description of the partitions) for the supported boot chains on supported boot devices and boards
│   ├── [...]
│   ├── extensible                                                                          Flash layout files for microSD card boot device with no userfs partition but a rootfs partition extended to microSD card size
│   │   ├── FlashLayout_sdcard_<board name>-<hardware security>-extensible.tsv              (recommended setup for package repository service) microSD card boot device with rootfs partition extended to microSD card size
│   │   └── [...]
│   └── optee                                                                               Flash layout files for optee boot chain
│       ├── FlashLayout_<boot device>_<board name>-<hardware security>-optee.tsv
│       └── [...]
├── Kernel                                                                                   Debug binaries for Linux kernel
│   ├── config-6.6.129                                                                    Reference config file for Linux kernel
│   └── vmlinux                                                                              Image of the Linux kernel
├── m33-firmware                                                             TF-M/CubeMp2 binaries for M33FW partitions and supported boot chains
│   ├── ddr_phy-<board name>-cm33tdcid-ostl-sdcard_Signed.bin  <hardware security>-<storage m33>_Signed.bin  DDR binary for M33ddr' partition
│   ├── tf-m-starterapp-<board name>-<hardware security>-<storage m33>-<storage a35>_s_ns.bin  TF-M/CubeMP2 binary for M33FW partition
│   └── [...]
├── m33-project                                                             CubeMp2 firmware binaries which can be assembled with TF-M secure binaries
│   ├── StarterApp_M33TD_full-dynamic-<board name>-<hardware security>-<storage m33>-<storage a35>_ns.bin CubeMP2 binary
│   └── [...]
├── optee                                                                                    OPTEE-OS binaries
│   ├── debug                                                                                Debug binaries for OPTEE-OS
│   │   ├── tee-<board name>-<hardware security>-<boot chain>.elf                            Debug symbol file for OPTEE-OS
│   │   ├── tee-<board name>-<hardware security>-<boot chain>-programmer.elf                 Debug symbol file for OPTEE-OS configured for usb/serial
│   │   └── [...]
│   ├── tee-header_v2-<board name>-<hardware security>-<boot chain>.bin                    OPTEE-OS binary for FIP binaries creation (FIP partition)
│   ├── tee-header_v2-<board name>-<hardware security>-<boot chain>-programmer.bin         OPTEE-OS binary for FIP binaries creation (FIP-BOOT partition)
│   ├── tee-pageable_v2-<board name>-<hardware security>-<boot chain>.bin                  OPTEE-OS binary for FIP binaries creation (FIP partition)
│   ├── tee-pageable_v2-<board name>-<hardware security>-<boot chain>-programmer.bin       OPTEE-OS binary for FIP binaries creation (FIP-BOOT partition)
│   ├── tee-pager_v2-<board name>-<hardware security>-<boot chain>.bin                     OPTEE-OS binary for FIP binaries creation (FIP partition)
│   ├── tee-pager_v2-<board name>-<hardware security>-<boot chain>-programmer.bin          OPTEE-OS binary for FIP binaries creation (FIP-BOOT partition)
│   └── [...]
├── scripts
│   └── create_sdcard_from_flashlayout.sh
├── u-boot                                                                                   U-BOOT binaries
│   ├── debug                                                                                Debug binaries for U-BOOT
│   │   ├── u-boot-<soc name>-<u-boot config>.elf                                            Debug symbol file for U-BOOT
│   │   └── [...]
│   ├── configuration-<soc name>_defconfig                                                   Reference configuration file for U-Boot
│   ├── u-boot-nodtb-<soc name>-<u-boot config>.bin                                        U-BOOT binary for FIP binaries creation
│   ├── u-boot-<board name>-<hardware security>-<u-boot config>.dtb                          U-BOOT device tree for FIP binaries creation
│   └── [...]
├── st-image-weston-openstlinux-weston-stm32mp2-m33td.rootfs.ext4                            Binary for full image content (no split of partition)
├── st-image-weston-openstlinux-weston-stm32mp2-m33td.rootfs.license
├── st-image-weston-openstlinux-weston-stm32mp2-m33td.rootfs-license_content.html            License summary for all packages needed to feed all partitions
├── st-image-weston-openstlinux-weston-stm32mp2-m33td.rootfs.manifest
├── st-image-weston-openstlinux-weston-stm32mp2-m33td.splitted-bootfs.ext4                    Binary for bootfs partition on eMMC and microSD card devices)
├── st-image-weston-openstlinux-weston-stm32mp2-m33td.splitted-vendorfs.ext4                  Binary for vendorfs partition on eMMC and microSD card devices)
├── st-image-weston-openstlinux-weston-stm32mp2-m33td.splitted-rootfs.ext4                    Binary for rootfs partition on eMMC and microSD card devices)
├── st-image-weston-openstlinux-weston-stm32mp2-m33td.splitted-userfs.ext4                    Binary for userfs partition on eMMC and microSD card devices)
└── [...]
Description:
<soc name>:
* stm32mp21
* stm32mp25
<board name>:
* stm32mp215-dk, stm32mp257f-ev1
<hardware security>:
* if nothing declared then there is a minimal hardware configuration for RIFF profile OPEN
* cm33tdcid-ostl                     custom hardware configuration (can be different following use-case and hardware) for RIFF profile  CUSTOM (CLOSED)
* cm33tdcid-ostl-serial-ca35tdcid    specific configuration used for programmation
<boot chain>:
* optee                     optee boot chain
<storage>:
* emmc                            eMMC storage
* nor                             NOR storage
* programmer-uart                 storage programmation via UART
* programmer-usb                  storage programmation via USB
* sdcard                          microSD card storage
<storage a35>:
* emmc                            eMMC storage
* nor                             NOR storage
* sdcard                          microSD card storage
<storage m33>:
* emmc                            eMMC storage
* nor                             NOR storage
* sdcard                          microSD card storage
<boot device>:
* emmc                            boot Cortex M33 via emmc storage and Cortex A35 via emmc storage
* nor-emmc                        boot Cortex M33 via nor storage and Cortex A35 via emmc storage
* nor-nor-sdcard                  boot Cortex M33 via nor storage and Cortex A35 via nor storage for first stage (fsbl, fip) and files system are located on sdcard storage
* nor-sdcard                      boot Cortex M33 via nor storage and Cortex A35 via sdcard
* sdcard                          boot Cortex M33 via sdcard storage and Cortex A35 via sdcard storage
<u-boot config>:
* default
* programmer                Programmer config enabled
6.2. Image flashing[edit | edit source]
The STM32CubeProgrammer tool is used to flash the STM32MP25 Discovery kits with the downloaded image.
Several flash devices (microSD, eMMC...) are available on this board: see the STM32 MPU Flash mapping article if you want to know more about the supported flash memory technologies, and the flash partitions. The steps below consider the microSD card as the flash device.
As explained in the boot chain overview, the trusted boot chain is the default solution delivered by STMicroelectronics. Thus, the steps below use the image for the optee boot chain.
To flash the downloaded image on the microSD card:
- Set the boot switches to the off position (boot from UART/USB).

- Connect the USB type-C (OTG) port (4) to the host PC that contains the downloaded image.
- Insert the delivered microSD card into the dedicated slot (3).
- Connect the USB type-C (power supply) port (1) to the power connector or a host PC.
- Press the reset button (2) to reset the board.

- Go to the Starter Package directory that contains the binaries and the flash layout files:
cd <Starter Package installation directory>/stm32mp2-openstlinux-6.6-yocto-scarthgap-mpu-v26.06.10/images/stm32mp2
If the the proposition to organize the working directory has been followed, the command is:
cd Starter-Package/stm32mp2-openstlinux-6.6-yocto-scarthgap-mpu-v26.06.10/images/stm32mp2
| The commands below are for a Linux host PC; however, they are similar for a Windows host PC except that STM32_Programmer_CLI is replaced by STM32_Programmer_CLI.exe. |
- Check that the STM32CubeProgrammer tool is installed and accessible. If not, go to the installation procedure (installing the tools):
STM32_Programmer_CLI --h
      -------------------------------------------------------------------
                        STM32CubeProgrammer <tool version>
      -------------------------------------------------------------------
- Get the device port location for the USB link:
STM32_Programmer_CLI -l usb
       -------------------------------------------------------------------
                         STM32CubeProgrammer <tool version>
       -------------------------------------------------------------------

=====  DFU Interface   =====

Total number of available STM32 device in DFU mode: 1

  Device Index           : USB1
  USB Bus Number         : 003
  USB Address Number     : 002
  Product ID             : DFU in HS Mode @Device ID /0x505, @Revision ID /0x100
  Serial number          : 003A00423836500B00343046
  Firmware version       : 0x0110
  Device ID              : 0x0505
- Flash the microSD card with the image for the trusted boot chain.
For STM32MP23x lines ![]()
STM32_Programmer_CLI -c port=usb1 -w flashlayout_st-image-weston/optee/FlashLayout_sdcard_stm32mp235f-dk-optee.tsv
For STM32MP25x lines ![]()
STM32_Programmer_CLI -c port=usb1 -w flashlayout_st-image-weston/optee/FlashLayout_sdcard_stm32mp2dk-optee.tsv
- This operation takes several minutes (mainly depending of the rootfs size). A successful flashing outputs the following log (e.g. given for STM32MP25x lines
 ):
):
| Note that the logs that you will obtain, might be slightly different, especially if you use a different software release. |
      -------------------------------------------------------------------
                        STM32CubeProgrammer <tool version>
      -------------------------------------------------------------------


USB speed   : High Speed (480MBit/s)
Manuf. ID   : STMicroelectronics
Product ID  : DFU in HS Mode @Device ID /0x505, @Revision ID /0x100
SN          : 003A00423836500B00343046
DFU protocol: 1.1
Board       : --
Device ID   : 0x0505

Start Embedded Flashing service


Memory Programming ...
Opening and parsing file: tf-a-stm32mp257f-dk-usb.stm32
  File          : tf-a-stm32mp257f-dk--usb.stm32
  Size          : 204.38 KB
  Partition ID  : 0x01

Download in Progress:
[==================================================] 100%

File download complete
Time elapsed during download operation: 00:00:02.315

RUNNING Program ...
  PartID:      :0x01

Reconnecting the device ...

USB speed   : High Speed (480MBit/s)
Manuf. ID   : STMicroelectronics
Product ID  : DFU @Device ID /0x505, @Revision ID /0x1000, @Name /STM32MP257FAI Rev.A,
SN          : 003A00423836500B00343046
DFU protocol: 1.1
Board       : --
Device ID   : 0x0505
Device name : STM32MP257FAI Rev.A
Device type :
Device CPU  :
Start operation done successfully at partition 0x01


Memory Programming ...
Opening and parsing file: fip-stm32mp257f-dk-ddr.bin
  File          : fip-stm32mp257f-dk-ddr.bin
  Size          : 29.38 KB
  Partition ID  : 0x02

Download in Progress:
[==================================================] 100%

File download complete
Time elapsed during download operation: 00:00:00.015

RUNNING Program ...
  PartID:      :0x02

Reconnecting the device ...

USB speed   : High Speed (480MBit/s)
Manuf. ID   : STMicroelectronics
Product ID  : DFU @Device ID /0x505, @Revision ID /0x1000, @Name /STM32MP257FAI Rev.A,
SN          : 003A00423836500B00343046
DFU protocol: 1.1
Board       : --
Device ID   : 0x0505
Device name : STM32MP257FAI Rev.A
Device type :
Device CPU  :
Start operation done successfully at partition 0x02


Memory Programming ...
Opening and parsing file: fip-stm32mp257f-dk-optee.bin
  File          : fip-stm32mp257f-dk-optee.bin
  Size          : 2.44 MB
  Partition ID  : 0x03

Download in Progress:
[==================================================] 100%

File download complete
Time elapsed during download operation: 00:00:02.184

RUNNING Program ...
  PartID:      :0x03

Reconnecting the device ...

USB speed   : High Speed (480MBit/s)
Manuf. ID   : STMicroelectronics
Product ID  : USB download gadget@Device ID /0x505, @Revision ID /0x1000, @Name /STM32MP257FAI Rev.A,
SN          : 003A00423836500B00343046
DFU protocol: 1.1
Board       : --
Device ID   : 0x0505
Device name : STM32MP257FAI Rev.A
Device type :
Device CPU  :
Start operation done successfully at partition 0x03

Flashlayout Programming ...
[==================================================] 100%
Running Flashlayout Partition ...

Reconnecting the device ...

USB speed   : High Speed (480MBit/s)
Manuf. ID   : STMicroelectronics
Product ID  : USB download gadget@Device ID /0x505, @Revision ID /0x1000, @Name /STM32MP257FAI Rev.A,
SN          : 003A00423836500B00343046
DFU protocol: 1.1
Board       : --
Device ID   : 0x0505
Device name : STM32MP257FAI Rev.A
Device type :
Device CPU  :
Flashlayout partition started successfully


Memory Programming ...
Opening and parsing file: tf-a-stm32mp257f-dk-sdcard.stm32
  File          : tf-a-stm32mp257f-dk-sdcard.stm32
  Size          : 207.66 KB
  Partition ID  : 0x04

Download in Progress:
[==================================================] 100%

File download complete
Time elapsed during download operation: 00:00:00.088

RUNNING Program ...
  PartID:      :0x04
Start operation done successfully at partition 0x04


Memory Programming ...
Opening and parsing file: tf-a-stm32mp257f-dk-sdcard.stm32
  File          : tf-a-stm32mp257f-dk-sdcard.stm32
  Size          : 207.66 KB
  Partition ID  : 0x05

Download in Progress:
[==================================================] 100%

File download complete
Time elapsed during download operation: 00:00:00.089

RUNNING Program ...
  PartID:      :0x05
Start operation done successfully at partition 0x05


Memory Programming ...
Opening and parsing file: metadata.bin
  File          : metadata.bin
  Size          : 96.00 B
  Partition ID  : 0x06

Download in Progress:
[==================================================] 100%

File download complete
Time elapsed during download operation: 00:00:00.006

RUNNING Program ...
  PartID:      :0x06
Start operation done successfully at partition 0x06


Memory Programming ...
Opening and parsing file: metadata.bin
  File          : metadata.bin
  Size          : 96.00 B
  Partition ID  : 0x07

Download in Progress:
[==================================================] 100%

File download complete
Time elapsed during download operation: 00:00:00.006

RUNNING Program ...
  PartID:      :0x07
Start operation done successfully at partition 0x07


Memory Programming ...
Opening and parsing file: fip-stm32mp257f-dk-optee.bin
  File          : fip-stm32mp257f-dk-optee.bin
  Size          : 2.44 MB
  Partition ID  : 0x08

Download in Progress:
[==================================================] 100%

File download complete
Time elapsed during download operation: 00:00:00.984

RUNNING Program ...
  PartID:      :0x08
Start operation done successfully at partition 0x08


Memory Programming ...
Opening and parsing file: st-image-bootfs-openstlinux-weston-stm32mp2.ext4
  File          : st-image-bootfs-openstlinux-weston-stm32mp2.ext4
  Size          : 64.00 MB
  Partition ID  : 0x10

Download in Progress:
[==================================================] 100%

File download complete
Time elapsed during download operation: 00:00:28.705

RUNNING Program ...
  PartID:      :0x10
Start operation done successfully at partition 0x10


Memory Programming ...
Opening and parsing file: st-image-vendorfs-openstlinux-weston-stm32mp2.ext4
  File          : st-image-vendorfs-openstlinux-weston-stm32mp2.ext4
  Size          : 48.00 MB
  Partition ID  : 0x11

Download in Progress:
[==================================================] 100%

File download complete
Time elapsed during download operation: 00:00:21.442

RUNNING Program ...
  PartID:      :0x11
Start operation done successfully at partition 0x11


Memory Programming ...
Opening and parsing file: st-image-weston-openstlinux-weston-stm32mp2.ext4
  File          : st-image-weston-openstlinux-weston-stm32mp2.ext4
  Size          : 746.66 MB
  Partition ID  : 0x12

Download in Progress:
[==================================================] 100%

File download complete
Time elapsed during download operation: 00:05:39.847

RUNNING Program ...
  PartID:      :0x12
Start operation done successfully at partition 0x12


Memory Programming ...
Opening and parsing file: st-image-userfs-openstlinux-weston-stm32mp2.ext4
  File          : st-image-userfs-openstlinux-weston-stm32mp2.ext4
  Size          : 128.00 MB
  Partition ID  : 0x13

Download in Progress:
[==================================================] 100%

File download complete
Time elapsed during download operation: 00:00:58.746

RUNNING Program ...
  PartID:      :0x13
Start operation done successfully at partition 0x13
Flashing service completed successfully
Visit the STM32CubeProgrammer article:
- to use another flash device than the microSD card one.
- to know more about the flashing operation.
6.3. Image flashing via raw image[edit | edit source]
The script create_sdcard_from_flashlayout.sh present with the downloaded image permit to generate a raw image ready to flash microSD on STM32MP25 Discovery kits.
To generate raw image and flash it on the microSD card:
For STM32MP23x lines ![]()
- Get the downloaded image.
- Call the script create_sdcard_from_flashlayout.sh with the flash layout of "STM32MP23 Discovery kits" as parameter:
./scripts/create_sdcard_from_flashlayout.sh flashlayout_st-image-weston/optee/FlashLayout_sdcard_stm32mp235f-dk-optee.tsv
- Flash the microSD from the Linux PC via dd command. Follow the instruction available at the end of execution of create_sdcard_from_flashlayout.sh script:
dd if=FlashLayout_sdcard_stm32mp235f-dk-optee.raw of=<microSD destination> bs=8M conv=fdatasync status=progress
For STM32MP25x lines ![]()
- Get the downloaded image
- Call the script create_sdcard_from_flashlayout.sh with the flash layout of STM32MP25 Discovery kits as parameter:
./scripts/create_sdcard_from_flashlayout.sh flashlayout_st-image-weston/optee/FlashLayout_sdcard_stm32mp257f-dk-optee.tsv
- Flash the microSD from the Linux PC via dd command. Follow the instruction available at the end of execution of create_sdcard_from_flashlayout.sh script:
dd if=FlashLayout_sdcard_stm32mp257f-dk-optee.raw of=<microSD destination> bs=8M conv=fdatasync status=progress
For more information, see How to populate the SD card with dd command.
7. Booting the board[edit | edit source]
Now that the image is flashed on the STM32MP257x-DKx Discovery kit, let's finalize the system configuration:
- Step 0: check that the LVDS display board is well connected.
- Step 1: check the configuration of the boot switches:
- The boot related switches must be configured so that the device (e.g. microSD card ) on which the image has been flashed is selected as boot source.
- The figure below shows the boot switches for the recommended boot from microSD card.

- Step 2: (optionally) connect a USB keyboard and/or a USB mouse (not provided) using the USB type-A ports (4 in the picture below).
- Step 3: (optionally) connect an Ethernet cable (not provided) to the dedicated connector (5).

- Step 4: check that the microSD card is inserted into the dedicated slot (3).
- Step 5: connect the USB Power – TypeC cable to the connector (1).
- Step 6: (optionally) install and configure a remote Terminal program (e.g. Minicom on Ubuntu Linux PC or Tera Term on Windows PC) onto your host PC, and connect the ST-LINK/V3 USB type-C port (1) to a host PC that runs a Terminal program with ST-LINK/V3 virtual port.
- Step 7: press the reset button (2) to reset the board
The board boots and the system will be available after few seconds.
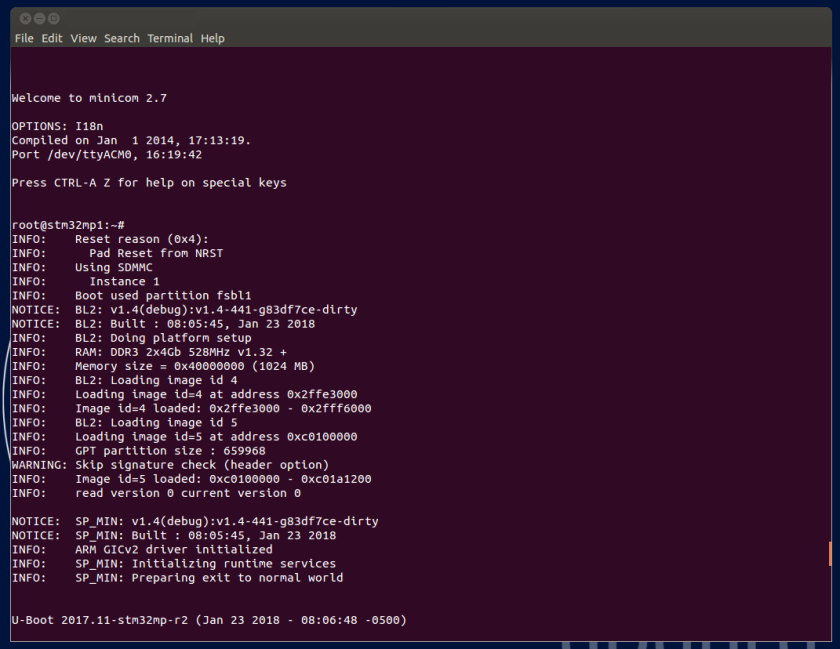
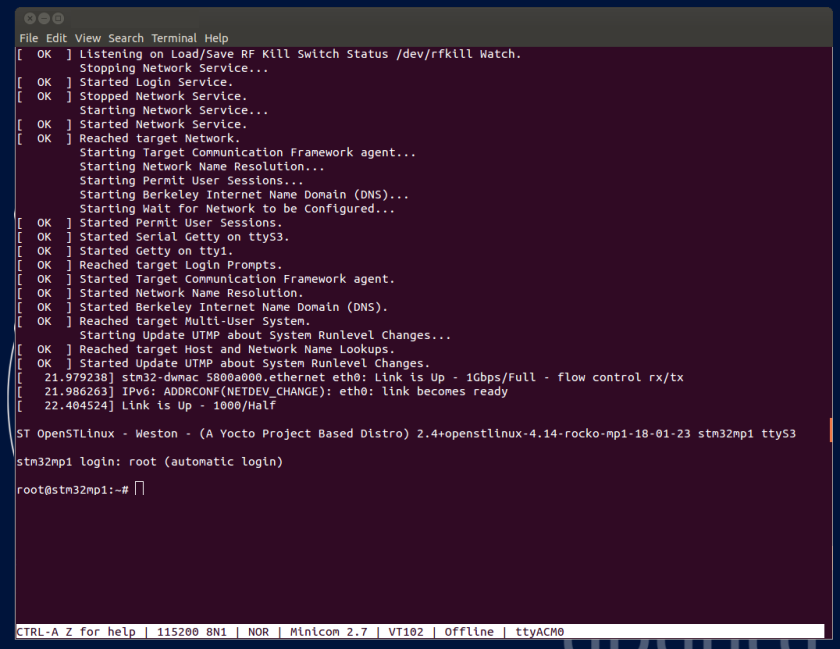
8. Checking the boot sequence[edit | edit source]
Assuming you have performed the optional step 6 above, the information (coming successively from the TF-A, OP-TEE OS, U-Boot and the Linux operating system that is booting on the board), should be displayed on the host PC Terminal.
| The information displayed below might differ from that on your own application, and should just be considered as an example. |
For M33-TD flavor ![]() , 2 consoles, one for Cortex-A and one for Cortex-M (but not represented in picture above), are accessible via ST-LINK.
, 2 consoles, one for Cortex-A and one for Cortex-M (but not represented in picture above), are accessible via ST-LINK.
In parallel, a U-Boot splash screen picture is displayed on the board display (if one is connected to the board).
A user space graphical boot splash screen (PSplash) picture is then briefly displayed on the board display (if one is connected to the board).
When the boot process is complete, the launcher application is shown on the board display (if one is connected to the board).
More detail about this launcher application in GTK demo launcher page.
9. Mouse, keyboard and Ethernet hot-plugs[edit | edit source]
Let's assume that the optional step 2 and step 3 were not achieved when setting up the system above.
When connecting a USB mouse, the following information is displayed by the Terminal program:
[  926.786326] usb 2-1.1: new low-speed USB device number 3 using ehci-platform
[  926.961413] input: Logitech Optical USB Mouse as /devices/platform/soc/5800d000.usbh-ehci/usb2/2-1/2-1.1/2-1.1:1.0/0003:046D:C016.0001/input/input2
[  926.975098] hid-generic 0003:046D:C016.0001: input: USB HID v1.10 Mouse [Logitech Optical USB Mouse] on usb-5800d000.usbh-ehci-1.1/input0
When connecting a USB keyboard, the following information is displayed by the Terminal program:
[ 1009.026567] usb 2-1.3: new low-speed USB device number 4 using ehci-platform
[ 1009.193990] input: Dell Dell USB Keyboard as /devices/platform/soc/5800d000.usbh-ehci/usb2/2-1/2-1.3/2-1.3:1.0/0003:413C:2003.0002/input/input3
[ 1009.280101] hid-generic 0003:413C:2003.0002: input: USB HID v1.10 Keyboard [Dell Dell USB Keyboard] on usb-5800d000.usbh-ehci-1.3/input0
When connecting an Ethernet cable, the following information is displayed by the Terminal program:
[ 1215.356377] stm32-dwmac 5800a000.ethernet end0: Link is Up - 1Gbps/Full - flow control rx/tx
[ 1215.363377] IPv6: ADDRCONF(NETDEV_CHANGE): end0: link becomes ready
[ 1215.391068] Link is Up - 1000/Half
10. Remote and local Terminal programs[edit | edit source]
As already explained in the step 6 above, a remote Terminal program can be installed and configured on your host PC in order to communicate with the board through a serial link or an Ethernet link: see How to get Terminal.
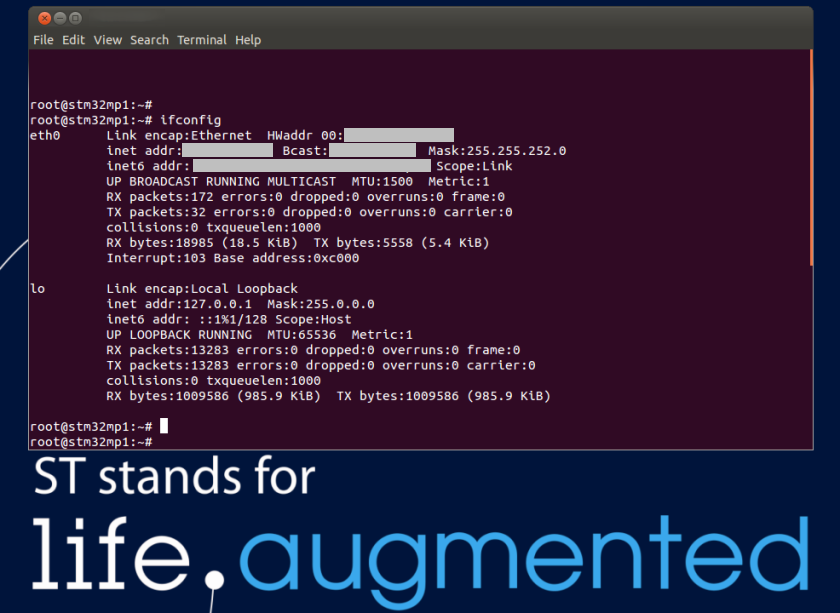
The remote Terminal on your host PC can be used to enter command lines, as shown below with the ip command to query the network interface parameters:
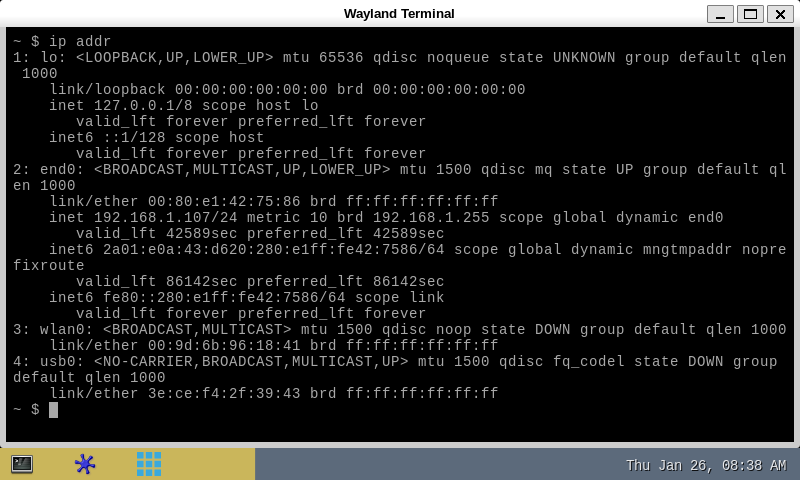
A local Terminal program can be launched directly on the board. Click on the small icon at the top left corner of the display (see the red arrow on the figure below):
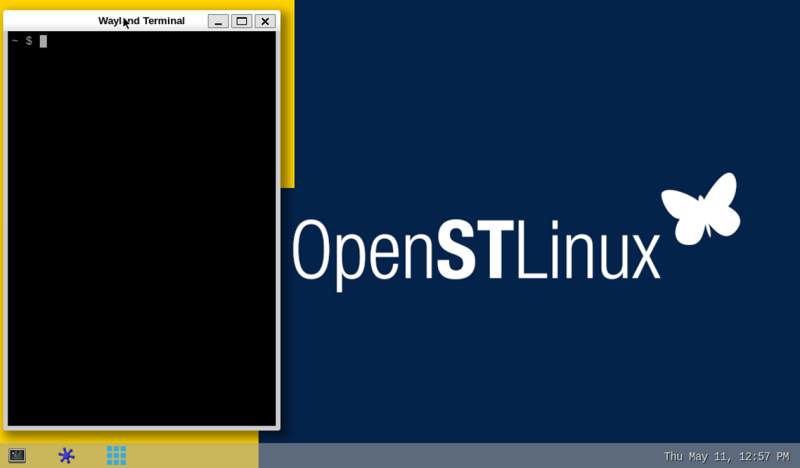
Then the on-board Wayland Terminal can be used to directly enter command lines as shown below, still with the ip addr command to query the network interface parameters:
Consequently, unless an explicit restriction is mentioned, command lines can be run from both Terminals.
Note: in this article, any command executed on the board (through the remote Terminal or the Wayland Terminal) starts with , while any command executed on the host PC starts with .
11. Executing basic commands[edit | edit source]
| The outputs of the commands executed below are examples; the outputs obtained might differ. |
11.1. Having a look at the OpenSTLinux directory structure[edit | edit source]
The directory structure and directory contents in the OpenSTLinux distribution is standard. Some details are available in the OpenSTLinux directory structure article.
11.2. Identifying the software running on board[edit | edit source]
| Obviously, what you obtain might differ from what is displayed on the Output example column. |
For ecosystem release v6.2.1  [edit | edit source]
| Software | How to get its version | Output example |
|---|---|---|
| TF-A | TF-A Version number |
NOTICE: BL2: v2.10-stm32mp1-r3.1(debug):lts-v2.10.24-dirty |
| U-Boot | See the version displayed in the console |
2023.10-stm32mp-r3.1 [...] |
| Linux kernel |
cat /proc/version |
Linux version 6.6.129 (xxxx@yyyy) (aarch64-ostl-linux-gcc (GCC) 13.4.0, GNU ld (GNU Binutils) 2.42.0.20240723) [...] |
| GCC |
cat /proc/version |
Linux version 6.6.129 (xxxx@yyyy) (aarch64-ostl-linux-gcc (GCC) 13.4.0) [...] |
| Yocto Project |
grep DISTRO_CODENAME /etc/build |
DISTRO_CODENAME = scarthgap |
| Weston |
weston --version |
weston 13.0.1 |
| GStreamer |
gst-play-1.0 --version |
GStreamer 1.22.12 |
| GPU (only on STM32MP25x lines |
cat /sys/kernel/debug/gc/version |
6.4.21.1.1058597 built [...] |
11.3. Configuration tips[edit | edit source]
11.4. Getting board IP address[edit | edit source]
Prerequisite: your board is connected to your local network through the Ethernet connector (see step 3).
- Get the IP address of your board with the ip Linux command line (recommended method):
ip addr show end0
3: end0: <BROADCAST,MULTICAST,UP,LOWER_UP> mtu 1500 qdisc mq state UP group default qlen 1000
    link/ether xx:xx:xx:xx:xx:xx brd ff:ff:ff:ff:ff:ff
    inet xx.xx.xx.xx/xx brd xx.xx.xx.xx scope global dynamic end0
       valid_lft 159045sec preferred_lft 159045sec
    inet6 xxxx::xx:xx:xx:xx/xx scope link
       valid_lft forever preferred_lft forever
- Get the IP address of your board with the ifconfig Linux command line (a deprecated but well-known command):
ifconfig end0
end0      Link encap:Ethernet  HWaddr xx:xx:xx:xx:xx:xx
          inet addr:xx.xx.xx.xx  Bcast:xx.xx.xx.xx  Mask:255.255.252.0
          inet6 addr: xxxx::xx:xx:xx:xx/xx Scope:Link
          UP BROADCAST RUNNING MULTICAST  MTU:1500  Metric:1
          RX packets:2619 errors:0 dropped:0 overruns:0 frame:0
          TX packets:1311 errors:0 dropped:0 overruns:0 carrier:0
          collisions:0 txqueuelen:1000
          RX bytes:353250 (344.9 KiB)  TX bytes:118305 (115.5 KiB)
          Interrupt:247
11.5. Copying a file from your host PC to your board (and reciprocally)[edit | edit source]
- How to transfer a file over network (recommended method)
11.6. Miscellaneous commands[edit | edit source]
| The outputs of the commands executed below are examples; the outputs that you obtain might differ. |
11.6.1. Printing distribution specific information[edit | edit source]
cat /etc/os-release
ID=openstlinux-weston
NAME="ST OpenSTLinux - Weston - (A Yocto Project Based Distro)"
VERSION="5.0.17-openstlinux-6.6-yocto-scarthgap-mpu-v26.06.10 (Scarthgap)"
VERSION_ID=5.0.17-openstlinux-6.6-yocto-scarthgap-mpu-v26.06.10
VERSION_CODENAME="scarthgap"
PRETTY_NAME="ST OpenSTLinux - Weston - (A Yocto Project Based Distro) 5.0.17-openstlinux-6.6-yocto-scarthgap-mpu-v26.06.10 (Scarthgap)"
CPE_NAME="cpe:/o:openembedded:openstlinux-weston:5.0.17-openstlinux-6.6-yocto-scarthgap-mpu-v26.06.10"
Where:
| ID | A lower-case string identifying the operating system |
| NAME | A string identifying the operating system |
| VERSION | A string identifying the operating system version, including a release code name |
| VERSION_ID | A lower case string identifying the operating system version |
| VERSION_CODENAME | Code name for the distribution |
| PRETTY_NAME | A full pretty name of the release |
| CPE_NAME | A CPE name for the operating system, following the Common Platform Enumeration Specification[1] |
11.6.2. Printing system information[edit | edit source]
uname -a
Linux stm32mp2-XX-XX-XX 6.6.129 #1 SMP PREEMPT Thu Mar  5 15:03:43 UTC 2026 aarch64 GNU/Linux
Where:
| Linux | Kernel name |
| stm32mp2-XX-XX-XX | Network node hostname |
| 6.6.129 | Kernel release |
| #1 SMP PREEMPT Thu Mar 5 15:03:43 UTC 2026 | Kernel version |
| aarch64 | Machine hardware name |
| GNU/Linux | Operating system |
11.6.3. Printing Linux kernel and GCC versions[edit | edit source]
cat /proc/version
Linux version 6.6.129 (oe-user@oe-host) (aarch64-ostl-linux-gcc (GCC) 13.4.0, GNU ld (GNU Binutils) 2.42.0.20240723) #1 SMP PREEMPT Thu Mar  5 15:03:43 UTC 2026
Where:
| Linux | Kernel name |
| version 6.6.129 | Kernel release |
| (xxxx@yyyy) | Person (xxxx) who compiled the kernel, and machine (yyyy) where it happened |
| (aarch64-ostl-linux-gcc (GCC) 13.4.0 ) | Version of the GCC compiler used to compile the kernel |
| #1 SMP PREEMPT Thu Mar 5 15:03:43 UTC 2026 | Kernel version; type of kernel (SMP) and date and time of the kernel compilation |
11.6.4. Printing the amount of disk space available on all mounted file systems[edit | edit source]
df -h
Filesystem      Size  Used Avail Use% Mounted on
devtmpfs         116M     0  116M   0% /dev
/dev/mmcblk0p10  684M  453M  184M  72% /
tmpfs            195M  176K  195M   1% /dev/shm
tmpfs             78M  8.8M   70M  12% /run
tmpfs            4.0M     0  4.0M   0% /sys/fs/cgroup
tmpfs            195M   16K  195M   1% /tmp
/dev/mmcblk0p8    55M   39M   12M  77% /boot
/dev/mmcblk0p9    14M  5.9M  6.8M  47% /vendor
tmpfs            195M   96K  195M   1% /var/volatile
/dev/mmcblk0p11   14G   45M   13G   1% /usr/local
tmpfs             39M  4.0K   39M   1% /run/user/1000
tmpfs             39M     0   39M   0% /run/user/0
Where:
| Filesystem | Source of the mount point, usually a device |
| Size | Total size in human readable format (e.g. 1K, 234M, 2G) |
| Used | Used size in human readable format |
| Available | Available size in human readable format |
| Use% | Percentage of used size divided by the total size |
| Mounted on | Mount point |
Note: the user file system (userfs) and the boot file system (bootfs) are accessible respectively through the /usr/local mounting point, and the /boot mounting point (see Flash partitions for a description of the file systems).
12. Examples[edit | edit source]
12.1. Examples for A35-TD flavor [edit | edit source]
12.1.1. Examples running on Cortex-A35[edit | edit source]
The table below gathers links towards articles proposing examples of peripherals usage.
| Link to the example |
|---|
| Playing an audio/video local file |
| Playing an audio/video stream |
| Displaying an image |
| Running a simple 3D example (GPU usage) |
| Displaying a fullscreen camera preview |
| Taking a picture |
12.1.2. Examples running on Cortex-M33[edit | edit source]
Refer to STM32CubeMP2 Starter Package and STM32CubeMP2_Package#Examples--applications--and_demonstrations articles to have list of supported examples.
12.2. Examples for M33-TD flavor [edit | edit source]
12.2.1. Examples running on Cortex-A35[edit | edit source]
The table below gathers links towards articles proposing examples of peripherals usage.
| Link to the example |
|---|
| Playing an audio/video local file |
| Playing an audio/video stream |
| Displaying an image |
| Running a simple 3D example (GPU usage) |
| Displaying a fullscreen camera preview |
| Taking a picture |
12.2.2. Examples running on Cortex-M33[edit | edit source]
Refer to STM32CubeMP2_Package#Examples--applications--and_demonstrations articles to have list of supported examples.
13. Fast links to essential commands[edit | edit source]
If you are already familiar with the Starter Package for the Yocto-based OpenSTLinux embedded software, fast links to the essential commands are listed below.
| With the links below, you will be redirected to other articles; use the back button of your browser to come back to these fast links |
14. How to go further?[edit | edit source]
Now that the image is flashed on the STM32MP25 Discovery kits, it is possible to switch to the STM32MPU Developer Package in order to modify or tune the Yocto-based OpenSTLinux embedded software with the user own developments.
Arm® is a registered trademark of Arm Limited (or its subsidiaries) in the US and/or elsewhere. ![]()