1. Introduction[edit | edit source]
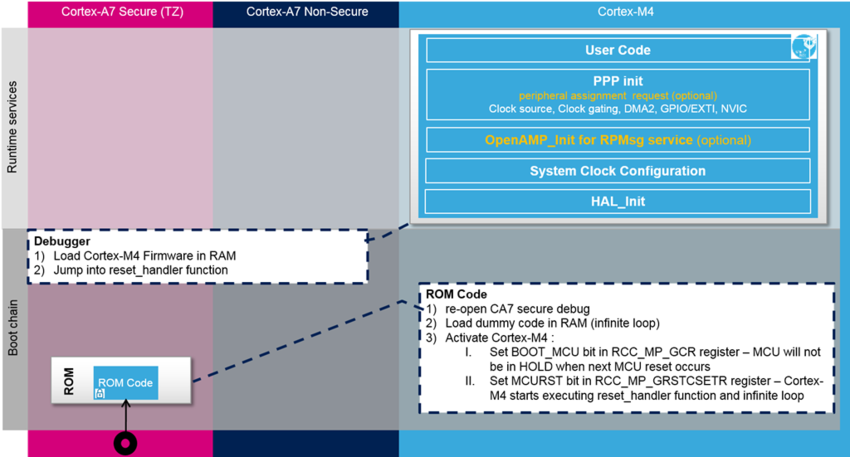
To simplify the development of the STM32MP1 ecosystem coprocessor firmware, the Cortex®-M4 firmware can be developed in a stand-alone « MCU Single Core like » way called « Developer mode». It removes the complexity of multiprocessor system development such as inter processor communication, system resources management...; and focuses on « real-time » application development.
An application can dynamically detect if the STM32MP1 is running in developer or production mode through the SYSCFG_BOOTR register.
- A macro IS_ENGINEERING_BOOT_MODE() is provided in CMSIS device file for that purpose.
- Most of available projects support both developer and production modes.
This article describes how to initialize the STM32CubeMP1 Arm® Cortex®-M4 Software in Engineering mode and when ready move to Production mode.
Finally, detailed description of each step is given together with sample code.
Notes:
|
2. Boot modes[edit | edit source]
The STM32MP1 can be run in 2 different boot modes : Production boot mode (default mode) and Engineering boot mode
2.1. Production boot mode[edit | edit source]
Firmware is loaded into the Cortex-M coprocessor by the master processor (Cortex-A7 - Flash Memory boot mode), this means:
- System resources are managed directly by OpenSTLinux (clocks, regulators, and so on)
- the pre-built pieces of firmware are provided/downloaded in an OpenSTLinux image or file system
- the pre-built firmware is launched on the coprocessor through the Linux Remote Proc component
- Cortex-A firmware (Linux OS) is in charge of loading the Cortex-M firmware
Notes: At boot time, you can select 3 kernel configurations:
Example for STM32MP157C-DK2 board: Select the boot mode 1: stm32mp157c-dk2-sdcard 2: stm32mp157c-dk2-a7-examples-sdcard 3: stm32mp157c-dk2-m4-examples-sdcard |
2.2. Developer boot mode[edit | edit source]
The developer boot mode (also known as "engineering boot mode") is used specifically for firmware testing directly on the Cortex-M coprocessor, this means:
- all resources are managed directly in the example source code (clocks, regulators, and so on)
- the firmware can be loaded directly from your favorite IDE
Most of the examples can be used in Developer boot mode (except those that require firmware running on a Cortex-A7, such as the OpenAMP examples)
Notes:
|
3. Arm® Cortex®-M4 startup in developer mode (“MCU Single Core like”)[edit | edit source]
The Developer mode allows the user to connect a debugger on an open chip, load and debug the Arm® Cortex®-M4 firmware in an “MCU like world”. In this mode, STM32CubeMP1 initialization steps are similar to a single CPU MCU device.
There are some rules that need to be followed in order to develop in developer mode (also known as "engineering mode") :
- Peripheral assignment request (ResMgr_Request) is a multicore instruction and can be integrated into the code when developing the developer mode firmware.
- ResMgr_Request is based on an ETZPC peripheral features. In developer mode (also known as "engineering boot mode") , ETZPC configuration makes all resources accessible to the Arm® Cortex®-M4 and therefore ResMgr_Request will return True in any case.
- OpenAMP_Init for RPMsg service (MX_OPENAMP_Init) is NOT executed in developer mode (also known as "engineering mode") as there are blocking step in RPMsg framework initialization code running on the Arm® Cortex®-A7 (rproc_virtio_wait_remote_ready). The call to MX_OPENAMP_Init can masked by the macro call if (!IS_ENGINEERING_BOOT_MODE())
4. Arm® Cortex®-M4 startup in production mode[edit | edit source]
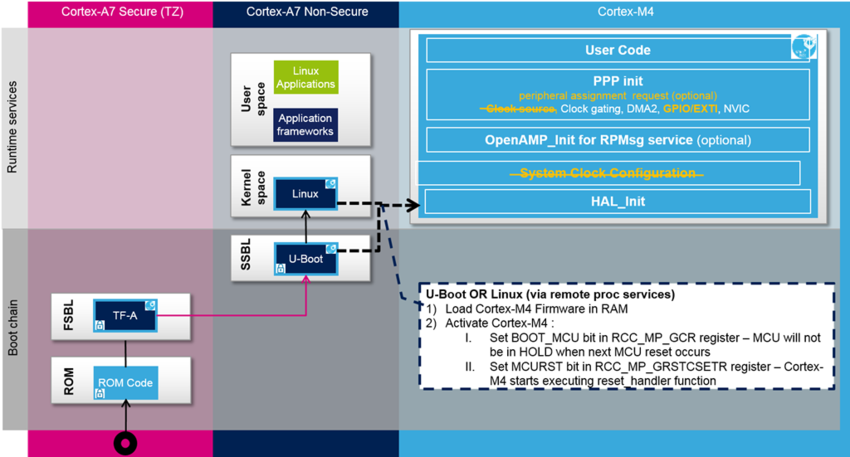
The Arm® Cortex®-M4 STM32CubeMP1 firmware is started by running OpenSTLinux on Arm® Cortex®-A7.
It can be started by a U-Boot with the remoteproc feature (rproc command) or, later, by Linux remoteproc framework, depending on the application startup time targets.
In order to move the Arm® Cortex®-M4 application from developer (also known as "engineering boot mode") to production mode, the following 4 items need to be addressed:
- System clock configuration (SystemClock_Config()) is "done" by running the FSBL on Arm® Cortex®-A7. Beware, this function call shall NOT be executed in production mode. SystemClock_Config() shall be under if(IS_ENGINEERING_BOOT_MODE()).
- Clock source of each peripheral is also done by running the FSBL on Arm® Cortex®-A7 and the function call (HAL_RCCEx_PeriphCLKConfig()) shall be done under if(IS_ENGINEERING_BOOT_MODE()).
- GPIO configuration PERIPH_LOCK service (hardware semaphore) can be used to protect the (HAL_GPIO_Init/HAL_GPIO_DeInit()).
- If the GPIO bank is used by both Arm® Cortex®-A7 and Arm® Cortex®-M4, this GPIO bank is seen as a shared resource. Some GPIO registers are not designed to support concurrent core accesses and they need be protected by hardware semaphore.
- EXTI configuration (HAL_EXTI_SetConfigLine()) for configurable events shall be protected by PERIPH_LOCK service (hardware semaphore).
- EXTI is a shared resource and registers used for configurable events are not designed to support concurrent core accesses and they have to be protected by hardware semaphore.
5. How to log in production mode[edit | edit source]
On top of all the different tools supporting STM32CubeMP1 debugging, the different examples have integrated in a way to log STM32CubeMP1 firmware visible from Linux (so, only valid for production mode).
A resource table entry is dedicated for that, see: How to add trace for the log buffer.
The principle:
- "__LOG_TRACE_IO_" preprocessor flag needs to be defined
- The logs done with log_info() or log_err() functions will be available in Linux sysfs file: "/sys/kernel/debug/remoteproc/remoteproc0/trace0"
These logs can be retrieved after a firmware crash: refer to How to retrieve Cortex-M4 logs after crash for more information.

