1. Introduction[edit | edit source]
Besides offering the STMicroelectronics USB stack, USBX, the Azure® RTOS USB embedded stack is currently supported and offered with a set of applications running on STM32 MPUs.
USBX is the Azure® RTOS USB Host and USB Device embedded stack. It is tightly coupled with ThreadX. In some classes, it requires the FileX and NetX Duo stacks. It allows operation with USB devices with multiple configurations, composite devices, and USB OTG.
USBX provides both USB Host and USB Device stacks with a large set of USB classes. The modular architecture makes porting onto different USB hardware internal peripherals easier as soon as the low-level driver can answer the USBX requests.
All the STM32 USB internal peripherals (Host, Device, OTG, high_speed, and full_speed) are supported transparently by USBX through the common STM32 HAL driver API.
USBX provides all common USB features and classes. The following figure provides the list of currently supported classes:
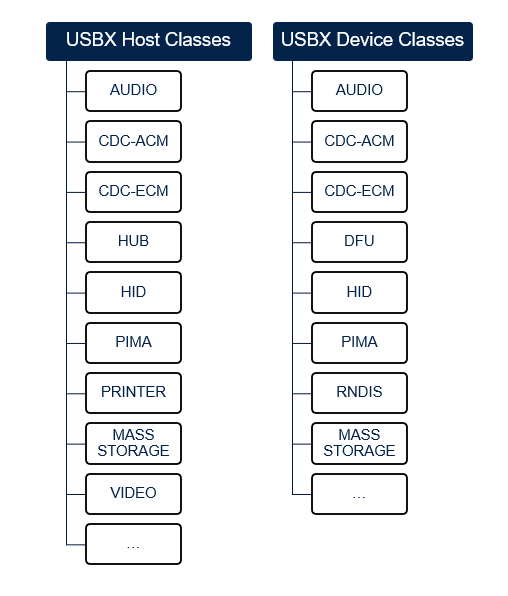
| HUB class is to be made available in the future on specific products. |
Besides ThreadX integration with USBX, the USB events are managed through interrupts.
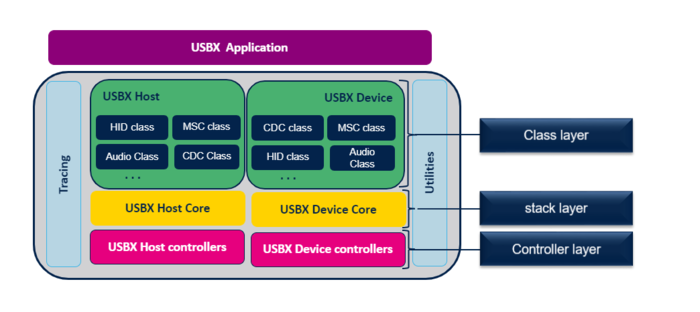
The USBX stack has mainly three layers:
- The lower layer is the controller layer that ensures interfacing with the hardware USB peripheral. For STM32 MPUs, this layer is compatible with the HAL.
- The middle layer ensures the USB stack processing and the interfacing requirements between the low and high layers.
- The higher layer includes the different classes and ensures interfacing with the application layer.
The following figure provides an overview of the USBX three-layer architecture and main components.
As presented in the following figure, the different layers can be easily found within the USBX folder.
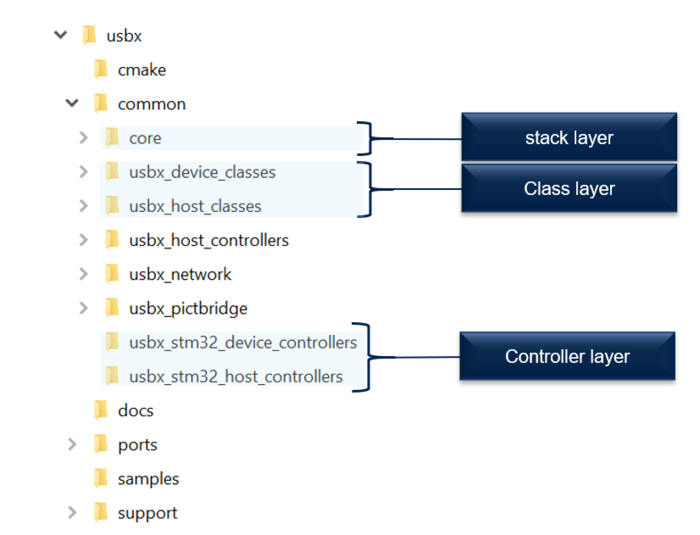
| For more details, refer to Azure® RTOS USBX documentation[1]. |
| For frequently asked questions, visit the general FAQ section in the introduction to Azure® RTOS with STM32 article. |
2. USBX Device for STM32[edit | edit source]
This section provides the main guidelines to use the USBX Stack with the HAL on STM32 MPUs.
2.1. STM32 device porting layer[edit | edit source]
As described in the previous section, USBX is based on three layers that must be referenced within any application project.
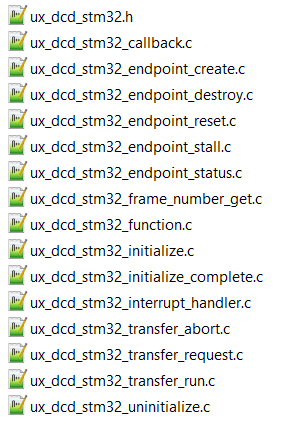
To be able to interface with the STM32 HAL, the project must integrate the STM32 device controllers.
The drivers presented in the figure below include all the APIs allowing interfacing with the STM32 HAL.
2.2. How to customize the USBX Device for STM32[edit | edit source]
After referencing the required drivers, and depending on the class and application requirements, do the following:
1. Add the convenient descriptors: the device descriptor, the configuration descriptor, the interface descriptor, the endpoint descriptor, and the strings (language ID, product ID, vendor ID, manufacturer, and more).
The following figure shows some of the required definitions for the HID class:

| For reference, all the required descriptors can be found in the ux_device_descriptors.c/.h files within the provided STM32 HID device application. |
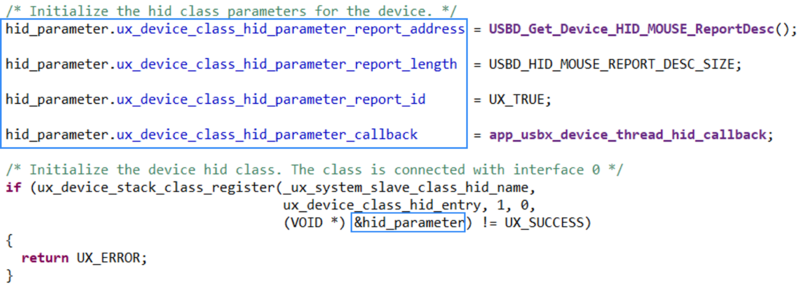
2. Add the class parameters: every class needs to interface with the user application through some variables or functions. Thus, for every class, a structure must be filled before registering the class.
As an example for the HID application, the following structure must be filled in order to be able to register the class:
3. Customize the USBX build options by modifying the status of the different conditional compilation elements defined in the ux_user.h file, such as:
• the USBX thread stack size,
• the maximum class number that can be loaded by USBX,
• the maximum number of devices that can be attached into one USB system,
• the maximum number of endpoints,
• the device used classes,
• the device state side use.
4. Initialize all required peripherals and resources. Depending on the application requirements (UART, I2C and more), all required peripherals must be initialized, generally in the stm32XXxx_hal_msp.c file, where XX corresponds to the lines name (For example, STM32MP13x lines ![]() ) .
) .
| To make sure that all the customizations defined in the ux_user.h file are considered, UX_INCLUDE_USER_DEFINE_FILE should be added within the preprocessor defined symbols. |
When configuring the project, a list of variables can be customized, before building a device application.
2.3. How to use the USBX Device stack to implement an application[edit | edit source]
1. To start the USBX application, ThreadX must be initialized as described in How to use ThreadX section.
2. Initialize the USBX controller data structures and allocate the required memory.
  /* Initialize USBX Memory & data structures */
  ux_system_initialize(pointer, USBX_MEMORY_SIZE, UX_NULL, 0);
3. Prepare the device, string and LangID frameworks.
  /* Get_Device_Framework_High_Speed and get the length */
  device_framework_high_speed = USBD_Get_Device_Framework_Speed(USBD_HIGH_SPEED,
                                &device_framework_hs_length);

  /* Get_Device_Framework_Full_Speed and get the length */
  device_framework_full_speed = USBD_Get_Device_Framework_Speed(USBD_FULL_SPEED,
                                &device_framework_fs_length);

  /* Get_String_Framework and get the length */
  string_framework = USBD_Get_String_Framework(&string_framework_length);

  /* Get_Language_Id_Framework and get the length */
  language_id_framework = USBD_Get_Language_Id_Framework(&languge_id_framework_length);
| The descriptors must be implemented at application level to be provided as parameters when initializing the stack. For reference, all the required descriptors can be found in the ux_device_descriptors.c/.h files within every provided STM32 device application. |
4. Initialize the USBX Device stack with the prepared frameworks.
  /* The code below is required for installation of the device portion of USBX.
  in this application */
  ret =  ux_device_stack_initialize(device_framework_high_speed,
                                    device_framework_hs_length,
                                    device_framework_full_speed,
                                    device_framework_fs_length,
                                    string_framework,
                                    string_framework_length,
                                    language_id_framework,
                                    languge_id_framework_length, UX_NULL);
5. Initialize the device class parameters and register the class.
  /* Initialize the device class. The class is connected with interface 0 in this case */
  ret = ux_device_stack_class_register(_ux_system_slave_class_xxxx_name,
                                       ux_device_class_xxxx_entry, 1, 0, (VOID *)&class_xxxx_parameter);
6. Initialize the USB hardware peripheral and start the controller.
7. Implement the required applications tasks using Threads or Message Queue as explained in How to use ThreadX section.
| The bare metal implementation is to be made be available in the future (ie. to make possible the use of USBX without ThreadX). |
2.4. USBX Device applications[edit | edit source]
This section provides an overview of the USBX Device applications offered on STM32 MPUs.
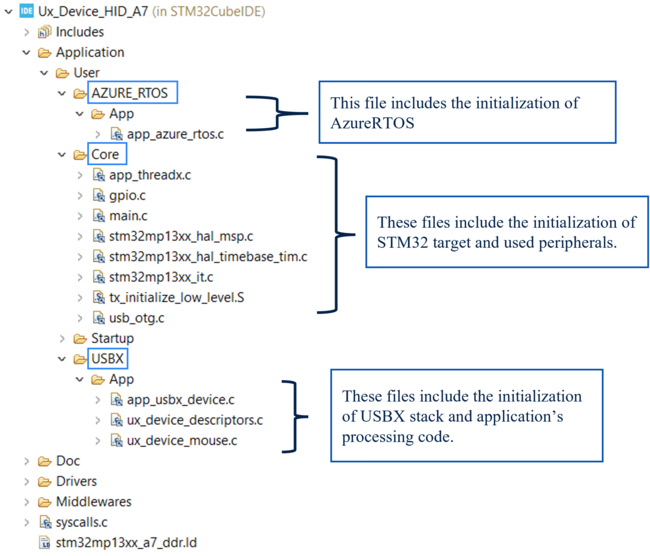
2.4.1. USBX Device application architecture[edit | edit source]
The following figure shows the project architecture and main application files.
3. USBX Host for STM32[edit | edit source]
This section provides the main guidelines to use the USBX Host stack with the HAL on STM32 MPUs.
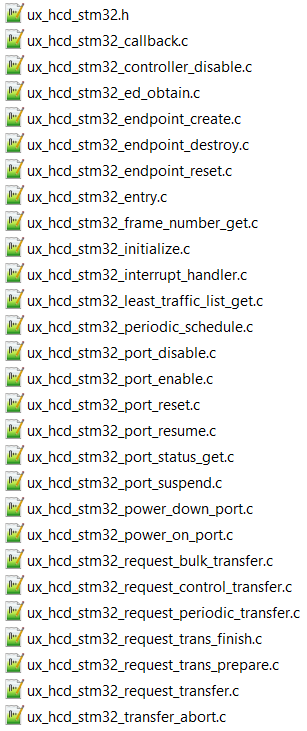
3.1. STM32 host porting layer[edit | edit source]
As described in the previous section, the USBX stack is based on three layers that must be referenced within any application project. To be able to interface with the STM32 HAL, the project must integrate the STM32 host controllers interfacing with the HAL layer. The drivers presented in the figure below include all the APIs allowing the interfacing with the STM32 HAL.
3.2. How to customize the USBx Host for STM32[edit | edit source]
1. Customize the USBX build options by modifying the status of the different conditional compilation elements defined in the ux_user.h file, such as:
• the USBX thread stack size,
• the maximum class number that can be loaded by USBX,
• the maximum number of devices that can be attached into one USB system,
• the maximum number of endpoints,
• the host used classes,
• the host state side use.
2. Depending on the application requirements, the different peripherals and clocks should be correctly defined. Generally, the different peripheral IO initializations are done in the stm32XXxx_hal_msp.c, where XX refers to the STM32 family (For example, STM32MP13x lines ![]() ).
).
| To make sure that all the customized defines in the ux_user.h file are taken into consideration, the "UX_INCLUDE_USER_DEFINE_FILE" should be added within the preprocessor defined symbols. |
3.3. How to use the USBX Host stack to implement an application[edit | edit source]
1. To start the USBX application, ThreadX must be initialized as described in How to use ThreadX section.
2. Initialize the USBX different data structures to be used by the USB system.
  /* Initialize USBX memory. */
  if (ux_system_initialize(pointer, USBX_MEMORY_SIZE, UX_NULL, 0) != UX_SUCCESS)
  {
    ret = UX_ERROR;
  }
3. Register an error callback function to be able to get the error events at application level (this step is optional). This callback is called when an error occurs at thread level or at interrupt level. It can be called to inform the user of the error codes that can be related to the host controller, the device controller, the initialization, the class, the device stack, and more.
  /* register a callback error function */
  _ux_utility_error_callback_register(&ux_host_error_callback);
4. Initialize the USB Host stack.
  /* The code below is required for installing the host portion of USBX.  */
  if (ux_host_stack_initialize(ux_host_event_callback) != UX_SUCCESS)
  {
    status = UX_ERROR;
  }
Device status check: The function ux_host_stack_initialize() allows the initialization of the USB host stack. It takes a change event callback as a parameter, allowing the user application to determine whether the device status is defined. This callback, if required, should be defined at application level. It is called when the device status is modified (inserted, removed, and so on) allowing the user to perform the required process following that event.
5. Register the class.
  /* Register the convenient class. */
  if ((status =  ux_host_stack_class_register(_ux_system_host_class_xxxx_name,
                                              _ux_host_class_xxxx_entry)) != UX_SUCCESS)
  {
    status = UX_ERROR;
  }
6. Initialize the USB hardware peripheral.
7. Register all the available USB Host controllers with the USBX stack.
  /* Register all the USB host controllers available in this system. */
  if (ux_host_stack_hcd_register(_ux_system_host_hcd_stm32_name,
                                 _ux_hcd_stm32_initialize,
                                 USB_OTG_HS_PERIPH_BASE,
                                 (ULONG)&hhcd_USB_OTG_HS) != UX_SUCCESS)
  {
    status = UX_ERROR;
  }
7. Define and create the application required Threads or Message Queue.
8. Start the USB Host controller.
3.4. USBX Host applications[edit | edit source]
This section provides an overview of the offered USBX Host application.
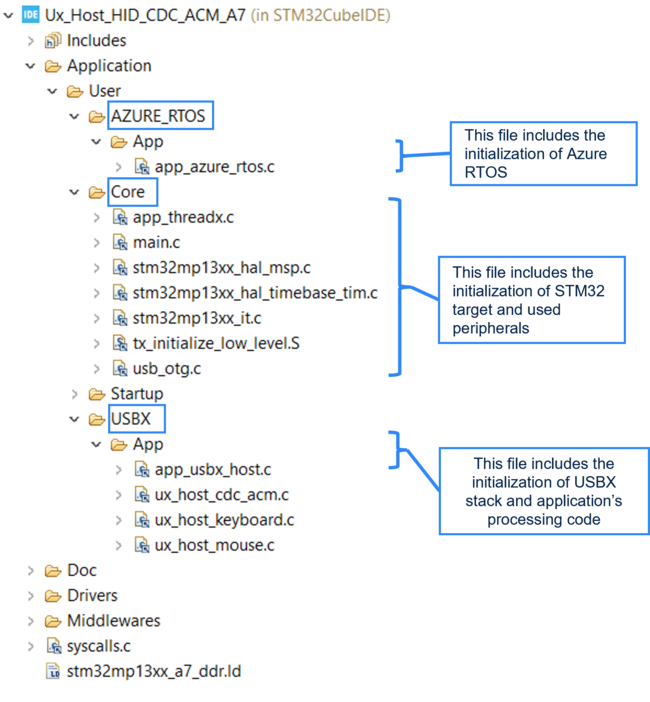
3.4.1. USBX Host application architecture[edit | edit source]
The following figure shows the USB Host application main files and architecture.
4. STM32 USB-USBX migration[edit | edit source]
Commonly for all applications, it is up to the user to initialize the HAL layer through HAL_Init(), the MPU configuration (if required), the system clocks through SystemClock_Config(), and the different hardware peripherals that are used in the application (such as UART/USART, SD card, I2C, and SPI).
4.1. Migration from USBD to USBX Device[edit | edit source]
USB Device framework builder:
For the STM32 USB applications that are based on the USB Device library, the user only has to register the convenient class in the application. All the class-dependent descriptors (such as configuration and device qualifier descriptors) are provided automatically when requested within the class layer.
For USBX-based applications, it is up to the user to build the required descriptors in the framework. Thus, a dedicated framework builder API has been implemented to make this task easier. In fact, this API ensures the implementation of the required USB descriptors at application level (such as device descriptors, configuration descriptors and specific class descriptors).
The USB Device initialization and configuration are mainly ensured by calling, in the application layer, the APIs described in the table below:
| Application based on STM32 USB Device stack | Application based on USBX Device stack |
|---|---|
| USBD_Init () initializes the device stack and registers the class driver.
Before calling this API, the user must:
|
ux_system_initialize() initializes USBX memory and data structures. ux_device_stack_initialize() initializes the USB Device stack. This API takes as parameters the different frameworks that the user has to define in the application.
|
| USBD_RegisterClass () links the class driver to the device core. The different common descriptors (configuration, qualifier and class descriptors) are provided within the class layer. The user must add the device descriptor. | ux_device_stack_class_register() registers the convenient class with the convenient parameter structures for every class as explained in How to customize section. |
| USBD_Start () starts the USB device core including the device driver (no need to call HAL_PCD_Start() as this was already done inside the USBD_Start() function). | ux_device_stack_pcd_register () initializes the USBX Device stack with the prepared frameworks.
When the initialization is complete, the device driver must be started by calling HAL_PCD_Start() in the application. |
4.2. Migration from USBH to USBX Host[edit | edit source]
The USB Host initialization and configuration is mainly ensured by calling, in the application layer, the APIs described in the table below:
| Application based on STM32 USB Host stack | Application based on USBX Host stack |
|---|---|
| USBH_Init () initializes the host library and loads the class driver. It includes the USB Host driver initialization by calling HAL_HCD_Init() which, in turn, ensures the USB hardware peripheral initialization by calling the HAL_HCD_MspInit (). This last HAL function must be overloaded by the user at application level, to include the correct initialization (such as USB GPIOs, clock, interrupt enabling and correct priority configuration).
USBH_Init () also ensures the low-level driver parameter initialization (such as speed, DMA enable, low-power enable and PHY interface) by calling USBH_LL_Init(). As a result, this last LL function must be overloaded at application level and then called in the core layer. |
ux_system_initialize() initializes the USBX data structures to be used by the USB system. ux_host_stack_initialize () initializes the USB Host stack. This API takes as parameter a pointer to the host events callback that must be defined by the user (if required).
|
| USBH_RegisterClass () links the class driver to the host core. | ux_host_stack_class_register() registers the convenient class. |
| USBH_Start () starts the USB host core including the Host driver (no need to call HAL_HCD_Start() as this was already done inside the USBH_Start() function). | ux_host_stack_hcd_register () registers all the available USB Host controllers with the USBX stack.
When the initialization is complete, the application must:
|
| USBH_Process() must be called to manage the background process of the USB core. | This process is currently managed through threads with ThreadX. |
5. References[edit | edit source]