This article explains some of the basics of STM32CubeIDE support for STM32 MPU. STM32CubeIDE is an all-in-one multi-OS development tool, which is part of the STM32Cube ecosystem.
For more information about STM32CubeIDE, refer to its user guide.
1. STM32CubeIDE purpose[edit | edit source]
STM32CubeIDE is an advanced C/C++ development platform with peripheral configuration, code generation, code compilation, and debug features for STM32 microcontrollers and microprocessors. It is based on the Eclipse®/CDT framework, GCC toolchain for the development and GDB for the debugging.
It allows the integration of the hundreds of existing plugins that complete the features of the Eclipse® IDE..
With STM32CubeIDE, you can
- select the appropriate STM32 device corresponding to your needs from Empty projects.
- Cube projects need to be imported in STM32CubeIDE after being created by STM32CubeMX.
- configure the device using STM32CubeMX
- develop and debug applications on top of Arm® Cortex®-M
2. How to install STM32CubeIDE[edit | edit source]
STM32 MPU support, inside STM32CubeIDE, is available on Linux® and Windows® host PCs, but it is NOT on macOS®.
| STM32CubeIDE for Linux® host PC | STM32CubeIDE for Windows® host PC | |
|---|---|---|
| Download |
Version v2.2.0
|
Version v2.2.0
|
| Installation guide | ||
| User manual | ||
| Detailed release note |
| |
| Restrictions | Main restrictions are identified in this chapter
| |
Minor releases may be available from the update site. Check chapter 10 in (UM2609) for more information on how to update STM32CubeIDE.
STM32 MPU support, inside STM32CubeIDE, is available on Linux® and Windows® host PCs, but
it is NOT on macOS®.
| STM32CubeIDE for Linux® host PC | STM32CubeIDE for Windows® host PC | |
|---|---|---|
| Download |
Version v2.1.0
|
Version v2.1.0
|
| Installation guide | ||
| User manual | ||
| Detailed release note |
| |
| Restrictions | Main restrictions are identified in this chapter
| |
Minor releases may be available from the update site. Check chapter 10 in (UM2609) for more information on how to update STM32CubeIDE.
2.1. STM32CubeIDE v2.0.0 - MPU support[edit | edit source]
2.1.1. Supported features[edit | edit source]
Same features than #STM32CubeIDE v1.19.0 - MPU support
2.1.2. Main changes[edit | edit source]
- STM32CubeIDE is now independent from STM32CubeMX.
With this release, device configuration, previously handled within STM32CubeIDE via STM32CubeMX, is now exclusively available through the stand-alone STM32CubeMX tool.
Users must configure microcontroller peripherals and generate initialization code separately in STM32CubeMX, then import the generated projects into STM32CubeIDE for coding and debugging.
STM32CubeIDE, is now a stand-alone tool, offers the possibility to create empty project through its own processor and board selectors now present inside.
- What does this change mean for developers?
- Separate download and installation: STM32CubeMX is no more integrated in STM32CubeIDE, requiring separate download alongside STM32CubeIDE 2.0.0 for configuration and code generation.
- Tool update flexibility: Developers can update and freeze STM32CubeMX and STM32CubeIDE independently, with multiple versions of each installed side-by-side.
- Memory footprint and performance: Removing STM32CubeMX integration reduces installation size (~3.7GB to 2.9GB) and lowers CPU/RAM usage, improving stability especially on Linux.
- For additional details, refer also to this link at:
- User authentication removed
- ST-MCU-FINDER-PC removed
- Support for ST-ARM-CLANG, STMicroelectronics LLVM-based toolchain for Arm®, through site update mechanism
- Support for GCC 14 toolchain through site update mechanism
- Support for bundled CMake/Ninja binaries
2.1.3. Main restrictions[edit | edit source]
If STM32CubeIDE v2.0.0 is installed from scratch and if the imported project in STM32CubeIDE v2.0.0 is a project generated with STM32CubeMX v6.16, then it is not possible to install the OpenSTLinux plugin, consequently, it is not possible neither to import OSTL Projects: Linux, Optee, TF-A, U-Boot.
In order to work around this, the following is recommended:
- Install STM32CubeIDE 1.19.0
- Install OpenSTLinux plugin v6.1.0 in STM32CubeIDE 1.19.0
- Import the concerned projects (Linux, Optee, TF-A, U-Boot)
Help>Check for updates> selectSTM32CubeIDE 2.0.0>Next>Finish- Then restart the STM32CubeIDE.
To have the full restrictions list, refer to STM32CubeIDE errata (This page is available in the stm32mcu wiki, be aware that, visiting this page, you will leave the stm32mpu wiki)
2.1.4. How to get STM32CubeIDE v2.0.0[edit | edit source]
STM32 MPU support, inside STM32CubeIDE, is available on Linux® and Windows® host PCs, but it is NOT on macOS®.
| STM32CubeIDE for Linux® host PC | STM32CubeIDE for Windows® host PC | |
|---|---|---|
| Download |
Version v2.0.0
|
Version v2.0.0
|
| Installation guide | ||
| User manual | ||
| Detailed release note |
| |
| Restrictions |
| |
Minor releases may be available from the update site. Check chapter 10 in (UM2609) for more information on how to update STM32CubeIDE.
2.2. STM32CubeIDE v1.19.0 - MPU support[edit | edit source]
2.2.1. Supported features[edit | edit source]
This version of STM32CubeIDE provides support:
- for the Arm® Cortex®-M core, contained in the STM32MP15x lines
 , STM32MP25x lines , STM32MP23x lines and STM32MP21x lines - NEW
 - M33-TD flavor
 for STM32MP257x-EV1 Evaluation board and STM32MP215F-DK Discovery kit - NEW
 - for OpenSTLinux-v6.1 and Linux® user space projects in 32-bit and 64-bit,
- and for projects running on Arm® Cortex®-A: STM32CubeMP13 MPU Package projects or Project Utilities.
- GCC 13.3 as a default toolchain
- Updated to Eclipse® 2024-09
2.2.1.1. For Arm® Cortex®-M core[edit | edit source]
It provides:
- STM32MP1 & STM32MP2 sample or board selection,
- Device configuration,
- Target Status widget, with visibility management,
- Console management with capability to manually set-up non-ST console instead of automatic detection,
- Arm®Cortex®-M project creation, compilation and debug in two modes:
- Engineering mode, with Arm®Cortex®-M firmware download via JTAG/SWD on STM32MP1,
- redirection of semi-hosting on TCP port with openOCD
- Production mode, with Arm® Cortex®-M firmware download:
- Via Ethernet link to the LAN or point to point,
- Via Ethernet-over-USB for point-to-point connection,
- Engineering mode, with Arm®Cortex®-M firmware download via JTAG/SWD on STM32MP1,
- Live variable watch view,
- System analysis and real-time tracing (SWV),
- Check of ST-LINK firmware version,
- SFRs view support for register access,
- Remote target path project property (for production mode),
- Remote system explorer configuration,
- TCP console for semihosting output
2.2.1.2. For Arm® Cortex®-A core[edit | edit source]
2.2.1.2.1. With OpenSTlinux distribution[edit | edit source]
STM32CubeIDE version 1.19.0 brings support for OpenSTLinux-v6.1 projects with two modes: 32-bit for STM32MP1 and 64-bit for STM32MP2, on Linux® workstation only, including:
- Installation of Yocto SDK in 32-bit or 64-bit, external to STM32CubeIDE only - no dedicated Eclipse plugin,
- Installation of OpenSTLinux projects sources for STM32MP1 (32-bit) or STM32MP2 (64-bit), two Eclipse plugins - sources external to STM32CubeIDE project, user to provide paths to OpenSTLinux projects sources, see STM32MPU Developer Package for installation
- Linux®, project with:
- Standard build target (such as all, dtb, module and others), including STM32CubeMX-generated device tree,
- Support for running target update via "STM32 Cortex-A Linux Deployment" running configuration,
- Support of GCNANO project with build target
- TF-A project with standard build target,
- U-boot project with standard build target,
- OP-TEE project with standard build target,
- Support for OP-TEE trusted application creation and debug,
- Linux®, project with:
- Support of creation, build and debug of Linux® user space project types including:
- executable,
- static library,
- shared library,
- Debug via "weston" user for executable using GTK library
2.2.1.2.2. With STM32CubeMP13 MPU Package[edit | edit source]
- Support of creation, build and debug of STM32CubeMP13 MPU Package projects project types including executable only
2.2.1.2.3. With Project Utilities[edit | edit source]
- Support of import, build and debug of STM32 Projects Utilities in 32-bit and 64-bit
2.2.2. Main changes coming with new release[edit | edit source]
- STM32MP21x lines
- M33-TD flavor support for STM32MP257x-EV1 Evaluation board and STM32MP215F-DK Discovery kit
2.2.3. Main restrictions[edit | edit source]
None
2.2.4. Release update[edit | edit source]
Some new update of release has been done to solve previous restrictions.
- The Bootloader project for STM32MP1 series is now functional,
- OpenSTLinux plugin for STM32MP2 series is now functional for any TD flavor (A35-TD or M33-TD) on any STM32 MPU boards .
Following steps must be followed to integrate the correction on top of STM32ubbeIDE already installed or project already created (No need to re-install STM32CubeIDE-v1.19.0):
In order to install new OSTL MP1 plugins you need to:
- uninstall the older OSTL plugin if you have already installed one.
- reload updatesite for OpenSTlinux Releases.
- restart STM32CubeIDE and install the new one with OSGI version 202507300701.
- Check that you are pointing to the newest one through help -> About STM32CubeIDE -> Installation Details.

In order to install new OSTL MP2 plugins you need to:
- uninstall the older OSTL plugin if you have already installed one.
- reload updatesite for OpenSTlinux Releases.
- restart STM32CubIDE and install the new one with OSGI version 202509081623.
- Check that you are pointing to the newest one through help -> About STM32CubeIDE -> Installation Details.

2.2.5. How to get STM32CubeIDE v1.19.0[edit | edit source]
STM32 MPU support, inside STM32CubeIDE, is available on Linux® and Windows® host PCs, but it is NOT on macOS®.
| STM32CubeIDE for Linux® host PC | STM32CubeIDE for Windows® host PC | |
|---|---|---|
| Download |
Version v1.19.0
|
Version v1.19.0
|
| Installation guide |
| |
| User manual | ||
| Detailed release note |
| |
| Restrictions |
| |
Minor releases may be available from the update site. Check chapter 10 in (UM2609) for more information on how to update STM32CubeIDE.
2.3. STM32CubeIDE v1.17.0 - MPU support[edit | edit source]
2.3.1. Supported features[edit | edit source]
This version of STM32CubeIDE provides support
- for the Arm® Cortex®-M core, contained in the STM32MP15x lines , STM32MP23x lines and STM32MP25x lines - NEW
- for OpenSTLinux-v6.0 and Linux® user space projects in 32-bit and 64-bit,
- and for projects running on Arm® Cortex®-A: STM32CubeMP13 MPU Package projects or Project Utilities.
- GCC 12.3 as a default toolchain
- Updated to Eclipse® 2023-12
2.3.1.1. For Arm® Cortex®-M core[edit | edit source]
It provides :
- STM32MP1 & STM32MP2 sample or board selection,
- Device configuration,
- Target Status widget, with visibility management,
- Console management with capability to manually set-up non-ST console instead of automatic detection,
- Arm®Cortex®-M project creation, compilation and debug in two modes:
- Engineering mode, with Arm®Cortex®-M firmware download via JTAG/SWD on STM32MP1,
- redirection of semi-hosting on TCP port with openOCD
- Production mode, with Arm® Cortex®-M firmware download :
- Via Ethernet link to the LAN or point to point,
- Via Ethernet-over-USB for point-to-point connection,
- Engineering mode, with Arm®Cortex®-M firmware download via JTAG/SWD on STM32MP1,
- Live variable watch view,
- System analysis and real-time tracing (SWV),
- Check of ST-LINK firmware version,
- SFRs view support for register access,
- Remote target path project property (for production mode),
- Remote system explorer configuration,
- TCP console for semihosting output
2.3.1.2. For Arm® Cortex®-A core[edit | edit source]
2.3.1.2.1. With OpenSTlinux distribution[edit | edit source]
STM32CubeIDE version v1.17.0 brings support for OpenSTLinux-v6.0 projects with two modes: 32-bit for STM32MP1 and 64-bit for STM32MP2, on Linux® workstation only, including:
- Installation of Yocto SDK in 32-bit or 64-bit, external to STM32CubeIDE only - no dedicated Eclipse plugin,
- Installation of OpenSTLinux projects sources for STM32MP1 (32-bit) or STM32MP2 (64-bit), two Eclipse plugins - sources external to STM32CubeIDE project, user to provide paths to OpenSTLinux projects sources, see STM32MPU Developer Package for installation - NEW
- Linux®, project with:
- Standard build target (such as all, dtb, module and others), including STM32CubeMX-generated device tree,
- Support for running target update via "STM32 Cortex-A Linux Deployment" running configuration,
- Support of GCNANO project with build target
- TF-A project with standard build target including FIP image generation,
- U-boot project with standard build target,
- OP-TEE project with standard build target,
- Support for OP-TEE trusted application creation and debug,
- Linux®, project with:
- Support of creation, build and debug of Linux® user space project types including:
- executable,
- static library,
- shared library,
- Debug via "weston" user for executable using GTK library
2.3.1.2.2. With STM32CubeMP13 MPU Package[edit | edit source]
- Support of creation, build and debug of STM32CubeMP13 MPU Package projects project types including executable only
2.3.1.2.3. With Project Utilities[edit | edit source]
- Support of import, build and debug of STM32 Projects Utilities in 32-bit and 64-bit
2.3.2. Main changes coming with new release[edit | edit source]
- STM32MP23x lines support
2.3.3. How to get STM32CubeIDE v1.17.0[edit | edit source]
STM32 MPU support, inside STM32CubeIDE, is available on Linux® and Windows® host PCs, but it is NOT on macOS®.
| STM32CubeIDE for Linux® host PC | STM32CubeIDE for Windows® host PC | |
|---|---|---|
| Download |
Version v1.17.0
|
Version v1.17.0
|
| Installation guide | ||
| User manual | ||
| Detailed release note |
| |
| Errata |
| |
Minor releases may be available from the update site. Check chapter 10 in (UM2609) for more information on how to update STM32CubeIDE.
3. How to get started with STM32CubeIDE[edit | edit source]
This section links to two different how to articles depending on whether you are migrating from SW4STM32 to STM32CubeIDE or starting a new project with STM32CubeIDE.
3.1. How to create STM32CubeMPU project in STM32CubeIDE[edit | edit source]
How to create STM32CubeMPU project in STM32CubeIDE.
3.2. How to migrate from SW4STM32 to STM32CubeIDE[edit | edit source]
How to import SW4STM32 project in STM32CubeIDE
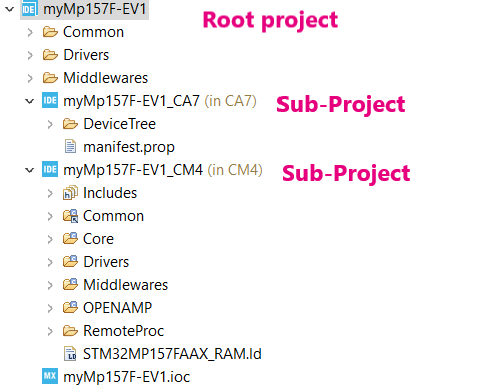
4. Project structure[edit | edit source]
A hierarchical project structure is created together with the creation of an STM32 MPU project.
The project structure for single-core projects is flat.
On the contrary, in a multi-core project, the hierarchical project structure is used.
When the user creates or imports an STM32 MPU project (multi-core project), its structure is made of one root project together with sub-projects, referred to as STM32 MCU projects, for each core. A hierarchical structure example is shown below.
5. Arm® Cortex®-M debug on STM32 MPU device[edit | edit source]
Two modes are used to debug Arm® Cortex®-M firmware on STM32 MPU devices.
5.1. Developer mode (STM32MP1 only)[edit | edit source]
Only for STM32MP1 series
Note:
|
Very powerful to debug preliminary Arm® Cortex®-M, the developer mode implies a specific boot mode: the developer boot mode where only the Cortex®-M is started. Firmware is loaded via JTAG/SWD into its dedicated RAM.
This mode is not the default one. It must be set via the "Debug Configuration" menu, in the "Debugger" tab , with "through JTGA/SWD link (developer mode)" option selected.
Debugging in developer mode, in an STM32 MPU device, is very similar to a standard STM32 MCU debug in terms of functionality, except that, in this case, the Arm® Cortex®-M core has only one dedicated memory, no Flash memory type.
5.2. Production mode[edit | edit source]
In production mode for STM32MP2 series, the Cortex®-A core runs a Linux® operating system that provides the high-level application environment and system services, including debugging support infrastructure. Meanwhile, the Cortex®-M core executes the real-time firmware application, typically developed and debugged using STM32CubeIDE.
The board, also named "target", is booted in the production mode from the Flash memory (example, the SD card); it is connected to the Host:
- via the Ethernet network, using an Ethernet cable or dedicated USB cable,
- and via a USB cable to the ST-LINK probe, giving access to the JTAG/SWD and Linux® console
ST-LINK automatically brings support for Cortex®-A Linux® console via VCP (Virtual COM port). This enables the Target Status widget, visible on the bottom-right of STM32CubeIDE panel, and allowing target IP address discovery. For production mode setup, it is recommended to get the target IP address discovered by the Target Status widget before creating the debug configuration. This principle is depicted in the Debug Configuration screenshot below.
Network connection can be set up in two ways:
- Ethernet
- managed network: IP address attributed by DHCP server
- unmanaged network: IP address to be manually configured
- USB
- using the dedicated USB OTG connection for Ethernet point to point.
Debug is performed though the following workflow:
1. The firmware built binary is transferred to the target using the network (SSH protocol), more precisely to the Cortex®-A Linux® file system.
2. Firmware is loaded to Cortex®-M core using the “remoteproc” framework.
3. Finally, the debug session is started via the JTAG/SWD connection
The production mode is the default one when you create a new debug configuration. It is automatically set via the "Debug Configuration" menu.

More information on how to use "STM32CubeIDE target status" are given in article How to use the Target Status widget in STM32CubeIDE.
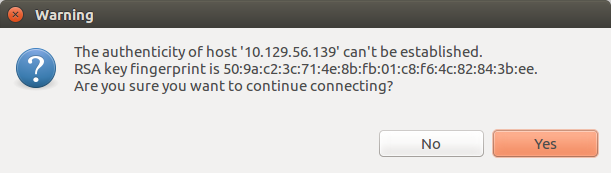
At debug launch, some specific pop-up appear:
- The SSH Password must be completed: the default one is root.
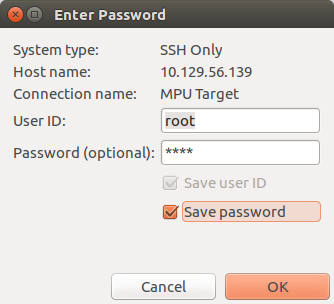
- The RSA key must be approved.
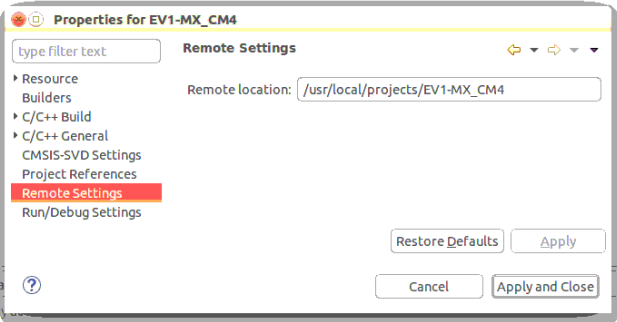
Defining an Arm® Cortex®-M project in an STM32 MPU context also means to define where are downloaded in the Arm® Cortex®-A Linux® file system:
- the Cortex®-M firmware: <ProjectName>.elf
- the load/unload script fw_cortex_m4.sh used by the STM32CubeIDE if present it can be customized
- and a README, informing a user having a direct connection onto the target.
This is the purpose of "Remote Path Setting" property which is linked to the project. Its default value at creation is /usr/local/project/<ProjectName>, but can also be changed using the Remote Settings properties item.
Inside project structure, directory "<ProjectName>_CM4/Core/RemoteProc/" defines the tree downloaded when debugging in the production mode.
Note: load script mechanism described above is NOT supported with STM32MP2 (RemoteProc/ shall not be present).
5.3. Secure Project (STM32MP2 only)[edit | edit source]
Only for STM32MP2 series
On STM32MP2 series}, Arm® Cortex®-M33 supports secure project, refer to How to build and debug secure project on Cortex-M33 coprocessor in STM32CubeIDE.
5.4. ST-LINK sharing support[edit | edit source]
It is possible to connect to an ST-LINK probe several applications, in parallel of openOCD. This support relies onto 'ST-Link Server'.
It is enabled by checking Shared ST-Link inside "Debug Configuration > Debugger > ST-Link Client Setup".
6. OpenSTLinux project support on Cortex®-A[edit | edit source]
On Linux® host ONLY, STM32CubeIDE supports OpenSTLinux projects and its associated Yocto Project® SDK:
- Yocto Project® SDK is referenced, pointing to an installation directory. Refer to STM32MPU_Developer_Package#Installing_the_SDK for local install.
- OpenSTLinux projects are first installed - see STM32MPU Developer Package - and imported inside STM32CubeIDE hierarchical project thanks to dedicated Eclipse® plugin to be installed - see How_to_import_and_build_STM32MPU_OpenSTLinux_projects_in_STM32CubeIDE
A contextual menu is available selecting the Cortex®-A sub-project (named <project-name>_CA7 on STM32MP1, <projet-name>_CA35 on STM32MP2):
- "Setup OpenSTLinux" - in charge of Yocto Project® SDK set-up and OpenSTLinux Eclipse® plugin installation
- "Import an OpenSTLinux Project..." - allowing to import one OpenSTLinux inside selected STM32Cube project

Note that Yocto Project ® SDK set-up can also be made from "Window > Preferences" menu selecting "OpenSTLinux SDK Manager" menu from "STM32Cube" preferences.
It exists two flavors for OpenSTLinux plugins:
- STM32MP1 source support plugin requiring 32-bit Yocto Project® SDK
- STM32MP2 source support plugin requiring 64-bit Yocto Project® SDK
These Eclipse® plugins allow to easily import OpenSTLinux projects.
Note that a minimum disk space of 5 GBytes is needed under "/tmp" during the installation phase.
6.1. How to install Yocto Project® SDK in STM32CubeIDE[edit | edit source]
This article How to install the Yocto Project SDK in STM32CubeIDE explains how to point to an already existing SDK installation.
6.2. How to import and build OpenSTLinux projects[edit | edit source]
All projects from OpenSTLinux can be imported inside STM32CubeIDE and are available for compilation with Yocto Project® SDK.
See How to import and build STM32MPU OpenSTLinux projects in STM32CubeIDE.
6.3. How to develop a user space application[edit | edit source]
STM32CubeIDE provides support for creating, building and debugging projects aiming to run into the Linux® user space of STM32 MPUs. This includes executable, static and shared library.
6.4. How to develop a OP-TEE trusted application[edit | edit source]
STM32CubeIDE provides support for creating, building and debugging projects aiming to run into the Linux® user space of STM32 MPUs with support of secure service thanks to OP-TEE trusted application.
7. For M33-TD flavor STM32MP2 support[edit | edit source]
STM32CubeIDE provides support for importing, building and debugging projects based onto MCUboot. It is recommended to first read the TF-M overview article.
STM32MP2 project with M33-TD flavor ![]() must be created thanks to STM32CubeMX.
must be created thanks to STM32CubeMX.
As depicted hereafter, for full support, this STM32CubeIDE project needs:
- to be opened in STM32CubeIDE providing:
- Cortex®-M33 non-secure STM32CubeIDE project
- device trees sources for Cortex®-M33 and Cortex®-A35
- TF-M CMake project needs to be imported providing sources for:
- MCUboot
- TF-M
- OpenSTLinux Makefile projects need to be imported providing sources for:
- TF-A
- U-Boot
- OPTEE
- Linux

Refer to :
- How to migrate STM32CubeMPU examples from A35-TD flavor to M33-TD flavor
- How to import, build and debug secure project for Cortex-M33 in STM32CubeIDE for M33-TD flavor
- How to import, build and debug STM32CubeMP2 StarterAppM33TD demonstration in STM32CubeIDE
- How to port StarterAppM33TD demonstration to a new board
- How to build STM32CubeMPU package for M33-TD flavor with different boot storage profiles
Arm® is a registered trademark of Arm Limited (or its subsidiaries) in the US and/or elsewhere. ![]()
Arm® is a registered trademark of Arm Limited (or its subsidiaries) in the US and/or elsewhere. ![]()