This article explains how to get and install the X-LINUX-QT starter package.
X-LINUX-QT starter package is not delivered for versions v2.2.0 and v2.3.0 compatible respectively with Yocto-based OpenSTLinux embedded software v6.1.0 / Yocto-based OpenSTLinux embedded software v6.2.0.
Nevertheless the starter package can be generated thanks to the X-LINUX-QT_Distribution_Package. This article is still useful for this version of X-LINUX-QT expansion package.
X-LINUX-QT starter package v2.1.0 compatible with Yocto-based OpenSTLinux embedded software v6.0.0 is provided by ST.
1. Prerequisites[edit | edit source]
Needed prerequisites are described in X-LINUX-QT expansion package#Prerequisites.
2. Get and install X-LINUX-QT starter package[edit | edit source]
2.1. Get and install X-LINUX-QT starter package v2.2.0 or v2.3.0[edit | edit source]
The X-LINUX-QT starter package v2.2.0 /v2.3.0 is compatible resp. with Yocto-based OpenSTLinux embedded software v6.1.0/Yocto-based OpenSTLinux embedded software v6.2.0.
2.1.1. Generate the X-LINUX-QT starter package image[edit | edit source]
The X-LINUX-QT starter package must be generated following instructions available in X-LINUX-QT_Distribution_Package#Re-build_the_X-LINUX-QT_starter_package.
2.1.2. Load the generated image in the board[edit | edit source]
When the image st-image-qt is available, it must be loaded in the board.
"How to load an image in an ST board" is explained in' Image flashing' chapter available in one of articles available in Category:Starter Package : find the one corresponding to your ST board, and follow the flashing instructions.
2.1.3. Boot the board[edit | edit source]
When the image st-image-qt has been loaded in the board, the board must be boot.
"How to boot an ST board" is explained in' Booting the board' chapter available in one of articles available in Category:Starter Package: find the one corresponding to your ST board, and follow the flashing instructions.
2.2. Get and install X-LINUX-QT starter package v2.1.0 - archive[edit | edit source]
Click on EXPAND, displayed on the right of the line, if you want to know how to install the X-LINUX-QT starter package v2.1.0
The X-LINUX-QT starter package v2.1.0 is compatible with Yocto-based OpenSTLinux embedded software v6.0.0.
2.2.1. Install OpenSTLinux starter Package[edit | edit source]
As additional prerequisite of X-LINUX-QT starter package, get and install the Yocto-based OpenSTLinux embedded software v6.0.0.
All articles relative to starter packages are available in Category:Starter Package: find the one corresponding to your ST board, and follow the installation instructions (if not yet done), before going further.
Thanks to the starter package, the Flash partitions are populated.
2.2.2. Install the X-LINUX-QT starter package[edit | edit source]
The packagegroup-x-linux-qt package must be installed on top of the OpenSTLinux starter package to bring the "Qt™ framework" as graphics solution.
Once the board is booted, make sure that it is connected to the internet, then execute the following commands in the console to install the X-LINUX-QT packages:
- First of all, it might be necessary to update date and time on the connected board before running the commands below. Date and Time on the connected board can be updated by this command:
date +%y%m%d -s "20250701"
date +%T -s "00:00:00"
For STM32MP1 series' boards ![]() , click on "Expand", visible on the right side of the page, to view command lines to add right Qt™ package Debian:
, click on "Expand", visible on the right side of the page, to view command lines to add right Qt™ package Debian:
- with GPU support (STM32MP157F-DK2 Discovery kit
 ), add this Qt™ package Debian path:
echo "deb NA for this versionQTMP1GPU/6.0 scarthgap main" > /etc/apt/sources.list.d/extra.qt.packages.openstlinux.st.com.list
- without GPU support (STM32MP135F-DK Discovery kit ), add this Qt package Debian path:
echo "deb NA for this versionQTMP1CPU/6.0 scarthgap main" > /etc/apt/sources.list.d/extra.qt.packages.openstlinux.st.com.list
For STM32MP2 series' boards ![]() , click on "Expand", visible on the right side of the page, to view command lines to add right Qt™ package Debian:
, click on "Expand", visible on the right side of the page, to view command lines to add right Qt™ package Debian:
- with GPU support (STM32MP257F-DK Discovery kit ), add this Qt™ package Debian path:
echo "deb NA for this versionQTMP2GPU/6.0 scarthgap main" > /etc/apt/sources.list.d/extra.qt.packages.openstlinux.st.com.list
- without GPU support (STM32MP215F-DK Discovery kit ), add this Qt package Debian path:
echo "deb NA for this versionQTMP2CPU/6.0 scarthgap main" > /etc/apt/sources.list.d/extra.qt.packages.openstlinux.st.com.list
- Refresh the apt database to access the Qt™ package repository:
apt-get update
| If some proxy issue occurs executing the previous command, refer to prerequisites from here |
- Install the package group for the X-LINUX-QT package:
apt install -y packagegroup-x-linux-qt
- For board with GPU support (STM32MP157F-DK2 Discovery kit , STM32MP257F-DK Discovery kit ), you can add a Qt™ demo-launcher:
apt-get install -y demo-launcher
- When available, restart the Weston graphical services with the new Qt™ STLauncher:
systemctl restart weston-graphical-session.service
| Instead of restarting the Weston graphical service which could take few seconds, user could just close the current GTK demo-launcher and start the new Qt™ STLauncher from the Weston bottom toolbar (last icon in the list) |
| When Weston service is not available, just reset the board |
3. Starter package expected results[edit | edit source]
The X-LINUX-QT starter package is firstly installed (see previous chapters), then follow steps defined below depending if your board supports the GPU or not.
3.1. For board without GPU support[edit | edit source]
STM32MP135F-DK Discovery kit ![]() and STM32MP215F-DK Discovery kit
and STM32MP215F-DK Discovery kit ![]() do not support the GPU. For such board, the splash screen is displayed.
do not support the GPU. For such board, the splash screen is displayed.
In order to run a Qt example, please use following commands. They can depend on the X-LINUX-QT/OpenSTLinux release you have installed.
First of all, "weston graphical service" needs to be stopped:
systemctl stop weston-graphical-session.service
Then any Qt example can be run such as analog clock widget:
/usr/share/examples/widgets/widgets/analogclock/analogclock
or (path changed with Qt version)
/usr/share/examples/widgets/widgets/analogclock/bin/analogclock

3.2. For board with GPU support[edit | edit source]
STM32MP157F-DK2 Discovery kit ![]() and STM32MP257F-DK Discovery kit
and STM32MP257F-DK Discovery kit ![]() support the GPU. For such boards, once the Weston graphical service is restarted, the new Qt™ STLauncher is displayed.
support the GPU. For such boards, once the Weston graphical service is restarted, the new Qt™ STLauncher is displayed.
- The Qt™ STLauncher splash screen is displayed for few seconds:

- The Main Window displays all compatible installed applications.
- To display more information about the running hardware and software:
- Click on the Settings button on the top right of the screen:
- The SETTINGS screen is displayed:

- Click on the INFORMATIONS button.
- The INFORMATIONS screen is displayed:

4. Run examples from the starter package[edit | edit source]
4.1. Legacy demonstrations[edit | edit source]
Demonstrations, available via the GTK demo launcher, are also supported by the new Qt™ STLauncher.
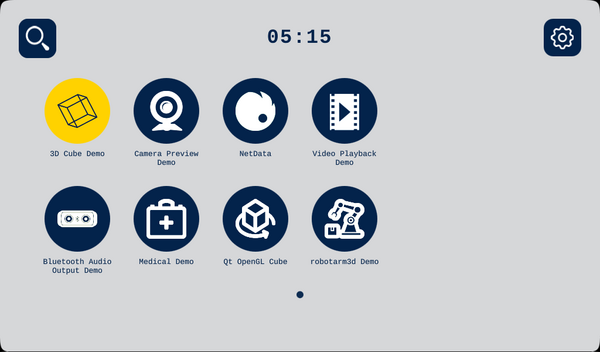
For example, run the 3D Cube Demo from the new Qt™ STLauncher:
- Select the demo's icon (Selected icon will be in Yellow)

- Click on the demo's icon again to run the demo:

4.2. New Qt examples[edit | edit source]
Qt™ OpenGL Cube example
The Qt™ OpenGL Cube example is now displayed in the new Qt™ STLauncher.
In order to run the examples, select its icon first then click on it again to start it.
- Select the Qt™ OpenGL Cube example icon (Selected icon will be in Yellow):
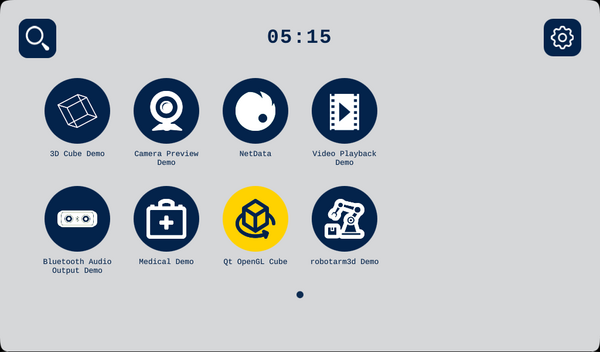
- Click on the demo's icon again to run the demo:

4.3. New Qt demonstrations[edit | edit source]
The new Medical and RobotArm3D demonstrations are displayed in the new Qt™ STLauncher. In order to run the demonstration, select its icon first then click on it again to start it.
- ST Medical


- ST RobotArm3D Demo

