1. Purpose[edit | edit source]
Secure boot is a key feature to guarantee a secure platform.
STM32MPU boot sequence supports a trusted boot chain that ensures that the loaded images are authenticated and checked in integrity before being used.
When the chip is secured unlocked the secure boot is not enforced, this means that:
- authentication and integrity are not ensured
- authentication is not mandatory
- when required, the authentication may fail
- an image may be encrypted but not authenticated
The ROM code logs error and goes on processing until it jumps to FSBL. The goal is to help developers to debug the secure boot chain.
When the chip is secured locked, the secure boot is enforced, this means that:
- authenticity and integrity are ensured
- authentication is mandatory
- only authenticated images may be encrypted
For details about secure boot features on STM32MP13x lines ![]() and STM32MP2 series see Secure boot on STM32MP13 lines and STM32MP2 series
and STM32MP2 series see Secure boot on STM32MP13 lines and STM32MP2 series
For details about secure boot features on STM32MP15x lines ![]() see Secure boot on STM32MP15 lines
see Secure boot on STM32MP15 lines
For details about the closing and setup of the chip for enforced secure boot see Operating guidances
2. Secure boot on STM32MP13x lines  and STM32MP2 series[edit | edit source]
2.1. Overview[edit | edit source]
STM32 MPU provides authentication processing with ECDSA [1] verification algorithm, based on ECC [2]. ECDSA offers better result than RSA with a smaller key. STM32 MPU relies on a 256 bits ECDSA key.
The figure above shows the steps implied in secure boot:
- Keys generation
- Keys registration
- Image encryption and signing
- Image authentication with key revocation and version anti-rollback
- Image decryption
2.2. Keys generation[edit | edit source]
The first step is to generate the necessary keys with STM32 KeyGen tool.
Authentication keys
- The STM32 KeyGen tool generates eight ECC pair of keys that are used to sign the images.
- The STM32 KeyGen tool generates eight ECC pair of keys that are used to sign the images.
- The STM32 KeyGen tool also generates a file containing the hash of the table of eight (algo+public key) hashes (*PKHTH*) that are used to authenticate the public key on the target.
Encryption / Decryption key
- The STM32 KeyGen tool generates the encryption/decryption master key (EDMK) that is used to derive the decryption key used to encrypt and decrypt the image payload.
2.3. Keys registration[edit | edit source]
PKHTH and EDMK shall be stored in BSEC non volatile memory (OTP words).
Table below shows which OTP shall be used, depending on the serie.
2.4. Image signing[edit | edit source]
- Eight signing keys available.
- Public Keys are hashed and this table of hashes is stored in the header.
- Each key is identified by its index in the table.
- The index of the key used for signing, the activate key index, are stored in the header.
- Using a key revokes all the keys with lower index.
- All series support ECDSA algorithms :
- P-256 NIST
- Brainpool 256T1
- In addition STM32MP21x lines
 supports:
- P-384 NIST
- Brainpool 384T1
- (The ECDSA algorithm is stored in the header)
2.5. Image authentication[edit | edit source]
The EDCSA verification follows the process below:
- The ROM code computes the SHA256 hash of the Table of Public Hashes available in the header.
- Then, it compares this hash with the one stored in BSEC non-volatile memory in PKHTH. If it is different, the authentication process fails, otherwise it continues.
- The ROM code computes the SHA256 hash of the “Public key” available in the signed file[Note 1].
- Then, it checks this “Public key”:
- It checks that the active key index stored in the header is greater or equal to the "min active key index" stored in BSEC non-volatile memory. If this is not the case, the authentication process fails, otherwise it continues
- It compares the hash of of the “Public key” previously computed to the one corresponding to the active key index in the Table of Public Hashes. If it is different, the authentication process fails, otherwise it continues
- It checks that the active key index stored in the header is greater or equal to the "min active key index" stored in BSEC non-volatile memory. If this is not the case, the authentication process fails, otherwise it continues
- The ROM code computes the SHA256 of the FSBL payload plus the file header.
- It uses the “Public key” that has just been authenticated to verify that the signature stored in the header is a valid signature of this hash. If the verification fails, then the authentication process fails, otherwise the authentication is successful and the ROM code goes on with the boot process.
- The ROM code ends the authentication process by if needed, updating the "min active key index" and the "min FSBL version" in the BSEC non volatile memory.
- Key revocation
- The "min active key index" stored in OTP WORD 22 on STM32MP13x lines
 and OTP WORD 17 or OTP WORD 22 on STM32MP2 series is updated if the active key index that was used is greater that it.
 - Anti rollback
- The ROM code checks that the FSBL version contained in the header is greater or equal to the "min FSBL version" stored in OTP WORD 4 on STM32MP13x lines
 or OTP WORD 12 or OTP WORD 19 on STM32MP2 series. If not the authentication process fails, otherwise the ROM code updates the "min FSBL version" and continues the boot process.
- ↑ "Public key" hash is in fact the hash of (Algorithm id + Public key)
2.6. Image encryption[edit | edit source]
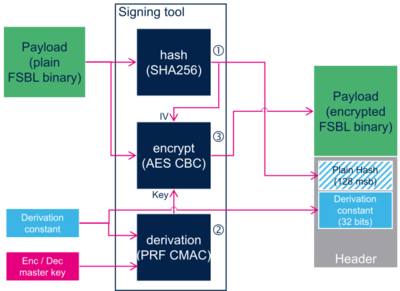
- The host calculates the SHA256 hash of FSBL binary, and stores the 128 most significant bits of it in the header.
- The host calculates the PRF CMAC derivation of the Encryption Decryption Master Key (EDMK) with a derivation constant to generate the encryption key, and stores the derivation constant in the header.
- The host uses the encryption key to encrypt the FBSL binary with AES algorithm. AES Initial Vector (IV) consists in the 128 most significant bits of the hash.
2.7. Image decryption[edit | edit source]
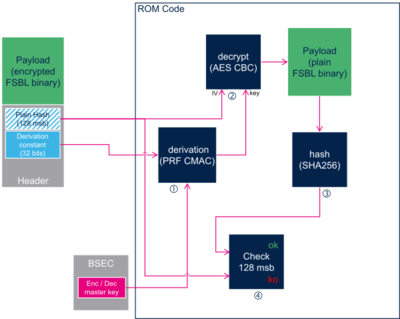
- The ROM code calculates the PRF CMAC derivation of the Encryption Decryption Master Key (EDMK) stored in BSEC non-volatile memory, with the derivation constant stored in the header, and obtains the decryption key.
- The ROM code uses the decryption key to decrypt the FBSL binary with AES algorithm. AES Initial Vector (IV) consists in the 128 most significant bits of plain image hash stored in the header.
- The ROM code calculates the SHA256 hash of the plain FSBL binary,
- The ROM code compares the 128 most significant bits of this hash with the ones stored in the header , if the verification fails, then the decryption process fails, otherwise the decryption is successful, and the ROM code goes on with the boot process.
Note that as shown in "Image encryption" figure above the decryption process is optional and when enabled always occurs on an authenticated image.
3. Secure boot on STM32MP15x lines  [edit | edit source]
3.1. Overview[edit | edit source]
STM32 MPU provides authentication processing with ECDSA [3] verification algorithm, based on ECC [4]. ECDSA offers better result than RSA with a smaller key. STM32 MPU relies on a 256 bits ECDSA key.
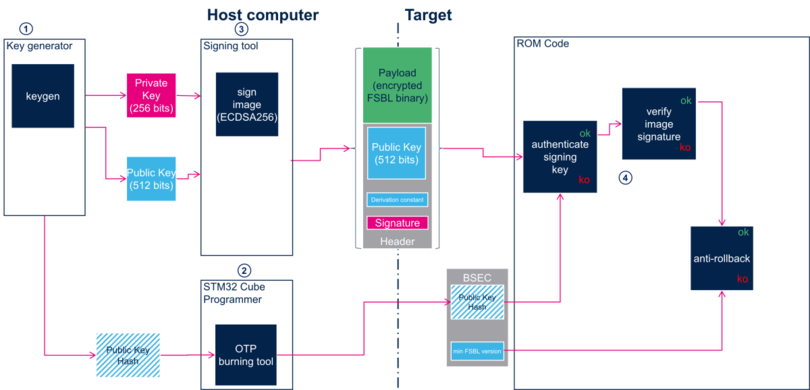
The figure above shows the steps implied in secure boot:
3.2. Keys generation[edit | edit source]
The first step is to generate the necessary keys with STM32 KeyGen tool.
Authentication keys
- The STM32 KeyGen tool generates one ECC pair of keys that is used to sign the images.
- The STM32 KeyGen tool generates one ECC pair of keys that is used to sign the images.
- The STM32 KeyGen tool tool also generates a third file containing the public key hash (PKH) that is used to authenticate the public key on the target.
- The STM32 KeyGen tool tool also generates a third file containing the public key hash (PKH) that is used to authenticate the public key on the target.
3.3. Keys registration[edit | edit source]
- PKH shall be stored in OTP WORD 24 to 31.
3.4. Image signing[edit | edit source]
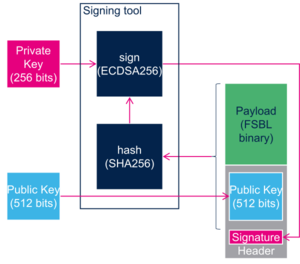
- Only one signing key available.
- The public key is stored in the header.
- Two algorithms supported for ECDSA calculation. The algorithm is in the header
- P-256 NIST
- Brainpool 256 T1
3.5. Image authentication[edit | edit source]
The EDCSA verification follows the process below:
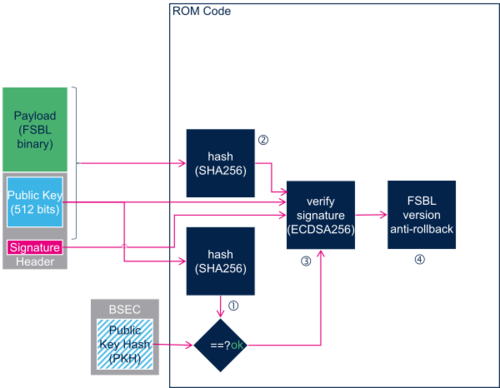
- The ROM code computes the SHA256 hash of the “Public key” available in the signed file. Then, it compares this hash with the one stored in STM32MP1 BSEC non-volatile memory in OTP WORD 24 to 31 , if different, the authentication process fails, otherwise it continues.
- The ROM code computes the SHA256 of the FSBL payload plus the “Public key” and the file header.
- It uses the “Public key” that has just been authenticated to verify that the signature stored in the header is a valid signature of this hash, if the verification fails, then the authentication process fails, otherwise the authentication is successful and the ROM code goes on with the boot process.
- The ROM code checks that the FSBL version contained in the header is greater or equal to the "min FSBL version" stored in OTP WORD 4, if not the authentication process fails, otherwise the ROM code continues the boot process.
4. Operating guidances[edit | edit source]
The needed keys file is generated using STM32 KeyGen tool.
The files are signed with STM32 Signing tool.
The secure provisioning on the board of the needed keys in the associated OTPs are done directly by the end-user application or with Secure Secret Provisioning (SSP).
When the device is secured locked as explained in Life cycle, the ROM accepts only authenticated images. It is locked by blowing the appropriate fuses as described in the life cycle table.
See How to use U-Boot stm32key command for examples of secure boot activation without SSP.
On secured locked device if the authentication fails, the ROM code enters into a serial boot loop indicated by the blinking Error LED (cf ROM code common debug and error cases).
5. References[edit | edit source]


