This article shows the mapping used in STM32 MPU Embedded Software distribution for ST boards, that can be used as starting point for other boards.
1. Supported Flash memory technologies[edit | edit source]
STM32MP1 series and STM32MP2 series support the different types of Flash memory. The bullets below show which interfaces are supported on STMicroelectronics boards:
- SD card on the SDMMC interface
- used on STM32MP13 DISCO board
- used on STM32MP15 EVAL board
- used on STM32MP15 DISCO board
- used on STM32MP25 EVAL board
- used on STM32MP25 DISCO board
- e•MMC on the SDMMC interface
- used on STM32MP15 EVAL board
- used on STM32MP25 EVAL board
- used on STM32MP25 DISCO board
- NAND Flash memory on the FMC interface
- used on STM32MP15 EVAL board only.
- Serial NOR Flash memory on the Dual QSPI/OCTOSPI interface
- used on STM32MP15 EVAL board
- used on STM32MP25 EVAL board
- Serial NAND Flash memory on the Dual QSPI/OCTOSPI interface
- not present on ST boards
- HyperFlash memory on the OCTOSPI interface
- not present on ST boards
The next section lists all partitions used on STM32MPU boards (size, name, and content), and the following sections show how they are mapped on the different types of Flash memory.
2. Flash partitions[edit | edit source]
The tables below list the partitions defined for STMP32MP1 and STM32MP2 boards in Cortex-A main processor mode and gives typical sizes with OpenSTLinux, that can be tuned, depending on the targeted application needs.
| Size | Component | Comment |
|---|---|---|
| Remaining area | userfs | The user file system contains user data and examples |
| 768 Mbytes | rootfs | Linux root file system contains all user space binaries (executable, libraries, and so on), and kernel modules |
| 16 Mbytes | vendorfs | This partition is preferred to the rootfs for third-party proprietary binaries, and ensures that they are not contaminated by any open source licence, such as GPL v3 |
| 64 Mbytes | bootfs or boot (NAND) |
The boot file system contains:
|
| 2 * 256 Kbytes (*) | u-boot-env or uboot_config / uboot_config_r (NAND) |
This partition is used to store the U-Boot environment. uboot_config_r is used for redundancy management with uboot_config, in NAND Flash. |
| 4 Mbytes | fip | The TF-A firmware image package (FIP) is a binary file that encapsulates several binaries, and their certificates (optionally, for authentication), that will be loaded by TF-A BL2. OpenSTLinux FIP contains:
There are two partitions, fip-a and fip-b, when A/B (seamless) FIP firmware update is activated in TF-A BL2. |
| 256 Kbytes to 512 Kbytes (*) | metadata | Metadata are used by TF-A BL2 to localize the FIP version to use, when the FIP is subject to firmware update.
Notes:
|
| 256 Kbytes to 512 Kbytes (*) | fsbl | The first stage boot loader is Arm Trusted Firmware (TF-A). At least two copies are embedded. Notes:
|
(*): The partition size depends on the Flash technology, to be aligned to the block erase size of the Flash memory present on the board: NOR (256 Kbytes) / NAND (512 Kbytes).
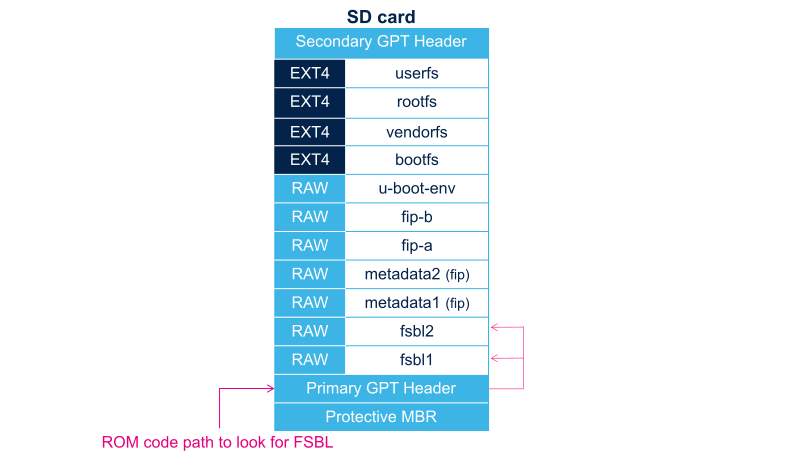
3. SD card memory mapping[edit | edit source]
The SD card has to be partitioned with GPT format in order to be recognized by the STM32MP1 and STM32MP2 ROM code. The easiest way to achieve this is to use STM32CubeProgrammer.
The ROM code looks for the GPT entries whose name begins with "fsbl": fsbl1 and fsbl2 for example.
Note: The SD card can be unplugged from the board and inserted into a Linux host computer for direct partitioning with Linux utilities and access to the bootfs, rootfs and userfs partitions. The file system is Linux EXT4.
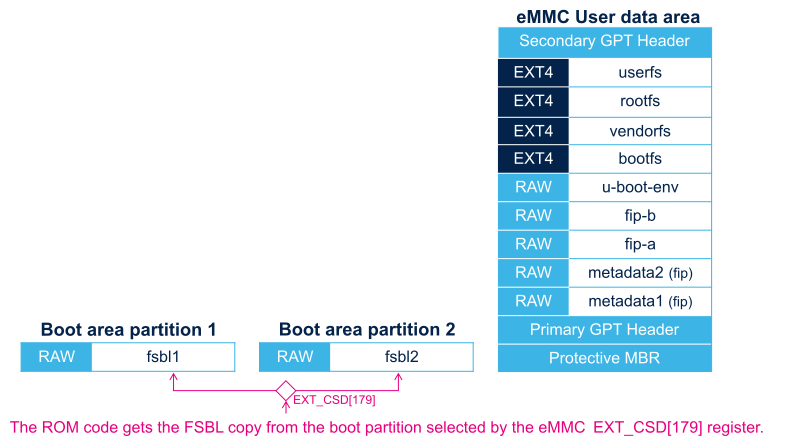
4. e•MMC memory mapping[edit | edit source]
The e•MMC embeds four physical partitions:
- Boot area partition 1: one copy of the FSBL
- Boot area partition 2: one copy of the FSBL
- User data area: formatted with GPT partitioning and used to store all remaining partitions
- Replay Protected Memory Block (RPMB): not shown in the figure below, since not involved in the current boot chain.
STM32CubeProgrammer has to be used to prepare the e•MMC with the layout shown below, and to populate each partition.
5. NOR memory mapping[edit | edit source]
As NOR Flash memory is expensive, its size is usually limited to the minimum needed to store only the bootloaders. The system files (bootfs, rootfs and userfs) are usually stored in another Flash memory, such as the SD card in OpenSTLinux distribution.
STM32CubeProgrammer must be used to prepare the NOR Flash and the SD card with the layout shown below, and to populate each partition.
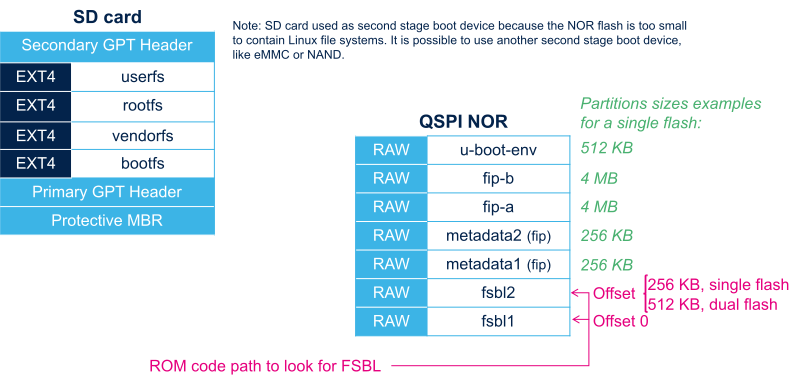
It is possible to use an e•MMC card or NAND as second-level Flash memory, rather than an SD card. This requires the following aspects to be changed:
- The Flash memory layout, using STM32CubeProgrammer in order to write the rootfs and userfs to the targeted Flash memory
- The Linux kernel parameters, using U-Boot, in order to indicate where the rootfs and userfs have to be mounted.
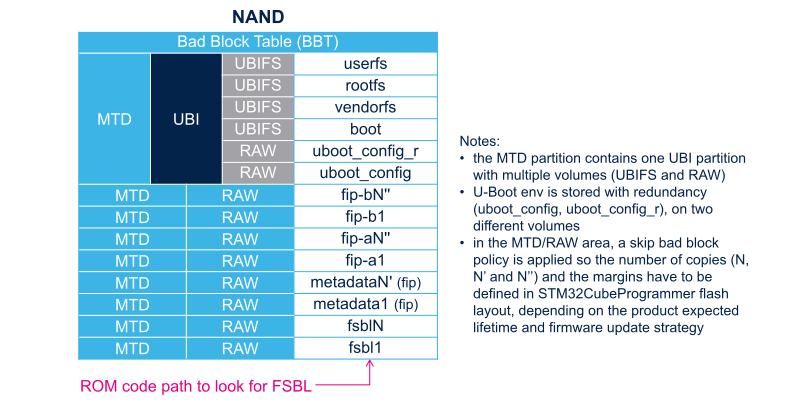
6. NAND memory mapping[edit | edit source]
STM32CubeProgrammer has to be used to prepare the NAND Flash memory with the layout shown below, and to populate each partition.
Arm® is a registered trademark of Arm Limited (or its subsidiaries) in the US and/or elsewhere. ![]()
Arm® is a registered trademark of Arm Limited (or its subsidiaries) in the US and/or elsewhere. ![]()