1. Article purpose[edit | edit source]
The purpose of this article is to:
- Introduce the X-LINUX-TSNSWCH expansion package
- Define the hardware and software deliverables to use the X-LINUX-TSNSWCH expansion package
- Describe all steps to integrate the X-LINUX-TSNSWCH expansion package
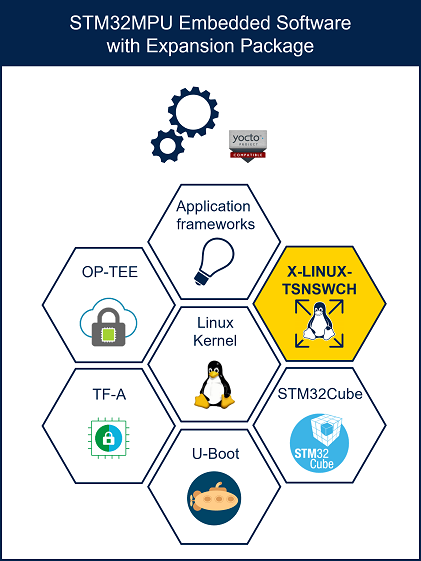
2. X-LINUX-TSNSWCH expansion package description[edit | edit source]
2.1. Overview[edit | edit source]
X-LINUX-TSNSWCH is an OpenSTLinux distribution expansion package that targets both the time-sensitive networking (TSN) feature and the hardware Ethernet switch configuration in Linux®.
The X-LINUX-TSNSWCH expansion package is a Yocto layer that provides the necessary resources to generate software for managing time-sensitive networking and the hardware Ethernet switch, at both userland and Linux® kernel levels. It simplifies development to achieve one of the following goals:
- Configure the hardware Ethernet switch and use it with TSN configurations
- Configure the hardware Ethernet switch (also known as the ETHSW internal peripheral) and use it without TSN configurations
- Provide the necessary utilities to configure TSN endpoints
By default, adding this package to your Linux® distribution makes the hardware Ethernet switch ready to use and installs the TSN configuration tools.
2.2. Main software modifications[edit | edit source]
2.2.1. Linux® kernel[edit | edit source]
The X-LINUX-TSNSWCH expansion package provides:
- Two additional kernel modules to enable the hardware for a standard Ethernet switch (compatible for time-sensitive networking):
- The "st-stm32-deip" module to enable hardware clocks and regulators useful for the TSNSWCH internal peripheral
- The "edge" module to enable the TSNSWCH internal peripheral
- A specific device tree overlay for TSNSWCH definition
2.2.2. User space additional stacks[edit | edit source]
The X-LINUX-TSNSWCH provides a series of userland tools and components for time-sensitive networking (TSN).
See Ethernet switch overview for more details.
2.3. Versioning[edit | edit source]
The latest version of the X-LINUX-TSNSWCH expansion package is v6.0.
The X-LINUX-TSNSWCH expansion package is designed to be used with the OpenSTLinux distribution ecosystem release v6.0.0 ![]() .
.
2.4. Associated licenses[edit | edit source]
See X-LINUX-TSNSWCH licenses for information on the licenses applied to the X-LINUX-TSNSWCH expansion package.
3. Prerequisites[edit | edit source]
3.1. Hardware prerequisites[edit | edit source]
The X-LINUX-TSNSWCH is designed to be demonstrated on the following target:
- STM32MP257F-EV1

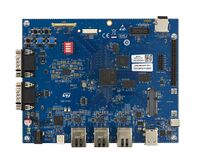
The hardware description for the STM32MP257x-EV1 is available in a dedicated wiki page here.
3.2. Software prerequisites[edit | edit source]
The X-LINUX-TSNSWCH expansion package runs with OpenSTLinux ecosystem release v6.0.0 ![]() .
.
Prerequisite: You need to get and install the STM32MPU Distribution Package. The instructions, repeated from the dedicated wiki page, are provided below.
- The STM32MPU OpenSTLinux distribution is delivered through a manifest repository location and a manifest revision.
- The installation relies on the repo command. In case the Repo tool (a Google-built repository management tool that runs on top of git) is not yet installed and configured on the host PC, refer to the PC prerequisites article.
- The OpenSTLinux distribution is massively using open source software (OSS) packages that are downloaded from a variety of open source repositories; so it is required that the IT infrastructure proxies do not forbid such accesses. If some proxy-related issues are suspected, refer to the How to avoid proxy issues article.
- Install the STM32MPU OpenSTLinux distribution: openstlinux-6.6-yocto-scarthgap-mpu-v24.11.06
| STM32MPU Distribution Package OpenSTLinux distribution - STM32MPU-Ecosystem-6.0.0 release | |
|---|---|
| Installation |
cd <working directory path>/Distribution-Package
repo init -u https://github.com/STMicroelectronics/oe-manifest.git -b refs/tags/openstlinux-6.6-yocto-scarthgap-mpu-v24.11.06 Note: "ERROR 404" may appear during "repo init" command without any impact on the process.
repo sync
Note: Distribution package needs around 140MB to be installed (and around 25GB once distribution package is compiled). |
| Release note |
Details about the content of this software package are available in the associated STM32 MPU ecosystem release note.
|
- When installed, the OpenSTLinux Distribution Package is available with following tree structure:
Distribution-Package OpenSTLinux distribution ├── layers │ ├── meta-openembedded Collection of layers for the OpenEmbedded-Core universe (OpenEmbedded standard) │ ├── meta-st │ │ ├── meta-st-openstlinux STMicroelectronics layer that contains the frameworks and images settings for the OpenSTLinux distribution │ │ ├── meta-st-stm32mp STMicroelectronics layer that contains the description of the BSP for the STM32 MPU devices │ │ │ ├── recipes-bsp │ │ │ │ ├── alsa Recipes for ALSA control configuration │ │ │ │ ├── ddr-firmware Firmware for DDR PHY on STM32MP │ │ │ │ ├── drivers Recipes for Vivante GCNANO GPU kernel drivers │ │ │ │ ├── fip-stm32mp FIP generation │ │ │ │ ├── trusted-firmware-a Recipes for TF-A │ │ │ │ ├── trusted-firmware-m For STM32MP2 series - Recipes for TF-M │ │ │ │ └── u-boot Recipes for U-Boot │ │ │ ├── recipes-connectivity │ │ │ │ └── bluetooth Systemd service to suspend/resume correctly bluetooth │ │ │ ├── recipes-core │ │ │ │ ├── [...] bbappend recipes to update some core services │ │ │ ├── recipes-extended │ │ │ │ ├── external-dt Recipes for providing device tree files for STM32 MPU devices outside of BSP components │ │ │ │ ├── libb64 For STM32MP2 series - Library for base64 encoding/decoding data │ │ │ │ ├── linux-examples Recipes for Linux examples for STM32 MPU devices │ │ │ │ ├── m33projects For STM32MP2 series - Recipes for firmware examples for Cortex M33 │ │ │ │ ├── m4coredump For STM32MP15x linesonly - Recipes for script to manage coredump of cortexM4 │ │ │ │ ├── m4projects For STM32MP15x lines
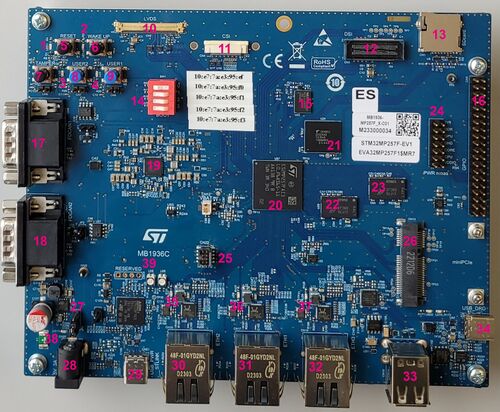
4. Hardware setup[edit | edit source]
The time-sensitive networking (TSN) switch is available via the two Ethernet ports labeled 31 and 32.
The Ethernet port labeled "30" can be used only as a TSN endpoint.
Ethernet Ports 31 and 32:
- These ports can be used to connect devices requiring accurate timing synchronization, provided by the X-LINUX-TSNSWCH expansion package through the PTP protocol.
- They also support TSN capabilities, such as queuing discipline through Qdisc configuration.
- As explained in the Overview chapter, these ports can also function as standard hardware Ethernet switches without utilizing TSN features.
5. Software setup[edit | edit source]
5.1. How to get software[edit | edit source]
The X-LINUX-TSNSWCH expansion package is only available as a Distribution package.
By following the procedure described in the next sections, you can regenerate the complete distribution by enabling the X-LINUX-TSNSWCH expansion package.
As presented in Software prerequisites, it is assumed that you have already installed the STM32MPU Distribution Package.
5.1.1. Install the X-LINUX-TSNSWCH distribution package[edit | edit source]
- Clone the meta-st-stm32mp-tsn-swch git repositories.
cd <Distribution Package installation directory>/layers/meta-st
git clone -b scarthgap https://github.com/STMicroelectronics/meta-st-stm32mp-tsn-swch.git
cd ../..
- Source the build environment with the correct board and layer.
(Example of the STM32MP25x lines ![]() )
)
DISTRO=openstlinux-weston MACHINE=stm32mp2 source layers/meta-st/scripts/envsetup.sh
bitbake-layers add-layer ../layers/meta-st/meta-st-stm32mp-tsn-swch
5.1.2. Build the image[edit | edit source]
bitbake st-image-weston
| Note that building the image might take a significant amount of time, depending on the performance of the host computer. |
5.2. How to populate the flash memory with the image[edit | edit source]
The build-<distro>-<machine>/tmp-glibc/deploy/images/<machine> directory receives complete file system images.
Build directory structure: images
The STM32CubeProgrammer tool is used to program the STM32MPU boards with the built image. It is assumed that this tool has been installed through the Starter Package associated with your board.
Depending on the board, several flash memory devices (microSD, eMMC...) might be available. The microSD card is considered as the flash device in the rest of this article.
The procedure to flash your board is explained in the Starter Package article that corresponds to your board (remember that all articles relative to Starter Packages are found in Category:Starter Package):
Once the flashing is terminated, the boot switches must be configured so that the Flash device (e.g. microSD card) on which the image has been flashed, is selected as the boot source:
- Boot switches on the STM32MP135x-DK Discovery kit
- Boot switches on the STM32MP157x-DK Discovery kit
- Boot switches on the STM32MP157x-EV1 Evaluation board
- Boot switches on the STM32MP257x-EV1 Evaluation board
5.3. How to run the X-LINUX-TSNSWCH package software[edit | edit source]
See How to configure Ethernet switch and How to configure TSN switch.
5.4. How to trace and debug[edit | edit source]
See How to configure Ethernet switch and How to configure TSN switch.
6. How to run use case[edit | edit source]
This part will be completed later.
In the meantime, you can find information in How to configure Ethernet switch and How to configure TSN switch.
7. References[edit | edit source]
Arm® is a registered trademark of Arm Limited (or its subsidiaries) in the US and/or elsewhere. ![]()