1. Article purpose[edit | edit source]
The purpose of this article is to:
- briefly introduce the USBPHYC peripheral and its main features,
- indicate the peripheral instances assignment at boot time and their assignment at runtime (including whether instances can be allocated to secure contexts),
- list the software frameworks and drivers managing the peripheral,
- explain how to configure the peripheral.
2. Peripheral overview[edit | edit source]
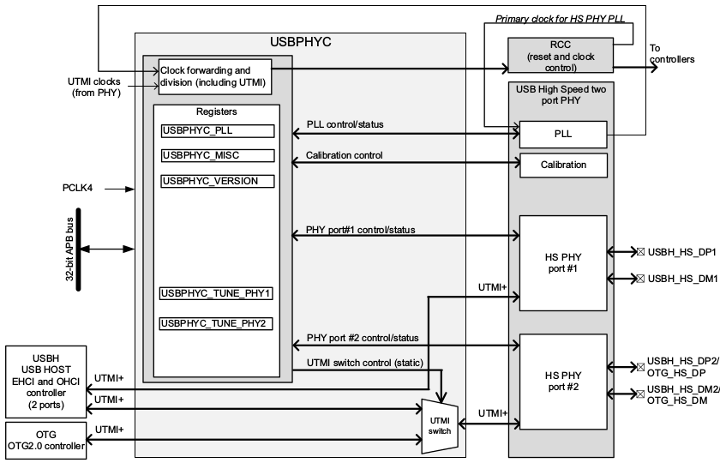
The USBPHYC peripheral is a block that contains a dual port USB high-speed UTMI+ PHY and a UTMI switch. It makes the interface between:
The USBPHYC peripheral:
- controls a two port high-speed PHY:
- sets the PLL values
- performs other controls (and monitoring) on the PHY.

Refer to the STM32 MPU reference manuals for the complete list of features, and to the software frameworks and drivers, introduced below, to see which features are implemented.
3. Peripheral usage[edit | edit source]
This chapter is applicable in the scope of the OpenSTLinux BSP running on the Arm® Cortex®-A processor(s), and the STM32CubeMPU Package running on the Arm® Cortex®-M processor.
3.1. Boot time assignment[edit | edit source]
3.1.1. On STM32MP1 Series[edit | edit source]
USBPHYC instances are boot devices that support Flash programming with STM32CubeProgrammer.
The USBPHYC peripheral is used by ROM code, FSBL and SSBL when using OTG in Device mode (DFU).
Click on the right to expand the legend...
| Domain | Peripheral | Boot time allocation | Comment | |||
|---|---|---|---|---|---|---|
| Instance | Cortex-A7 secure (ROM code) |
Cortex-A7 secure (TF-A BL2) |
Cortex-A7 non-secure (U-Boot) | |||
| High speed interface | USBPHYC (USB HS PHY controller) | USBPHYC (USB HS PHY controller) | ✓ | ☐ | ☐ | The USBPHYC can be used by ROM code, FSBL and SSBL in DFU mode to support serial boot. It can be used also in U-boot by OTG and USBH with command line tools. |
3.2. Runtime assignment[edit | edit source]
3.2.1. On STM32MP13x lines  [edit | edit source]
Click on the right to expand the legend...
| Domain | Peripheral | Runtime allocation | Comment | ||
|---|---|---|---|---|---|
| Instance | Cortex-A7 secure (OP-TEE) |
Cortex-A7 non-secure (Linux) | |||
| High speed interface | USBPHYC (USB HS PHY controller) | USBPHYC (USB HS PHY controller) | ⬚ | ☐ | Assignment (single choice) |
3.2.2. On STM32MP15x lines  [edit | edit source]
Click on the right to expand the legend...
| Domain | Peripheral | Runtime allocation | Comment | |||
|---|---|---|---|---|---|---|
| Instance | Cortex-A7 secure (OP-TEE) |
Cortex-A7 non-secure (Linux) |
Cortex-M4 (STM32Cube) | |||
| High speed interface | USBPHYC (USB HS PHY controller) | USBPHYC (USB HS PHY controller) | ☐ | ⬚ | ||
4. Software frameworks and drivers[edit | edit source]
Below are listed the software frameworks and drivers managing the USBPHYC peripheral for the embedded software components listed in the above tables.
- Linux®: PHY framework
- U-Boot: PHY uclass (drivers/phy/phy-uclass.c ) and driver (drivers/phy/phy-stm32-usbphyc.c )
5. How to assign and configure the peripheral[edit | edit source]
The peripheral assignment can be done via the STM32CubeMX graphical tool (and manually completed if needed).
This tool also helps to configure the peripheral:
- partial device trees (pin control and clock tree) generation for the OpenSTLinux software components,
- HAL initialization code generation for the STM32CubeMPU Package.
The configuration is applied by the firmware running in the context in which the peripheral is assigned.
For U-boot and Linux kernel configuration, please refer to USBPHYC device tree configuration.

