1. Article purpose[edit | edit source]
This article explains how to integrate the X-NUCLEO-NFC06A1[1] expansion board with the STM32MP157F-DK2 Discovery kit ![]() . An OpenSTLinux software expansion package is provided, X-LINUX-NFC6[2]. It runs on the Arm® Cortex®-A7-based core of the STM32MP1 microprocessor. The application demonstrates Radio Frequency Abstraction Library (RFAL)-based NFC driver.
. An OpenSTLinux software expansion package is provided, X-LINUX-NFC6[2]. It runs on the Arm® Cortex®-A7-based core of the STM32MP1 microprocessor. The application demonstrates Radio Frequency Abstraction Library (RFAL)-based NFC driver.
2. Prerequisites[edit | edit source]
• Ubuntu® version 18.04 or higher installed in PC/Virtual-machine.
• STM32MP157F-DK2 Discovery kit ![]() .
.
• X-NUCLEO-NFC06A1[1]: NFC card reader expansion board based on the ST25R3916.
• microSD™ card (minimum 8 GBytes) to boot the STM32MP157F-DK2 Discovery kit ![]() .
.
• SD™ card reader / LAN connectivity.
• USB Type-A or USB Type-C® to USB Micro-B cable.
• USB Type-A or USB Type-C® to USB Type-C® cable.
• USB-PD-compliant 5V 3A power supply.
The PC/Virtual-machine forms the cross-development platform to build the RFAL library and the application code.
3. Hardware setup[edit | edit source]
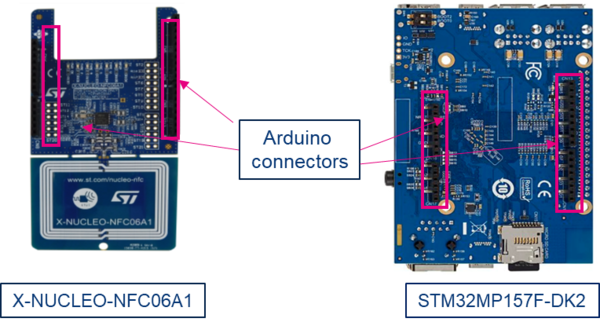
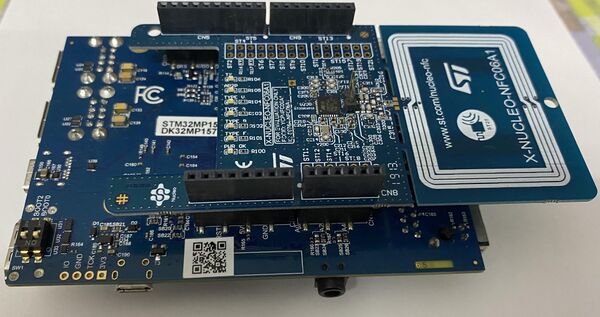
The X-NUCLEO-NFC06A1[1] is docked onto the ARDUINO® connector present on the back side of the STM32MP157F-DK2 ![]() board as explained in the steps below.
board as explained in the steps below.
Step 1: Plug the X-NUCLEO-NFC06A1[1] expansion board onto the ARDUINO® connectors on the back side of the STM32MP157F-DK2 Discovery board.
Step 2: Connect the ST-LINK programmer/debugger embedded on the Discovery board to your host PC via the USB Micro-B type port (CN11).
Step 3: Power the STM32MP157F-DK2 Discovery kit ![]() through the USB Type-C® port (CN6).
through the USB Type-C® port (CN6).
4. Software setup[edit | edit source]
To run the application, the platform configuration must be updated by modifying the device tree to enable SPI4 on STM32MP157F-DK2. For doing that:
- use the pre-built images available by referring to Steps for quick evaluation of software using pre-compiled binaries,
- or modify the device tree and build your own software images in full-fledged development environment. Read How to update the platform configuration in the Developer Package
You can connect to the STM32MP157F-DK2 Discovery kit ![]() . from the host PC via TCP/IP network using ssh and scp commands, or through serial UART using tools like minicom for Linux® or Tera Term for Windows®.
. from the host PC via TCP/IP network using ssh and scp commands, or through serial UART using tools like minicom for Linux® or Tera Term for Windows®.
4.1. Steps for quick evaluation of software using pre-compiled binaries[edit | edit source]
Step 1: Program the Starter Package on the SD™ card and boot the board. Refer to Populate the target and boot the image.
Step 2: Enable internet connectivity on the board via Ethernet or Wi-Fi®. Refer to the wiki page to connect via Wi-Fi®: How to setup wifi connection.
Step 3: Download the X-LINUX-NFC6[2] software package.
Step 4: Use the following commands to copy the device tree blob and update the new platform configuration:
If network connectivity is not available, you can transfer the files locally from your Windows® PC to the
Discovery kit using Tera Term. For that, refer to How to transfer files to Discovery kit using Tera Term on Windows PC
PC $> cd X-LINUX-NFC6_v1.0.0/STM32MP157F-DK2_DeviceTree/Binaries
PC $> scp stm32mp157f-dk2.dtb root@<ip address of board>:/boot/
PC $> ssh root@<ip address of board>
Board $> /sbin/depmod –a
Board $> sync
Board $> reboot
Step 5: After the board boots up, copy the application binary and the shared lib to the Discovery board.
PC $> cd X-LINUX-NFC6_v1.0.0/NFCPollerApplication/Binaries
PC $> scp ./nfcpoller_st25r3916 root@<ip address of board>:/usr/bin
PC $> scp ./librfal_st25r3916.so root:<ip address of board>:/usr/lib
PC $> ssh root@<ip address of board>
Board $> cd /usr/bin
Board $> chmod +x nfc_poller_st25r3916
Board $> ./nfc_poller_st25r3916
4.2. How to update the platform configuration in the Developer Package[edit | edit source]
The following steps allow you to set up the development environment. The application starts running once these commands are executed.
Step 1: Download STM32MP1 Developer Package and install the SDK on your Ubuntu® machine.
Step 2: Open the device tree file ‘stm32mp157f-dk2.dts’ in the Developer Package source code and add the below mentioned code snippet to the file:This updates the device tree to enable and configure the SPI4 driver interface.
&spi4 {
	pinctrl-names = "default", "sleep";
	pinctrl-0 = <&spi4_pins_b>;
	pinctrl-1 = <&spi4_sleep_pins_b>;
	/*status = "disabled";*/
	cs-gpios = <&gpioe 11 0>;
	status = "okay";

	spidev@0x00 {
		compatible = "semtech,sx1301";
		spi-max-frequency = <500000>;
		reg = <0>;
	};
};
Refer to following link for help: How to compile the device tree with the Developer Package
Step 3: Compile the Device Tree to get the stm32mp157f-dk2.dtb file.
4.3. How to build the RFAL Linux® application code[edit | edit source]
Step 1: prerequisites: the SDK for OpenSTLinux distribution must be downloaded, installed and enabled.
Step 2: Download the X-LINUX-NFC6[2] software package.
Step 3: Run below commands on your Ubuntu® machine to cross-compile the code. Once all commands are executed successfully, the files below are generated:
- The example application: nfc_poller_st25r3916
- The shared lib for running the example application: librfal_st25r3916.so
PC $> sudo apt-get install cmake
PC $> cd X-LINUX-NFC6_v1.0.0/NFCPollerApplication/Source/Linux_RFAL_st25r3916_v2.2.0/linux_demo/build
PC $> cmake ..
PC $> make
4.4. How to run the RFAL Linux® application on STM32MP157F-DK2[edit | edit source]
Step 1: Copy the generated binaries onto the Discovery kit using the commands below:
PC $> scp X-LINUX-NFC6_v1.0.0/NFCPollerApplication/Source/Linux_RFAL_st25r3916_v2.4.0/linux_demo/build/nfc_poller/nfc_poller_st25r3916 root@<board ip address>:/usr/bin
PC $> scp X-LINUX-NFC6_v1.0.0/NFCPollerApplication/Source/Linux_RFAL_st25r3916_v2.4.0/linux_demo/build/rfal/st25r3916/librfal_st25r3916.so root@<board ip address>:/usr/lib
Step 2: Open a terminal on the Discovery kit board or use ssh login and run the application using the following commands.
PC $> ssh root@<board ip address>
Board $> cd /usr/bin #enter directory where binaries were copied
Board $> ./nfc_poller_st25r3916 # Run the application
The user then sees the below message on the screen:
Welcome to the ST25R3916 NFC Poller Demo on Linux.
Scanning for NFC Technologies ......
When an NFC tag is brought near the NFC receiver, the UID and NFC tag type is displayed on the screen.
4.5. How to include meta-nfc6 layer in the Distribution Package[edit | edit source]
Step 1. Download and compile the SDK for OpenSTLinux distribution on your Linux machine.
Step 2. Follow the default Example_of_directory_structure_for_Packages suggested by ST wiki page to follow this document synchronously.
Step 3. Download the X-LINUX-NFC6[2] application package and copy it to /layers directory in the Distribution Package.
PC$> cp –rf X-LINUX-NFC6_v1.0.0/NFCPollerApplication/Source/meta-nfc6 STM32MP15-Ecosystem-v3.0.0/Distribution-Package/openstlinux-5.10-dunfell-mp1-21-03-31/layers
PC$> cd STM32MP15-Ecosystem-v3.0.0/Distribution-Package/openstlinux-5.10-dunfell-mp1-21-03-31/
Step 4. Set up the build configuration.
PC$> DISTRO=openstlinux-weston MACHINE=stm32mp1 source layers/meta-st/scripts/envsetup.sh
Step 5. Add the meta-nfc6 layer to the build configuration of the SDK for OpenSTLinux distribution configuration.
PC$> bitbake-layers add-layer ../layers/meta-nfc6
Step 6. Update the configuration to add new components in your image.
PC$> echo 'IMAGE_INSTALL_append += "nfc6"' >> ../layers/meta-st/meta-st-openstlinux/conf/layer.conf
Step 7. Build your layer separately and then build the complete Distribution Layer.
PC$> bitbake st-image-weston
Note: Building the Distribution Package for the first time may take several hours. However, it takes only few minutes to build meta-nfc6 layer and install the executables in the final images. Once the build is complete, the images are present in the following directory: build-<distro>-<machine>/tmp-glibc/deploy/images/stm32mp1.
Step 8. Follow instructions on ST wiki page: Flashing the built image to program the new built images onto the Discovery kit.
Step 9. Run the application as mentioned in Step 2 of Section 4.4.
5. References[edit | edit source]
- ↑ 1.0 1.1 1.2 1.3 X-NUCLEO-NFC06A1
- ↑ 2.0 2.1 2.2 2.3 X-LINUX-NFC6

