This article aims to explain how to load and start STM32CubeMP13 applications via microSD™ card using the "SD external loader firmware utility" provided into the STM32CubeMP13 package. This use case is useful in production mode.
1. SD external loader firmware utility[edit source]
1.1. Introduction[edit source]
The SD external loader firmware utility is used to load and start STM32CubeMP13 applications programmed into a microSDTM card.
- It allows the programming of embedded software applications on external microSDTM cards for the STM32MP135x-DK Discovery kit
 .
. - This package contains all the binaries necessary to program the microSDTM card through the serial interface and boot from the microSDTM card.
- This package version :
- Supports the UART serial protocol.
- Does not support the USB DFU serial protocol in this release.
- Does not support OTP programming.
1.2. Contents[edit source]
The SD External Loader utility contains the binaries listed below, as well as readme and .tsv files. Details for each can be found below.
├── Projects
    ├── STM32MP135C-DK
       ├── External_Loader
          ├── SD_Ext_Loader
          │    ├── [FlashLayout_OpenBL_ExtLoaderSDMMC_SerialBoot.tsv]
          │    ├── [FSBLA_Sdmmc1_A7_Signed.bin]
          │    ├── [MP13_BSP_TemplatesA7_DISCO_Signed.bin]
          │    ├── [readme.txt]
          │    ├── [SD_Ext_Loader.bin]
          │    ├── [STM32PRGFW_UTIL_MP13xx_CP_Serial_Boot.stm32]
- FlashLayout_OpenBL_ExtLoaderSDMMC_SerialBoot.tsv
- This file defines flash memory partitions, binaries, and the corresponding partition ID. Refer to the STM32CubeProgrammer_flashlayout article for more details.
- FSBLA_Sdmmc1_A7_Signed.bin
- This binary is the first-stage bootloader (FSBLA), programmed via STM32PRGFW_UTIL_MP13xx_CP_Serial_Boot.stm32 on the microSDTM card, and is used to load the test application from the microSD™ card to DDR.
- MP13_BSP_TemplatesA7_DISCO_Signed.bin
- This binary is the test application, programmed on the microSD™ card via STM32PRGFW_UTIL_MP13xx_CP_Serial_Boot.stm32. On reset, when booting from the microSD™ card, it is loaded into DDR for execution by FSBLA.
- This can be replaced with any customer test application. Application has to be built for DDR (refer to build test application for DDR) and then properly signed with the STM32CubeProgrammer signing tool (or via postbuild steps and scripts)). In this test application, the blue LED is initialized and after successful execution, the blue LED is toggled at 200ms and the logs shown below are printed on the serial console:

- readme.txt
- Read this file carefully; it provides all the information for the example setup and verdict.
- SD_Ext_Loader.bin
- This binary provides microSD™ card read, write, and erase functionalities. It is used for programming binaries onto the microSD™ card.
- STM32PRGFW_UTIL_MP13xx_CP_Serial_Boot.stm32
- This binary initializes the UART interface and reads binaries serially in serial boot mode.
SD_Ext_Loader.bin is loaded into RAM. FSBLA_Sdmmc1_A7_Signed.bin and MP13_BSP_TemplatesA7_DISCO_Signed.bin are programmed into the microSD™ card for subsequent boot in SD mode. Refer to Set boot switches for more details.
2. Hardware and software prerequisites[edit source]
- STM32MP135x-DK Discovery kit with a micro-USB cable connected to the ST-Link port.
- USB Type-C cable for powering the board.
- A microSD™ card plugged into the microSD™ card slot in the board.
- STM32CubeProgrammer PC tool installed (v2.14.0 minimum).
3. How to run the utility[edit source]
3.1. Set boot mode to serial[edit source]
- Set the boot pins to the b000 (BOOT0/1/2 to OFF) position to select serial mode. Refer to Set boot switches.
- Connect the micro-USB cable between the PC and ST-Link connector on the board. The PC should detect the UART interface.
3.2. Flash microSD™ card in serial boot[edit source]
3.2.1. Flash microSD™ card using STM32CubeProgrammer GUI[edit source]
Read STM32CubeProgrammer pages for more details.
- Click on UART and then select COM port:

- Click on Connect button:
- STM32CubeProgrammer is now connected to ROM Code and logs show the chip ID, bootloader version and other details.

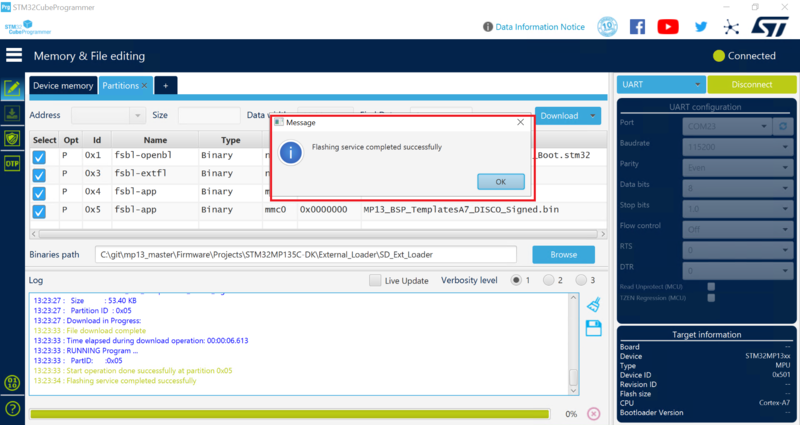
- Click on Open file by clicking on + icon and then select TSV file : FlashLayout_OpenBL_ExtLoaderSDMMC_SerialBoot.tsv

- Select Binaries path with Browse button: Firmware\Projects\STM32MP135C_DK\External_Loader\SD_Ext_Loader

- Click on Download button :
- STM32CubeProgrammer now starts downloading the binaries. Once all the binaries are successfully downloaded, there is a pop-up message indicating - Flashing service completed successfully

3.2.2. Flash microSD™ card using STM32CubeProgrammer CLI[edit source]
- Browse the installed STM32CubeProgrammer binary directory i.e. STM32CubeProgrammer\bin
- Open command prompt from this directory.
- Execute below command to load the SD external loader binaries:
$STM32_Programmer_CLI.exe -c port=COM
<num> -w
<YourDirectoryPath>\Projects<STM32device>\External_Loader\SD_Ext_Loader\FlashLayout_OpenBL_ExtLoaderSDMMC_SerialBoot.tsv
- DO NOT reset the board till the command has completed.
- STM32CubeProgrammer now starts downloading all the binaries listed in TSV file. Once all the binaries are successfully downloaded, there is a message indicating : Flashing service completed successfully.
3.3. Run test application[edit source]
- Once binaries are programmed into microSD™ card successfully, set boot pins to b101 (BOOT0 and BOOT2 to ON and BOOT1 to OFF) position to select to select SD mode. Refer to Set boot switches.
- MP13_BSP_TemplatesA7_DISCO_Signed.bin test application toggles blue LED at 200ms, indicating that it has been loaded and executed successfully from DDR. It also prints below logs on serial console -: