1. Article purpose[edit source]
Purpose of this article is to:
- Introduce the X-LINUX-QT Expansion Package,
- Define the hardware & software deliverables to use the X-LINUX-QT packages,
- Describe all steps to integrate the X-LINUX-QT packages and associated expected results,
- Explain how to create a Qt™ application using the X-LINUX-QT Developer Package
- Describe all steps to use Qt™ Creator with the X-LINUX-QT Developer Package and associated expected results.

2. X-LINUX-QT Expansion Package description[edit source]
2.1. Overview[edit source]
X-LINUX-QT is an STM32 MPU OpenSTLinux Expansion Package that targets Qt™ based application and graphical user interface (GUI) development for STM32MP25x lines ![]() .
.
It contains Linux® Qt™ frameworks, as well as an ST Application Launcher based on Qt™ Framework and application examples to get started with Qt™ application development.
The Qt™ framework contains a comprehensive set of highly intuitive and modularized C++ library classes and is loaded with APIs to simplify your application development. Qt™ produces highly readable, easily maintainable and reusable code with high runtime performance and small footprint – and it's cross-platform.
This expansion package is a complete ecosystem that allows developers working with OpenSTLinux to create Qt™ based application very easily.
- All-in-one Qt™ solutions for the entire STM32 MPU series supporting Wayland and Weston.
- Pre-integrated into Linux® distribution based on ST environment
- Include Qt™ frameworks to build UIs and Applications
- Include ST Application Launcher based on Qt™ framework forSTM32 MPU devices (see supported platforms list)
2.2. Main restrictions[edit source]
2.3. Versioning[edit source]
Latest version of X-LINUX-QT is 1.0.0.
The X-LINUX-QT Expansion Package is based to be used with OpenSTLinux distribution ecosystem release v5.1.0 ![]() .
.
The generic versioning X-LINUX-QT vx.y.z is built as follows:
x: major version depending on Qt™ major versions. Each new major version is incompatible with previous Qt™ versions.
Initial major version 1.0.0 is be for Qt 5.x and version 2.0.0 will be for Qt 6.x
y: minor version depending on the OpenSTLinux distribution major versions. Each new major version is incompatible with previous OpenSTLinux distribution versions. Initial minor version will be for OpenSTLinux Distribution v5.x
z: patch version is changed when new functionalities, bug fixes and/or modules are added to the X-LINUX-QT OpenSTLinux Expansion Package in a backward compatible manner.
3. Associated licenses[edit source]
Associated licenses are available in the wiki article X-LINUX-QT_licenses.
4. Prerequisites[edit source]
4.1. Hardware prerequisites[edit source]
- STM32MP257F-EV1 Evaluation board

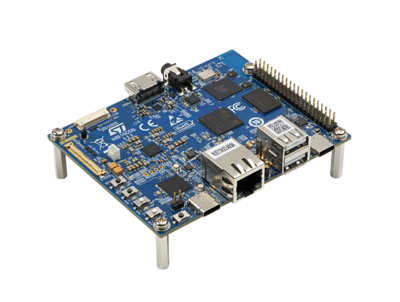
- STM32MP257F-DK Discovery kit

4.2. Software prerequisites[edit source]
The X-LINUX-QT Expansion Package runs with OpenSTLinux ecosystem release v5.1.0 ![]() .
.
In this article, the Qt™ Creator[1] tool is used to build, debug and run applications demos on target.
- You will need to create a Qt™ account then download and install the Qt™ Creator
- The Qt™ online installer is available from here
5. Hardware setup[edit source]
5.1. STM32MP257x-EV1 Evaluation board[edit source]
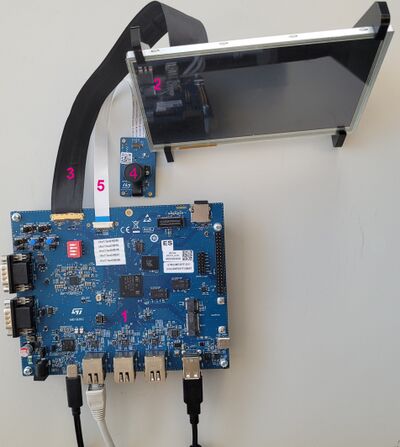
The STM32MP257x-EV1 - hardware description describes how to set up the STM32MP257F-EV1 Evaluation board ![]() . In this article is explained how to assemble the boards, set the right power jumper configuration, connect the display to the board and connect the board to your development environment.
. In this article is explained how to assemble the boards, set the right power jumper configuration, connect the display to the board and connect the board to your development environment.
6. Software setup[edit source]
6.1. How to get software[edit source]
There are 3 possibilities to install the additional X-LINUX-QT expansion package software to port on top of OpenSTLinux.
Select the one corresponding to your needs amongst :
- X-LINUX-QT Starter Package : quickly and easily bring Qt™ framework on STM32 MPU as graphics solution.
- X-LINUX-QT Developer Package: quickly and easily bring and develop with Qt™ framework on STM32 MPU as graphics solution.
- X-LINUX-QT Distribution package: an OpenEmbedded meta-layer must be added on top of the STM32MPU Distribution Package to bring "Qt™ framework" as graphics solution.
6.1.1. How to install the Starter Package[edit source]
6.1.1.1. Install OpenSTLinux Starter Package[edit source]
Before developing with the Developer Package, it is essential to start up your board thanks to its Starter Package. All articles relative to Starter Packages are found in Category:Starter Package: find the one that corresponds to your board, and follow the installation instructions (if not yet done), before going further.
In brief, it means that:
- your board boots successfully
- the flashed image comes from the same release of the STM32MPU Embedded Software distribution than the components that will be downloaded in this article
Thanks to the Starter Package, all Flash partitions are populated.
6.1.1.2. Install the X-LINUX-QT Starter Package[edit source]
Once the board is booted, make sure it is connected to the internet then execute the following command in the console to install the X-LINUX-QT packages:
- Refresh the apt database to access the Qt™ package repository :
apt-get update
- Install the package with the apt configuration to access the Qt™ packages :
apt-get install apt-openstlinux-x-linux-qt
- Update the apt database to read the Qt™ package repository :
apt-get update
- Install the package group for the X-LINUX-QT package
apt-get install -y packagegroup-x-linux-qt
- Restart the Weston graphical services with the new ST-Launcher
systemctl restart weston-graphical-session.service
6.1.1.3. Starter Package expected results[edit source]
Once the X-LINUX-QT Starter Package is installed and the Weston graphical service is restarted, the new STLauncher will be displayed.
- The STLauncher Splash Screen will be displayed for few seconds

- The Main Window displays all compatible installed applications
- To display more information about the running hardware and software:
- Click on the Settings button on the top right of the screen
- The SETTINGS screen will be displayed

- Click on the INFORMATIONS button
- The INFORMATIONS screen will be displayed

6.1.2. How to install Developer Package[edit source]
6.1.2.1. Install OpenSTLinux Developer Package[edit source]
To download and install the OpenSTLinux Developer Package, you need to follow instruction given in STM32MPU_Developer_Package#Developer_Package_step-by-step_overview
6.1.2.2. Install the X-LINUX-QT Developer Package[edit source]
Download and install the X-LINUX-QT SDK Addon
The X-LINUX-QT SDK-Addon is delivered through two tarball files named :
- en.sdk-x86_64-stm32mp2-openstlinux-6.1-yocto-mickledore-mpu-v24.06.26-x-linux-qt-v1.0.0.tar.gz for x86_64 host architecture
- en.sdk-aarch64-stm32mp2-openstlinux-6.1-yocto-mickledore-mpu-v24.06.26-x-linux-qt-v1.0.0.tar.gz for arm64 host architecture
Download and install the X-LINUX-QT SDK-Addon.
The software package is provided AS IS, and by downloading it, you agree to be bound to the terms of the software license agreement (SLA0048). The detailed content licenses can be found here.
| X-LINUX-QT Developer Package SDK-Addon v1.0.0 release | |
|---|---|
| Download |
|
| Installation | For x86_64 host architecture
 mkdir -p ~/MySDK
 tar xvf en.sdk-x86_64-stm32mp2-openstlinux-6.1-yocto-mickledore-mpu-v24.06.26-x-linux-qt-v1.0.0.tar.gz -C ~/MySDK
chmod +x ~/MySDK/stm32mp2-openstlinux-6.1-yocto-mickledore-mpu-v24.06.26-x-linux-qt-v1.0.0/sdk/st-image-qt-openstlinux-weston-stm32mp2-x86_64-toolchain-4.2.4-openstlinux-6.1-yocto-mickledore-mpu-v24.06.26-addon-x-linux-qt-v1.0.0.sh
 cd <working directory absolute path>/Developer-Package/SDK
 ~/MySDK/stm32mp2-openstlinux-6.1-yocto-mickledore-mpu-v24.06.26-x-linux-qt-v1.0.0/sdk/st-image-qt-openstlinux-weston-stm32mp2-x86_64-toolchain-4.2.4-openstlinux-6.1-yocto-mickledore-mpu-v24.06.26-addon-x-linux-qt-v1.0.0.sh
===============================================================================================================================================
ST OpenSTLinux - Weston - (A Yocto Project Based Distro) SDK installer version 4.2.4-openstlinux-6.1-yocto-mickledore-mpu-v24.06.26 - X-LINUX-QT version 1.0.0 SDK-Addon installer
===============================================================================================================================================
Extracting X-LINUX-QT-Addon SDK................................................................................................Done.
Setting it up... Done.
Using /home/bbkarim/Qt/Tools/sdktool/libexec/qtcreator/sdktool
Adding "Qt 5.15.13 for STM32MP25 ( 4.2.4-openstlinux-6.1-yocto-mickledore-mpu-v24.06.26, X-LINUX-QT v1.0.0)" kit for Qt Creator... Done.
X-LINUX-QT-Addon SDK has been successfully set up and is ready to be used.
|
For arm64 host architecture
 mkdir -p ~/MySDK
 tar xvf en.sdk-aarch64-stm32mp2-openstlinux-6.1-yocto-mickledore-mpu-v24.06.26-x-linux-qt-v1.0.0.tar.gz -C ~/MySDK
chmod +x ~/MySDK/stm32mp2-openstlinux-6.1-yocto-mickledore-mpu-v24.06.26-x-linux-qt-v1.0.0/sdk/st-image-qt-openstlinux-weston-stm32mp2-aarch64-toolchain-4.2.4-openstlinux-6.1-yocto-mickledore-mpu-v24.06.26-addon-x-linux-qt-v1.0.0.sh
 cd <working directory absolute path>/Developer-Package/SDK
 ~/MySDK/stm32mp2-openstlinux-6.1-yocto-mickledore-mpu-v24.06.26-x-linux-qt-v1.0.0/sdk/{{X-
==================================================================================================================================================
ST OpenSTLinux - Weston - (A Yocto Project Based Distro) SDK installer version 4.2.4-openstlinux-6.1-yocto-mickledore-mpu-v24.06.26 - X-LINUX-QT version 1.0.0 SDK-Addon installer
===================================================================================================================================================
Extracting X-LINUX-QT-Addon SDK......................................................................................................... Done.
Setting it up... Done.
Using /home/bbkarim/Qt/Tools/sdktool/libexec/qtcreator/sdktool
Adding "Qt 5.15.13 for STM32MP25 ( 4.2.4-openstlinux-6.1-yocto-mickledore-mpu-v24.06.26, X-LINUX-QT v1.0.0)" kit for Qt Creator... Done.
X-LINUX-QT-Addon SDK has been successfully set up and is ready to be used.
| |
| Release note |
6.1.3. How to install Distribution Package[edit source]
6.1.3.1. Install OpenSTLinux Distribution Package[edit source]
As prerequisite to X-LINUX-QT Distribution Package, you need to get and install the STM32MPU Distribution Package v5.1.0.. The way to proceed is given below:
- The STM32MPU OpenSTLinux distribution is delivered through a manifest repository location and a manifest revision.
- The installation relies on the repo command. In case the Repo tool (a Google-built repository management tool that runs on top of git) is not yet installed and configured on the host PC, refer to the PC prerequisites article.
- The OpenSTLinux distribution is massively using open source software (OSS) packages that are downloaded from a variety of open source repositories; so it is required that the IT infrastructure proxies do not forbid such accesses. If some proxy-related issues are suspected, refer to the How to avoid proxy issues article.
- Install the STM32MPU OpenSTLinux distribution: openstlinux-6.1-yocto-mickledore-mpu-v24.06.26
| STM32MPU Distribution Package OpenSTLinux distribution - STM32MPU-Ecosystem-5.1.0 release | |
|---|---|
| Installation |
cd <working directory path>/Distribution-Package
repo init -u https://github.com/STMicroelectronics/oe-manifest.git -b refs/tags/openstlinux-6.1-yocto-mickledore-mpu-v24.06.26 Note: "ERROR 404" may appear during "repo init" command without any impact on the process
repo sync
|
| Release note |
Details about the content of this software package are available in the associated STM32 MPU ecosystem release note.
|
- When installed, the OpenSTLinux Distribution Package is available with following tree structure:
Distribution-Package OpenSTLinux distribution ├── layers │ ├── meta-openembedded Collection of layers for the OpenEmbedded-Core universe (OpenEmbedded standard) │ ├── meta-st │ │ ├── meta-st-openstlinux STMicroelectronics layer that contains the frameworks and images settings for the OpenSTLinux distribution │ │ ├── meta-st-stm32mp STMicroelectronics layer that contains the description of the BSP for the STM32 MPU devices │ │ │ ├── recipes-bsp │ │ │ │ ├── alsa Recipes for ALSA control configuration │ │ │ │ ├── ddr-firmware Firmware for DDR PHY on STM32MP │ │ │ │ ├── drivers Recipes for Vivante GCNANO GPU kernel drivers │ │ │ │ ├── fip-stm32mp FIP generation │ │ │ │ ├── trusted-firmware-a Recipes for TF-A │ │ │ │ ├── trusted-firmware-m For STM32MP25x linesonly - Recipes for TF-M │ │ │ │ └── u-boot Recipes for U-Boot │ │ │ ├── recipes-connectivity │ │ │ │ ├── bluetooth Systemd service to suspend/resume correctly bluetooth │ │ │ │ ├── openssl bbappend recipe to add openssl environment setup to SDK │ │ │ ├── recipes-extended │ │ │ │ ├── external-dt Recipes for providing device tree files for STM32 MPU devices outside of BSP components │ │ │ │ ├── linux-examples Recipes for Linux examples for STM32 MPU devices │ │ │ │ ├── libb64 For STM32MP25x lines
Additional information can be found in the STM32MPU_Distribution_Package article.
6.1.3.2. Install X-LINUX-QT Distribution Package[edit source]
To install the X-LINUX-QT Distribution Package
- Clone the meta-st-x-linux-qt git repository
 cd <Distribution Package installation directory>
 git clone -b v1.0.0 https://github.com/STMicroelectronics/meta-st-x-linux-qt.git layers/meta-st/meta-st-x-linux-qt
- Clone the meta-qt5 git repository
git clone -b scarthgap https://github.com/meta-qt5/meta-qt5.git layers/meta-qt5
- Source the build environment with the correct board and layer
DISTRO=openstlinux-weston MACHINE=stm32mp2 BSP_DEPENDENCY="layers/meta-qt5 layers/meta-st/meta-st-x-linux-qt" source layers/meta-st/scripts/envsetup.sh
6.1.3.3. Re-build the X-LINUX-QT Starter Package[edit source]

To rebuild the X-LINUX-QT Starter Package, user must install the X-LINUX-QT Distribution Package, set up the environment and run the adequate bitbake command as below:
bitbake st-image-qt package-index
The output will be the "full image" files for the st-image-qt.
Then restart the Weston graphical services with the new ST-Launcher :
systemctl restart weston-graphical-session.service
6.1.3.4. Re-build the X-LINUX-QT Developer Package[edit source]

To rebuild the X-LINUX-QT Developer Package, user must install the X-LINUX-QT Distribution Package, set up the environment and run the adequate bitbake command as below:
bitbake st-image-qt -c do_populate_sdk
The output will be the full SDK installer for the st-image-qt.
Then come back to install the #X-LINUX-QT Developer Package chapter to know how to install this generated SDK.
7. Run examples from the starter package[edit source]
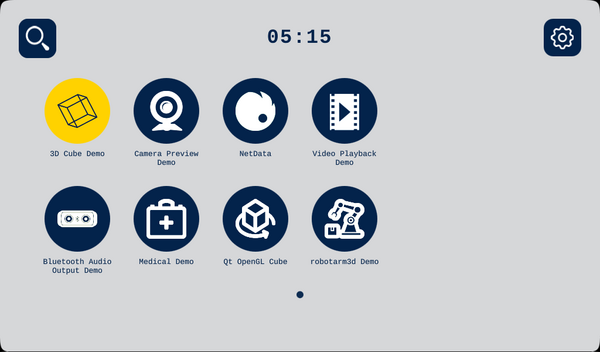
7.1. Play legacy demos[edit source]
Demos, which whare re available via the GTK demo launcher, are still supported by the new QT STLauncher.
For example, you can run the 3D Cube Demo from the new Qt STLauncher :
- Select the demo's icon (Selected icon will be in Yellow)

- Click on the demo's icon again to run the demo

7.2. Launch new Qt demos[edit source]
Qt™ OpenGL Cube example is now displayed in the new STLauncher.
In order to run the examples, select its icon first then click on it again to start it
- Select the Qt™ OpenGL Cube example icon
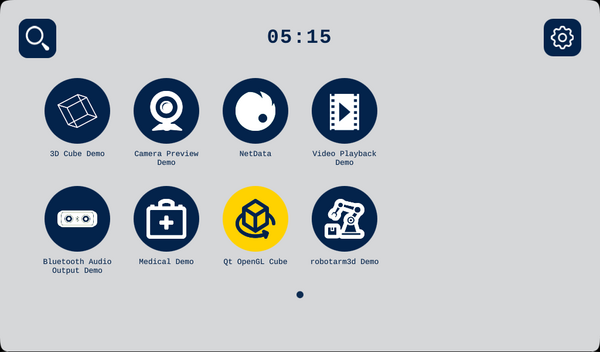
- Click on the demo's icon again to run the demo

7.3. New Qt demonstrations[edit source]
The new Medical and RobotArm3D demonstrations are displayed in the new STLauncher.
In order to run the demonstration, select its icon first then click on it again to start it.
7.3.1. ST Medical[edit source]


7.3.1.1. ST RobotArm3D Demo[edit source]


8. How to create a QT application using the X-LINUX-QT Developer Package[edit source]
9. How to configure Qt Creator with the X-LINUX-QT Developer Package[edit source]
The Qt™ Creator[2] tool is used to build, debug and run applications demos on target.
9.1. Prerequisites to Qt Creator usage[edit source]
- User needs to create a Qt™ account
9.2. Install the Qt Creator[edit source]
- The Qt™ Creator can be downloaded and installed following this link
- The Qt™ online installer can be dowloaded cliking on this link
- The Qt™ Creator must be installed from here before installing the X-LINUX-QT Developer Package.
- Installing the X-LINUX-QT Developer Package configures also the Qt™ Creator for the new STM32MPU Kit.
9.3. Select the new Kit installed by the X-LINUX-QT Developer Package[edit source]
Once the Qt™ Creator is launched and the Welcome to Qt™ Creator is displayed:
- go to the Examples from the list on the left ,
- then select the new STM32MP2 Kit added by the X-LINUX-QT Developer Package from the dropdown list.
The supported examples are then displayed.

9.4. Select the project example[edit source]
- You may search for a specific example in the Search bar in front of the selected Kit
- Select the example you are looking for (just a simple click on it)

- Close the Help window if not needed

9.5. Configure the project example[edit source]
- Make sure the new added Kit by X-LINUX-QT Developer Package is selected
- Press the Configure Project button

- Make sure all configuration steps are successfully done (Green Bars)

9.6. Configure the Kit[edit source]
- Select the Configure Project button from the vertical bar on the left
- Select the new Kit added by the X-LINUX-QT Developer Package
- Select Run Settings
- On the right panel, scroll down till the Environment section
- Add the below environment variables
XDG_RUNTIME_DIR=/run/user/1000
QT_QPA_PLATFORM=wayland
QT_VULKAN_LIB=/usr/lib/libvulkan.so.1

9.7. Build and run the project[edit source]
- Make sure your board is connected to your host machine via Ethernet ports indicated 30 below :

- Once in the Run Setting panel, you shouldn't have the below notice at the bottom of the screen.

- Press the Run button from the vertical bar on the left
- That will build, deploy and run the selected example on the connected board.

- If everything went well, then the example will be running on the connected board.
10. References[edit source]