1. Purpose[edit source]
Secure boot is a key feature to guarantee a secure platform.
STM32MP1 boot sequence supports a trusted boot chain that ensures that the loaded images are authenticated and checked in integrity before being used.
2. Authentication processing on STM32MP13x lines  [edit source]
2.1. Full view[edit source]
STM32 MPU provides authentication processing with ECDSA [1] verification algorithm, based on ECC [2]. ECDSA offers better result than RSA with a smaller key. STM32 MPU relies on a 256 bits ECDSA key.
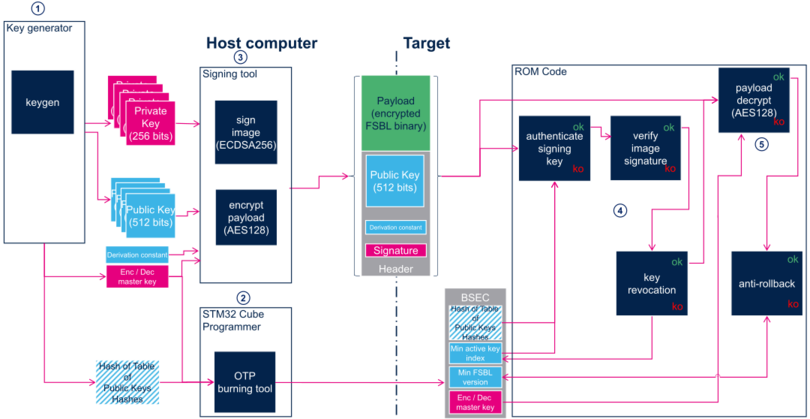
The figure above shows the steps implied in secure boot:
2.2. Keys generation[edit source]
First step is to generate necessary keys with STM32 KeyGen tool.
Authentication keys
- The STM32 KeyGen tool generates 8 ECC pair of keys that will be used to sign the images.
- The STM32 KeyGen tool generates 8 ECC pair of keys that will be used to sign the images.
- The STM32 KeyGen tool tool also generates a file containing the hash of the table of 8 public key hashes (PKHTH) that will be used to authenticate the public key on the target.
Encryption / Decryption key
- The STM32 KeyGen tool generates the decryption master key (DMK) that will be used to derive the decryption key used to encrypt and decrypt the image payload.
2.3. Keys registration[edit source]
- PKHTH shall be stored in OTP WORD 24 to 31.
- DMK shall be stored in OTP WORD 92 to 95.
2.4. Image signing[edit source]

- 8 signing keys available.
- Public Keys are hashed and this table of hashes is stored in the header.
- Each key is identified by its index in the table.
- The index of the key used for signing, the activate key index, is stored in the header.
- Using a key revokes all the keys with lower index.
- Two algorithms supported for ECDSA calculation. The algorithm is in the header
- P-256 NIST
- Brainpool 256
2.5. Image authentication[edit source]
The EDCSA verification follows the process below:

- The ROM code computes the SHA256 hash of the Table of Public Hashes available in the header.
- Then, it compares this hash with the one stored in STM32MP1 BSEC non volatile memory in OTP WORD 24 to 31 : if different, the authentication process is ko. Otherwise, it continues…
- The ROM code computes the SHA256 hash of the “Public key” available in the signed file.
- Then, it checks this “Public key” :
- It checks that the active key index stored in the header is greater or equal to the "min active key index" stored in BSEC non volatile memory: if not, the authentication process is ko. Otherwise, it continues…
- It compares the hash of of the “Public key” previously computed to the one corresponding to the active key index in the Table of Public Hashes: if different, the authentication process is ko. Otherwise, it continues…
- It checks that the active key index stored in the header is greater or equal to the "min active key index" stored in BSEC non volatile memory: if not, the authentication process is ko. Otherwise, it continues…
- The ROM code computes the SHA256 of the FSBL payload plus the “Public key” and the file header.
- It uses the “Public key” that has just been authenticated to verify that the signature stored in the header is a valid signature of this hash: if the verification fails, then the authentication process is ko. Otherwise, the authentication is successful and the ROM code goes on with the boot process.
- The ROM code ends the authentication process by, if needed, updating the "min active key index" and the "min FSBL version" in the STM32MP1 BSEC non volatile memory.
- Key revocation
- The "min active key index" stored in in OTP WORD 22 is updated if the active key index that was used is greater that it.
- Anti rollback
- The ROM code checks that the FSBL version contained in the header is greater or equal to the the "min FSBL version" stored in OTP WORD 4 : if not the the authentication process is ko. Otherwise, the ROM code updates the "min FSBL version" and continues the boot process.
2.6. Image encryption[edit source]

- The host calculates the SHA256 hash of FSBL binary, and stores the 128 most significant bits of it in the header.
- The host calculates the PRF CMAC derivation of the Master Encryption Key with a derivation constant to generate the encryption, and stores the derivation constant in the header.
- The host uses the encryption key to encrypt the FBSL binary with AES algorithm
.
2.7. Image decryption[edit source]

- The ROM code calculates the PRF CMAC derivation of the Master Encryption Key stored in STM32MP1 BSEC non volatile memory, with the derivation constant stored in the header.
- The ROM code uses the decryption key to encrypt the FBSL binary with AES algorithm.
- The ROM code calculates the SHA256 hash of the plain FSBL binary,
- The ROM code compares the 128 most significant bits of this hash with the ones stored in the header : if the verification fails, then the decryption process is ko. Otherwise, the decryption is successful and the ROM code goes on with the boot process.
3. Authentication processing on STM32MP15x lines [edit source]
3.1. Full view[edit source]
STM32 MPU provides authentication processing with ECDSA [3] verification algorithm, based on ECC [4]. ECDSA offers better result than RSA with a smaller key. STM32 MPU relies on a 256 bits ECDSA key.
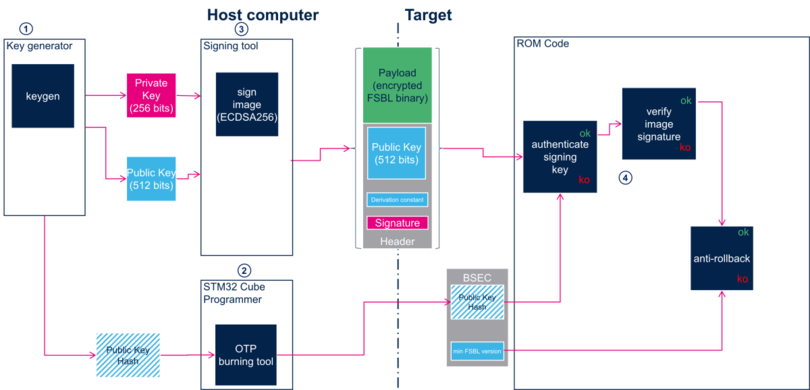
The figure above shows the steps implied in secure boot:
3.2. Keys generation[edit source]
First step is to generate necessary keys with STM32 KeyGen tool.
Authentication keys
- The STM32 KeyGen tool generates one ECC pair of keys that will be used to sign the images.
- The STM32 KeyGen tool generates one ECC pair of keys that will be used to sign the images.
- The STM32 KeyGen tool tool also generates a third file containing the public key hash (PKH) that will be used to authenticate the public key on the target.
- The STM32 KeyGen tool tool also generates a third file containing the public key hash (PKH) that will be used to authenticate the public key on the target.
3.3. Keys registration[edit source]
- PKH shall be stored in OTP WORD 24 to 31.
3.4. Image signing[edit source]

- Only one signing key available.
- The public key is stored in the header.
- Two algorithms supported for ECDSA calculation. The algorithm is in the header
- P-256 NIST
- Brainpool 256
.
3.5. Image authentication[edit source]
The EDCSA verification follows the process below:

- The ROM code computes the SHA256 hash of the “Public key” available in the signed file. Then, it compares this hash with the one stored in STM32MP1 BSEC non volatile memory in OTP WORD 24 to 31 : if different, the authentication process is ko. Otherwise, it continues…
- The ROM code computes the SHA256 of the FSBL payload plus the “Public key” and the file header.
- It uses the “Public key” that has just been authenticated to verify that the signature stored in the header is a valid signature of this hash: if the verification fails, then the authentication process is ko. Otherwise, the authentication is successful and the ROM code goes on with the boot process.
- The ROM code checks that the FSBL version contained in the header is greater or equal to the the "min FSBL version" stored in OTP WORD 4 : if not the the authentication process is ko. Otherwise, the ROM code continues the boot process.
4. Operating guidances[edit source]
4.1. U-Boot command stm32key[edit source]
OpenSTLinux embeds a stm32key tool that can be called from U-Boot command line interface to manage these OTP.
  help stm32key
 stm32key read [<addr>] : Read the hash stored at addr in memory or in OTP
 stm32key fuse [-y] <addr> : Fuse hash stored at addr in OTP
 stm32key close [-y] : Close the device, the hash stored in OTP
The optional option -y is used to skip the confirmation message.
Nota: the support of close is available in ecosystem release ≥ v3.1.0
In this article, this stm32key tool is used to illustrate and experiment the steps needed to activate the secure boot, but these OTP can also be updated directly by customer application or with Secure Secret Provisioning (SSP).
4.2. Operating guidance on STM32MP13x lines [edit source]
4.3. Operating guidance on STM32MP15x lines [edit source]
4.3.1. Authentication steps[edit source]
- Key registration: update and lock PKH in OTP (
stm32key fuse)
- Perform image authentication and check that the ROM code accepted them.
- Close the device, only signed binary will be accepted (
stm32key close)
4.3.2. Key generation[edit source]
First step is to generate the ECC pair of keys with STM32 KeyGen tool. This is the key pair that will be used to sign the images.
The tool also generates a third file containing the public key hash (PKH) that will be used to authenticate the public key on the target.
4.3.3. Key registration[edit source]
4.3.3.1. Load hash public key[edit source]
PKH file (publicKeyhash.bin) must be available in DDR before proceeding.
For example loaded from a filesystem partition on a storage device, like bootfs (partition 4) on SD card (mmc0):
  load mmc 0:4 0xc0000000 publicKeyhash.bin
 32 bytes read in 50 ms (0 Bytes/s)
4.3.3.2. Register hash public key[edit source]
First step to enable the authentication is to burn the OTP WORD 24 to 31 in BSEC with the corresponding public key hash (PKH, output file from STM32 KeyGen).
Make sure that a trusted image was programmed on your board, because below operation will not be possible with optee boot.
You can verify this PKH available in DDR:
  stm32key read 0xc0000000                                       Read loaded key from DDR to confirm it is valid (without writing it in OTP)
 OTP value 24: 12345678
 OTP value 25: 12345678
 OTP value 26: 12345678
 OTP value 27: 12345678
 OTP value 28: 12345678
 OTP value 29: 12345678
 OTP value 30: 12345678
 OTP value 31: 12345678
stm32key fuse 0xc0000000 Write and lock the key in OTP
The device now contains the hash to authenticate images. To read back the OTP, you can use NVMEM framework or the command stm32key:
stm32key read Read the key in OTP
4.3.4. Image signing[edit source]
In a second step, FSBL binary must be signed. STM32 Signing tool allows to fill the STM32 binary header that is parsed by the embedded software to authenticate each binary.
4.3.5. Image programming[edit source]
Once the image is signed, it can be programmed into the flash on the target board with STM32CubeProgrammer.
4.3.6. PKH check[edit source]
Before really starting the authentication process, the ROM code compares the hash of the public key carried in the STM32 header with the one that was provisioned in OTP.
4.3.7. Authentication[edit source]
4.3.7.1. ROM code authentication[edit source]
Using a signed binary, the ROM code authenticates and starts the FSBL.
At boot time on board, you must see the following line in TF-A trace:
NOTICE:  CPU: STM32MP157CAA Rev.?
NOTICE:  Model: STMicroelectronics STM32MP157C eval daughter on eval mother
NOTICE:  Board: MB1263 Var1.0 Rev.C-01
NOTICE:  Bootrom authentication succeeded
INFO:    Reset reason (0x15):
INFO:      Power-on Reset (rst_por)
INFO:    PMIC version = 0x10
On closed device, if the authentication fails, the ROM code enters into a serial boot loop indicated by the blinking Error LED (cf ROM code common debug and error cases).
The ROM code provides secure services to the FSBL for image authentication with the same ECC pair of keys, so there is no need to support ECDSA algorithm in FSBL.
4.3.8. Closing the device[edit source]
Notice that this last step is not shown in the diagram above.
Without any other modification, the device is able to perform image authentication but non authenticated images can still be used and executed: the device is still opened, let's see this as a kind of test mode to check that the PKH is properly set.
As soon as the authentication process is confirmed, the device can be closed and the user is forced to use signed images.
OTP WORD0 bit 6 is the OTP bit that closes the device. Burning this bit will lock authentication processing and force authentication from the Boot ROM. Non signed binaries will not be supported anymore on the target.
To program this bit, the STM32CubeProgrammer or U-Boot command line interface can be used.
Here is how to proceed with U-Boot:
stm32key close
or if stm32key close is not supported, you can write bit 6 = 0x40 in OTP 0:
fuse prog 0 0x0 0x40
5. References[edit source]