This article gives information about how to easily develop a LVGL application on STM32MP1 using STM32CubeIDE.
1. Architecture overview[edit source]
The following diagram summarizes all the configurations of the LVGL library. In this article we will detail each of the possibilities and we will see how to generate the SDK.
1.1. Component presentation[edit source]
1.1.1. LVGL[edit source]
LVGL (Light and Versatile Graphics Library) is an open-source embedded GUI library that is written in C (with C++ compatibility) and is released under the MIT license. It’s optimized for deployment on micro-controllers and bare metal (no OS) devices, but on this article, we will see how to develop LVGL applications for our STM32MP1 microprocessor that runs the OpenSTLinux linux distribution.
1.1.2. SDL2[edit source]
- SDL or Simple Direct Media Layer is a cross-platform development library designed to provide low level access to audio, keyboard, mouse, joystick, and graphics hardware . it allows to show windows, show images, play sounds, manage keyboards...
- SDL is written in C, works natively with C++, and there are bindings available for several other languages, including C# and Python.
- SDL 2.0 is distributed under the zlib license. This license allows you to use SDL freely in any software.
1.1.3. Wayland / Weston[edit source]
- Wayland is a protocol that allows a composer to communicate with multiple windows. It works only with systems using KMS (Kernel-based mode-setting), a kernel feature dependent on the graphics card driver used, hence the need to use a composer.
- A composer implementing the Wayland protocol (Mutter, Kwin, Enlightenment, Weston...) is necessary (otherwise Wayland alone does nothing, and it is always an X server that would be used).
- The composer is a window manager who uses a buffer in memory to manage each window and apply visual effects to it.
- Weston is the reference implementation of a graphical composer window manager for the Wayland display protocol, its existence is justified by the need to develop Wayland without depending on the ups and downs of the development of libraries and environments, by the need to be able to rigorously test Wayland without experiencing bugs independent of Wayland.
1.1.4. DRM / KMS[edit source]
For more information about drm /kms, you can see the following article: DRM/KMS
1.2. Different configurations[edit source]
1.2.1. Weston Wayland SDL2[edit source]
1.2.2. DRM-KMS / SDL2 configuration with GPU[edit source]
1.2.3. DRM-KMS / SDL2 configuration without GPU[edit source]
2. How to generate SDK for the configuration[edit source]
2.1. Purpose to generate SDK[edit source]
2.2. Generate SDK for SDL2 with GPU configuration[edit source]
- Before generating the SDK, we will start by creating a recipe append file for the sdl2 library in our distribution package.
 mkdir /local/STM32MP15-Ecosystem-v3.1.0/Distribution-Package/openstlinux-5.10-dunfell-mp1-21-11-17/layers/meta-st/meta-st-openstlinux/recipes-graphics/libsdl2
 cd /local/STM32MP15-Ecosystem-v3.1.0/Distribution-Package/openstlinux-5.10-dunfell-mp1-21-11-17/layers/meta-st/meta-st-openstlinux/recipes-graphics/libsdl2
 touch libsdl2_%.bbappend
- To configure SDL2 for stm32mp1 platform and Vivante GPU,copy the following script into the recipe.
PACKAGECONFIG_GL = ""
PACKAGECONFIG ??= " \
    ${PACKAGECONFIG_GL} \
    ${@bb.utils.filter('DISTRO_FEATURES', 'alsa pulseaudio', d)} \
    ${@bb.utils.contains('DISTRO_FEATURES', 'wayland', 'wayland gles2', '', d)} \
    ${@bb.utils.contains("TUNE_FEATURES", "neon","arm-neon","",d)} \
    kmsdrm \
"
PACKAGECONFIG[gles2]      = "--enable-video-opengles2,--disable-video-opengles2,virtual/libgles2"

EXTRA_OECONF += " \
    --disable-video-vivante \
    --disable-video-vulkan \
    --disable-video-opengl \
"
- To solve some problems of reading the symbols for the lib libegl , we must apply a patch on the recipe.
- On the same directory , we create a file with the extension (.patch) that we call sdl.
- Copy the following script into our patch.
--- a/src/loadso/dlopen/SDL_sysloadso.c
+++ b/src/loadso/dlopen/SDL_sysloadso.c
@@ -46,8 +46,13 @@ SDL_LoadObject(const char *sofile)
         return NULL;
     }
#endif
+    // SDL will skip dlopen'ing libEGL.so after it spots EGL symbols on our
+    // wrapper, so force loading it here.
+    if (strncmp(sofile, "libEGL.so", 9) != 0)
+        handle = dlopen(sofile, RTLD_NOW|RTLD_LOCAL | RTLD_GLOBAL | RTLD_LAZY);
+    else
+        handle = dlopen(sofile, RTLD_NOW|RTLD_LOCAL);

-    handle = dlopen(sofile, RTLD_NOW|RTLD_LOCAL);
     loaderror = dlerror();
     if (handle == NULL) {
         SDL_SetError("Failed loading %s: %s", sofile, loaderror);
- Apply the patch on our recipe.
- To create SDK :
 cd /local/STM32MP15-Ecosystem-v3.1.0/Distribution-Package/openstlinux-5.10-dunfell-mp1-21-11-17
 DISTRO=openstlinux-weston MACHINE=stm32mp1 source layers/meta-st/scripts/envsetup.sh
 bitbake -c populate_sdk st-image-weston
- Bitbake generates the sdk in the following directory:
cd /local/STM32MP15-Ecosystem-v3.1.0/Distribution-Package/openstlinux-5.10-dunfell-mp1-21-11-17/build-openstlinuxweston-stm32mp1/tmp-glibc/deploy/sdk
- Give the right of execution :
chmod +x st-image-weston-openstlinux-weston-stm32mp1-x86_64-toolchain-3.1.11-snapshot.sh
- Run the SDK and copy it back to the developer package.
./ st-image-weston-openstlinux-weston-stm32mp1-x86_64-toolchain-3.1.11-snapshot.sh -d /local/STM32MP15-Ecosystem-v3.1.0/Developer-Package/SDK_SDL2_WITH_GPU
2.3. Generate SDK for SDL2 without GPU configuration[edit source]
3. How to build LVGL project with STM32CubeIDE[edit source]
3.1. Get LVGL project[edit source]
- Create a new folder.
- Open a terminal in this folder.
- Download the LVGL project with the following command:
git clone --recursive https://github.com/lvgl/lv_port_pc_eclipse.git
If you are using Windows, you can go to LVGL's GitHub and download the folder and unzip it.
- Rename your project.
- Launch STM32CubeIDE
- Import your project :
Click on file ==> Import ==> Existing Projects into Workspace ==> select your LVGL project.
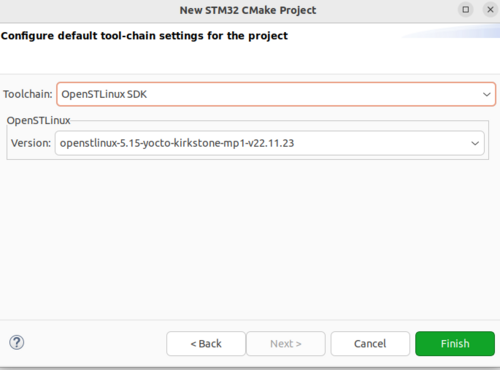
- Change the toolchain .
By default, stm32CubeIDE uses a Tool Chain for a x86_64 architecture, in our case we want to compile for our microprocessor with an ARM architecture. For this we need to change it:
Right-Click on you project ==> Properties ==> C/C++ Build ==> Tool Chain Editor ==> select OpenSTLinux SDK ==> Apply and Close
3.2. Configure CubeIDE with SDK[edit source]
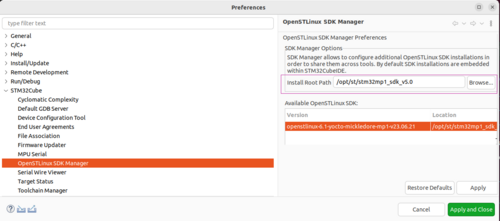
To be able to use the SDK that we have generated , stm32CubeIDE needs the absolute path to access it :
Right-click on you project ==> Properties ==> C/C++ Build ==>Environment ==> Double click on SDKPATH ==> Paste the the absolute path ==> click on "OK" ==> click on "Apply an close "
3.3. Proposed modifications on LVGL project[edit source]
3.4. Run the demo[edit source]
- Build the project
Right-Click on you project ==> Build project
- If everything works well, in your project (folder "Debug") you find the binary file.
You can copy it to the board by using the following command:
scp <name_of_your_binary> root@<IP_address>:/
To get the IP address of your target, type the following commands:
 minicom  -D /dev/ttyACM0
 ifconfig
inet is the ip address of your target
- Run your binary
 sync
 cd /
 ./<name_of_your_binary >
To kill the current project:
CTRL + c
3.5. Display performances[edit source]
To measure performances, you will need two terminals, the first to launch the application and the second to display the performances in real time.
- After copying the binary, we launch the first terminal on the board with the following commands :
  minicom  -D /dev/ttyACM0
   ./<name_of_your_binary>
- we launch the second terminal with SSH .
ssh root@<IP_address>
on the same terminal paste and run the following script :
 (while true; do \

gpu_last_gc=$(cat /sys/kernel/debug/gc/idle); \

m=$(mpstat 4 1 | grep "Average:     all" | awk -F" " '{print "cpu load " $3 "%"}'); \

echo "-------------------------"; \

export fps=`cat /sys/kernel/debug/dri/0/state | grep fps -m1 | grep -o '[0-9]\+'`; echo display  ${fps}fps; \

gpu_on=$(echo $gpu_last_gc | tr -d '\n' | tr -d ',' | awk -F" " '{printf("%f\n", $2)}'); \

gpu_start=$(echo $gpu_last_gc | tr -d '\n' | tr -d ',' | awk -F" " '{printf("%f\n", ($2+$5+$8+$11))}'); \

tr -d '\n' < /sys/kernel/debug/gc/idle | tr -d ',' | awk -v on=$gpu_on -v start=$gpu_start -F" " '{printf ("gpu load %.0f%%\n", ($2 - on) * 100/($2+$4+$6+$8 - start));}'; \

echo $m; \

done) &
to stop the script: Click on
                      > 'f' +'g'+ ENTER
                      > CTRL+C


