How to start with certificate linked to SOC class and SOC ID on STM32H5
Target description
The generation of a root certificate and a certificate chain and how to use it to open the debugger through a debug authentication are explained in the two following articles:
- How to start with OEMiRoT on STM32H573 and 563 TrustZone enabled.
- How to start with STiRoT on STM32H573.
The purpose of this article is to explain how to generate a certificate and a certificate chain valid only for one specific MCU product and for one specific sample.
Introduction
It is advised to read the following article: Debug Authentication STM32H5 How to Introduction.
Read the chapter about the root certificate and the certificate chain included in one of the "How to start" mentioned previously.
Prerequisites
To try the certificate and certificate chain, a provisioned board is needed with an installed running application code.
It is advised to use one of the two following examples based on the STM32Cube Firmware.
Execute chapter 1 to chapter 4.
- How to start with OEMiRoT on STM32H573 and 563 TrustZone enabled.
- How to start with STiRoT on STM32H573.
- Note:
- There is a limitation for STM32H56x devices embedding SFSP2.5.0 (or previous SFSP).
- On these devices, when the product state is set to CLOSED, the SOC ID cannot be readout using the Discover function.
- A certificate chain is possible, but a certificate chain linked to a specific SOC ID is not supported on these products. There is no workaround.
- The SFSP version is readout at the address: 0x0BF960CC ; for SFSP2.5.0 the value is: 0x02050000.
- There is a limitation for STM32H56x devices embedding SFSP2.5.0 (or previous SFSP).
1. Unhide of the required field in STM32 Trusted Package Creator
- To link a certificate or certificate chain to a specific product, the identifier called the SOC class (in accordance with the ARM PSA ADAC specification) needs to be specified.
- To link a certificate or certificate chain to a specific sample die, the identifier called the SOC ID (in accordance with the ARM PSA ADAC specification) needs to be specified.
By default, the field to specify these identifiers is not available in the STM32 Trusted Package Creator.
A modification of the certificate generation xml file is needed.
This file is located in STM32CubeProgrammer directory: STM32CubeProgrammer\bin\TPC_CertifGen_Data_Base.
The ID of the product is indicated in the Reference Manual or can be found using STM32CubeProgrammer as indicated in the next chapter.
For this example, this ID called SOC Class (or also target ID) is 0x484 (STM32H57/6).
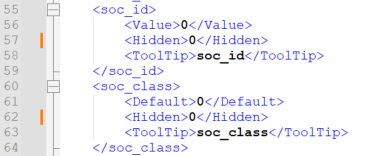
The STM32_CertifGen_DB_0x484.xml file needs to be update according to the following description:
- Change: <Hidden>1</Hidden>
- Into: <Hidden>0</Hidden> (lines 57 and 62 in the above figure example)
With these modifications the related fields are visible in STM32 Trusted Package Creator.
2. STM32CubeProgrammer Discover to read SOC Class and SOC ID
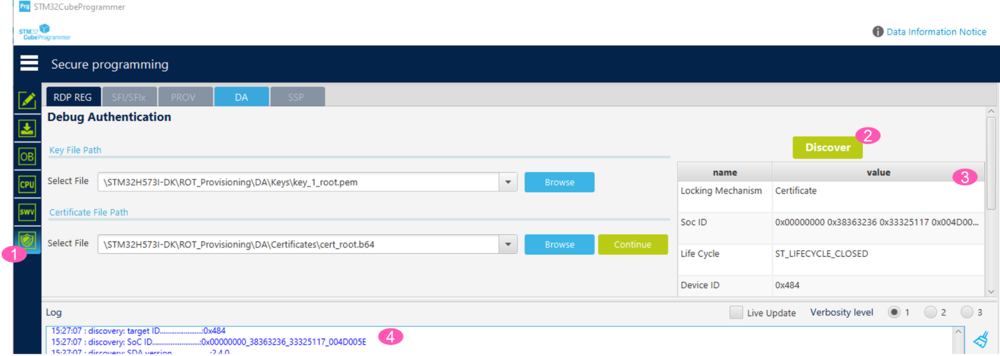
Open STM32CubeProgrammer, see figure below.
- 1. Click Shield.
- 2. Click Discover.
- 3. According to the prerequisites, an application code is installed and the device set in Closed state.
- 4. From the Log window, the SOC ID value can be copied, the SOC Class (target ID) value is also indicated.
The next chapter shows how these two values are used with STM32 Trusted Package Creator to generate certificates.
3. Generation of Root certificate and certificate chain linked to SOC ID and SOC Class
With the modification explained previously, done for the STM32_CertifGen_DB_0x484.xml file, STM32 Trusted Package Creator displays the SOC Class and SOC ID fields as shown in the next sections.
3.1. Root certificate generation
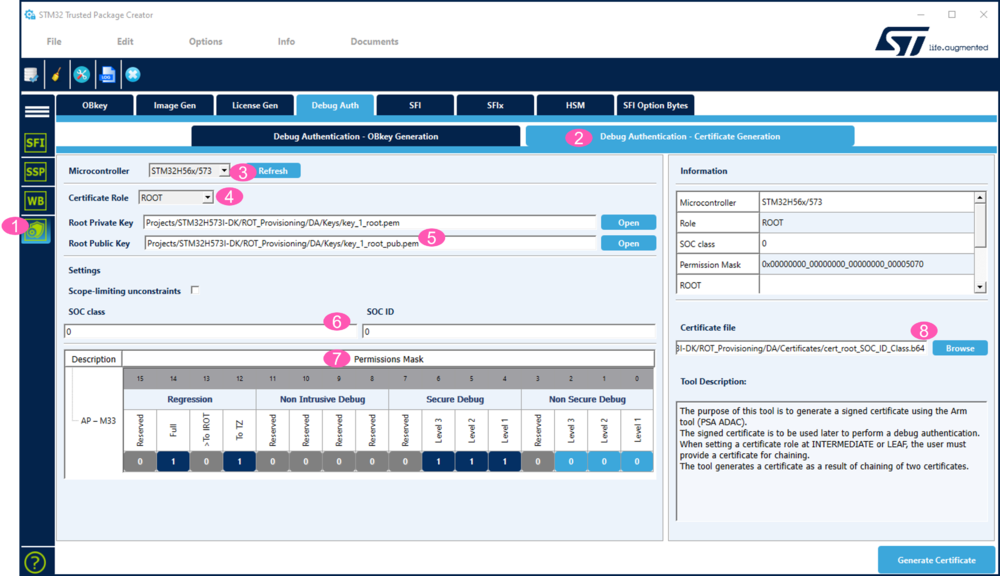
- Open STM32TrustedPackageCreator:
- 1. Click Shield.
- 2. Select "Debug Authentication - Certificate Generation".
- 3. Select the STM32H56/573.
- 4. Select "ROOT" to generate the root certificate.
- 5. Enter the path for the root private and public keys of the "How to start" (see prerequisite).
- 6. For the SOC class and SOC ID:
- It is possible to link the complete certificate chain to the SOC Class and SOC ID, but it is also possible to link only the leaf certificate to these IDs.
- Untick "Scope-limiting unconstrains".
- If "0" is entered in the fields the root certificate is not linked to the SOC Class or to the SOC ID.
- See the figure 4 to enter the SOC Class and SOC ID.
- 7. Set the wanted permission mask.
- 8. Select the Certificate directory of the CubeFW example and chose the name for the root certificate.
Enter the SOC Class and SOC ID
To link the certificate to the SOC Class and / or to the SOC ID, it has to be entered as shown in the following picture.
- The SOC Class needs to be entered manually, with the following format 0X8404 (for ID 0x484) (a solution to improve this point is under investigation).
- The SOC ID (also called target ID) can be cut and pasted from the STM32CubeProgrammer log window, as indicated in figure 2.
Generate the Root Certificate: click on "Generate Certificate" in TPC.
3.2. Intermediate certificate generation
How to generate an intermediate certificate for a certificate chain is described in detail in the two "how to start" indicated at the beginning of this article.
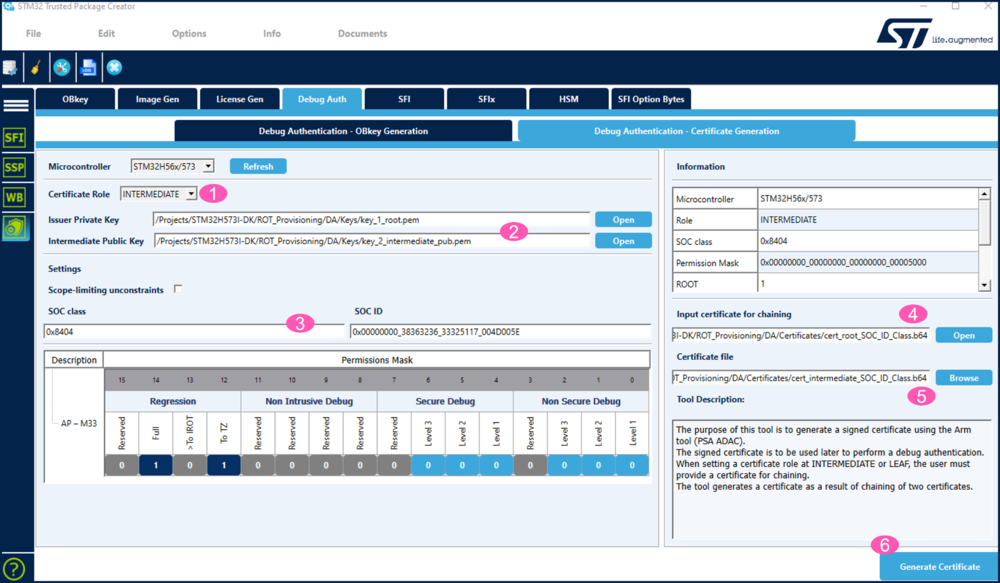
- 1. Select "INTERMEDIATE".
- 2. Enter the private root key and the intermediate pub key paths.
- 3. Enter the SOC Class and SOC ID. It is also possible to not link the intermediate certificate to the SOC Class and / or the SOC ID (in this case "0" has to be filled).
- 4. Enter the root certificate path generated in the previous step.
- 5. Enter the path and name for the intermediate certificate to generate.
- 6. Click Generate Certificate.
3.3. Leaf certificate generation
How to generate a leaf certificate for a certificate chain is described in detail in the two "how to start" indicated at the beginning of this article.
If the SOC Class and SOC ID have been filled in the previous steps, the complete certificate chain is linked to it.
It is also possible to use the SOC Class and SOC ID only for the leaf certificate generation.
In this case only the leaf certificate is restricted to the specific product and specific die sample.
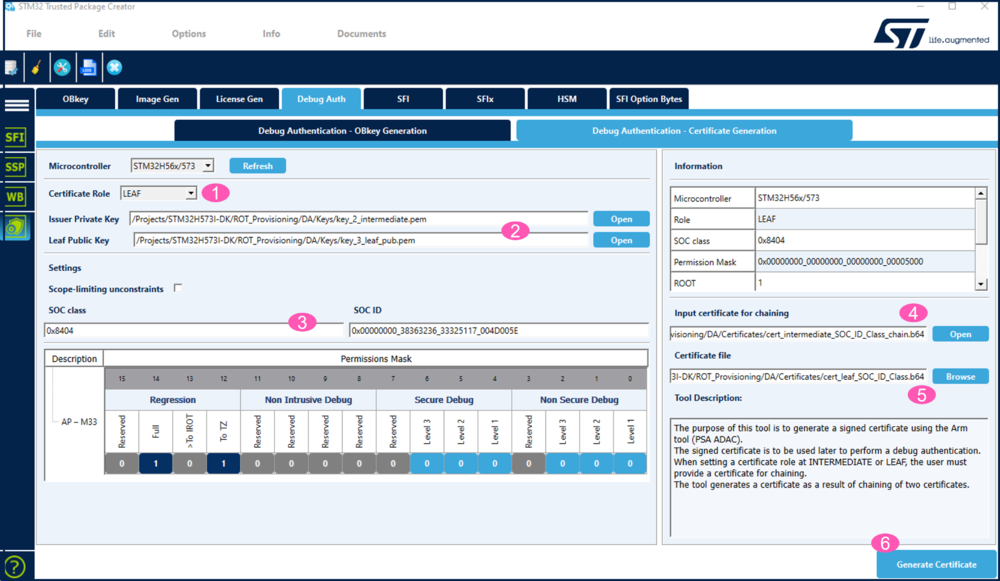
- 1. Select "LEAF".
- 2. Enter the private intermediate key and the leaf pub key paths.
- 3. Enter the SOC Class and SOC ID.
- 4. Enter the intermediate chain certificate path generated in the previous step.
- 5. Enter the path and name for the leaf certificate to generate.
- 6. Click Generate Certificate.
3.4. Debug authentication using the certificate and certificate chain generated previously
According to the settings chosen during these step-by-step instructions:
- The permission mask set for the root certificate generation allows performing secure debug and regressions (see figure 3).
- The permission mask set for the leaf certificate generation allows performing only regressions (see figure 6).
The different debug opening and regression exercises proposed in the previously mentioned "how to start" can be tested using these certificates.
The following trials are proposed to test if the previously generated certificates are specific to the device of your board.
- Test the leaf certificate through performing a regression
- How to proceed is described in the "how to start" articles. (Take care to use the leaf certificate name defined in the figure 6.)
- How to proceed is described in the "how to start" articles. (Take care to use the leaf certificate name defined in the figure 6.)
- Test that the leaf certificate is specific to the device on your board
- If you have a second board available:
- Perform a provisioning using the OEMiRoT or STiRoT "how to start", but without regenerating the certificates.
- Try a regression using the leaf certificate, this regression is failing.
- Regenerate the leaf certificate (only this certificate) with the SOC ID of this other board (see section Leaf certificate generation).
- Perform a regression using this new generated leaf certificate.
- If only one single board is available:
- Perform a provisioning using the OEMiRoT or STiRoT "how to start".
- Regenerate the leaf certificate (only this certificate) but change some digit of the SOC ID (see section Leaf certificate generation).
- A regression using this new generated certificate is failing.
- Perform a regression using the root certificate.
- If you have a second board available:
