The purpose of this article is to show an integration of the Secure Manager in a STM32CubeMX ecosystem.
Before starting with the practical example described below, read Secure Manager for STM32H5.
The boot scheme below is produced during this step by step article:

1. Introduction
User application description
This step by step article describes how to use the STM32CubeMX to generate a nonsecure application in the Secure Manager environment.
This application uses RTC calendar, Timestamp, USART1, and GPIOs. When pressing the User button in the discovery board, the corresponding date and date information is sent by USART1 in a message.

This article also describes the use of the Secure Manager cryptography service to encrypt the message transmitted via USART1.
2. Prerequisites
- Hardware
- STM32H573 discovery board: Discovery MB1677- STM32H573 (USB-C cable not included). The STM32H573 devices have all the available security features, including the HW crypto accelerator.
Note: the Secure Manager is not supported on STM32H56x devices, as Hardware cryptography is not available.

- In case the board has already been used for other trainings:
- If the board is in another state other than OPEN, perform a regression using the script provided in the last training.
- If the board is in OPEN state, check that the SECBOOT_LOCK option byte is not set. Use STM32CubeProgrammer.
- Required tools
- STM32CubeMX from version 6.9.2 to version 6.13 included.
- STM32Cube_H5_V1.1.0 with STM32Cube_H5_V1.1.1 patch, or later.
- STM32CubeProgrammer_rev2.14.0 or later (Select STM32TrustedPackageCreator (TPC) during the installation).
- One of the supported IDE:
- EWARM (IAR) : V9.20.1 and the patch EWARMv8_STM32H5xx_V1.1.0 or later, to support the STM32H5 series
- STM32CubeIDE : 1.13.0 or later.
- MDK_ARM : V5.37.0.0 and the patch Keil_STM32H5_DFP.1.0.0 or later, to support the STM32H5 series.
- Tera Term / Putty or equivalent UART terminal emulator.
- STM32Cube Firmware
- Download the STM32CubeFW_H5 Cube firmware.
- With STM32Cube_H5_V1.1.0, we must also download the STM32Cube_H5_V1.1.1 patch and copy all the files into V1.1.0.
- Later versions of STM32Cube_H5_V1.1.x are delivered as a single zip file.
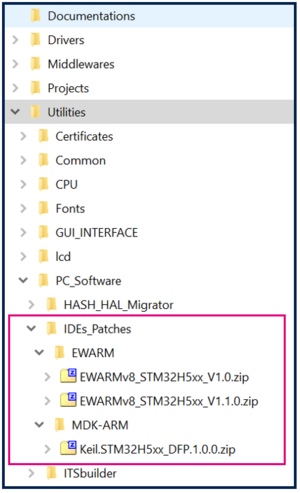
- The IDE patches can be found in the STM32CubeFW_H5 Cube firmware: Extract the zip file corresponding to the IDE patch to use, and follow the instructions in the readme.txt file to install it.
- The “Projects” directory includes the STM32H573I-DK directory. If the STM32CubeProgrammer tool is not installed in the default folder C:\Program Files\STMicroelectronics\STM32Cube\STM32CubeProgrammer, the customized installation path must be updated in the environment variable: env.bat. Refer to the example in the figure below.
- Download the STM32CubeFW_H5 Cube firmware.


3. Project configuration with STM32CubeMX
3.1. Setting up the STM32CubeMX project
Launch STM32CubeMX
- Click on Access to MCU Selector. For this example, it is easier to enable only the necessary GPIOs, so it is advised to use the MCU selector instead of the board selector.
- Enter STM32H573 in Commercial part number.
- Select the device used in STM32H5-DK.
- Click Start project.
- Enable TrustZone.

Create the STM32CubeMX project:
- Go to Project Manager tab.
- Type the name of the project. The related folder is created, if it did not exist previously.
- Choose a folder for the project, avoiding long paths.
- Select the relevant toolchain. This example uses EWARM.

Secure project
- Check only the Non Secure Project checkbox.

Save Project
- Go to File → Save Project. The project folder and the Secure_Manager_Integration.ioc file are created, if these did not exist.

3.2. Boot path configuration
To configure the boot path proceed as follows:
- 1) Click on Boot Path and Debug Authentication.
- 2) Click on Select.

- 1) Select the ST immutable Root of Trust. The TZ activation is already chosen. This selection defines the UBE option byte, but setting up this option byte is not required.
- 2) Click on Next.
- 3) Select Updatable Root of Trust (For this example, a second uRoT boot stage is available).
- 4) Click on Next.
- 5) Select Secure Manager Non Secure Application.
- 6) Click Finish.

When clicking Finish, the ROT_Provisioning folder is added to the project.
Boot path configuration is done:

The Secure Manager is integrated in the project, and launches the User application that is configured in the next steps. Here is a description of the configured boot process:

3.3. User application configuration
The parameters in the user application configuration are detailed below. We need to change the clocking, configure USART1 and RTC to send messages, and activate ICACHE.
3.3.1. Modify the default clocking
Open Clock Configuration and modify HCLK to 250MHz.
STM32CubeMX will automatically find a solution to configure the System clock source.

3.3.2. USART1 configuration to display events to the terminal
3.3.2.1. USART1 Configuration
In Pinout & Configuration tab select USART1, and edit the parameters as described below:

3.3.2.2. Mapping of the USART1
To use USART1 with PA9 and PA10 pins (STLINK pinout).
- Change PB6 to PA9:

- Change PB7 to PA10:

3.3.3. Configure and activate RTC
Activate RTC Clock source, Calendar and Timestamp, and keep RTC as nonsecure.
The RTC interrupt must trigger as soon as an input event is detected on the user button (PC13). For this reason, the RTC nonsecure interrupt must be enabled.

In the GPIO Settings, make sure that the User button PC13 is associated to RTC:

3.3.4. Activate the ICACHE
Still in Pinout & Configuration tab activate ICACHE:

3.4. Code generation
Now that the user application is configured, we can generate the code and check the structure of the project as shown in images below.


4. Secure Manager Provisioning
- On the STM32H573-DK, check that the switch (SW1) is set to 0 to boot from the user flash.

- Connect the STM32H573-DK using the USB-C cable.
- Execute the provisioning_auto.bat script.

Note:
Two scripts are available in the figure above:
- The provisioning_auto.bat installs the default configuration (this option is used in this article).
- The provisioning.bat customizes the configuration this option is used in How to start with Secure Manager customized config on STM32H5).
- For Linux and Mac operating systems, the end users may have to change manually the attribute of .sh scripts to executable.
After the installation, we should see:
- The message saying the board is correctly confirmed.
- Led1, led2, led3 and led4 must blink on the discovery board (this is the code installed by default by the script).
5. User application modification and generation
5.1. Project configuration
Open the generated project with IAR, and select Project → Options.
Modify the Flash loader. Here is the path of the flashloader to be used: $TOOLKIT_DIR$\config\flashloader\ST\FlashSTM32H5_SEC.board
Connect under reset is not possible. The debugger can only attach when the target is running as nonsecure. In this case, change the Reset connection configuration.

When using another IDE, proceed the same way.
5.2. Build the application

5.3. Customize the code
- Create an empty file detection.c, and save it on the Secure_Manager_Integration\NonSecure\Core\Src folder.
This file contains the functions to write text via USART1.
In the second part of this step by step article, the Cryptography API is included, and the OUTPUT_ENC_DATA to use the cryptography functions are added.
Copy paste the full code on the file, and save it:
/* Includes */
#include "main.h"
#include "detection.h"
#include "stdio.h"
#include "string.h"

// TODO: uncomment to enable encryption
//#define OUTPUT_ENC_DATA

#define OUT_BUFFER_SIZE (4 * 16)
#define ENC_BUF_SIZE OUT_BUFFER_SIZE + PSA_BLOCK_CIPHER_BLOCK_LENGTH(PSA_KEY_TYPE_AES)
#ifdef OUTPUT_ENC_DATA
#include "crypto.h"
#endif

extern RTC_HandleTypeDef hrtc;
uint32_t  g_EventDetected = 0;
RTC_DateTypeDef sDate;
RTC_TimeTypeDef sTime;

#define OUT_BUFFER_SIZE (4 * 16)
char OutBuffer[OUT_BUFFER_SIZE];

void HAL_RTCEx_TimeStampEventCallback(RTC_HandleTypeDef *RTC_Handle)
{
  if ( g_EventDetected == 0 )
  {
    HAL_RTCEx_GetTimeStamp(&hrtc, &sTime, &sDate, RTC_FORMAT_BIN);
    g_EventDetected = 1;
  }
}


char OutBuffer[OUT_BUFFER_SIZE];

char *BuildOutputEvent(void);
static void OutputEventInClear(char *buffer);
#ifdef OUTPUT_ENC_DATA
static void Encrypt_data(uint8_t *input, size_t inSize, uint8_t *output, size_t *outSize);
static void OutputEventInEncrypted(char *buffer);
#endif

char *BuildOutputEvent(void)
{
	memset(OutBuffer, 0, OUT_BUFFER_SIZE);
	sprintf(OutBuffer, "Detect button\r\nTime : %.2d:%.2d:%.2d\n\rDate : %.2d-%.2d-%.2d\n\r",
			 sTime.Hours, sTime.Minutes, sTime.Seconds,sDate.Month, sDate.Date, 2023);
	return OutBuffer;
}

#ifdef OUTPUT_ENC_DATA
static void Encrypt_data(uint8_t *input, size_t inSize, uint8_t *output, size_t *outSize)
{
	  psa_status_t psa_status;
	  size_t size = 0;

	  /* Encrypt single part functions */
	  psa_status = psa_cipher_encrypt(0x23, PSA_ALG_CBC_NO_PADDING, (uint8_t const*) input, inSize, output, *outSize, &size);
	  if (psa_status != PSA_SUCCESS)
	  {
	    printf("Error encrypting with the single-shot API\n\r");
	  }
	  else
	  {
            if (size != *outSize)
            {
                    printf("Issue out size ...\r\n");
            }
            *outSize=size;
	  }
}
static void OutputEventInEncrypted(char *buffer)
{
uint8_t encBuffer[ENC_BUF_SIZE] = {0};
size_t encBufferSize=ENC_BUF_SIZE;

	Encrypt_data((uint8_t *)buffer, OUT_BUFFER_SIZE, encBuffer, &encBufferSize);
	printf("\n\r*************Event detected (encrypted) ********************\n\r");
	for(uint32_t i=0; i<encBufferSize;i++)
	{
		printf("%02x", encBuffer[i]);
	}
	printf("\r\n");
}
#endif

static void OutputEventInClear(char *buffer)
{
	  printf("\n\r****************Event detected (clear)********************\n\r");
	  printf(buffer);
}

void ProcessEventDetection()
{
	if (g_EventDetected)
	{
		char *event = BuildOutputEvent();
		OutputEventInClear(event);
#ifdef OUTPUT_ENC_DATA
		OutputEventInEncrypted(event);
#endif
		g_EventDetected=0;
	}
}
- Create an empty file trace.c, and save it on the Secure_Manager_Integration\NonSecure\Core\Src folder.
Use this file to use printf with IAR.
Copy paste the full code on the file, and save it:
/* Includes */
#include "main.h"

extern UART_HandleTypeDef huart1;

int32_t iar_fputc(int32_t ch);
#define PUTCHAR_PROTOTYPE int32_t iar_fputc(int32_t ch)

size_t __write(int32_t file, unsigned char const *ptr, size_t len)
{
  UNUSED(file);
  size_t idx;
  unsigned char const *pdata = ptr;

  for (idx = 0; idx < len; idx++)
  {
    (void)iar_fputc((int32_t)*pdata);
    pdata++;
  }
  return len;
}

/* @brief  Retargets the C library printf function to the USART.
* @param  None
* @retval None
*/
PUTCHAR_PROTOTYPE
{
  /* Place the implementation of fputc here */
  /* e.g. write a character to the USART1 and Loop until the end of transmission */
  HAL_UART_Transmit(&huart1, (uint8_t *)&ch, 1, 0xFFFF);

  return ch;
}
- Create an empty file detection.h, and save it on the Secure_Manager_Integration\NonSecure\Core\Inc folder.
Copy paste the full code on the file, and save it:
#ifndef __DETECTION_H
#define __DETECTION_H
#include "stdio.h"
void ProcessEventDetection(void);
#endif
- Add the files detection.c and trace.c to the Core folder in IAR :

- Add this section of code in main.c, as shown in the figure below:
/* USER CODE BEGIN Includes */
#include "detection.h"
/* USER CODE END Includes */
 /* USER CODE BEGIN 2 */
 printf("*************************************\r\n");
 printf("Timestamped event detection version 1\r\n");
 printf("*************************************\r\n");
 /* USER CODE END 2 */
    /* USER CODE BEGIN WHILE */
  while (1)
  {
	ProcessEventDetection();
    /* USER CODE END WHILE */

- Build the code.
5.4. Run the application
- Connect the STM32H573-DK using the USB-C cable.
- Click Download and debug the code:

- Start Tera Term or another terminal emulator. Refer to the figure below.
- Select → Serial → select the COM port.
- Setup → Serial port → set Speed to 115200 baudrate, Data to 8 bit and Stop bit to 1bit → New setting.

- Press the reset button of the discovery board (B2 black button).
- Press the user button (blue button) to trigger the event.

6. Add Data encryption
This section shows how to add the use of the Secure Storage and the cryptography. We will add the encryption of the Timestamp information on the target, and also the capability to decode it on the PC.
The process followed is:
- Use its-blob.bat to generate the preprovisioned blob containing a secret key.
- Reinstall the Secure Manager.
- Use psa crypto api using the provisioned key to encrypt the data.
Choose the AES-CBC cryptographic tool (Symmetric cryptography). Below, we explain how to:
- Put the encryption key securely in the target, and protect it against any direct access.
- Add data encryption before transmission via USART.
First, we will store the encryption key in a prebuilt trusted storage that will be flashed at the same time as the Secure Manager (at production, for example).
Then, we will include the PSA cryptography API with STM32CubeMX, to encrypt messages.

6.1. Provision the AES key in the Internal Trusted Storage
We need to securely put the encryption key in the target, and to protect it against direct access.
6.1.1. AES key generation
First, we create the AES key that will be used to encrypt data. We can use the key of our choice in 256 bits. To generate a random key, use OpenSSL.
- If OpenSSL is not installed on the PC we can download it from [OpenSSL].
- Create a new file key.bat on the folder Secure_Manager_Integration\ROT_Provisioning\SM\Keys that will generate a random AES key in a file AES_256bits.bin".
- Edit key.bat with Notepad,and copy paste this code in the file:
TOOLDIR corresponds to the folder where we have installed OpenSSL, and that can be customized.
SETLOCAL
SET TOOLDIR=C:\Program Files\OpenSSL-Win64\bin
SET TOOL=%TOOLDIR%\openssl.exe

SET MY_CURR_DIR=%cd%

@ECHO ON
cd %TOOLDIR%
"%TOOL%" rand 32 > %MY_CURR_DIR%\AES_256bits.bin
cd %MY_CURR_DIR%

@ENDLOCAL
@PAUSE
- Save the file and launch it by double-clicking on it.
- A new file AES_256bits.bin is created in the Secure_Manager_Integration\ROT_Provisioning\SM\Keys folder, containing a random AES key.
6.1.2. Personalize the blob script
The script its_blob.bat is used to generate a blob binary file. Blob files (Binary Large Objects) are currently used to store keys. The MCU can use AES key to encrypt blob before storing it.
- Edit the file its_blob.bat in the folder Secure_Manager_Integration\ROT_Provisioning\SM with Notepad. Add this code to add the AES key at line 64:
:: Add AES key to blob
%ItsBuilder% addkey2blob %blob% %blob% -i 0x23 -o 0xffffffff --keytype=AES -b 256 -a CBC -k Keys\AES_256bits.bin -u ENCRYPT --format=RAW 2>>%current_log_file%
if !errorlevel! neq 0 goto :error
- Save it as its_blob_perso.bat.
6.1.3. Generate the ITS_Factory_Blob.bin
- Launch the previously edited script (its_blob_perso.bat) by double-clicking on it.
- Note: For Linux and Mac operating systems, the end users may have to change manually the attribute of .sh scripts to executable.

This script uses the ITS builder tool in STM32Cube_FW_H5_V1.1.1\Utilities\PC_Software\ITSbuilder:

It generates the ITS_Factory_Blob.bin file in the Secure_Manager_Integration\ROT_Provisioning\SM\Binary folder.
The success message is displayed as follows:

6.1.4. Regression
Perform a full regression to reinitialize the device.
- The installed Secure Manager is removed.
- The full user Flash and OBKeys are erased.
- The memory mapping for nonsecure application is no longer fixed.
- The device is set in Open state.
For further information, refer to Secure Manager STM32H5 How to Intro article.

- Double-click on regression.bat script to automatically perform the regression.
- Note: For Linux and Mac operating systems, the end users may have to change manually the attribute of .sh scripts to executable.
- When the regression is completed, the script displays the message below:
6.1.5. Secure Manager Provisioning
- On the STM32H573-DK, check that the switch (SW1) is set to 0 to boot from the user flash.
- Connect the STM32H573-DK using the USB-C cable.
- Execute the provisioning_auto.bat script.
- Note: For Linux and Mac operating systems, the end users may have to change manually the attribute of .sh scripts to executable.
During the installation, the SFI needs the ITS_Factory_Blob.bin generated previously, in order to store OEM Keys:

Find below the scheme of SFI image generation, done during the provisioning:

After the installation:
- The message saying the board is correctly confirmed should be displayed.
- On the discovery board the led1, led2, led3 and led4 must blink (default code installed by the script).
The board is now in TZ-CLOSED state. The AES key has been provisioned in Trusted storage at the same time that the Secure Manager.
6.2. Include the PSA cryptography API with STM32CubeMX
The PSA cryptography API with STM32CubeMX must be included, and the application needs to be modified to call psa_cipher_encrypt.
Open STM32CubeMX. In the Pinout & Configuration tab, select Secure Manager API and add Cryptography service. Then Generate the code.

6.3. Activate the encryption in the code

PSA API used: psa_cipher_encrypt

A random IV is generated for each encryption, and it is added before the data in the output buffer. IV is used to initialize the encryption algorithm.
6.4. Test the application
- Click Download and debug the code :
- Start Tera Term or another terminal emulator. Refer to the figure below.
- Select → Serial → select COM port.
- Setup → Serial port → set Speed to 115200 baudrate, Data to 8 bit and Stop bit to 1bit → New setting.
- Press the reset button of the discovery board (B2 black button).
- Press the user button (blue button) to trigger the event.

The message is now crypted.
6.5. Decrypt the data
If OpenSSL is installed on computer, we can create a file decrypt.bat in the Secure_Manager_Integration\ROT_Provisioning\SM\Keys folder.
Copy paste the following script on it :
@ECHO OFF

SETLOCAL
SET TOOLDIR=c:\Program Files\OpenSSL-Win64\bin
SET TOOL=%TOOLDIR%\openssl.exe

SET MY_CURR_DIR=%cd%
SET KEY_HEX=1E50151479E14CBBD9F3B1E98EB24FB1F7B648B2BCB5B1CE3F0EED6ECF56EBE2

REM Parse command line arguments
SET /P INPUT_HEX=Enter concatenated nonce and ciphertext as hexadecimal string:

SET NONCE_HEX=%INPUT_HEX:~0,32%
SET CIPHERTEXT_HEX=%INPUT_HEX:~32%

REM Convert hexadecimal strings to binary
SET /A CIPHERTEXT_LEN=0
if defined CIPHERTEXT_HEX (
    set "valid_hex=0123456789abcdefABCDEF"
    set "dec="
    for /l %%j in (0, 1, 15) do (
        if "!valid_hex:~%%j,1!" equ "!CIPHERTEXT_HEX:~0,1!" set "dec=!dec!%%j"
    )
    if defined dec set /a "CIPHERTEXT_LEN=(%CIPHERTEXT_HEX:~0,-1%/2)+1"
)
SET /A NONCE_LEN=(%NONCE_HEX:~0,-1%/2)+1

PowerShell -Command "$nonce = @(); For ($i = 0; $i -lt '%NONCE_HEX%'.Length; $i += 2) { $nonce += [System.Convert]::ToByte('%NONCE_HEX%'.Substring($i, 2), 16) }; Set-Content -Path '%MY_CURR_DIR%\nonce.bin' -Value $nonce -Encoding Byte"
PowerShell -Command "$ciphertext = @(); For ($i = 0; $i -lt '%CIPHERTEXT_HEX%'.Length; $i += 2) { $ciphertext += [System.Convert]::ToByte('%CIPHERTEXT_HEX%'.Substring($i, 2), 16) }; Set-Content -Path '%MY_CURR_DIR%\ciphertext.bin' -Value $ciphertext -Encoding Byte"

REM Decrypt ciphertext using hardcoded key and provided nonce
"%TOOL%" enc -d -aes-256-cbc -in %MY_CURR_DIR%\ciphertext.bin -out %MY_CURR_DIR%\plaintext.bin -K %KEY_HEX% -iv %NONCE_HEX%
- On the code, enter the key we are using: SET KEY_HEX = .., and check that TOOLDIR corresponds to the OpenSSL folder.
- Save the file and launch it by double-clicking on it.
- The script asks the encrypted text: copy paste the encrypted text we have on the console, and press enter.

- The plaintext.bin file is created, and it contains the plain text.
7. Regression
To reinitialize the device, perfom a regression:
- The installed Secure Manager is removed.
- The full user Flash and OBKeys are erased.
- The memory mapping for the nonsecure application is no longer fixed.
- The device is set in Open state.
For further information, refer to Secure Manager STM32H5 How to Intro article.
- Double-click on the regression.bat script.It automatically performs the regression.
- Note: For Linux and Mac operating systems, the end users may have to change manually the attribute of .sh scripts to executable.
- When the regression is completed, the script displays this message: