1. Overview
Zigbee Direct has three distinct device roles: ZVD, ZDD, and Zigbee Device.
- The ZVD is basically a BLE device that can address both BLE devices and Zigbee Direct Devices
- The Zigbee Device runs the Zigbee stack, and the 802.15.4 stack.
- The ZDD is a ZD device that can communicate both with other ZD and with a ZVD (interoperability of BLE and Zigbee). A ZDD runs the Zigbee Direct stack and the 802.15.4 MAC stack.
Direct communication between a ZVD and Zigbee Device is not possible. The ZDD must be present to route messages from the ZVD to the Zigbee Device.
The Ubisys Smart Home Application for iPhone or the Ledvance Direct Easy Application functions as a Zigbee virtual device (ZVD) and may be used to control Zigbee radio devices from a mobile device. In configurations that include both Zigbee direct devices (ZDD) and standard Zigbee devices, the ZDD acts as a bridge to relay commands from your phone to Zigbee devices without Bluetooth capabilities.
The Ubisys Smart Home Application does not currently support android smartphones. This page and the Ubisys Smart Home Application must be used on an iPhone. The Ledvance Direct Easy Application is both available on Android and on iPhone IOs but this application is not available worldwide to be downloaded on the Apple store or Google play stores (Ledvance Direct Easy is available in Europe). This concurrent demo BLE and Zigbee is better suited for an STM32WBA65-NUCLEO since it required a large footprint.
This demo shows an STM32WBA65-NUCLEO Zigbee direct device (ZDD - ZigbeeDirect_OnOff Application) using the Ubisys ZVD iOS phone application or the Direct Easy ZVD application to control a Zigbee device (ZD - ZigbeeDirect_OnOff_Server_Router_Identify Application) via Bluetooth. The ZVD joins the ZDD Zigbee network and controls the Zigbee device by sending On and Off commands or Level control commands.
Summary of Demo 1: With Ubisys ZVD, setup of the minimal topology: ZVD and ZDD.
Summary of Demo 2: With Ubisys ZVD, setup of three devices topology: ZDD and ZVD and then adding the ZD.
Summary of Demo 3: With Ledvance Direct Easy (Android or IOs) ZVD, setup of the minimal topology: ZVD and ZDD.
The demo 1 or 3 was used to demonstrate Zigbee interoperability with Philips hue 1100 bulb or IKEA tradfri bulb using v1.7 STM32WBA release. The demonstration of interoperability need a special configuration where the ZDD is switched from router to coordinator.
In current Cube release STM32WBA version v1.8.0, the ZR Zigbee Router application provided is the ZD:
- ZigbeeDirect_OnOff_Server_Router_Identify Application.
ZigbeeDirect_OnOff Zigbee application is the ZDD and the ZVD is the coordinator with v1.8 STM32WBA cube release.
2. Setup
In this section, we will:
- Download and install the Ubisys Smart Home application on an iPhone or the Ledvance Direct Easy Application.
- Build and flash the zdd ZigbeeDirect_OnOff Zigbee application to the NUCLEO-WBAxx.
- Retrieve the line (on teraterm or termite) public Bluetooth address of the NUCLEO-WBAxx for use with a BLE sniffing solution.
2.1. Phone application installation for Ubisys or Ledvance
To install the smartphone application to be used as the ZVD:
- Either open the App Store app on your iPhone and search "Ubisys Smart Home" in the App Store.
- Or search "Direct Easy" in your favorite application search on an android Phone or on an IOs iPhone (Beware that the application has regional restrictions).
- Install the app.
- Enable Bluetooth on your iPhone communication settings.
2.2. STM32WBAxx ZDD configuration
NUCLEO-WBA65RI has the zdd applications in its directory BLE_Zigbee of the STM32CubeWBA release v1.8.0.
To configure the STM32WBA65 as a ZDD:
- Build the ZDD BLE_Zigbee/ZigbeeDirect_OnOff Zigbee application in either IAR, Keil or STM32CubeIDE.
- Download the output binary to the NUCLEO-WBA65RI using an IDE or STM32CubeProgrammer.
2.3. Retrieve public Bluetooth® address
To retrieve the public Bluetooth address of the NUCLEO-WBA65RI:
- Connect the NUCLEO-WBA65RI to a computer via USB-serial.
- Open a serial terminal (like teraterm).
- Power on the NUCLEO-WBA65RI.
- Record the public Bluetooth address shown in the debug output.
- Use this address to configure your Bluetooth sniffing solution.
When you connect the NUCLEO-WBA65RI to a computer via USB-serial, you will have access to a limited command line. Type help to get a listing of the commands available and their descriptions.
3. Demo 1 Procedure using Ubisys Smart Home ZVD
In this section, we will:
- Start the ZDD BLE_Zigbee/ZigbeeDirect_OnOff application on the NUCLEO-WBA65RI.
- Connect the iPhone to the STM32WBA65 ZDD.
- Configuring and add a component to the ubisys Smart Home application.
- Control the ZDD using the iPhone.
3.1. Start the ZDD application
To start the ZDD application on the NUCLEO-WBA65RI:
- Power on the NUCLEO-WBA65RI.
- The ZDD application starts and begins sending Bluetooth® Low Energy (BLE) advertisement messages.
3.2. Connect the iPhone to the STM32WBAxx ZDD
To connect the Ubisys Smart Home app to the ZDD:
- Open the Ubisys Smart Home app on your iPhone.
- A screen displaying "Connect Gateway…" appears.
- Press the "x" in the top left corner to skip this step.
- A screen displaying "Facilities" appears.
- If the Facilities screen does not automatically appear, access the screen from the main menu of the app by selecting the menu path: Settings > Facilities.
- Press the edit symbol in the top right.
- Select "New Facility."
- Select "Create via Bluetooth..."
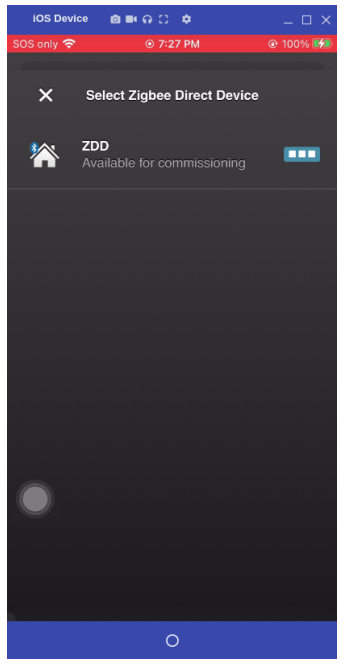
- Use the three dots to select the advertising ZDD.
- If the ZDD appears in the Facilities screen with the message "Does not permit joining," enter the "pjoin" command on the ZDD to re-enable joining or press push button SW1 on the ZDD to re-enable joining.
- In the notification, confirm that the ZDD has the expected Bluetooth® address by pressing OK.
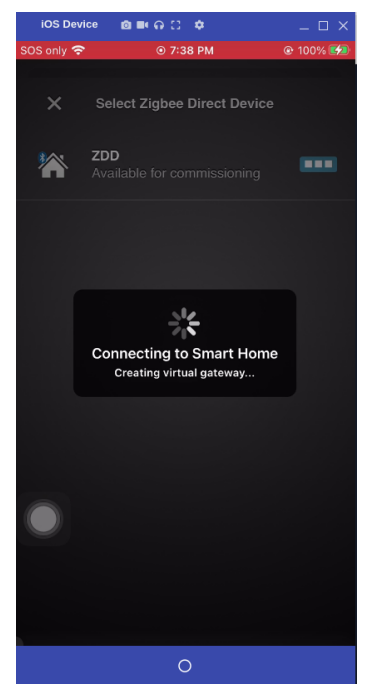
- This will start the connection process. During this process, the ZVD also commissions the ZDD to form a Zigbee network. Wait for the connection process to finish.
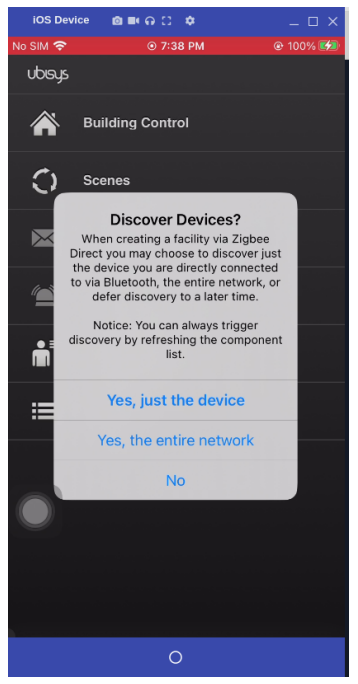
- When the Discover Devices notification appears, select "Yes, just the device."
The app begins searching for components. The process completes within a few seconds. At this point, an entry for your ZDD appears in the Facility menu along with an entry in the components menu under the menu path:
Configuration > Basic Configuration > Components
3.3. Managing components
The Ubisys app uses components to link UI controls to device functions. Functionalities of Zigbee devices are addressed via endpoints. Endpoints are displayed in the app with a preceding hashtag (#). The provided application will have an OnOff cluster on endpoint 1. In this section, we will:
- View the components on your device
- Edit the component name
- Create a room
- Add the component to the room
To manage components in the Ubisys app:
- Access the components menu by navigating to the menu path:
Configuration > Basic Configuration > Components.
- If you do not see your device as a component, refresh the components menu by swiping down.
- There may be a delay of a minute or so between the time a new device joins the network and when it appears in the components menu.
- Select the device with the correct Bluetooth® address from the components menu.
- Select the edit symbol and change the name of the device to "light nucleo".
- Navigate to the menu path:
- Select the edit symbol.
- Select the plus symbol located next to "New Room".
- Name the room and select the check mark.
- Select the newly created room.
- Navigate to the menu path:
- Select the light switch component (OnOff server) on the expected endpoint.
- Select the check mark.
- Select the check mark again to finish adding devices to the room.
Configuration > Basic Configuration > Rooms
Edit > Add device
3.4. Sending On and Off Commands
To send On and Off commands to the Zigbee device:
- Navigate to the menu path:
Building Control > <Name of room>
- A circle button will appear to toggle the light switch on and off.
With this process complete, the circle button now signifies when the cluster is turned on by changing color to green.
3.5. Disconnecting the ZVD from the ZDD
To disconnect the ZVD from the ZDD:
- Navigate to the menu path:
Settings > Facilities > Edit
- Select the red minus symbol next to the device
- Confirm by selecting "delete"
4. Demo 2 Procedure using Ubisys Smart Home ZVD
In this section, we will:
- Check the ZDD ZigbeeDirect_OnOff application to highlight that it is a Zigbee ZDD.
- Start the ZDD ZigbeeDirect_OnOff application on the NUCLEO-WBA65RI.
- Connect the iPhone to the STM32WBAxx ZDD.
- Add a ZD Zigbee Device ZigbeeDirect_OnOff_Server_Router_Identify to the ZDD’s Zigbee network.
- Add optionally two components to the ubisys Smart Home application.
- Control the Zigbee devices using the iPhone.
4.1. Check the ZDD application
The ZDD ZigbeeDirect_OnOff application allow you to form a network. Here are the few lines in app_zigbee_endpoint.c that configure the startup of the ZDD:
void APP_ZIGBEE_ApplicationInit(void) {
   LOG_INFO_APP( "ZIGBEE Application Init" );
   /* Initialization of the Zigbee stack */
   APP_ZIGBEE_Init();

    /* Configure Application Form/Join parameters : Startup, Persistence and Start */
   stZigbeeAppInfo.eStartupControl = ZbStartTypeJoin;
   stZigbeeAppInfo.bPersistNotification = false;
    /* USER CODE BEGIN APP_ZIGBEE_ApplicationInit */
   stZigbeeAppInfo.bNwkStartup = false;
4.2. Start the ZDD and ZD application
To start the ZDD application on the NUCLEO-WBA65RI:
- Power on the NUCLEO-WBA65RI with ZigbeeDirect_OnOff application.
- The ZDD application starts and begins sending Bluetooth® Low Energy (BLE) advertisement messages.
4.3. Connect the iPhone to the STM32WBA65 ZDD
To connect the Ubisys Smart Home app to the ZDD:
- Open the Ubisys Smart Home app on your iPhone.
- A screen displaying "Connect Gateway…" appears.
- Press the "x" in the top left corner to skip this step.
- A screen displaying "Facilities" appears.
- If the Facilities screen does not automatically appear, access the screen from the main menu of the app by selecting the menu path: Settings > Facilities.
- Press the edit symbol in the top right.
- Select "New Facility."
- Select "Create via Bluetooth."
- Use the three dots to select the advertising ZDD.
- If the ZDD appears in the Facilities screen with the message "Does not permit joining," enter the "pjoin" command on the ZDD teraterm to re-enable joining.
- In the opened notification, confirm that the ZDD has the expected Bluetooth® address and press OK.
- This will start the connection process. During this process, the ZVD commissions the ZDD to form a Zigbee network. Wait for the ZDD connection process to finish by having on the ZVD the question "Discover Devices?". Do not answer the question yet!
4.4. Connect the STM32WBAxx Zigbee Device to the STM32WBAxx ZDD
- Power on the second NUCLEO-WBA65RI with ZigbeeDirect_OnOff_Server_Router_Identify application.
- After 15 seconds, if the ZigbeeDirect_OnOff_Server_Router_Identify board does not have its blue LED ON, indicating that the ZDD and the ZD have formed a network, then type the "pjoin" command on the ZDD teraterm to re-enable joining. After 15 seconds, the ZigbeeDirect_OnOff_Server_Router_Identify board should have its blue LED ON
- When the ZigbeeDirect_OnOff_Server_Router_Identify board will have its blue LED ON, then select "Yes, the entire network." to the bellow question "Discover Devices?".
The app begins connecting with all ZD components that are connected to the ZDD. The process completes within two minutes with a message "Accept Changes" that is displayed on the ZVD for a short time. At this point, an entry for your ZDD appears in the Facility menu along with two STM entries in the components menu under the menu path.
Configuration > Basic Configuration > Components
At the end of the configuration, verify that 2 STM components are available in the component menu. If it is not the case, then re-do all the steps from the start with a teraterm open on the ZDD to follow the steps dynamically.
This ZDD teraterm indicates that the ZDD is connected to the ZD and that the ZDD is connected to the ZVD.
To connect a ZD device to the ZVD, an expert Ubisys option is indicated here:
- Access the Basic Configuration menu by navigating to the menu path:
Configuration > Basic Configuration
- Select "Open for new devices".
- Navigate to the menu path:
Configuration > Basic Configuration > Components
- Swipe down to refresh the page.
- *There may be a delay of a minute or so between the time Swipe down and when it appears in the components menu.
- Select the device with the correct Bluetooth® address from the components menu. This step is not needed when using STM32WBA65 applications.
4.5. Managing components
The Ubisys app uses components to link UI controls to device functions. Functionalities of Zigbee devices are addressed via endpoints. In the provided application, the OnOff cluster is on endpoint 1. In this section, we will:
- Create a room
- Add the components to the room
- Edit the components name
To manage components in the Ubisys app:
- Navigate to the menu path:
- Select the edit symbol.
- Select the plus symbol located next to "New Room".
- Name the room and select the check mark.
- Select the newly created room.
- Navigate to the menu path or select the pencil to add device on a dark window:
- Select the two STM32WBA65 components on the expected endpoint.
- Select the check mark.
- Select the check mark again to finish adding devices to the room.
- Select the edit symbol and change the name of the device to "onoff" and "lightsensitivitycontrol".
Configuration > Basic Configuration > Rooms
Edit > Add device
4.6. Sending On and Off Commands
To send On and Off commands to the Zigbee device:
- Navigate to the menu path:
Building Control > Name of room>
- Circle buttons will appear to toggle the lights switch on and off.
With this process complete, the circle buttons now signifies when the cluster is turned on by changing color to green.
4.7. Sending On and Off commands or level control commands to bulbs
In this topology:
Once the setup is complete, the display will be the following:
4.8. Disconnecting the ZVD from the ZDD
To disconnect the ZVD from the ZDD and the Zigbee device:
- Navigate to the menu path:
Settings > Facilities > Edit
- Select the red minus symbol next to the device
- Confirm by selecting "delete"
5. Demo 3 Procedure using Ledvance Direct Easy
In this section, we will:
- Start the ZDD BLE_Zigbee/ZigbeeDirect_OnOff application on the NUCLEO-WBA65RI.
- Connect the smartphone to the STM32WBA65 ZDD.
- Configuring and add a component to the Ledvance Direct Easy application.
- Control the ZDD using the smartphone ZVD.
5.1. Start the ZDD application
To start the ZDD application on the NUCLEO-WBA65RI:
- Power on the NUCLEO-WBA65RI.
- The ZDD application starts and begins sending Bluetooth® Low Energy (BLE) advertisement messages.
5.2. Connect and use the smartphone with the STM32WBAxx ZDD
To connect the Easy Direct app to the ZDD:
- Open the Easy Direct app on your smartphone.
- A screen displaying "accept conditions" appears and you have to accept geolocalisation and conditions.
- A screen displaying "Create Zone" appears and follow the flowcharts till the end.
- If the ZDD appears in the Facilities screen with the message "Does not permit joining," enter the "pjoin" command on the ZDD to re-enable joining or press push button SW1 on the ZDD to re-enable joining.
Start the search.
This will end the connection process. During this process, the ZVD also commissions the ZDD to form a Zigbee network.
The app begins searching for components. The process completes within a few seconds. At this point, an entry for your ZDD appears in the selected Zone and is ready to use.
To send On and Off commands to the Zigbee device:
Press the on/off symbol on the right side of the ZDD. It will toggle the light switch on and off.


