FP-AI-MONITOR1 runs learning and inference sessions in real time on the SensorTile wireless industrial node development kit (STEVAL-STWINKT1B), taking data from on-board sensors as input. FP-AI-MONITOR1 implements a wired interactive CLI to configure the node.
The article discusses the following topics:
- Prerequisites and setup,
- Presentation of human activity recognition (HAR) application,
- Integrating a new HAR model,
- Check the new HAR model with FP-AI-MONITOR1,
This article explains the very few steps needed to replace the existing HAR AI model with a completely different one.
For completeness, readers are invited to refer to the FP-AI-MONITOR1 user manual, and FP-AI-MONITOR1 an introduction to the technology behind for a detailed overview of the function pack software architecture and its various components.
1. Prerequisites and setup
1.1. Hardware
To use the FP-AI-MONITOR1 function pack on STEVAL-STWINKT1B, the following hardware items are required:
- STEVAL-STWINKT1B development kit board,
- Windows® powered laptop/PC (Windows® 7, 8, or 10),
- Two Micro-USB cables, one to connect the sensor board to the PC, and another one for the STLINK-V3MINI, and
- An STLINK-V3MINI.
1.2. Software
1.2.1. FP-AI-MONITOR1
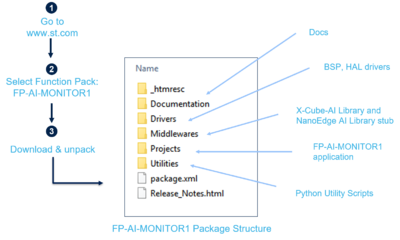
Download the FP-AI-MONITOR1 package from the ST website, extract and copy the contents of the .zip file into a folder on your PC. Once the pack is downloaded, unpack/unzip it and copy the content to a folder on the PC.
The steps of the process along with the content of the folder are shown in the following image.
1.2.2. IDE
- Install one of the following IDEs:
- STMicroelectronics STM32CubeIDE version 1.9.0,
- IAR Embedded Workbench® for Arm® (EWARM) toolchain version 9.20.1 or later, or
- RealView Microcontroller Development Kit (MDK-ARM) toolchain version 5.32.
1.2.3. TeraTerm
- TeraTerm is an open-source and freely available software terminal emulator, which is used to host the CLI of the FP-AI-MONITOR1 through a serial connection.
- Download and install the latest version available from TeraTerm.
2. Human activity recognition (HAR) application
The CLI application comes with a prebuilt Human Activity Recognition model.
Running the $ start ai command starts doing the inference on the accelerometer data and predicts the performed activity along with the confidence. The supported activities are:
- Stationary,
- Walking,
- Jogging, and
- Biking.
Note that the provided HAR model is built with a dataset created using the IHM330DHCX_ACC accelerometer with the following parameters:
- Output data rate (ODR) set to 26 Hz,
- Full scale (FS) set to 4G.
3. Integrating a new HAR model
FP-AI-MONITOR1 thus provides a preintegrated HAR model along with its preprocessing chain. This model is exemplary and by definition cannot fit the required performances or use case. It is proposed to show how this model can easily be replaced by another that may differ in many ways:
- Input sensor,
- Window size,
- Preprocessing,
- Feature extraction step,
- Data structure,
- Number of classes
It is assumed that a new model candidate is available and preintegrated as described in user manual.
The model is embedded in a Digital Processing Unit (DPU), which provides the infrastructure for managing data streams and their processing.
The reader is guided through all the little modifications required for adapting the code to accommodate the new model in its specificities.
3.1. New model differences
The HAR function pack prebuilt model is a 4-Classes SVC (Support vector classifier). A 24-sample window of 3D acceleration data collected at 26 Hz is input to a preprocessing block. It rotates the 3D acceleration vector so that gravity is on the Z-axis only. This operation is followed by gravity removal. After this first processing step, the data is injected into the SVC model to classify among one of four activity classes (Standing, walking, jogging, biking). The output is one vector (probability distribution) and one scalar (classification index) produced approximately every one second.
The new model is a DNN (Deep neural network), which takes raw acceleration vector input without any preprocessing. The analysis window is larger (48 x 3D samples collected at 26 Hz); thus, the inference frequency is lower: one in every two seconds. Unlike the prebuilt SVC model, this new model has only one output vector (Softmax output).
3.2. Integrating new model
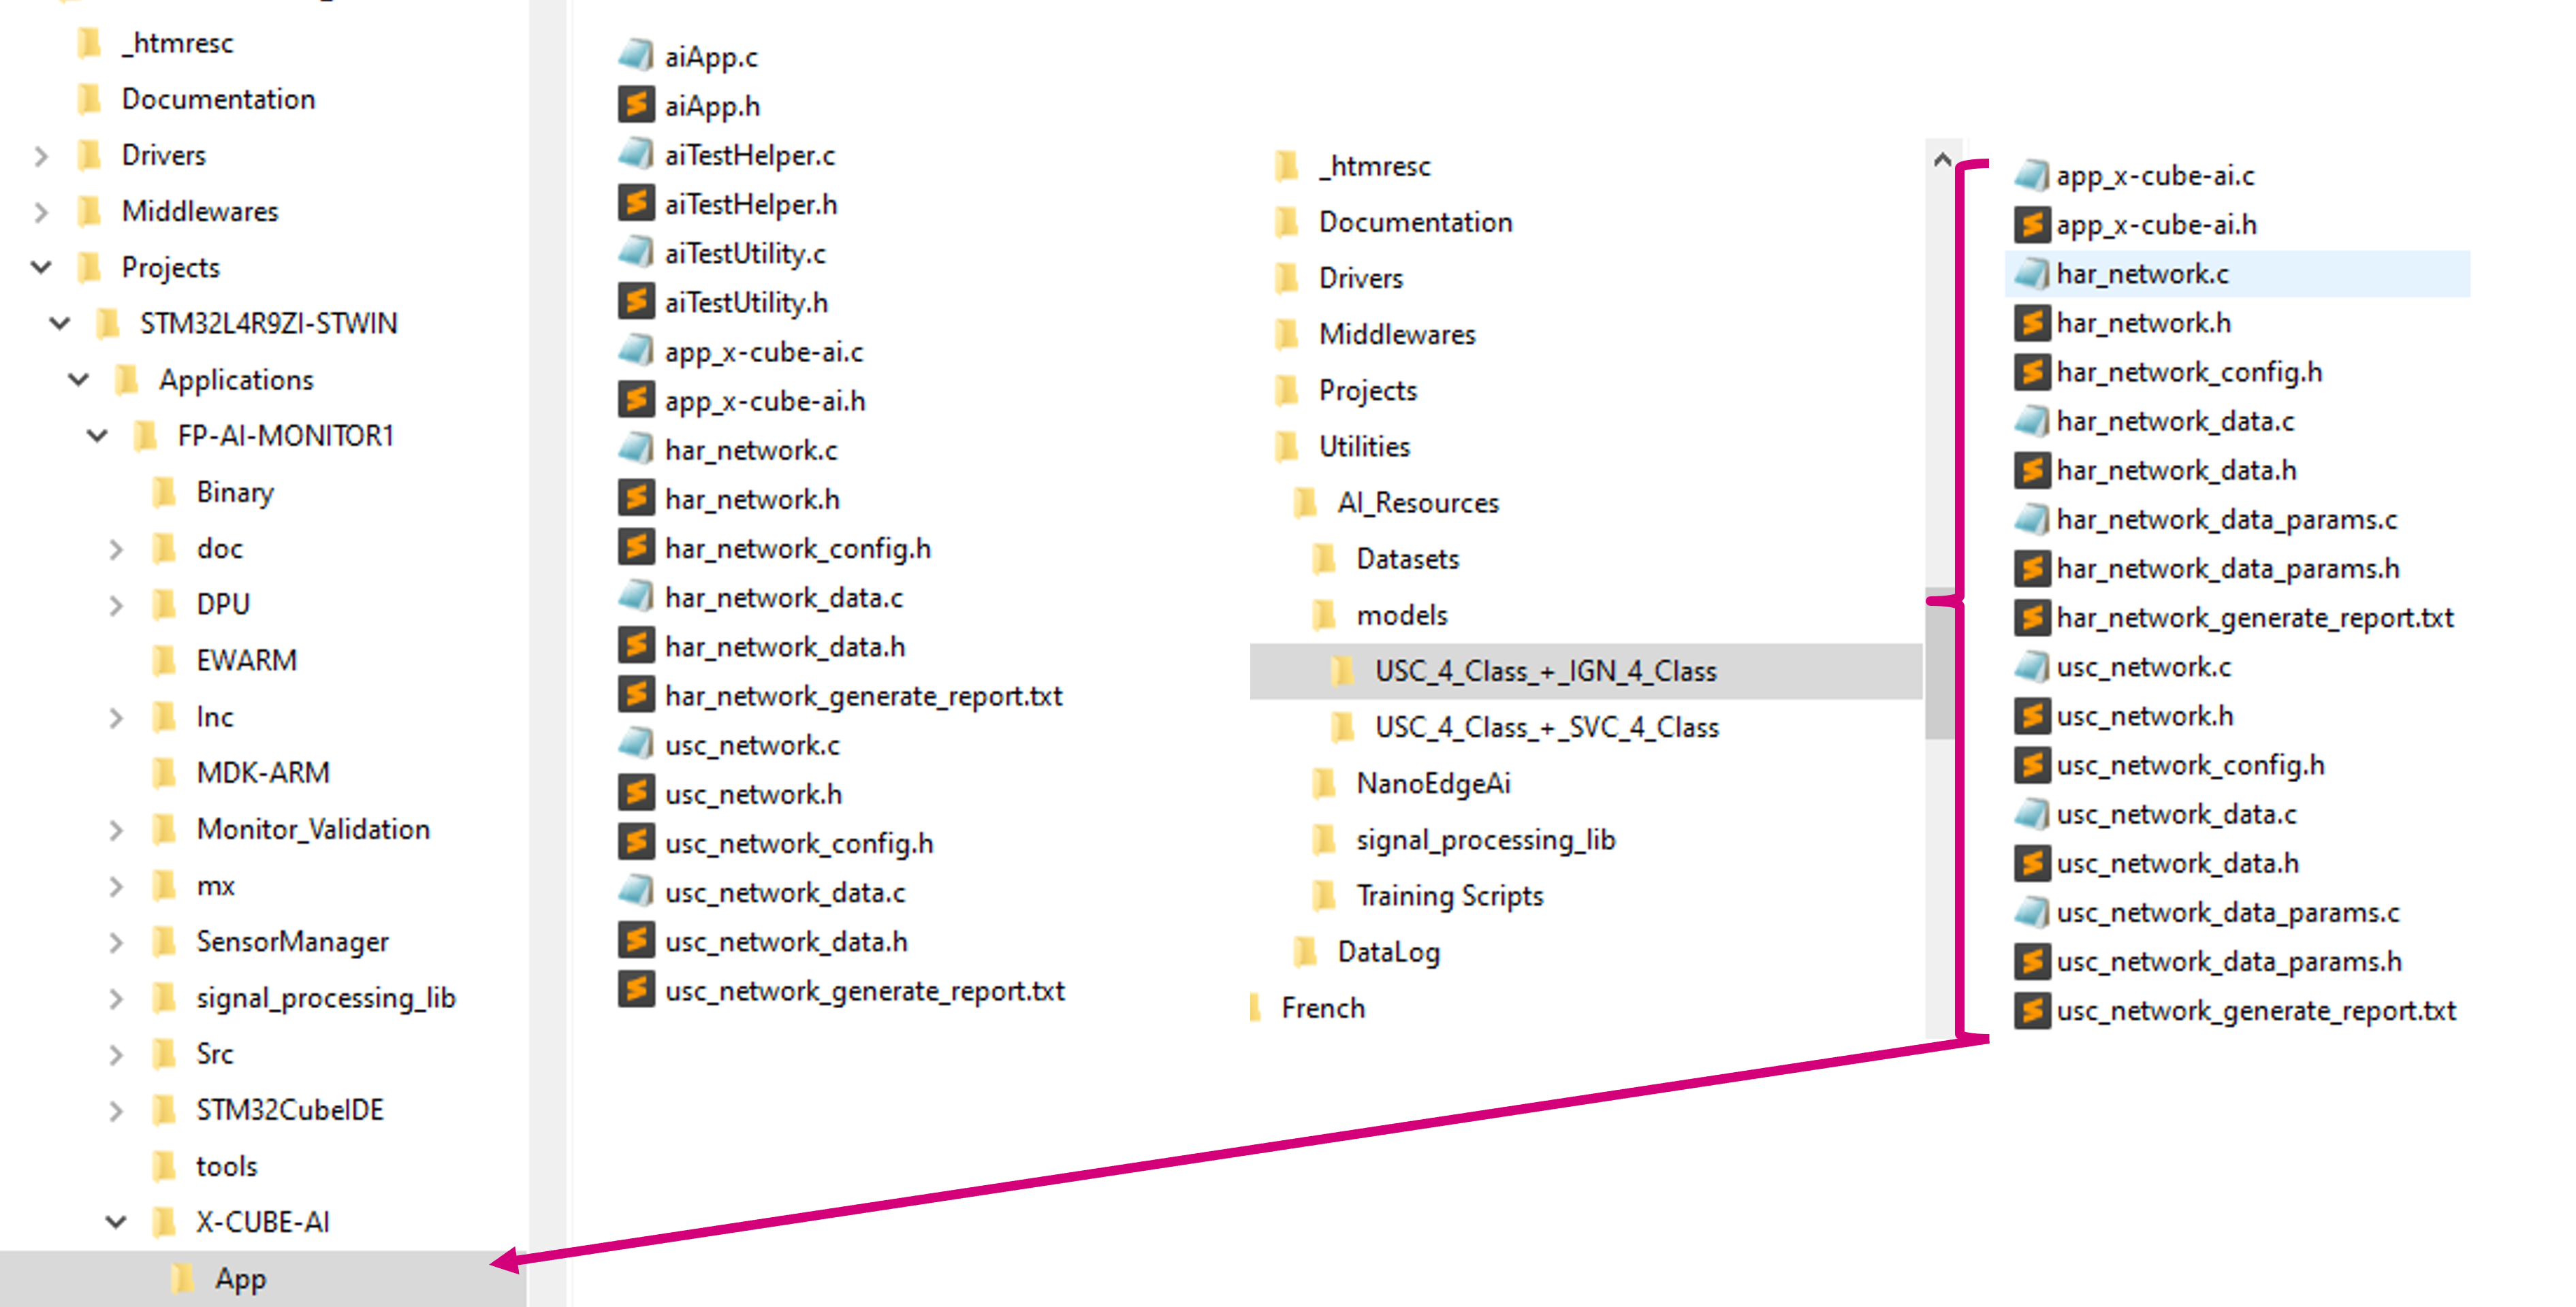
After generating a new HAR model with X-CUBE-AI, the user must copy and replace the following files in the /FP-AI-MONITOR1_V2.0.0/Projects/STM32L4R9ZI-STWIN/Applications/FP-AI-MONITOR1/X-CUBE-AI/App/ folder, as shown in the figure below.
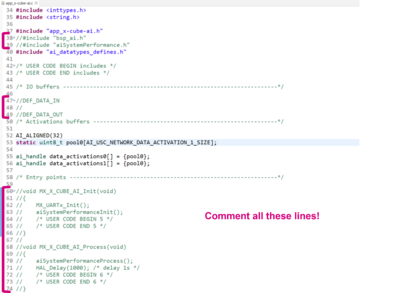
Once the files are copied, the user must comment the following lines in FP-AI-MONITOR1_V2.0.0/Projects/STM32L4R9ZI-STWIN/Application/FP-AI-MONITOR1/X-CUBE-AI/App/app_x-cube-ai.c as shown in the figure below.
3.3. Code adaptation
3.3.1. Change sensor and settings
The default sensor parameter setting occurs during eLooM initialization phase, specifically during the " AppController_vtblOnEnterTaskControlLoop" callback located in Projects\STM32L4R9ZI-STWIN\Applications\FP-AI-MONITOR1\Src\AppController.c. The first thing is to find the sensor identifier (id) needed among those registered to the sensor manager with a query. Then, if the sensor is available, its id is used to enable it and configure its output data rate and full-scale value that are consistent with the data set on which the new model is trained.
In our case, ODR = 26 Hz and FS = 4G.
Finally, the sensor is bounded to the AI task by affecting p_ai_sensor_obs.
All the steps are highlighted in yellow in the code snippet below.
/* ... */
sys_error_code_t AppController_vtblOnEnterTaskControlLoop (AManagedTask *_this)
{
  /* ... */
  /* Enable only the accelerometer of the combo sensor "ism330dhcx". */
  /* This is the default configuration for FP-AI-MONITOR1. */
  SQuery_t query;
  SQInit (&query, SMGetSensorManager ());
  sensor_id = SQNextByNameAndType (&query, "ism330dhcx", COM_TYPE_ACC);
  if (sensor_id != SI_NULL_SENSOR_ID)
  {
    SMSensorEnable (sensor_id);
    SMSensorSetODR (sensor_id, 26);
    SMSensorSetFS (sensor_id, 4.0);
    p_obj->p_ai_sensor_obs = SMGetSensorObserver (sensor_id);
    p_obj->p_neai_sensor_obs = SMGetSensorObserver (sensor_id);
  }
  else
  {
    res = SYS_CTRL_WRONG_CONF_ERROR_CODE;
  }
/* ... */
3.3.2. Adapt input shape
Align data shape definition in all software modules, namely in the AI task located in Projects\STM32L4R9ZI-STWIN\Applications\FP-AI-MONITOR1\Src\AITask.c:
/* ... */
#define AI_AXIS_NUMBER 3
#define AI_DATA_INPUT_USER 48
/* ... */
and in the AI DPU (Data processing unit), embedded in the AI task. The code is located in Projects\STM32L4R9ZI-STWIN\Applications\FP-AI-MONITOR1\DPU\Inc\AiDPU.h. For our case, the input shape is 3x48 (Instead of the former 3x24).
/* ... */
#define AIDPU_NB_AXIS (3)
#define AIDPU_NB_SAMPLE (48)
#define AIDPU_AI_PROC_IN_SIZE (AI_HAR_NETWORK_IN_1_SIZE)
#define AIDPU_NAME "har_network"
/* ... */
3.3.3. Change data structure
The input is a 2D float array with acceleration coordinates in space as rows and time index as columns:
X0 Y0 Z0 X0 Y0 Z0 X1 Y1 Z1 ... ... ... Xn Yn Zn
The current version of the AI task currently supports two types of output structures:
- A unique 1D float array output (Softmax output coming from CNN network).
- One scalar float (classification index from SVC model) and 1D float array (associated probability distribution)
The function pack needs no adaptation for the developed example. It automatically detects what is the output structure of the current model; the related code can be found in aiProcess () function located in Projects\STM32L4R9ZI-STWIN\Applications\FP-AI-MONITOR1\X-CUBE-AI\App\aiApp.c.
In case of need, the type of data can be simply changed in the DPU-specific function, AiDPUSetStreamsParam (), which is called to establish data input and output streams, located in Projects\STM32L4R9ZI-STWIN\Applications\FP-AI-MONITOR1\DPU\Src\AiDPU.c:
uint16_t AiDPUSetStreamsParam (AiDPU_t *_this, uint16_t signal_size, uint8_t axes, uint8_t cb_items)
{
/* ... */
  _this->super.dpuWorkingStream.packet.payload_fmt = AI_SP_FMT_FLOAT32_RESET ();

  /* The shape is 2D and the accelerometer is three AXES (X, Y, Z). */
  _this->super.dpuWorkingStream.packet.shape.n_shape = 2;
  _this->super.dpuWorkingStream.packet.shape.shapes[AI_LOGGING_SHAPES_WIDTH] = axes;
  _this->super.dpuWorkingStream.packet.shape.shapes[AI_LOGGING_SHAPES_HEIGHT] = signal_size;

  /* Initialize the out stream */
  _this->super.dpuOutStream.packet.shape.n_shape = 1;
  _this->super.dpuOutStream.packet.shape.shapes[AI_LOGGING_SHAPES_WIDTH] = 2;
  _this->super.dpuOutStream.packet.payload_type = AI_FMT;
  _this->super.dpuOutStream.packet.payload_fmt = AI_SP_FMT_FLOAT32_RESET ();
/* ... */
Today DPUs are supporting only float (coded in AI_SP_FMT_FLOAT32_RESET () macro) and integer (coded as AI_SP_FMT_INT16_RESET () macro) base types defined in ai_sp_dataformat.h.
A more complex topology may need specific developments.
3.3.4. Change preprocessing
The preprocessing is in general specific to the use case under consideration. For instance, gravity removal is inserted in the AI DPU for the SVC model.
As no preprocessing is required with a new CNN model, we propose to bypass it in the DPU located in Projects\STM32L4R9ZI-STWIN\Applications\FP-AI-MONITOR1\DPU\Src\AiDPU.c in the following fashion:
/* ... */
sys_error_code_t AiDPU_vtblProcess (IDPU *_this)
{
 /* ... */
  if ((*p_consumer_buff) != NULL)
  {
	GRAV_input_t gravIn[AIDPU_NB_SAMPLE];
/*	GRAV_input_t gravOut[AIDPU_NB_SAMPLE]; */

	assert_param (p_obj->scale != 0.0F);
	assert_param (AIDPU_AI_PROC_IN_SIZE == AIDPU_NB_SAMPLE*AIDPU_NB_AXIS);
	assert_param (AIDPU_NB_AXIS == p_obj->super.dpuWorkingStream.packet.shape.shapes[AI_LOGGING_SHAPES_WIDTH]);
	assert_param (AIDPU_NB_SAMPLE == p_obj->super.dpuWorkingStream.packet.shape.shapes[AI_LOGGING_SHAPES_HEIGHT]);

	float *p_in = (float *) CB_GetItemData ((*p_consumer_buff));
	float scale = p_obj->scale;
	for (int i=0 ; i < AIDPU_NB_SAMPLE ; i++)
	{
	  gravIn[i].AccX = *p_in++ * scale;
	  gravIn[i].AccY = *p_in++ * scale;
	  gravIn[i].AccZ = *p_in++ * scale;
/*	  gravOut[i] = gravity_suppress_rotate (&gravIn[i]); */
	}

    /* call Ai library. */
	 p_obj->ai_processing_f (AIDPU_NAME, (float *)/*gravOut*/ gravIn, p_obj->ai_out);
/* ... */
}
In this example, the preprocessing is simply bypassed, by calling the AI library, p_obj->ai_processing_f ()), with scaled input samples, but in some other, the preprocessing function gravity_suppress_rotate may be replaced by a different one, crafted by the data scientist.
3.3.5. Change the number of classes
The number and labels vary from use case to use case. In Projects\STM32L4R9ZI-STWIN\Applications\FP-AI-MONITOR1\Src\AppController.c, it is possible to tune the number of classes through #define CTRL_HAR_CLASSES and their labels through sHarClassLabels c-structure.
/* ... */
#define CTRL_HAR_CLASSES 6
/* ... */
static const char* sHarClassLabels[] = {
  "Downstairs",
  "Jogging",
  "Sitting",
  "Standing",
  "Upstairs",
  "Walking",
  "Unknown"
};
3.4. Build and test
- Build your project: Project > Build All
- Run > Run As > 1 STM32 Cortex-M C/C++ Application. Then click Run.
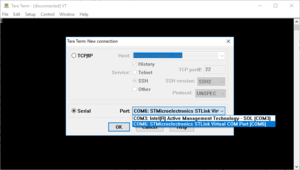
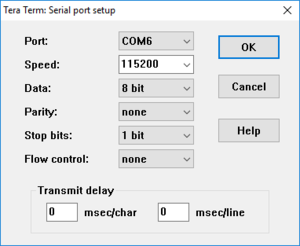
- Open a serial monitor application, such as Tera Term, PuTTY, or GNU screen, and connect to the ST-LINK Virtual COM port (COM port number may differ on your machine).
- Configure the communication settings to 115200 bauds, 8-bit, no parity.
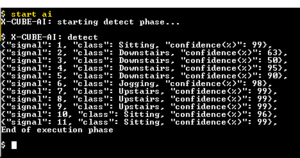
- Type
start aiand default settings (as discussed above) applies.
- Hit
ESCkey to stop.
The user can check that the new model is well integrated by simulating various human activities with the STWIN1B in hand and that it can be more or less cumbersome!
