1. Embedded provisioner introduction
Embedded provisioner is a proprietary solution to provision a Bluetooth® LE-Mesh network from a STM32WB platform instead of using a smartphone or tablet.
2. Requirements
Software and system requirements
The software required are the following (minimum IDEs version):
- IAR Embedded Workbench for ARM (EWARM) toolchain V8.20.2
- RealView Microcontroller Development Kit (MDK-ARM) toolchain V5.23
- STM32CubeIDE toolchain V1.7.0 [1]
Programmer:
- STM32CubeProgrammer[2]: to flash the board with an already generated binary
More information about software and system requirements are available in the ST Bluetooth® LE-Mesh Application Note[3].
Hardware requirements
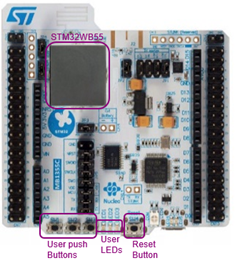
P-NUCLEO-WB55 Nucleo board[4] is necessary to set up the demonstration.
| STM32WB Nucleo board |
|---|
3. Setup
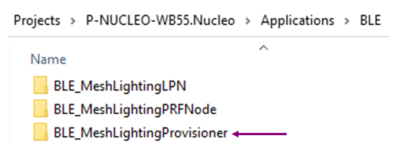
Embedded provisioner project can be found in STM32CubeWB MCU Package[5] at the following location.
| Embedded provisioner project directory |
|---|
To build and flash embedded provisioner project, process on the same way as for ST BLE-Mesh Proxy-Relay-Friend example.
Before building the project, choose between the two available configurations by modifying mesh_cfg_usr.h code as described below.
3.1. Embedded provisioner feature
With this setup, the provisioner node configures and initializes itself without action required from the user.
#define ENABLE_RELAY_FEATURE
#define ENABLE_PROXY_FEATURE
#define ENABLE_FRIEND_FEATURE
#define ENABLE_PROVISIONER_FEATURE
//#define DYNAMIC_PROVISIONER
[…]
#define ENABLE_SERIAL_PRVN                                                     1
3.2. Dynamic provisioner feature
With this setup, the provisioner node requires to be configured and initialized by the user. The configuration setup is described in the below sections.
#define ENABLE_RELAY_FEATURE
#define ENABLE_PROXY_FEATURE
#define ENABLE_FRIEND_FEATURE
//#define ENABLE_PROVISIONER_FEATURE
#define DYNAMIC_PROVISIONER
[…]
#define ENABLE_SERIAL_PRVN
For both setup, ensure that the serial commands are enabled, in order to pilot the provisioner from the terminal window.
/* Enables the serial interface using Uart */
#define ENABLE_SERIAL_INTERFACE                                                1
#define ENABLE_SIG_MODELS_AT_COMMANDS                                          1
#define ENABLE_VENDOR_MODELS_AT_COMMANDS                                       0
#define ENABLE_UT                                                              1
4. Getting started
Before following the steps described below, ensure that your project is setup to support the desired feature (embedded or dynamic provisioner) and flashed into the STM32WB platform.
Open a terminal to communicate with the platform. The terminal setup and use are described in ST Bluetooth® LE-Mesh Proxy-Relay-Friend example page.
If you build the provisioner application using ENABLE_PROVISIONER_FEATURE, you can skip step 1, as the board is automatically setup and initialized.
4.1. Step 1: starting provisioner node
In the case of DYNAMIC_PROVISIONER feature, logs on the terminal must display:
Unprovisioned device
NEXT NVM ADDRESS […]
BLE-Mesh Lighting Demo v1.[…]
BLE-Mesh Library v01.[…]
BD_MACAddress = […]
UUID Address = […]
Write the below command on the serial terminal to create one node ROOT node for the network creation:
ATEP ROOT (case insensitive)
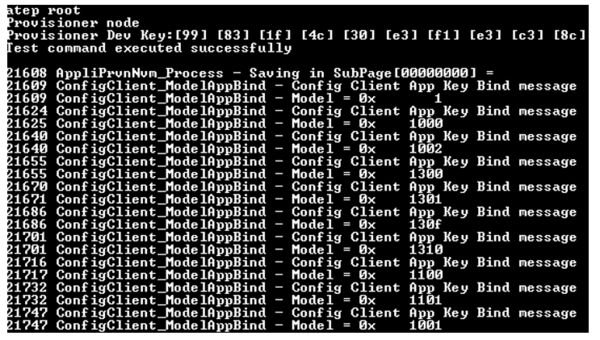
This command configures the provisioner and bind all the embedded models:
| Terminal logs: ATEP ROOT |
|---|
4.2. Step 2: scan unprovisioned devices
Write the below command on the serial terminal to scan unprovisioned devices in range:
ATEP SCAN (Case insensitive)
Log on terminal indicates unprovisioned devices with their corresponding UUIDs:
| Terminal logs: ATEP SCAN |
|---|
In the example above, two devices (device-0 and device-1) are not provisioned to the network.
4.3. Step 3: provision and configure devices
Write the below command to start provisioning of device-0:
ATEP PRVN-0 (Here 0 indicates the device–0)
Below Log displayed on the terminal indicates that the device-0 has been provisioned by the provisioner by creating the PB-Adv connection link:
Test command executed successfully
PB-ADV Link opened successfully
Device Key: […]
App Key: […]
Device is provisioned by provisioner
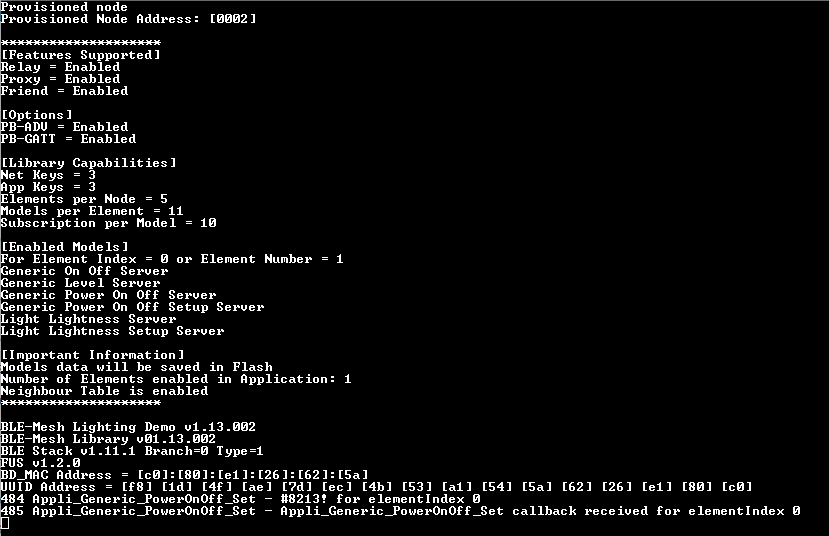
Log on provisioned node terminal indicates that the node is provisioned by the provisioner. Finally, the PB-Adv connection link is closed and device-0 is configured, and models bind.
| Terminal logs: node provisioned |
|---|
4.4. Step 4: provision other devices
To provision and configure new nodes, reproduce step 2 and step 3.
4.5. Step 5: unprovision Node
To unprovision previously provisioned nodes, write the bellow command:
ATEP UNPV 0002
Here 0002 indicates the address of the provisioned Node in the created Mesh network.
These Node addresses are automatically assigned during provisioning process, the first one (0001) is dedicated to the Provisioner Node.
These Node addresses are displayed on terminal log: during provisioning process and after each Node reset as shown bellow:
| Terminal logs: provisioned node address display during provisioning |
|---|
| Terminal logs: provisioned node address display after Node reset |
|---|
5. References


