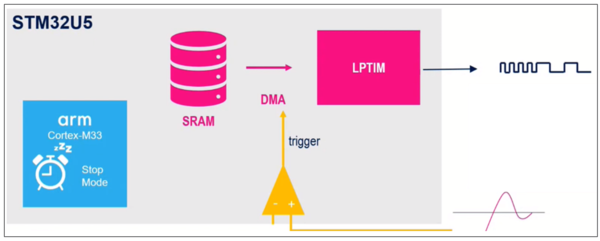
This article explains the LPBAM feature, when and how to use it, and also provides code examples.
1. Introduction to LPBAM
1.1. Definition
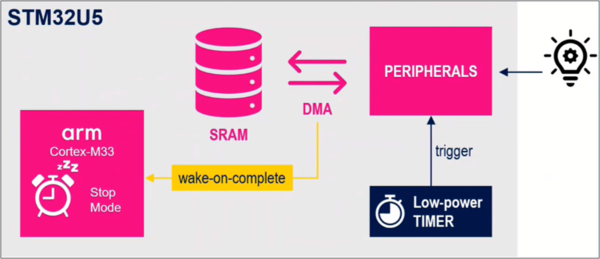
The LPBAM stands for low-power background autonomous mode. It is an operating mode available in the STM32U5 products series that allows peripherals to be functional and autonomous in Stop 2 mode independently from the device power modes without any software running.
LPBAM subsystem can chain different operations thanks to DMA linked-list transfers.
The DMA operations can be related to:
- Peripheral data transfer
- Peripheral reconfiguration
1.2. Benefits
Two major advantages result from using LPBAM subsystem mechanisms:
- Power consumption is optimized:
Bus and kernel clocks are distributed only when needed.
Most of the product parts can be shut down.
Analog peripherals or oscillators are powered on only when necessary.
- CPU bandwidth is offloaded:
Peripheral configurations are done by DMA instead of CPU.
Data transfers are done by DMA instead of CPU.
1.3. Smart Run Domain (SRD)
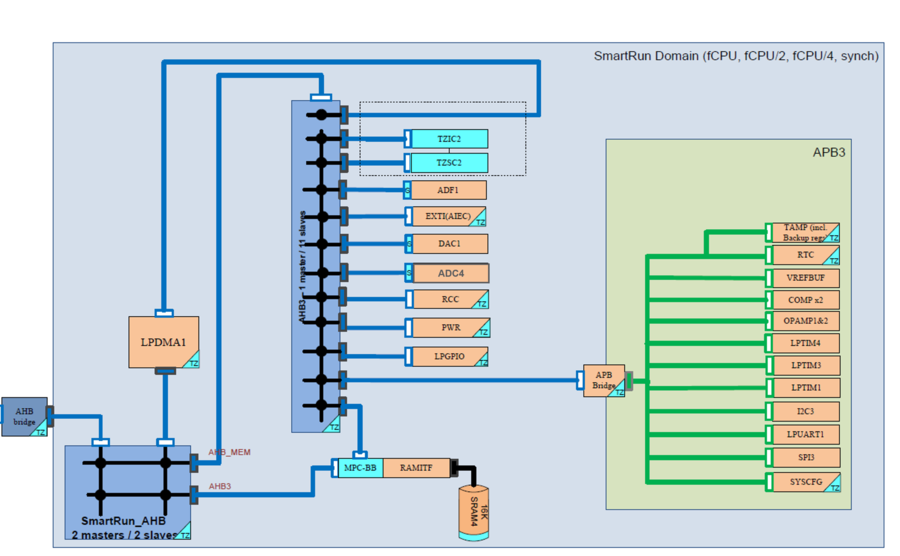
The STM32U5 is split into two domains: CPU domain (CD) and SmartRun domain (SRD)
The SRD architecture relies on a DMA allowing autonomous operation during low-power modes down to Stop 2. This architecture also features a 32-bit AHB bus matrix that interconnects:
- Two masters:
- the main AHB bus matrix
- LPDMA1 (low-power DMA featuring one master port)
- the main AHB bus matrix
- Two slaves:
- AHB3 peripherals including AHB to APB bridge connected to APB3
- internal SRAM4
- AHB3 peripherals including AHB to APB bridge connected to APB3
1.4. Peripherals supporting LPBAM
There are 2 types of peripherals:
- Autonomous peripherals: which have clock request capability and support DMA transfer in STOP mode.
- Passive peripherals: can only be reconfigured or used as triggers, they do not support DMA or clock requests.
LPBAM is an operating mode that allows peripherals to function autonomously, independently of power modes, and without running any software.
The LPBAM is supported in Stop 2 mode.
So autonomous peripherals can request their clock (kernel or bus clocks), and can then stay functional in Stop mode where the clocks are disabled by default to reduce consumption (except for LSE and LSI low-power low-speed oscillators).
The table below lists all peripherals that support LPBAM.
| Low-power mode | Stop 2 |
|---|---|
| Autonomous Peripherals | ADC4, ADF1, DAC1, LPDMA1, LPTIM1, LPTIM3, LPUART1, I2C3, SPI3 |
| Passive Peripherals | LPTIM4, LPGPIO, VREFBUF, COMPs and OPAMPs, RTC/TAMP |
2. How to use LPBAM to drive LPGPIO
To follow along with this example, you need a NUCLEO-U575 board.
Before starting the hands-on, make sure you have installed the following software:
- STM32CubeMX 6.5.0 (or a newer version)
- STM32CubeIDE 1.9.0 (or a newer version)
- STM32CubeU5 firmware package
2.1. Block Diagram
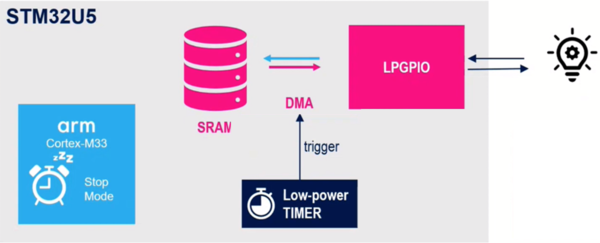
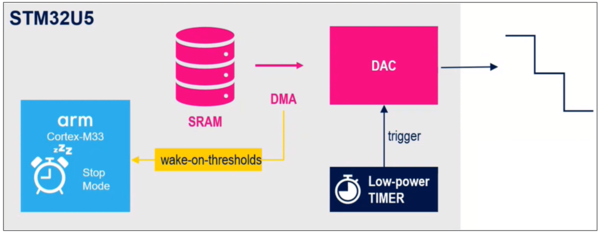
The purpose of this example is to drive a GPIO pin (PA1) in the low-power domain controlled by linked-list DMA which is triggered by a low-power timer LPTIM with two different frequencies.
- LPTIM with 50 ms period
- LPTIM with 100 ms period
2.2. Objectives
The purpose of this example is to demonstrate how to:
- Configure LPBAM scenario
- Measure the power consumption in STOP2 mode
2.3. STM32CubeMX LPBAM Configuration
To create an LPBAM application using the STM32CubeMX tool, you need:
- The STM32CubeMX standard view. This sets up the main application and code generation.
- The LPBAM view to build the LPBAM applications.
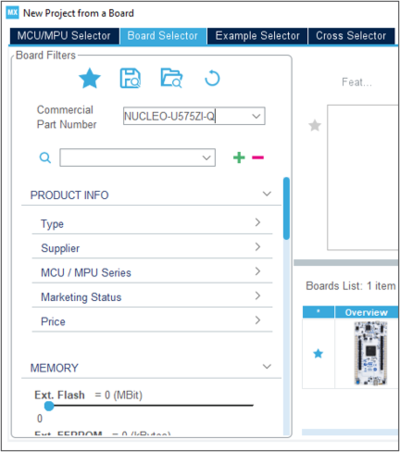
- Open STM32CubeMX and choose your board in the board selector menu:
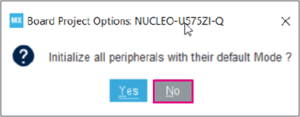
Then choose Start project with no peripheral initialization by pushing on the "NO" button. To avoid the generation of useless project code, the required peripherals are initialized later.
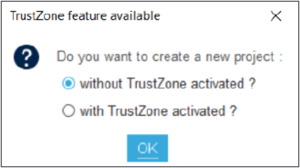
To build an LPBAM application when TrustZone® is deactivated:
- Choose "without TrustZone activated".
- Click on OK.
The STM32CubeMX tool entry point is always the standard view. Opening the project manager and saving the main project is recommended. For this application:
- Click on the project manager panel.
- Name the project LPGPIO_drive
- For the "Project Location", save the project with the other examples in the firmware package.
At this point, the project is configured, and the IOC file is saved under the selected path.
To increase the system performance, enabling the ICACHE peripheral in a one-way configuration is recommended.
To do this, click on the "System Core" menu, then on the "ICACHE" peripheral, and change "Mode" to "1-way (direct mapped cache)".
In this application, we are using LEDs (PC7 as LED BLUE, PG2 as LED RED, PB7 as LED GREEN) to observe the project runtime status and a user push-button pin (PC13) as an input with an external interrupt.
- Choose External Interrupt Mode with Rising edge trigger detection as GPIO mode for User Button (PC13)
- Enable the NVIC
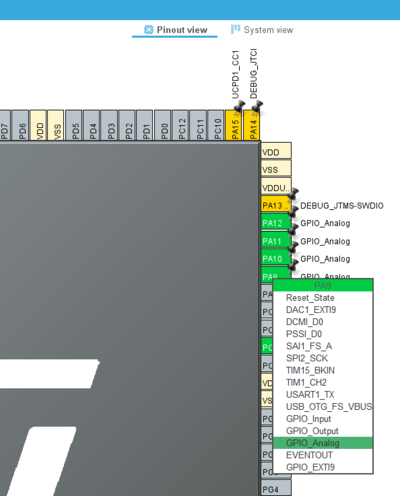
- Set the state of the USB OTG pins (PA9 to PA12) as GPIO Analog to reduce the power consumption.
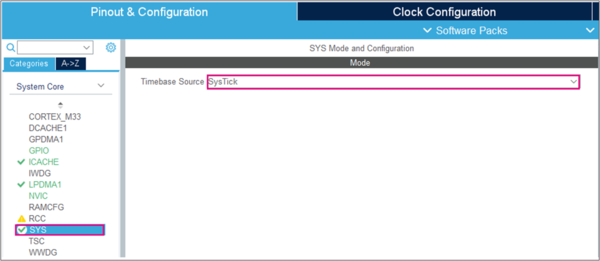
Choose Systick as a timebase
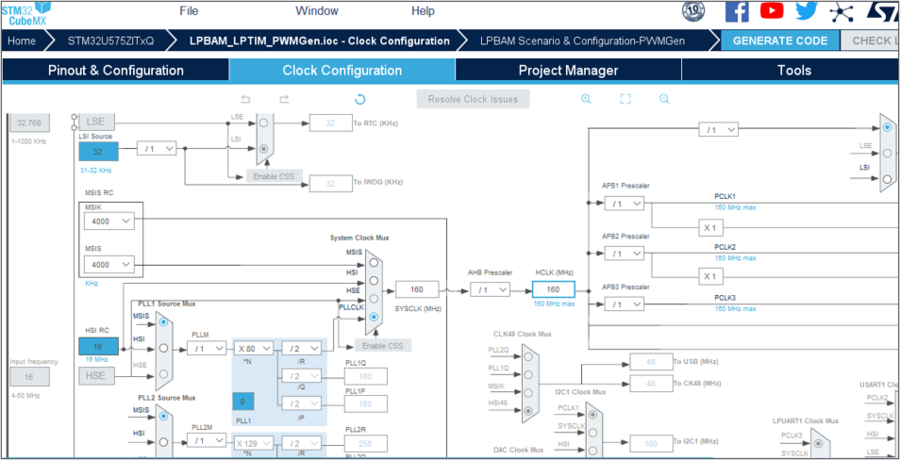
To reach the highest performance, in Clock Configuration, configure the system clock to the highest value. PLL 1 configuration is as follows:
- PLLM = 1
- PLLN = 80
- PLLP = 2
- PLLQ = 2
- PLLR = 2
2.3.1. LPBAM scenario and configuration
At this point, the main project system is configured. In the next step, we build the "LPGPIO driving" application.
Click on the "LPBAM Scenario & Configuration" panel
Click on the “+ Add Application” option to add an LPBAM application
When adding an LPBAM application, the STM32CubeMX tool shows the LBPAM view. As for the standard view, it contains “LPBAM Scenario & Configuration”, “Pinout & Configuration” and “Clock Configuration” panels.
To do so:
- Change the name of the application from LpbamAp1 to "LPGPIO_drive".
- Change the name of the Scenario to "TrigGPIO".
- Change the name of the Queue to "GPIOstate".
In Pinout & Configuration, under the system core, RCC, enable the low-speed clock LSE.
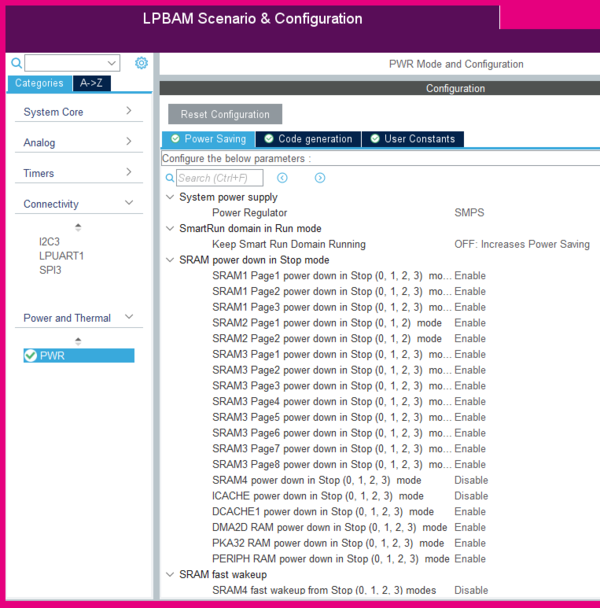
To reach the lowest power consumption regarding the hardware target, you need to shut off all unused resources through the PWR peripheral.
To do so:
- Click on "Pinout & Configuration", then on "Power and Thermal", then on "PWR".
- Enable the power-down for all the SRAMs, except SRAM4 and ICACHE.
Now configure the LPBAM peripherals in Pinout & Configuration:
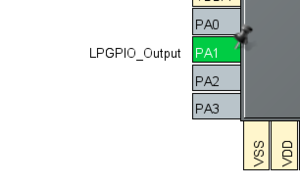
- Click on "System Core" then on "GPIO" and configure PA1 as LPGPIO Output
The next step is to configure the DMA channel that ensures the transfer of the LPTIM signal to trigger the LPGPIO.
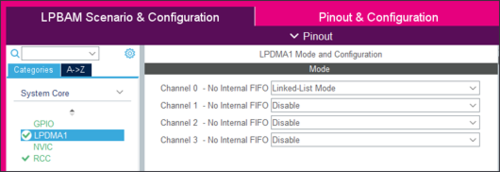
In LPBAM mode, the DMA channel must be configured in a linked-list mode.
When DMA transfer is done in an infinite loop, the DMA channel execution mode should be configured in circular mode:
- Left-click on "System core", then on "LPDMA1". Enable the "Linked-List Mode" for "CH0".
- Click on "CH0". Then change the "Execution Mode" to "Circular" so that the PWM example runs in an infinite loop.
- In Transfer Event Generation, choose the TC (and the HT) event generated at the (respectively half) end of the last linked-list item.
Next, go to "NVIC Settings" and enable "LPDMA1 SmartRun Channel 0 global interrupt".
All LPBAM peripherals (LPGPIO, LPDMA1, LPTIM) are now configured and ready for scenario queue building.
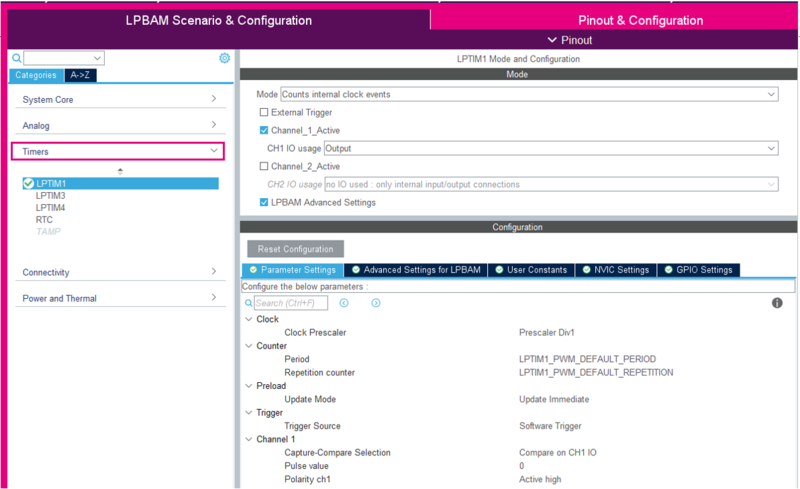
- Click on Timers then "LPTIM1". The "LPTIM1 Mode and Configuration" window appears.
- Configure the following changes:
To modify the values of the Period and Repetition counter as shown in the figure below, click on this icon
![]() and select No check.
and select No check.
In the “User Constants” panel, click on "add "and create three "Constants":
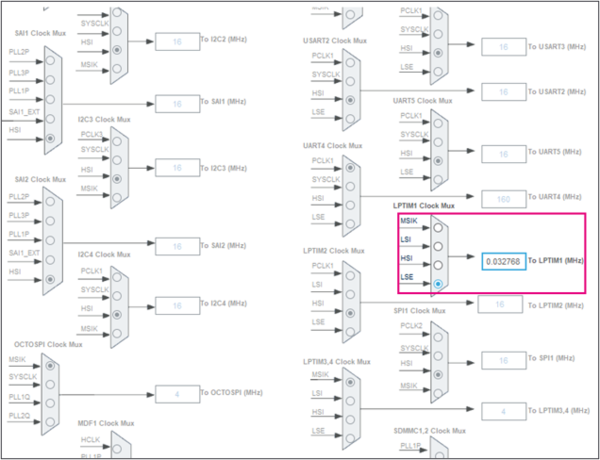
At this point, the LPTIM only needs the LPTIM clock configuration before it can generate a PWM signal.
In clock configuration, select LSE as the LPTIM1 clock source:
2.3.2. Scenario queue building
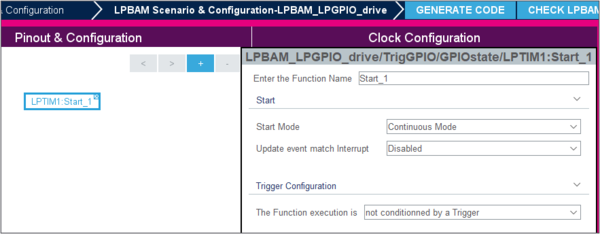
STEP1: The LPTIM1 configuration sequence for the first node is as follows:
1. Go to LPTIM1 and click on the "+" in front of Start.
2. Change the function name to "Start_1".
3. Change the start Mode to "Continuous Mode".
5. Under "Trigger Configuration", keep "The Function execution is" as "Not conditioned by a trigger".
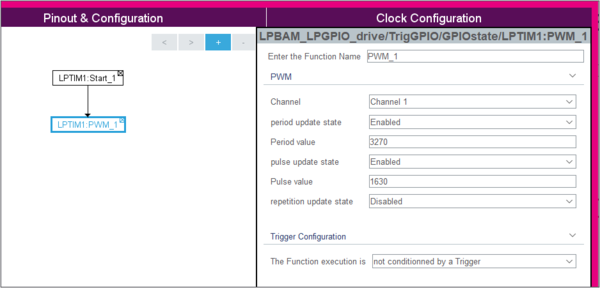
STEP2: configure the LPTIM1 configuration sequence for the second node as follows:
1. Go to LPTIM1 and click on the "+" in front of PWM.
2. Change the function name to "PWM_1".
3. Enable the period update state and insert 3270 as the period value.
4. Enable the pulse update state and insert 1630 as the pulse value.
5. Under "Trigger Configuration", keep "The Function execution is" as "Not conditioned by a trigger".
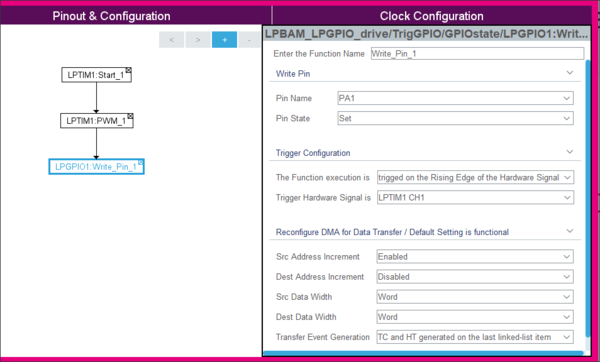
STEP3: we configure the LPGPIO that is triggered by the previous LPTIM signal with a 100 ms period, We create two nodes; one for the Set and the other for the Reset.
1. Go to LPGPIO1 and click on the "+" in front of "Write Pin".
2. Change the function name to "Write_Pin_1".
3. Choose PA1 as the pin Name.
4. Choose Set as the pin State.
5. Under "Trigger Configuration", change "The Function execution is" from "Not conditioned by a trigger" to "Triggered on the Rising edge of the hardware Signal".
6. Change "Trigger hardware Signal is" from "EXTI line 0" to "LPTIM CH1".
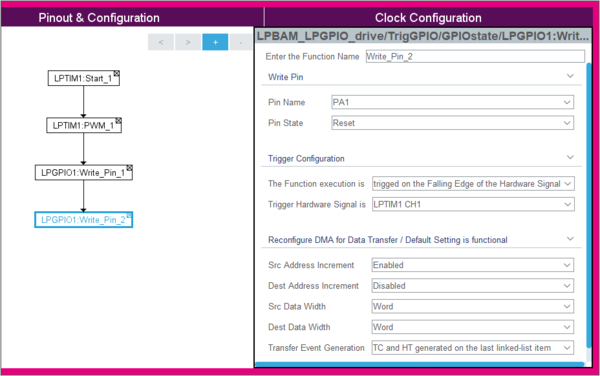
STEP 4: For the second node, only do the following changes:
1. Change the function name to "Write_Pin_2".
2. Choose Reset as the pin State.
3. Change The function execution to 'triggered on the falling edge of the hardware signal'.
4. Change "Trigger hardware Signal is" from "EXTI line 0" to "LPTIM CH1".
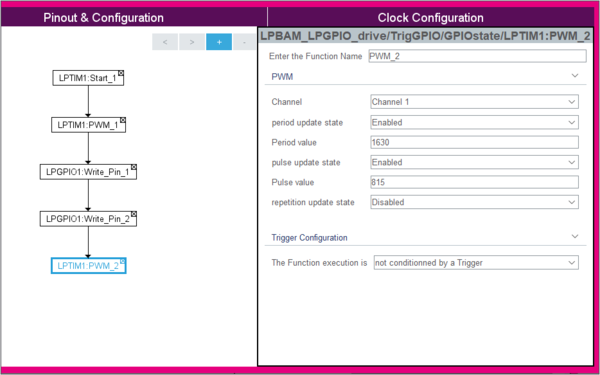
Now, we configure the LPTIM1 with a 50 ms period to trigger the LPGPIO, we chose to configure the LPTIM with 2 different frequencies to show the independence of the queue.
To do so, repeat steps 2, 3, and 4 and only change the period and pulse values in step 2 as following:
- Enable the period update state and insert 1630 as the period value.
- Enable the pulse update state and insert 815 as the pulse value.
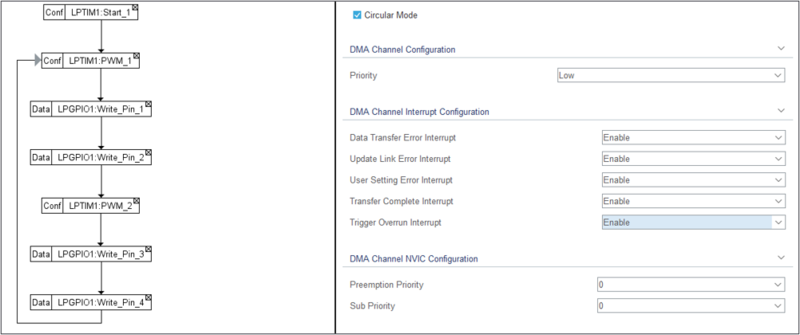
Now, click on the queue "GPIOstate" and check Circular mode so put the queue in a while (1) loop and drag the arrow to the LPTIM1: PWM_1 node.
Following these steps, your queue should look like this:
At this point, the "LPGPIO drive" application is built into the STM32CubeMX LPBAM tool. It is then recommended to check the LPBAM design via the “Check LPBAM design” button. The STM32CubeMX tool checks, in the background, the consistency of the built application. It returns detected issues in the LPBAM log.
Note: The below warnings won't affect the generation of your code!
Now, all the LPBAM application dependencies are configured.
2.4. Code configuration
The main and the LPBAM applications are ready to be generated.
- Click on "GENERATE CODE" or CTRL+ S
For the LPBAM application, the generated files are:
• lpbam_lpgpio_drive.h
• lpbam_lpgpio_drive_config.c
• lpbam_lpgpio_drive_build.c
• lpbam_lpgpio_drive_config.c
They contain all the APIs needed by the main application to manage any LPBAM application correctly.
Go to the main.h file, add «#include <stdint.h>» in the “USER CODE BEGIN Includes” user section. and in the USER CODE BEGIN ET add:
/* USER CODE BEGIN Includes */
#include <stdint.h>
/* USER CODE END Includes */
/* USER CODE BEGIN ET */
typedef enum
{
  PB_NOT_PRESSED =   0,
  PB_PRESSED     =   1,
} PB_State_t;
/* USER CODE END ET */
In the main.c file, add «#include "lpbam_lpgpio_drive.h"» in the “USER CODE BEGIN Includes” user section.
/* USER CODE BEGIN Includes */
#include "lpbam_lpgpio_drive.h"
/* USER CODE END Includes */
In the core of the main () API, the LEDs that we are using must be initialized inside the “USER CODE BEGIN PD” user section.
* USER CODE BEGIN PD */

#define LED_GREEN ((uint32_t) (0X0U))
#define LED_BLUE ((uint32_t) (0X1U))
#define LED_RED ((uint32_t) (0X2U))

#define ERROR_NONE ((int32_t) (0x0))
/* USER CODE END PD */
Add the button declaration to the “USER CODE BEGIN PV” user section in main.c.
* USER CODE BEGIN PV */
/* Push Button State */
__IO uint32_t PushButtonState = PB_NOT_PRESSED;
/* USER CODE END PV */
Now, add the functions declarations in the main.c under the user section named “USER CODE BEGIN PFP”.
/* USER CODE BEGIN PFP */
static void Enter_Stop2_Mode(void);
static int32_t LED_On(uint32_t Led);
static int32_t LED_Off(uint32_t Led);
/* USER CODE END PFP */
To reach the lowest power consumption, all pins unused by the LPBAM scenario are configured in analog mode, including the debug pins. After initializing the LEDs and the push-button, you need to call the LPBAM-generated APIs to initialize, build, link, and start the LPBAM application within the “USER CODE BEGIN 2” user section.
/*  LPBAM_LPGPIO_drive application init */
  MX_LPGPIO_drive_Init();

  /* LPBAM_LPGPIO_drive application TrigGPIO init */
  MX_LPGPIO_drive_TrigGPIO_Init();

  /* LPBAM_LPGPIO_drive application TrigGPIO build */
  MX_LPGPIO_drive_TrigGPIO_Build();

  /*  LPBAM_LPGPIO_drive application TrigGPIO link */
  MX_LPGPIO_drive_TrigGPIO_Link(&handle_LPDMA1_Channel0);

  /*  LPBAM_LPGPIO_drive application TrigGPIOstart */
  MX_LPGPIO_drive_TrigGPIO_Start(&handle_LPDMA1_Channel0);
At this point, the LPBAM application is operating. Stop2 mode must be entered:
 /* Enter Stop2 mode */
  Enter_Stop2_Mode ();
User push-button pin (PC13) is configured as input with external interrupt (EXTI_Line13), falling edge. When it is pressed, the system wakes up from Stop2 mode.
The board LEDs are used to monitor the transfer status:
- LED_GREEN: ON at the end of the application
- LED_BLUE ON after waking up from Stop2 mode and before pressing the user push-button.
  /* Reset push button state */
  PushButtonState = PB_NOT_PRESSED;

  /* Turn LED_BLUE on */
  LED_On(LED_BLUE);

  /* Wait for the next push button press to stop the LPBAM LPGPIO_drive application TrigGPIO scenario */
  while (PushButtonState == PB_NOT_PRESSED);

  /* Turn LED_BLUE off */
 LED_Off(LED_BLUE);
For this application, you need to call the following API also in the “USER CODE BEGIN 2” user section. This stops, unlinks, and de-initializes the LPBAM application and the green led turns on.
/*LPBAM_LPGPIO_drive application TrigGPIO scenario stop */
  MX_LPGPIO_drive_TrigGPIO_Stop(&handle_LPDMA1_Channel0);

  /* LPBAM_LPGPIO_driveapplication TrigGPIO scenario unlink */
  MX_LPGPIO_drive_TrigGPIO_UnLink(&handle_LPDMA1_Channel0);

  /* LPBAM_LPGPIO_drive application TrigGPIO scenario de-init */
  MX_LPGPIO_drive_TrigGPIO_DeInit();

  LED_On(LED_GREEN);
Any additional service can be added under user codes in the main.c file.
For this application, an application API is needed that:
- Enters Stop2 mode and checks whether or not the system was in stop mode
These functionalities are added to the “USER CODE BEGIN 4” user section.
/* USER CODE BEGIN 4 */
static void Enter_Stop2_Mode(void)
{
  /* Enter the system to STOP2 mode */
  __HAL_RCC_PWR_CLK_ENABLE ();
  HAL_PWREx_EnterSTOP2Mode (PWR_STOPENTRY_WFI);

  /* Check that the system was resumed from stop 2 */
  if (__HAL_PWR_GET_FLAG (PWR_FLAG_STOPF) == 0U)
  {
    Error_Handler();
  }

  /* Clear stop flag */
  __HAL_PWR_CLEAR_FLAG(PWR_FLAG_STOPF);

  /* Check that the stop flag is cleared */
  if (__HAL_PWR_GET_FLAG(PWR_FLAG_STOPF) != 0U)
  {
    Error_Handler();
  }
}
Now, add the GPIO_EXTI Callback function, and the LED_On and LED_Off functions.
void HAL_GPIO_EXTI_Rising_Callback(uint16_t GPIO_Pin)
{
  /* Prevent unused argument(s) compilation warning */
  UNUSED(GPIO_Pin);
  PushButtonState = PB_PRESSED;

}
static int32_t LED_On(uint32_t led)
{
  int32_t ret = ERROR_NONE;

  if(LED_GREEN == led)
  {
    HAL_GPIO_WritePin(LED_GREEN_GPIO_Port, LED_GREEN_Pin, GPIO_PIN_SET);
  }
  else if (LED_BLUE == led)
  {
    HAL_GPIO_WritePin(LED_BLUE_GPIO_Port, LED_BLUE_Pin, GPIO_PIN_SET);
  }
  else if (LED_RED == led)
  {
    HAL_GPIO_WritePin(LED_RED_GPIO_Port, LED_RED_Pin, GPIO_PIN_SET);
  }
  else
  {
    // Do nothing
  }
  return ret;
}
static int32_t LED_Off(uint32_t led)
{
  int32_t ret = ERROR_NONE;

  if(LED_GREEN == led)
  {
    HAL_GPIO_WritePin(LED_GREEN_GPIO_Port, LED_GREEN_Pin, GPIO_PIN_RESET);
  }
  else if (LED_BLUE == led)
  {
    HAL_GPIO_WritePin(LED_BLUE_GPIO_Port, LED_BLUE_Pin, GPIO_PIN_RESET);
  }
  else if (LED_RED == led)
  {
    HAL_GPIO_WritePin(LED_RED_GPIO_Port, LED_RED_Pin, GPIO_PIN_RESET);
  }
  else
  {
    // Do nothing
  }
  return ret;
}
/* USER CODE END 4 */
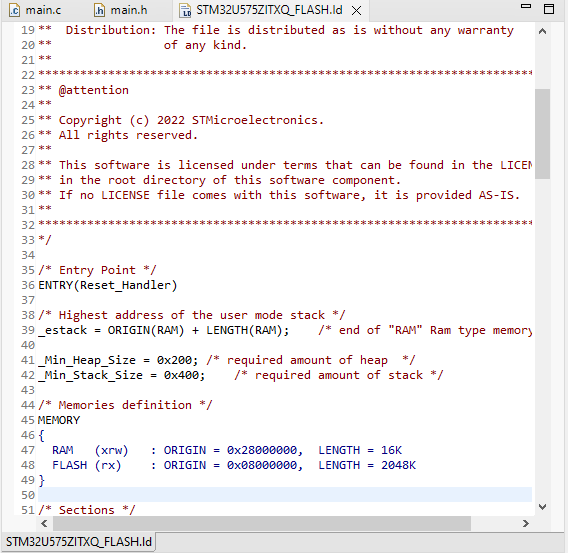
To do so, In the STM32CubeIDE, in Project Explorer > Debug, go to the STM32U575ZITXQ_FLASH.ld and configure the RAM ORIGIN = 0x28000000 and the LENGTH = 16 Kbytes
2.4.1. Compile and flash
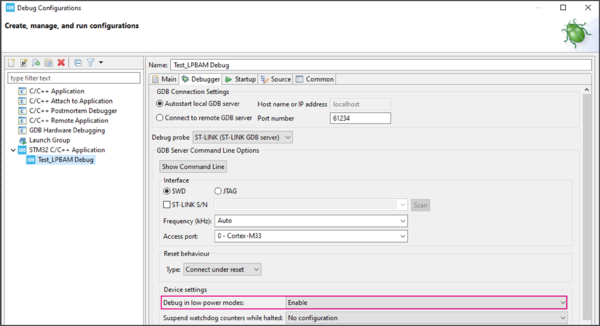
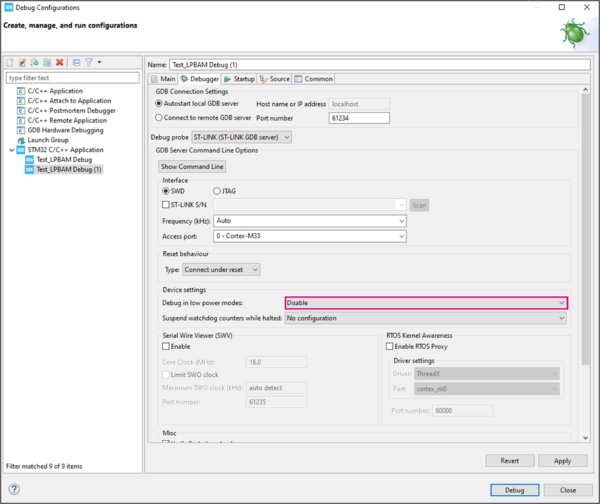
Depending on your application phase, you can either enable or disable the debug configuration.
- In the development phase, it is better to enable debugging in low-power modes for debug purposes
To do so:
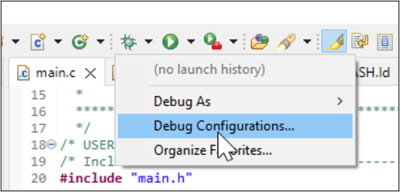
1. click on the debug configuration icon
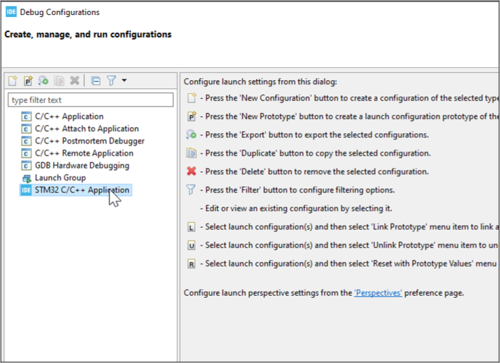
2. Click on the STM32 C/C++ application
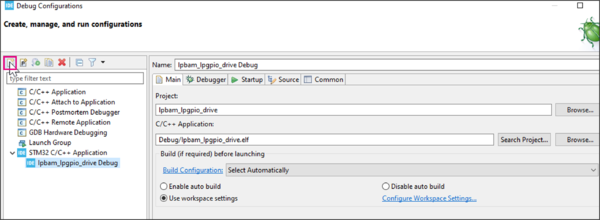
3. Click on the "New launch configuration icon"
4. Enable the debug in low-power modes
- After developing your application, to reach the optimal power consumption, make sure to disable the debug in low-power modes.
After downloading the code, the LPBAM scenario is repeated in an infinite loop.
Using a logic analyzer, we visualized the LPTIM and LPGPIO signals.
As shown in the above image, LPGPIO0_PA1 is set or reset following the LPTIM_PC1 signal with 50 and 100 ms periods.
2.5. Power Consumption measurement
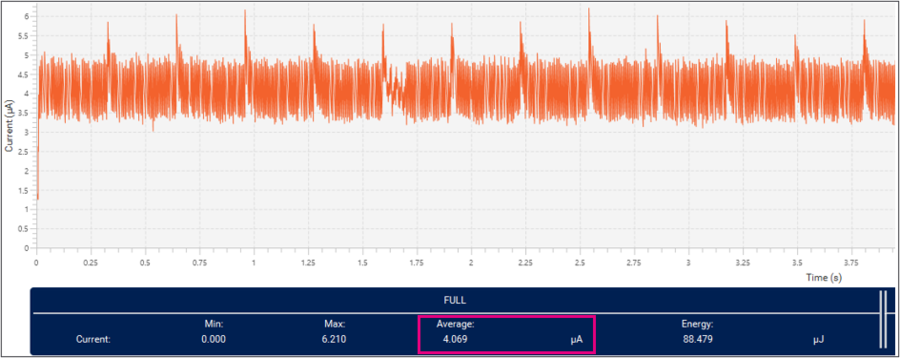
To measure the power consumption of the application, the STM32 Power Shield application is used to supply the Nucleo board. To do so, you can use the X-NUCLEO-LPM01A [5] expansion board for power consumption measurement and its user manual [6]
The Power Shield is a plug-and-play solution intended to ease power consumption measurements.
Using the power shield with the STM32U575 Nucleo board in stop2 mode, we measured 4.06µA which is aligned with the datasheet [8].
3. How to use LPBAM for I2C or SPI transfer
This case is applicable when interfacing with external components like a MEM sensor for example over I2C or SPI. LPBAM and LPDMA can be used to transfer data from the peripheral into memory, and the MCU core only wakes up when the transfer is completed: Wakeup on Complete.
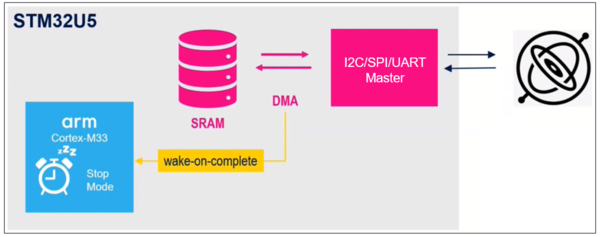
For an example of SPI or I2C transfer, check the examples in the STM32U5 Cube Firmware following these paths:
1) STM32Cube\Repository\STM32Cube_FW_U5\Projects\NUCLEO-U575ZI-Q\Applications\LPBAM\LPBAM_I2C_TransmitReceive
2) STM32Cube\Repository\STM32Cube_FW_U5\Projects\NUCLEO-U575ZI-Q\Applications\LPBAM\LPBAM_SPI_TransmitReceive
4. How to use LPBAM for ADC or DAC conversion
We can also trigger ADC with a periodic timer and store the data in memory while the rest of the device is sleeping.
For examples of ADC or DAC, check the example in the STM32U5 Cube Firmware following this path:
STM32Cube\Repository\STM32Cube_FW_U5\Projects\NUCLEO-U575ZI-Q\Applications\LPBAM\LPBAM_ADC_TempSense
STM32Cube\Repository\STM32Cube_FW_U5\Projects\NUCLEO-U575ZI-Q\Applications\LPBAM\LPBAM_DAC_OPAMP_SigAmpli
5. How to use LPBAM for LPTIM PWM ratio change, Input Capture, Pulse Counter
The LPTIM can be used for timing and output generation while the STM32 device is in low-power mode. it provides the basic functions of the STM32 general-purpose timers with the advantage of very low-power consumption. Additionally, when configured in Asynchronous counting mode, the LPTIM keeps running even when no internal clock source is active.
For an example of LPTIM PWM ration change, check the example in the STM32U5 Cube Firmware following this path:
STM32Cube\Repository\STM32Cube_FW_U5\Projects\NUCLEO-U575ZI-Q\Applications\LPBAM\LPBAM_LPTIM_PWMGen
More complex applications can be built using several DMA channels or chaining operations from different peripherals on the same channel as the case in AN5834 [10] which describes the LC sensor metering feature included in the STM32U5 Nucleo board NUCLEO-U575ZI-Q[11].
6. References
- ↑ AN5652 STM32U5 series power optimization
- ↑ 2.0 2.1 2.2 AN5816 How to build STM32 LPBAM application using STM32CubeMX
- ↑ Video: Configuring LPBAM applications on the STM32U5 with STM32CubeMX
- ↑ UM1718 User manual
- ↑ X-NUCLEO-LPM01A
- ↑ STM32 Nucleo expansion board User Manual.
- ↑ AN5845 STM32U5 Series power optimization using LPBAM
- ↑ Datasheet STM32U575xx
- ↑ AN4865 Low-power timer (LPTIM) applicative use cases on STM32 MCUs and MPUs
- ↑ AN5834 LC sensor metering implementation on STM32U5 Series featuring LPBAM
- ↑ NUCLEO-U575ZI-Q
