This article is a step-by-step guide of how to use ST Edge AI Developer Cloud online platform and services.

1. Glossary
- DMZ is a physical or logical subnetwork that contains and exposes an organization's external-facing services to an untrusted, usually larger network, such as the Internet.
- ELF is a common standard format for binary files.
- GUI stands for graphic user interface.
- IOC is the project configuration file for STM32CubeMX.
- K-means is a type of machine learning algorithm.
- Keras is an open-source library that provides a Python interface for artificial neural networks.
- MACC stands for multiply-accumulate.
- MATLAB® is a proprietary multi-paradigm programming language and numeric computing environment.
- MCU is an acronym for microcontroller unit.
- NPU is an acronym for Neural Processing Unit.
- Netron is a viewer for neural network, deep learning, and machine learning models.
- npz is a binary file format used to store arrays.
- ONNX is an open ecosystem that provides an open-source format for AI models.
- PyTorch is a machine learning framework.
- RAM stands for random access memory, which is volatile memory.
- REST API stands for representational state transfer application programming interface.
- scikit-learn is a free software machine learning library for the Python programming language.
- STM32 model zoo is a collection of reference machine learning models that are optimized to run on STM32 microcontrollers.
- Support vector machine (SVM) a type of machine learning algorithm.
- TensorFlow Lite is a mobile library for deploying models on mobile, microcontrollers, and other edge devices.
- TFLiteConverter is the API for converting TensorFlow models to TensorFlow Lite.
- USART stands for universal synchronous/asynchronous receiver/transmitter, which allows a device to communicate using serial protocols.
- X-CUBE-AI is an STM32Cube Expansion Package and part of the STM32Cube.AI ecosystem.
2. Overview
ST Edge AI Developer Cloud (STEDGEAI-DC) is a free-of-charge online platform and service that enables the creation, optimization, benchmarking, and generation of artificial intelligence (AI) for STM32 microcontrollers based on the Arm® Cortex®‑M processor. It is based on the STEdgeAI-Core technology.
The benefits and features of ST Edge AI Developer Cloud are:
- Online GUI (no installation required) accessible with STMicroelectronics extranet user credentials.
- Network optimization and visualization providing the RAM and flash memory sizes required to run on the STM32 target.
- Performance evaluation of quantization by converting a floating-point model into an integer model.
- Benchmark service on the STMicroelectronics hosted board farm including various STM32 boards to make the best suited hardware selection.
- Code generator including the network C code and optionally the full STM32 project.
- STM32 model zoo:
- Easy access to model selection, training script, and key model metrics, directly available for benchmark.
- Application code generator from the user's model with “Getting started” code examples.
- Machine learning (ML) workflow automation service with Python scripts (REST API).
- Supports all X-CUBE-AI features, such as:
- Native support for various deep learning frameworks, such as Keras and TensorFlow Lite, and support for frameworks that can export to the ONNX standard format, such as PyTorch, MATLAB®, and more.
- Support for the 8-bit quantization of Keras networks and TensorFlow Lite quantized networks.
- Support for various built-in scikit-learn models, such as isolation forest, support vector machine (SVM), K-means, and more.
- Possibility to use larger networks by storing weights in external flash memory and activation buffers in external RAM.
- Easy portability across different STM32 microcontroller series.
- User-friendly license terms.
3. Logging in
To start using the tool, navigate to the home page of the ST Edge AI Developer Cloud at https://stedgeai-dc.st.com/. The welcome page as shown below should appear:

When the page has fully loaded, click the "START NOW" or "Sign in" button. This redirects the user to the sign-in page, as shown below:

- If the user has a myST account, they can type their credentials and click the "Login" button.
- If they do not currently have an account, they can create one by clicking the "Create Account" button and filling out the required form. Account creation is entirely free.
4. Creating a project
After a successful login, the user is directed to the main page. This page presents three main zones, as shown below, in two groups:

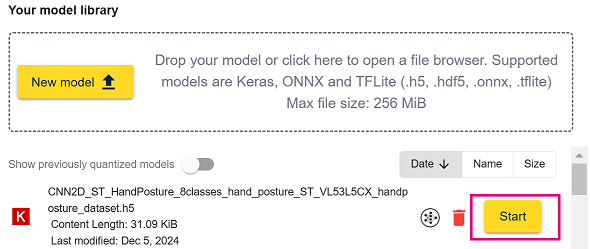
"Your model library" includes all the models you previously imported and a dropzone where you can upload a new one.
"Pick a model from ST Model Zoo" includes a set of models from ST Model Zoo including a link button redirecting to a README to know more about model properties.
4.1. Uploading a model
In the first zone, it is possible to upload any pretrained AI models by clicking the "Upload" button and selecting the file from the file explorer or by dragging and dropping it directly into the zone.
4.2. Importing from ST Model Zoo
The second zone shows a list of pretrained AI models, which can be used as a starting point for various use cases. These currently include eight categories:
- Hand posture
- Image classification
- Human activity recognition
- Audio event detection
- Object detection
- Speech enhancement
- Semantic Segmentation
- Pose Estimation
These models originate from the STM32 model zoo.
To create a new project, click the "Import" button located next to the desired model.
4.3. Using saved models
The third zone functions as a workspace and contains all AI models the user has previously analyzed and benchmarked in ST Edge AI Developer Cloud.
4.4. Starting the project
This article uses a .h5 model from the model zoo, which was created using the TensorFlow Keras API. To use the model, follow these steps:
- Scroll down the model list from the model zoo and locate the
CNN2D_ST_HandPosture_8classes_hand_posture_ST_VL53L5CX_handposture_dataset.h5model. Once located, select the "Import" button adjacent to it.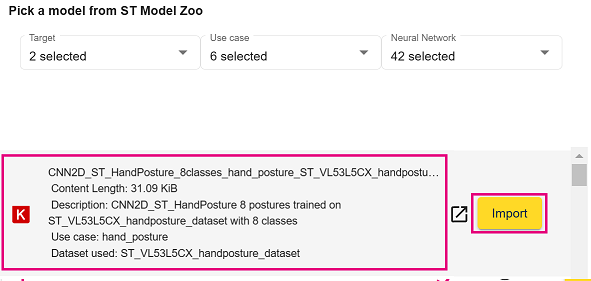
The model now appears in the workspace. - Click the "Start" button to create a new project.


After the project has been created, six action items become available in the top bar:

- Select a platform: select which platform you want to work on
- Quantize: quantize the float model using the post-training quantization.
- Optimize: optimize the model with different options.
- Benchmark: benchmark the AI model on different STM32 boards from our board farm.
- Results: view, analyze, and compare the results generated from different benchmarking runs.
- Generate: generate the code and the projects for the target family and board for the optimized and benchmarked model.
The following chapters of this page provide more details about these action items.
This section also shows the details of the currently selected model. This includes relevant information, such as input and output shape, type, and MACC numbers, among other data.

5. Select your version and your platform
ST Edge AI Developer Cloud supports multiple version of the backend tool, from STM32Cube.AI to the current ST Edge AI Core technology.

Version selection permits to see which platforms are supported.
5.1. Select your platform
Before going next and based on version you selected, you can choose which platform you want to work on:
- STM32 MCUs: Start with General Purpose STM32 Discovery Kits and Nucleos
- STM32 NPUs: Start with STM32 MCUs including Neural-ART™ to accelerate your AI applications
- STM32 MPUs: Start with STM32 Microprocessors embedding Cortex-A loaded with X-LINUX-AI
- Stellar Platforms: Start with Stellar-E or Stellar-PG to empower neural network architectures on automotive MCUs
- MEMS Sensors with ISPU: Start with MEMS Sensors embedding the ISPU, an ultralow power, computationally efficient, high-performance programmable core that can execute signal processing and AI algorithms in the edge

6. Quantize
This panel can be used to create a quantized model (8-bit integer format) from a Keras float model. Quantization is an optimization technique used to compress a 32-bit floating-point model by reducing the size of the weights of the model (smaller storage size and less memory peak usage at runtime), improving CPU/MCU usage and latency (including power consumption), with a possible degradation of the accuracy. A quantized model executes some or all operations on tensors with integers rather than floating-point values.
The quantization service uses the TensorFlow post-training quantization interface offered by TFLiteConverter. Select any input or output type from the three supported options, including int8, unsigned int8, or float32. To prevent accuracy loss during the quantization process, users are advised to provide their training dataset or a portion thereof. This can be provided in the form of .npz files. If no quantization file is provided, the quantization will be conducted using random data, and the resulting quantized model can only be used for benchmarks to obtain the necessary flash and RAM size, as well as the inference time, but the accuracy is not calculated.
Once an .npz file of the dataset has been provided, click the "Launch quantization" button to start the quantization process. This demonstration conducts the quantization without the dataset, using random numbers instead.

When the quantization process has finished, the quantized model is listed below. Click the "Select" button to change your current model to the quantized one.

After the optimization of the quantized model, the "History of optimization results" table shows the results. In this example, a reduction of approximately 70% in both flash memory and RAM size from the optimization should be observed, compared to the default analysis performed:

Once satisfied with the quantization results, click the "Go to benchmark" button, which takes the user to the model benchmarking step.
7. Optimize
In the optimize section, a default optimization is conducted using the balanced optimization option. This enables "use activation buffer for input buffer" and "use activation for output buffer". You can modify the default settings and click on "Optimize" to observe the impact.
7.1. Optimization options (STM32 NPUs)
In the optimize section, default optimization profile is selected which is embedded in ST Edge AI Core. You have the choice between memory profile, in order to use the whole memory range available for STM32N6 including 1MB internal for your application, and fully internal. You can modify the default settings and click on "Optimize" to observe the impact.
Epoch controller option permits to enable code generation using epoch controller, optimized for ST Neural-ART(tm) accelerator, improving performance.

7.2. Optimization options (STM32 MCUs, Stellar-E, Stellar-PG, ISPU)
There are three distinct options available for optimizing AI models:
- Balance between RAM size and inference time: this approach seeks to find a tradeoff between minimum RAM and the shortest inference time.
- Optimize for RAM size: this approach seeks to optimize the RAM size.
- Optimize for inference time: this approach seeks to optimize the inference time.

By default, the balanced option is selected to provide users with the best compromise between the smallest footprint and the shortest inference time possible.
7.2.1. Use activation buffer for input/output buffer
When these options are enabled, it indicates that the “activations” buffer is also used to handle the input/output buffers. This impacts memory but not inference time. Depending on the size of the input/output data, the “activations” buffer may be larger but overall less than the sum of the activation buffer plus the input/output buffer.
7.3. Launch the optimization
To initiate the optimization process, select the desired options and click the "Optimize" button. While the optimization is running, the user can monitor the terminal, which provides details regarding the optimization run. Any errors are displayed here.

Multiple optimizations can be launched by selecting different options, allowing the user to choose the option that best suits their needs. After each optimization operation, the terminal displays the reported numbers in terms of MACC, flash size, and RAM size.

When all optimizations have been conducted, the user can select the option that best suits their needs. This example uses the balanced approach. From here, the user can proceed to the next action item.
8. Benchmark
The Benchmark panel shows the currently selected model, as well as the current parameters used for optimization, as illustrated in the figure below.

The benchmark service allows users to run selected AI models remotely on several STM32 boards and obtain the internal or external flash memory and RAM usage, as well as the inference time. These STM32 boards are hosted on ST premises, known as the "board farm", and are accessible using a waiting queue. The panel lists some basic board information, including CPU type and frequency, as well as both internal and external memory sizes:

To initiate the benchmark on a given board, click the "Start Benchmark" button next to that board. This starts the benchmarking process. The example in this article uses the STM32H735G-DK board.
During the benchmarking process, users can observe the progress bar and current status in real time. A project for system performance application is created. The tool builds the project with the C code of the AI model and programs one of the actual physical boards in the board farm. It runs the application on the board and provides users with the memory footprint and inference time.

When the benchmark is complete, the measured inference time is shown next to the board, as illustrated below.
To obtain further details regarding the resources used per layer, click on the "three-bar" icon which corresponds to "Show details per layer" option. A dialog box with the corresponding bar chart appears.
The bar chart displays the size of each of the layers in bytes. Users can toggle between the bar chart and the pie chart by clicking the "Toggle Pie/Bar Chart" button. While the bar chart displays the actual size, the pie chart displays the distribution.

Users can perform the same action for the execution time. The bar chart displays the duration spent on each of the layers in milliseconds, while the pie chart displays the distribution of the execution time by each of the layers. To close this view, click anywhere outside of the dialog box.
The tool allows users to launch a benchmark on multiple boards simultaneously. They can launch the benchmarking on all boards by pressing all the "Start Benchmark" buttons. This repeats the process for all boards and reports the inference time on all boards next to them.
When all benchmarking runs are complete, the user can proceed to the "Results" step.
9. Results
The "Results" page shows a table of all benchmarks conducted in the ST Edge AI Developer Cloud, which is useful for comparing all benchmarks. Users can directly select a benchmark for code generation by clicking the "Generate with this configuration" button.
This demonstration uses the STM32H735G-DK board, which provides the smallest inference time.

10. Generate
The "Generate" page offers various outputs catering to different needs. These include updating an existing project, creating a new STM32CubeMX project, generating an STM32CubeIDE project with all sources included, or downloading compiled firmware to estimate the inference time on the user's own board.
When the user reaches the "Generate" step, they are presented with the same header of the currently selected model and current parameters. If coming from the benchmark or results step, the target board is already selected. Otherwise, the user needs to filter the CPU types or STM32 series to select their target STM32 board.


Following this, the user has four generation options to choose from:
- Download C Code
- Download STM32CubeMX IOC file
- Download STM32CubeIDE project
- Download firmware

10.1. Download C code
This option generates the STM32-optimized C Code associated with the user's pretrained neural network. The .zip package contains all network .c and .h files, the Cube.AI runtime library files, and the stm32ai command line reports and output. Users can replace the existing files in their project with these newly generated files.
10.2. Download STM32CubeMX IOC file
This option generates a .zip package containing an IOC file and the selected model, which is ready to start a new STM32CubeMX project locally on the user's machine. The user can open the IOC file with STM32CubeMX v6.6.1 or above and either directly generate the code or add other peripherals required for their application.
10.3. Download STM32CubeIDE project
This option generates a .zip package with an STM32CubeIDE project including an ioc file, project file, file tree, and STM32-optimized C code:
- The board is the selected board.
- X-CUBE-AI is activated in the project and the system performance application is selected.
- The neural network model is configured in the project and is available in the .zip package.
- The USART needed for the system performance application is already configured.
- The STM32CubeIDE project and all code and libraries are generated.
Users can open the project with STM32CubeIDE v1.10.0 or above by double-clicking the .project file in the package.
Once the project is imported into STM32CubeIDE, users can either edit the code or directly compile and flash the program on their own board.
10.4. Download firmware
This option generates the ELF file(s) associated with the selected board, which can be directly programmed on the user's own board using STM32CubeProgrammer. The system performance application is enabled on the application.
The AI system performance application is a self and bare-metal on-device application that allows out-of-the-box measurement of the critical system integration aspects of the generated neural network. The accuracy performance aspect is not and cannot be considered here. The reported measurements include CPU cycles by inference (duration in milliseconds, CPU cycles, CPU workload), used stack, and used heap (in bytes).
11. Other information
11.1. Project cannot be saved
It is important to note that, in some particular circumstances, the progress in the working project may be lost and cannot be retrieved. This happens, for example, if the web browser is closed or the internet connection is lost. If this happens, the user needs to start over.
11.2. Data protection
ST Edge AI Developer Cloud is deployed on the Microsoft Azure Cloud Service.
11.2.1. Customer external access and data upload
- External access to the service is always done through a firewall, a load balancer, and a route dispatcher. All accesses are performed using encrypted secured https.
- All users are authenticated using my.st.com authentication.
- There is no direct access to the internal Azure services nor uploaded resources.
- Uploaded data are checked for malicious data.
11.2.2. Model and data storage
- Uploaded models are stored in an Azure storage service and accessible only by the user who has uploaded the model, the stm32ai micro services, and the benchmark farm for the purpose of their service.
- Models are automatically deleted after 6 months of inactivity.
- Uploaded data is kept only for the duration of the process.
- Access to the storage is only allowed by private end points, which are not visible from outside the DMZ.
11.3. Embedded documentation

Users can open the online documentation anytime by clicking the "Open documentation" button embedded in the page or the "Documentation" icon at the top of the page to open the page in a new tab/window. To close the documentation page, click the "close documentation" button.
Some pages have "Information bubbles" available too. Clicking on the bubble takes the user directly to the documentation page related to the page they were on.
11.4. Step-by-step video tutorial
In addition to this wiki page, STMicroelectronics has created a video of a step-by-step guide for ST Edge AI Developer Cloud. It is available on the official STMicroelectronics YouTube channel: Getting started with ST Edge AI Developer Cloud.
12. References
- ST Edge AI Developer Cloud Documentation
- Evaluate model performance online with ST Edge AI Developer Cloud
- STM32 model zoo
- STM32Cube.AI
- UM2526 - Getting started with X-CUBE-AI Expansion Package for Artificial Intelligence (AI)
- TensorFlow Lite - Model conversion
- Netron