This article shows how to use the Teachable Machine online tool with STM32Cube.AI and the FP-AI-VISION function pack to create an image classifier running on the STM32H747I-DISCO board.
This tutorial is divided into three parts: the first part shows how to use the Teachable Machine to train and export a deep learning model, then STM32Cube.AI is used to convert this model into optimized C code for STM32 MCUs. The last part explains how to integrate this new model into the FP-AI-VISION1 to run live inference on an STM32 board with a camera. The whole process is described below:
| File:Info.png |
|
1. Prerequisites
1.1. Hardware
- STM32H747I-DISCO Board
- B-CAMS-OMV Flexible Camera Adapter board
- A Micro-USB to USB cable
- Optional: A webcam
1.2. Software
- STM32Cube IDE
- X-Cube-AI version 5.1.0 command line tool
- FP-AI-VISION1 version 2.0.0
- STM32CubeProgrammer
2. Training a model using Teachable Machine
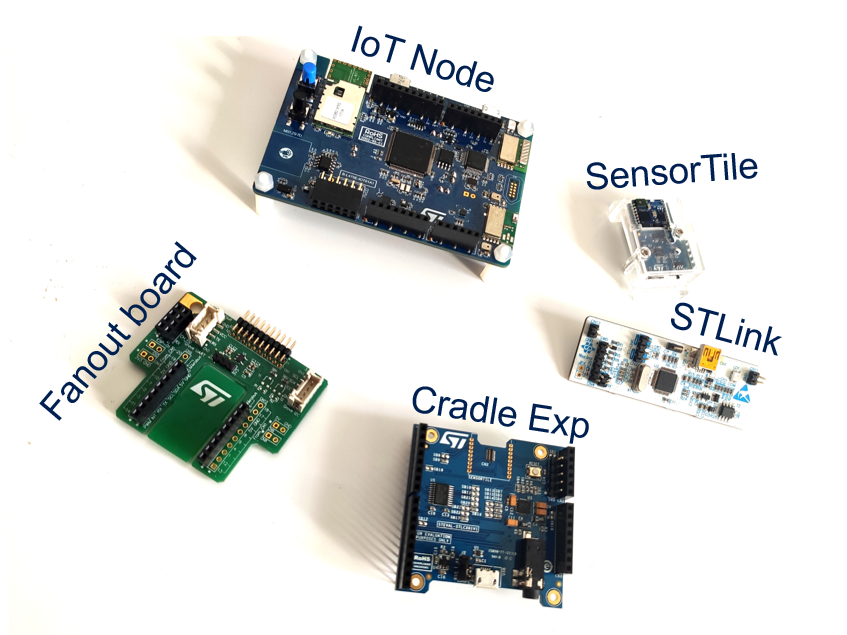
In this section, we will train deep neural network in the browser using Teachable Machine. We first need to choose something to classify. In this example, we will classify ST boards and modules. The chosen boards are shown in the figure below:
You can choose whatever object you want to classify it: fruits, pasta, animals, people, etc...
| File:Info.png | Note: If you do not have any webcam, Teachable Machine allows to import images from your computer. |
Let's get started. Open https://teachablemachine.withgoogle.com/, preferably from Chrome browser.
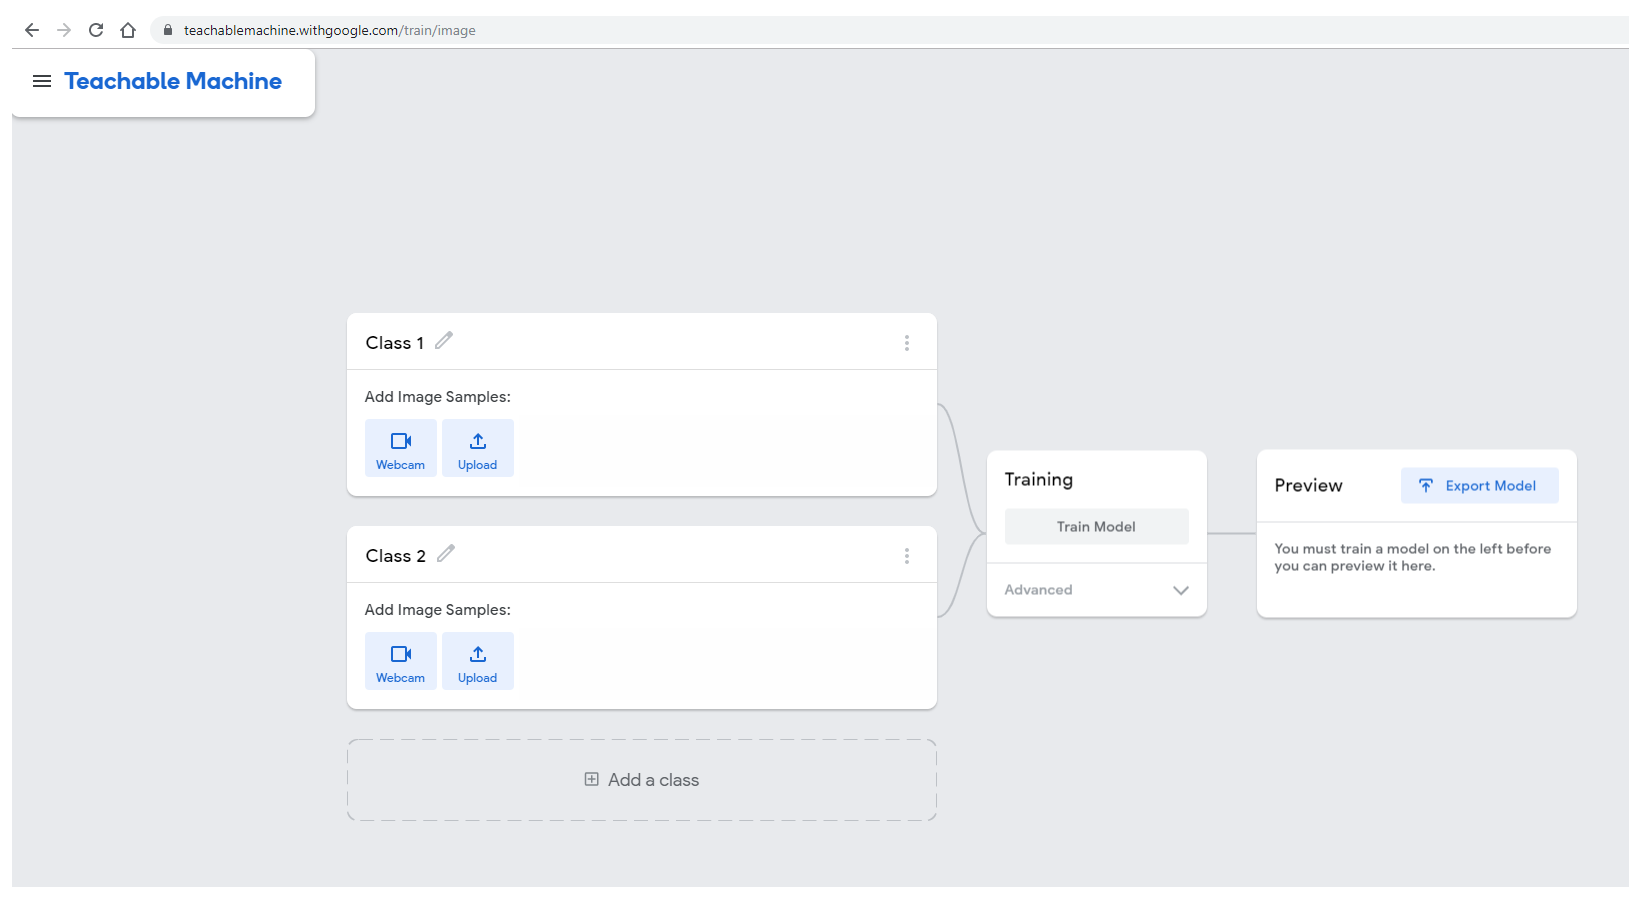
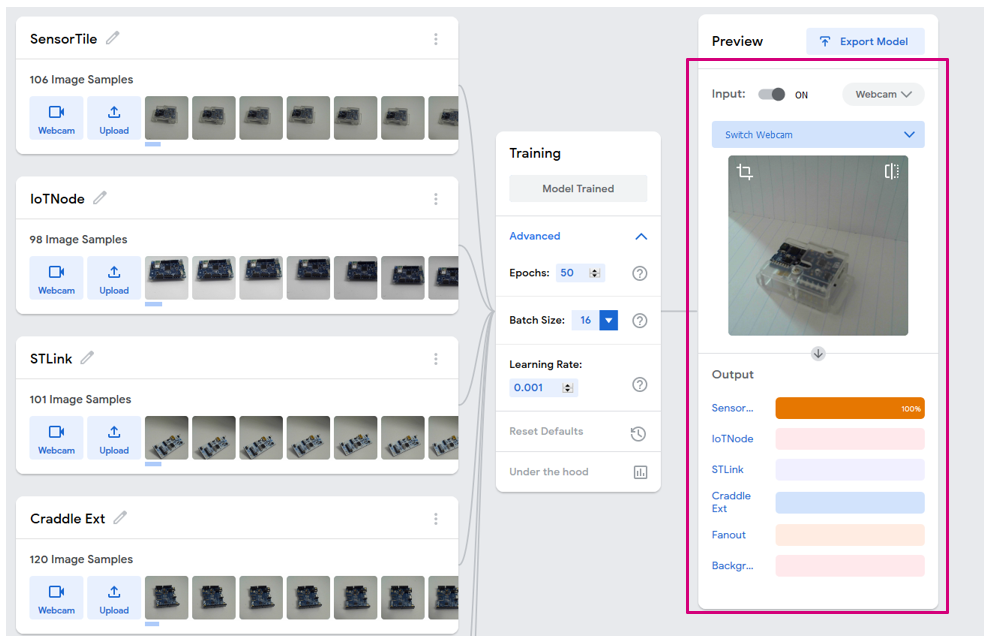
Click Get started, then select Image Project. You will be presented with the following interface.
2.1. Adding training data
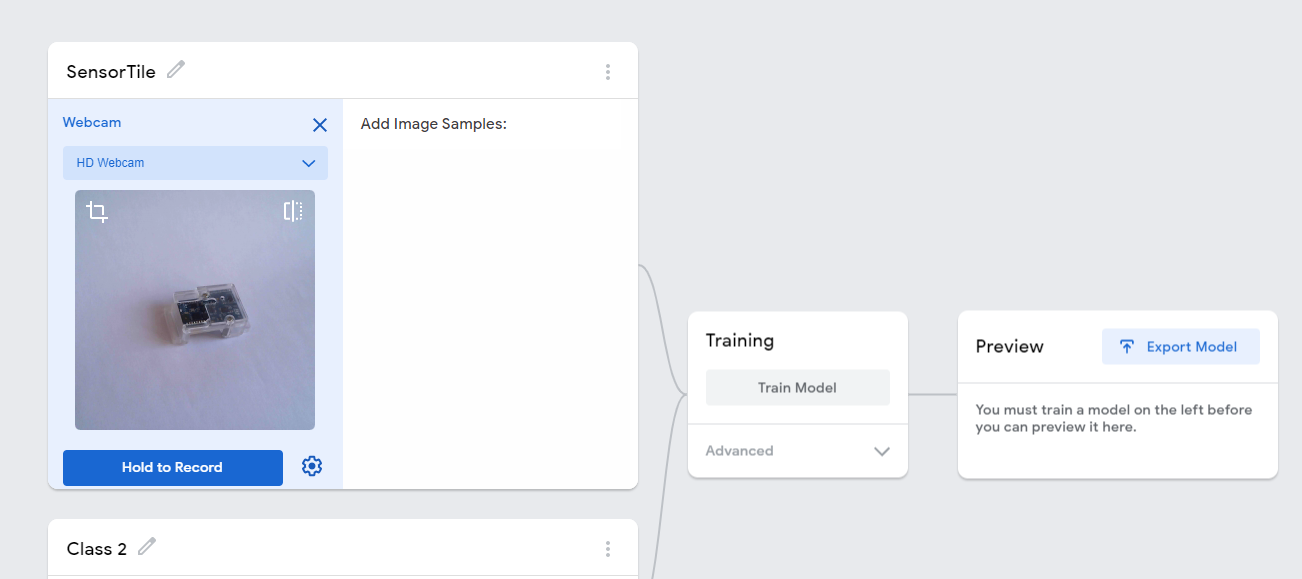
For each category you want to classify, edit the class name by clicking the pencil icon. In this example, we choose to start with SensorTile.
To add images with your webcam, click the webcam icon and record some images. If you have image files on your computer, click upload and select the directory containing your images.
| File:Info.png | No need to capture too many images, ~100 images per class is usually well enough. Try to vary camera angle, subject pose and scale as much as possible. To obtain the best results, a uniform background is recommended. |
Once you have a satisfactory amount of images for this class, repeat the process for the next one until your dataset is complete.
| File:Info.png | Note: It can be nice to have a "Background/Nothing" class, so that the model is able to tell when nothing is presented to the camera. |
2.2. Training the model
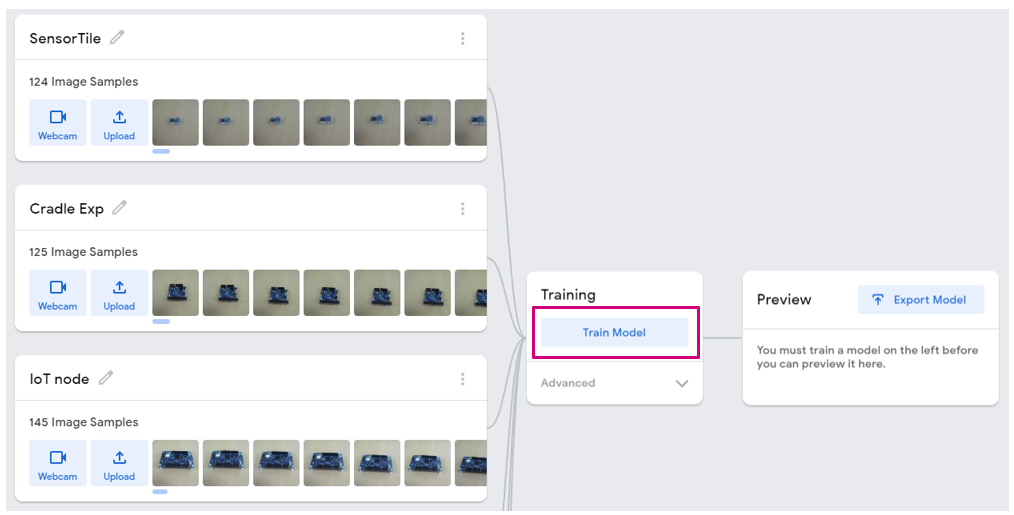
Now that we have a good amount of data, we are going to train a deep learning model for classifying these different objects. To do this, click the Train Model button as shown below:
This process can take a while, depending on the amount of data you have. To monitor the training progress, you can select Advanced and click Under the hood. A side panel displays training metrics.
When the training is complete, you can see the predictions of your network on the "Preview" panel. You can either choose a webcam input or an imported file.
2.2.1. What happens under the hood (for the curious)
Teachable Machine is based on Tensorflow.js to allow neural network training and inference in the browser. However, as image classification is a task that requires a lot of training time, Teachable Machine uses a technique called transfer learning: The webpage downloads a MobileNetV2 model that was previously trained on a big image dataset of 1000 categories. The convolution layers of this pre-trained model are very good at doing feature extraction so they do not need to be trained again. Only the last layers of the neural network are trained using Tensorflow.js, thus saving a lot of time.
2.3. Exporting the model
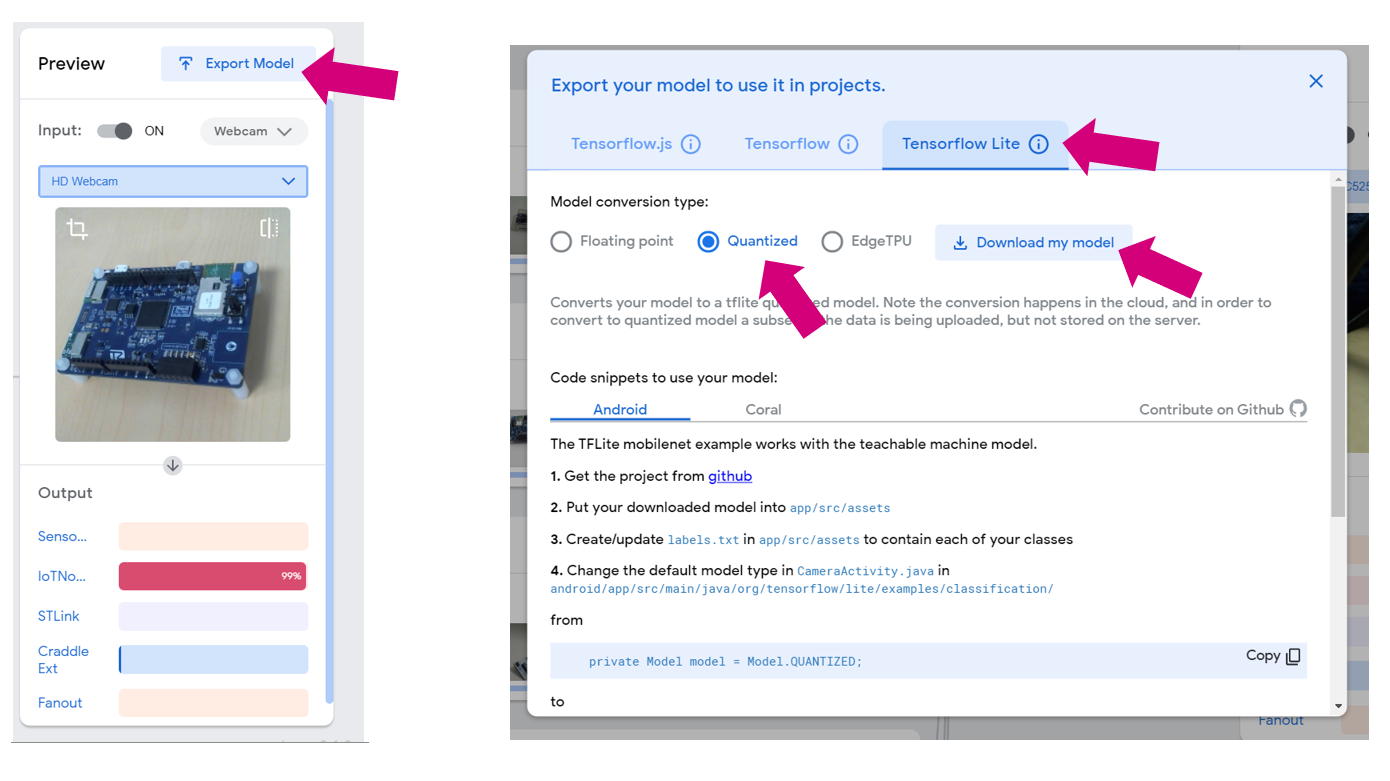
If you are happy with your model, it is time to export it. To do so, click the Export Model button. In the pop-up window, select Tensorflow Lite, check Quantized and click Download my model.
Since the model conversion is done in the cloud, this step can take a few minutes.
Your browser downloads a zip file containing the model as a .tflite file and a .txt file containing your label. Extract these two files in an empty directory that we will call workspace in the rest of this tutorial.
2.3.1. Inspecting the model using Netron (optional)
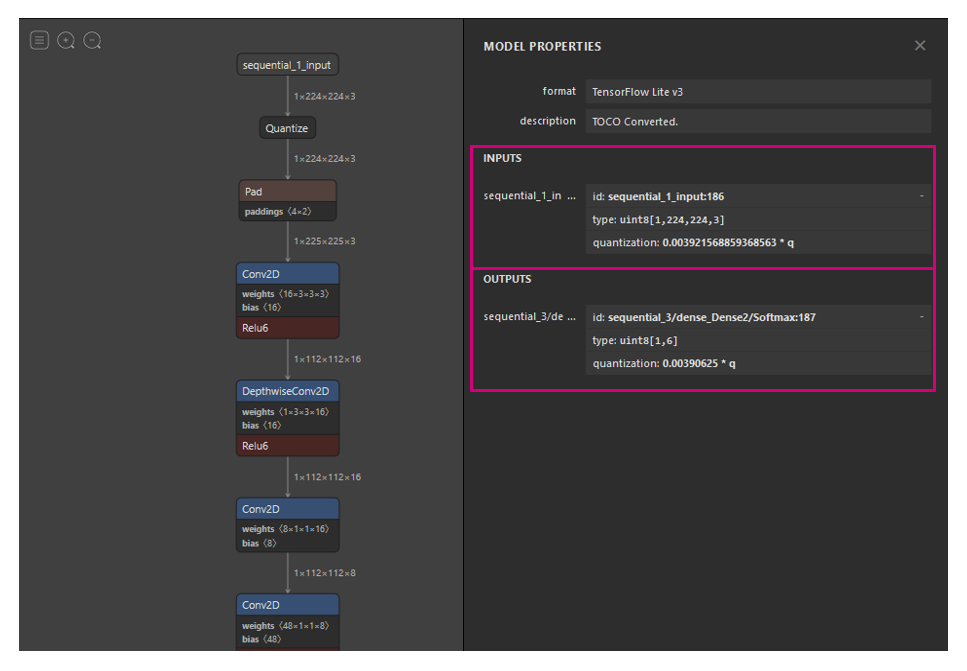
It is always interesting to take a look at a model architecture as well as its input and output formats and shapes. To do this, use the Netron webapp.
Visit https://lutzroeder.github.io/netron/ and select Open model, then choose the model.tflite file from Teachable Machine. Click sequental_1_input: we observe that the input is of type uint8 and of size [1, 244, 244, 3]. Now let's look at the outputs: in this example we have 6 classes, so we see that the output shape is [1,6]. The quantization parameters are also reported. Refer to part 3 for how to use them.
3. Porting to a target board
3.1. STM32H747I-DISCO
In this part we will use the stm32ai command line tool to convert the TensorflowLite model to optimized C code for STM32.
Warning: FP-AI-VISION1 v2.0.0 is based on X-Cube-AI version 5.1.0. You can check your version of Cube.AI by running stm32ai --version
|
Start by opening a shell in your workspace directory, then execute the following command:
PC $> cd <path to your workspace>
PC $> stm32ai generate -m model.tflite -v 2
The expected output is:
Neural Network Tools for STM32 v1.3.0 (AI tools v5.1.0)
Running "generate" cmd...
-- Importing model
 model files : /path/to/workspace/model.tflite
 model type  : tflite (tflite)
-- Importing model - done (elapsed time 0.531s)
-- Rendering model
-- Rendering model - done (elapsed time 0.184s)
-- Generating C-code
Creating /path/to/workspace/stm32ai_output/network.c
Creating /path/to/workspace/stm32ai_output/network_data.c
Creating /path/to/workspace/stm32ai_output/network.h
Creating /path/to/workspace/stm32ai_output/network_data.h
-- Generating C-code - done (elapsed time 0.782s)

Creating report file /path/to/workspace/stm32ai_output/network_generate_report.txt

Exec/report summary (generate dur=1.500s err=0)
-----------------------------------------------------------------------------------------------------------------
model file         : /path/to/workspace/model.tflite
type               : tflite (tflite)
c_name             : network
compression        : None
quantize           : None
L2r error          : NOT EVALUATED
workspace dir      : /path/to/workspace/stm32ai_ws
output dir         : /path/to/workspace/stm32ai_output

model_name         : model
model_hash         : 2d2102c4ee97adb672ca9932853941b6
input              : input_0 [150,528 items, 147.00 KiB, ai_u8, scale=0.003921568859368563, zero=0, (224, 224, 3)]
input (total)      : 147.00 KiB
output             : nl_71 [6 items, 6 B, ai_i8, scale=0.00390625, zero=-128, (6,)]
output (total)     : 6 B
params #           : 517,794 items (526.59 KiB)
macc               : 63,758,922
weights (ro)       : 539,232 (526.59 KiB)
activations (rw)   : 853,648 (833.64 KiB)
ram (total)        : 1,004,182 (980.65 KiB) = 853,648 + 150,528 + 6

------------------------------------------------------------------------------------------------------------------
id  layer (type)               output shape      param #     connected to             macc           rom
------------------------------------------------------------------------------------------------------------------
0   input_0 (Input)            (224, 224, 3)
    conversion_0 (Conversion)  (224, 224, 3)                 input_0                  301,056
------------------------------------------------------------------------------------------------------------------
1   pad_1 (Pad)                (225, 225, 3)                 conversion_0
------------------------------------------------------------------------------------------------------------------
2   conv2d_2 (Conv2D)          (112, 112, 16)    448         pad_1                    5,820,432      496
    nl_2 (Nonlinearity)        (112, 112, 16)                conv2d_2
------------------------------------------------------------------------------------------------------------------

( ... )

------------------------------------------------------------------------------------------------------------------
71  nl_71 (Nonlinearity)       (1, 1, 6)                     dense_70                 102
------------------------------------------------------------------------------------------------------------------
72  conversion_72 (Conversion) (1, 1, 6)                     nl_71
------------------------------------------------------------------------------------------------------------------
model p=517794(526.59 KBytes) macc=63758922 rom=526.59 KBytes ram=833.64 KiB io_ram=147.01 KiB


Complexity per-layer - macc=63,758,922 rom=539,232
------------------------------------------------------------------------------------------------------------------
id      layer (type)               macc                                    rom
------------------------------------------------------------------------------------------------------------------
0       conversion_0 (Conversion)  ||                                0.5%  |                                 0.0%
2       conv2d_2 (Conv2D)          |||||||||||||||||||||||||         9.1%  |                                 0.1%
3       conv2d_3 (Conv2D)          ||||||||||                        3.5%  |                                 0.0%
4       conv2d_4 (Conv2D)          |||||||                           2.5%  |                                 0.0%
5       conv2d_5 (Conv2D)          ||||||||||||||||||||||||||        9.4%  |                                 0.1%
7       conv2d_7 (Conv2D)          |||||||                           2.6%  |                                 0.1%

( ... )

64      conv2d_64 (Conv2D)         ||||                              1.5%  |||||                             3.7%
65      conv2d_65 (Conv2D)         |                                 0.3%  |                                 0.8%
66      conv2d_66 (Conv2D)         ||||||||                          2.9%  ||||||||                          7.1%
67      conv2d_67 (Conv2D)         |||||||||||||||||||||||||||||||  11.3%  |||||||||||||||||||||||||||||||  27.5%
69      dense_69 (Dense)           |                                 0.2%  ||||||||||||||||||||||||||       23.8%
70      dense_70 (Dense)           |                                 0.0%  |                                 0.1%
71      nl_71 (Nonlinearity)       |                                 0.0%  |                                 0.0%
------------------------------------------------------------------------------------------------------------------
This command generates four files under workspace/stm32ai_ouptut/:
- network.c
- network_data.c
- network.h
- network_data.h
Let's take a look at the highlighted lines: we learn that the model uses 526.59 Kbytes of weights (read-only memory) and 833.54 Kbytes of activations. As the STM32H747xx MCUs do not have 833 Kbytes of contiguous RAM, we need to use the external SDRAM present on the STM32H747-DISCO board. Refer to UM2411 section 5.8 "SDRAM" for more information.
| File:Info.png | These figures about memory footprint might be different for your model as it depends on the number of classes you have. |
3.1.1. Integration with FP-AI-VISION1
In this part we will import our brand-new model into the FP-AI-VISION1 function pack. This function pack provides a software example for a food classification application. For more information on FP-AI-VISION1, go here.
The main objective of this section is to replace the network and network_data files in FP-AI-VISION1 by the newly generated files and make a few adjustments to the code.
3.1.1.1. Open the project
If it is not already done, download the zip file from ST website and extract the content to your workspace. It must now contain the following elements:
- model.tflite
- labels.txt
- stm32ai_output
- FP_AI_VISION1
If we take a look inside the function pack, we'll start from the FoodReco_MobileNetDerivative application we can see two configurations for the model data type, as shown below.
Since our model is a quantized one, we have to select the Quantized_Model directory.
Go into workspace/FP_AI_VISION1/Projects/STM32H747I-DISCO/Applications/FoodReco_MobileNetDerivative/Quantized_Model/STM32CubeIDE and double-click .project. STM32CubeIDE starts with the project loaded. You will notice 2 sub-project for each core of the microcontroller : CM4 and CM7, as we don't use CM4, ignore it and work with the CM7 project.
3.1.1.2. Replacing the network files
The model files are located in workspace/FP_AI_VISION1/Projects/STM32H747I-DISCO/Applications/FoodReco_MobileNetDerivative/Quantized_Model/CM7/ Src and Inc directory.
Delete the following files and replace them with the ones from workspace/stm32ai_output:
In Src:
- network.c
- network_data.c
In Inc:
- network.h
- network_data.h
3.1.1.3. Updating the labels and display
In this step we will update the labels for the network output. The label.txt file downloaded with Teachable Machine can help you doing this. In our example, the content of this file looks like this:
0 SensorTile
1 IoTNode
2 STLink
3 Craddle Ext
4 Fanout
5 Background
From STM32CubeIDE, open fp_vision_app.c. Go to line 142 where the output_labels is defined and update this variable with our label names:
// fp_vision_app.c line 142
const char* output_labels[AI_NET_OUTPUT_SIZE] = {
    "SensorTile", "IoTNode", "STLink", "Craddle Ext", "Fanout", "Background"};
While we're here, we'll update the display mode that it shows camera image instead of food logos. Go around line 230 and update the App_Output_Display function. At the top of the function, the display_mode variable should be set to 0.
static void App_Output_Display(AppContext_TypeDef *App_Context_Ptr)
{
  static uint32_t occurrence_number = NN_OUTPUT_DISPLAY_REFRESH_RATE;
  static uint32_t display_mode = 0; // Updated
3.1.1.4. Cropping the image
Teachable Machine crops the webcam image to fit the model input size. In FP-AI-VISION1, the image is resized to the model input size, hence losing the aspect ratio. We will change this default behavior and implement a crop of the camera image.
In order to have square images and avoid image deformation we are going to crop the camera image using the DCMI. The goal of this step is to go from the 640x480 resolution to a 480x480 resolution.
First, edit fp_vision_camera.h line 59 to update the CAMERA_WIDTH define to 480 pixels:
//fp_vision_camera.h line 59
#if CAMERA_CAPTURE_RES == VGA_640_480_RES
#define CAMERA_RESOLUTION CAMERA_R640x480
#define CAM_RES_WIDTH 480 // Was 640
#define CAM_RES_HEIGHT 480
Then, edit fp_vision_camera.c located in Application/.
Modify the CAMERA_Init function (line 51) to configure DCMI cropping (update the function with the highlighted code bellow) :
void CAMERA_Init(CameraContext_TypeDef* Camera_Context_Ptr)
{
  CAMERA_Context_Init(Camera_Context_Ptr);

  /* Reset and power down camera to be sure camera is Off prior start */
  BSP_CAMERA_PwrDown(0);

  /* Wait delay */
  HAL_Delay(200);

  /* Initialize the Camera */
  if (BSP_CAMERA_Init(0, CAMERA_RESOLUTION, CAMERA_PF_RGB565) != BSP_ERROR_NONE)
  {
    Error_Handler();
  }

  /* Set camera mirror / flip configuration */
  CAMERA_Set_MirrorFlip(Camera_Context_Ptr, Camera_Context_Ptr->mirror_flip);

  HAL_Delay(100);

  /* Center-crop the 640x480 frame to 480x480 */
  const uint32_t x0 = (640 - 480) / 2;
  const uint32_t y0 = 0;

  /* Note: 1 px every 2 DCMI_PXCLK (8-bit interface in RGB565) */
  HAL_DCMI_ConfigCrop(&hcamera_dcmi,
                      x0 * 2,
                      y0,
                      CAM_RES_WIDTH * 2 - 1,
                      CAM_RES_HEIGHT - 1);

  HAL_DCMI_EnableCrop(&hcamera_dcmi);
  HAL_DCMI_Start_DMA(&hcamera_dcmi, DCMI_MODE_CONTINUOUS,
                     (uint32_t)Camera_Context_Ptr->camera_capture_buffer, (CAM_RES_WIDTH*CAM_RES_HEIGHT) / 2);

  /* Start the Camera Capture */
  /* [REMOVED]
  if(BSP_CAMERA_Start(0, (uint8_t *)Camera_Context_Ptr->camera_capture_buffer, CAMERA_MODE_CONTINUOUS)!=BSP_ERROR_NONE)
  {
    while(1);
  }
  */

  /* Wait for the camera initialization after HW reset */
  HAL_Delay(200);

#if MEMORY_SCHEME == FULL_INTERNAL_MEM_OPT
  /* Wait until camera acquisition of first frame is completed => frame ignored*/
  while (Camera_Context_Ptr->new_frame_ready == 0)
  {
    BSP_LED_Toggle(LED_GREEN);
    HAL_Delay(100);
  };
  Camera_Context_Ptr->new_frame_ready = 0;
#endif
}
Now image cropping is enabled and the image is square.
3.1.2. Compiling the project
The function pack for quantized models comes in four different memory configurations :
- Quantized_Ext
- Quantized_Int_Fps
- Quantized_Int_Mem
- Quantized_Int_Split
As we saw in Part 2, the activation buffer requires more than 800 Kbytes of RAM. For this reason, we can only use the Quantized_Ext configuration to place activation buffer. For more details on the memory configuration, refer to UM2611 section 3.2.4 "Memory requirements".
To compile only the Quantized_Ext configuration, select Project > Properties from the top bar. Then select C/C++ Build from the left pane. Click manage configuration and then delete all configurations that are not Quantized_Ext. Only one configuration is left.
Clean the project by selecting Project > Clean... and clicking Clean.
Eventually, build the project by clicking Project > Build All.
When the compilation is complete, a file named STM32H747I_DISCO_CM7.hex is generated in
workspace > FP_AI_VISION1 > Projects > STM32H747I-DISCO > Applications > FoodReco_MobileNetDerivative > Quantized_Model > STM32CubeIDE > STM32H747I_DISCO > Quantized_Ext
3.1.3. Flashing the board
Connect the STM32H747I-DISCO to your PC via a Micro-USB to USB cable. Open STM32CubeProgrammer and connect to ST-LINK. Then flash the board with the hex file.
3.1.4. Testing the model
Connect the camera to the STM32H747I-DISCO board using a flex cable. To have the image in the upright position, the camera must be placed with the flex cable facing up as shown in the figure below. Once the camera is connected, power on the board and press the reset button. After the "Welcome Screen", you will see the camera preview and output prediction of the model on the LCD Screen.
3.2. Troubleshooting
You may notice that once the model is running on STM32, the performance of the deep learning model is not as expected. The rationale is the following:
- Quantization: the quantization process can reduce the performance of the model, as going from a 32-bit floating point to a 8-bit integer representation means a loss in precision.
- Camera: the webcam used for training the model is different from the the camera on the Discovery board. This difference of data between the training and the inference can explain a loss in performance.

