1. Introduction
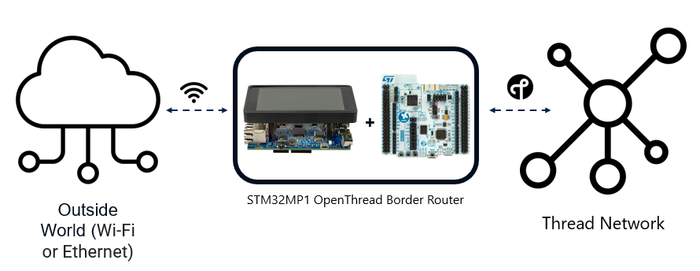
The OpenThread Border Router (OTBR) is crucial in Matter to enable the communication between IP-based networks. It acts as a bridge between the Thread network and the outside world.
The figure below represents one of the possible setups: a STM32MP157F-DK2 Discovery kit combined with a NUCLEO-WB55RG board.
A Thread Border Router supports at least the following functions:
- Bidirectional IP connectivity between Thread and Wi-Fi/Ethernet networks.
- Bidirectional service discovery via mDNS (on a Wi-Fi/Ethernet link).
- Thread-over-infrastructure that merges Thread partitions over IP-based links.
- External Thread commissioning (for example, a mobile phone) to authenticate and join a Thread device to a Thread network.
2. STM32MP1 OpenThread border router
The STM32MP1 OTBR works with the STM32WB55RG or STM32WBA55CG or STM32WB5MMG as radio coprocessor (RCP). It has been demonstrated with NUCLEO-WB55RG or NUCLEO-WBA55CG hardware which is connected to the STM32MP157F-DK2 Discovery kit (wiki for STM32MP15 Discovery kits) or STM32MP135F-DK Discovery kit (wiki for STM32MP13 Discovery kits) through a serial connection using an FTDI for NUCLEO-WB55RG and USB for NUCLEO-WBA55CG.
2.1. Required boards
- As OpenThread Border Router:
- As Thread® RCP firmware, NUCLEO-WB55RG or NUCLEO-WBA55CG ST radio coprocessor (RCP):
2.2. STM32MP157F-DK2 and STM32MP135F-DK installation
A Linux® PC running under Ubuntu® 18.04 or 20.04 is required. The developer can follow this link.
The Linux package can be found on Github.
3. NUCLEO-WB55RG RCP installation and hardware connection
3.1. NUCLEO-WB55RG RCP installation
- Step 1: Discover the NUCLEO-WB55RG hardware by following this link.
- Step 2: Get the firmware
- For X-CUBE-MATTER version 1.0.X get the X-CUBE-MATTER from st.com.
- From X-CUBE-MATTER version 1.1.0, the RCP binary is no more included in X-CUBE-MATTER delivery and could be generated using STM32CubeWB version 1.18.0 (for which the hardware connection of the board is done by default through FTDI) or following instructions from the readme.txt (in ...\STM32Cube_FW_WB_V<vn>\Projects\P-NUCLEO-WB55.Nucleo\Applications\Thread\Thread_RCP) for version higher than 1.18.0, <vn> being the version number. For the RCP binary generation:
- - Download the STM32CubeWB firmware from st.com
- - Go to Thread_RCP directory (STM32Cube_FW_WB_V<vn>/Projects/P-NUCLEO-WB55RG.Nucleo/Applications/Thread/Thread_RCP)
- - Choose your preferred code generation platform (e.g. STM32CubeIDE) and use it to generate the Thread_RCP binary.
- Step 3: Install the firmware by following this link.
3.2. NUCLEO-WB55RG RCP hardware connection
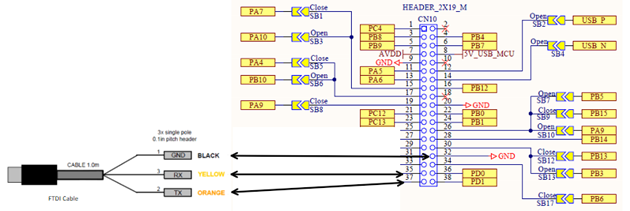
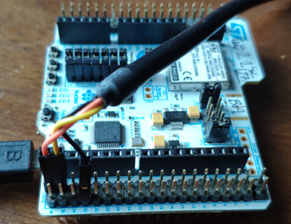
The communication is done through a serial connection. For RCP implementation, UART Rx/Tx are routed to the CN10 pin 35 (Tx) and the pin 37 (Rx) of an external connector. If the platform host uses USB, a USB/UART converter (e.g. FTDI) is needed. In this case, connect its Rx connector (usually the yellow one) to the CN10 pin 35, and its Tx connector (usually the orange one) to the CN10 pin 37. Black connector (i.e. ground) can be found on the CN10 pin 32.
4. NUCLEO-WBA55CG RCP installation and hardware connection
4.1. NUCLEO-WBA55CG RCP installation
For programming the P-NUCLEO-WBA55 platform, generate the RCP binary (not included in any X-CUBE-MATTER delivery) using STM32CubeWBA, and use STM32CubeProgrammer to program the Arm® Cortex® M33 CPU at the start address: 0x0800 0000.
For the RCP binary generation:
- Download the STM32CubeWBA firmware from st.com
- Go to Thread_RCP directory (STM32Cube_FW_WBA_V.../Projects/NUCLEO-WBA55CG/Applications/Thread/Thread_RCP)
- Choose your preferred code generation platform (e.g. STM32CubeIDE) and use it to generate the Thread_RCP binary
4.2. NUCLEO-WBA55CG RCP hardware connection
The communication is done by default through a direct USB serial connection to the STLINK of the nucleo board


