1. Introduction
The purpose of this article is to provide the background needed to understand and execute the two related "how to start".
The first article describes the use case with default configuration. It's strongly advised to start with this step by step example since it's a very easy use case to execute.
- How to start with Secure Manager default configuration on STM32H5.
- How to start with Secure Manager customized configuration on STM32H5 series.
Before starting with this article, it is recommended to read the following articles:
- Secure Manager introduction
- Secure Manager for STM32H5
- For more details about the possible configurations refer to the SMAK for STM32H5 dedicated chapter.
Secure Manager (SM) has been developped to provide an easy-to-use security solution for every customer.
It provides a complete security framework with ready-to-use security services.
The above getting started articles show through practical examples that the Secure Manager simplifies and reduces the time for developments involving security features.
For the getting started articles related to other STM32H5 security solutions, refer to the article Getting started with STM32H5 security.
2. Secure Manager Access Kit (SMAK)
The SMAK is the framework to develop nonsecure application using the Secure Manager services.
The How to start with Secure Manager (customized configuration) on STM32H5 article provides an step-by-step explanation to the use of the SMAK ecosystem, which is provided by ST. This article does not cover the development of secure modules. For information on SMDK, refer to the previously mentioned articles.
3. SMAK delivery format
The following three packages need to be downloaded from the STM32H5 web page[1]:
- STM32Cube_FW_H5_V1.1.0
- STM32Cube_FW_H5_V1.1.1 patch to copy into STM32Cube_FW_H5_V1.1.0
- X-CUBE-SEC-M-H5_V1.0.0 (or later version) contains the Secure Manager encrypted binary, provided by ST and available on STM32trustee-SM
For detailed information about the STM32CubeFW, refer to How to start with Secure Manager (customized configuration) on STM32H5.
Follow these steps:
- Copy the STM32Cube_FW_H5_V1.1.1 into the STM32Cube_FW_H5_V1.1.0.
- Copy the X-Cube-SEC-M_H5_v1.0.0 files into the STM32Cube_FW_H5_V1.1.0.
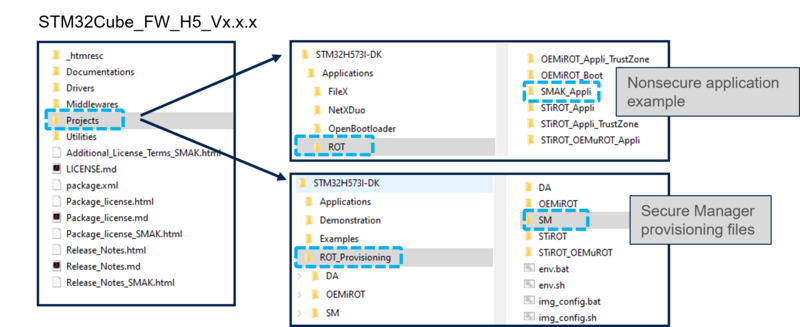
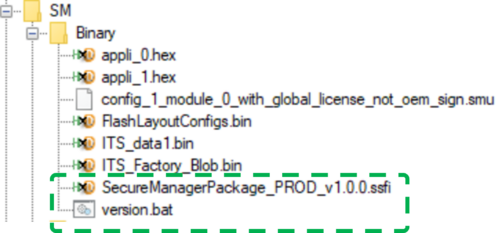
- The Secure Manager Package binary and the version.bat are added in the directory \Projects\STM32H573I-DK\ROT_Provisioning\SM\Binary of the STM32Cube_FW_H5 (see figure above).
4. Secure Manager installation (provisioning)
This section explains the installation principle. The figure below details the Secure Manager installation process.
(For practical steps, refer to the article
How to start with Secure Manager (customized configuration) on STM32H5).
- The encrypted binary copied from the X-CUBE-SEC-M-H5 is used to install the Secure Manager into the device.
- Depending on the configuration requirements, choose which one of the two scripts provided must be used for the installation:
- provisioning_auto.bat for default configuration: execute this script for an easy way to install the Secure Manager, if no personalization is needed.
- provisioning.bat for customized configuration: execute this script if custom memory configuration, keys, clock configuration, etc. are needed.
5. Nonsecure application development
The development of a nonsecure application is done as you normally proceed when developping an application without the Secure Manager.
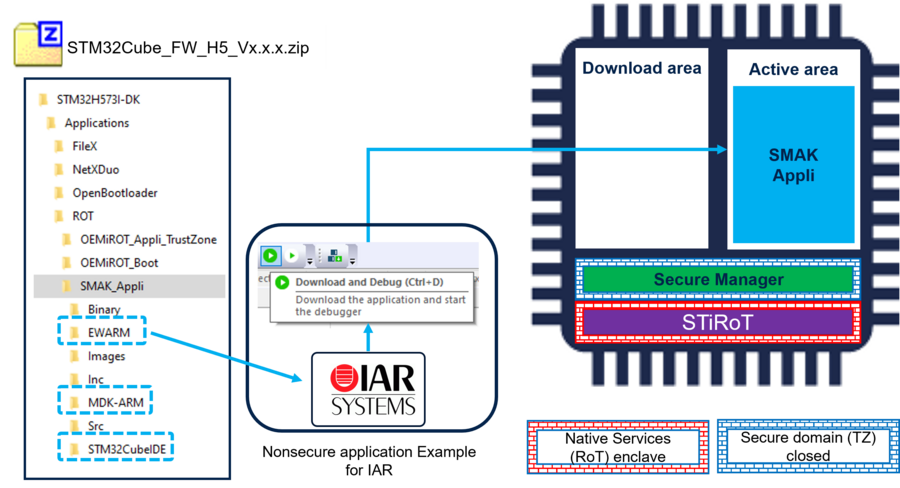
An example of nonsecure application (SMAK_Appli) is provided in the STM32CubeFW_H5 for IAR, STM32CubeIDE and Keil IDEs. The figure below shows how to use the provided example: Open it with the IDE of your choice and launch the download and debug.
The figure shows the example using IAR, but the three mentioned IDE are supported.
6. Firmware Update
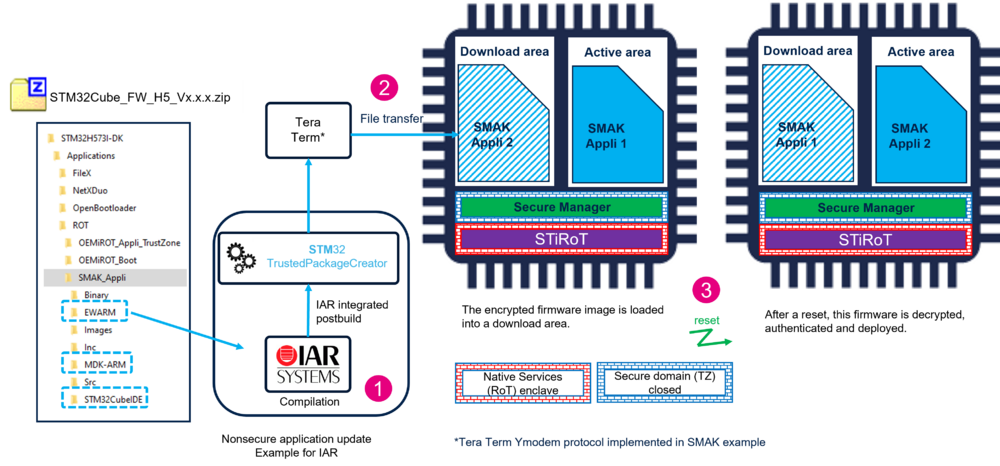
A firmware update is done through the following steps:
( A practical example is shown in the How to start with Secure Manager article)
- The new firmware is developped using the IDE of your choice.
- 1) The new firmware is compiled, the binary signed and encrypted through the postbuild command integrated in the IDE
- 2) The encrypted and signed file is transfered into the device in a download area of the user flash.
- At next reset it is automatically detected that a new firmware is available to be installed.
- 3) This new firmware is decrypted, authenticated and installed.
- As shown in the figure below, the new firmware is swaped and become the new active one.
Some additional information:
- At compilation using your chosen IDE, two scripts are automatically called:
- A prebuild script that updates the memory configuration according to the Secure Manager general configuration (see appendix, SM_Config_General.xml )
- A postbuild script calls automatically STM32 Trusted Package Creator to encrypt and sign the new firmware image. The encryption and authentication keys can be regenerated, but the default working keys are provided in the STM32Cube_FW_H5 (see appendix, SM_Config_Keys.xml).
- A tool (Tera Term in ST Ecosystem) is needed to transfer the new firmware image (encrypted and signed) into the download area.
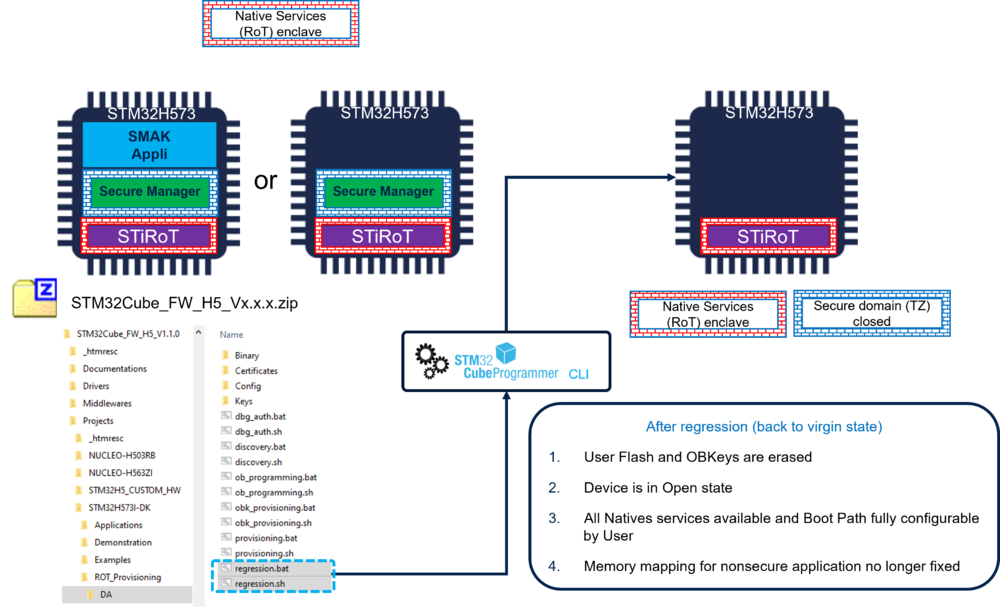
7. Regression
A regression is a reinitialization (back to virgin state) of the device erasing the user flash and the Secure Storage.
- The Secure Manager and the nonsecure application are removed.
- The product state is set back to Open.
- The Option Bytes are set back to their default value.
Note:
During the execution of the regression script, it is not visible how the rights are handled to allow the regression:
When the provisioning script is executed to install the Secure Manager, there is a step called DA configuration. (For further information on the configuration of the Debug Authentication, refer to the article Debug Authentication for STM32H5).
When a device is set in a different state than OPEN, it is mandatory to have provisioned certificate and key, to be able to reopen the debugger or to make a regression.
8. Appendix
8.1. Debug Authentication and permission mask
A default working setting is proposed in the STM32Cube_FW_H5.
To protect a commercial product, the CubeFW default keys must not be used.
The key(s) must be regenerated using the STM32TrustedPackageCreator. The key(s) can be only the rootkey or the different keys for a certificate chain (For more details, refer to Debug Authentication for STM32H5 ).
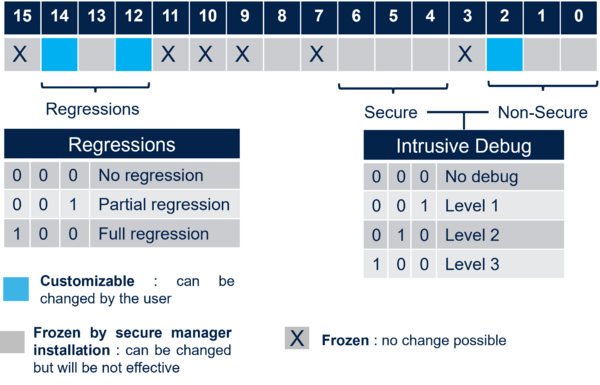
The maximum allowed permissions are configured through the SOC mask that is stored in the device during the provisioning.
The figure below shows the maximum possible permissions for a Secure Manager use case.
Only the three light blue bits can be changed by a user.
The other are reserved or made uneffective by the Secure Manager reducing the possible SOC mask configurations to:
- Regression
- Possible to not allow any regression
- Partial regression (removes the nonsecure code and data)
- Full regression (as shown in the regression section above)
- Intrusive Debug
- NS-application executed in HDPL3 (open the debugger to access to the NS-application code)
9. References
