Click here for Cellular overview
1. How To...
1.1. Introduction
This wiki article is a guideline that describes how to perform the main activities with X-CUBE-CELLULAR.
The section "How To" is divided into three parts. The first part concerns common remarks related to Azure RTOS and Free RTOS. The second part is specific to FreeRTOS while the last part relates to Azure RTOS .
1.2. How To applicable to FreeRTOS and Azure RTOS versions
1.2.1. How to start the delivered binary firmware
The binary firmware is provided for each supported board. The example below describes how to run the STM32L496 binary for the BG96 modem, the process is he same with other hardware setups. The steps are:
- Insert an activated SIM into the BG96 modem STMod+ board.
- Plug the BG96 modem board (module up, SIM down) into the STM32L496 board, more details on Cellular hardware setup.
- Plug an USB cable (the one near the blue quad-switch) on the STM32L496 board a new volume (DIS_L496ZG) displays on your PC).
- Flash the firmware (drag and drop the .bin onto the newly appearing volume).
- Open a TeraTerm serial terminal and set the right parameters (see the section below "How to setup Teraterm parameters").
- If required (by default it is empty), enter the right SIM APN using the APN setting as defined in the related "How To" section detailed below.
1.2.2. How to find the delivered binary required
All the binaries provided are available at: \Projects\<STM32 board name>\Demonstrations\<Demonstration name>\Binaries\
Example: \Projects\B-U585I-IOT02A\Demonstrations\Cellular\Binaries\
The name of the binaries indicates its purpose, <STM32 board>_<modem>_<IP stack>.bin
- u585_bg96_stm32ip.bin is the binary for the U585 discovery board associated to the BG96 modem and the IP stack selected is the IP in the STM32.
- u585_bg96_modemip.bin is the binary for the U585 discovery board associated to the BG96 modem, and the IP stack selected is in the modem.
1.2.3. How to set up Tera Term parameters
- Terminal
- [New line]
- [Receive]: Auto
- [Transmit]: CR
- [Local echo] selected
- [New line]
- Serial
- [Baud rate]: 115200
- [Data]: 8 bi
- [Parity]: none
- [Stop]: 1 bit
- [Flow control]: none
- [Transmit delay]: 10 ms each
1.2.4. How to set up the CLI commands available list
Hit "enter" then type "help" then hit "enter" the list of commands is displayed.
List of commands example:
- help: help command
- trace: trace management
- comlib: com library commands
- cst: cellular service task management
- atcmd: send an at command
- modem: modem configuration management
Therefore, to send an AT command to the modem just enter: atcmd AT+QIRC
1.2.5. How to set up APN using command line
Example: The name of the APN is "em", there is no login or password.
Enter the following commands:
- cst apnconf em
- cst modem off
- cst modem connected
Note that, to list all cst command parameter just enter "cst help"
The last two commands are used to restart the modem in order to take into account the newly defined APN.
If you want to avoid this step, it is easy to modify APN values in the source code and rebuild the firmware. See details below.
1.2.6. How to set the SIM APN by updating the plf_cellular_config.h file
According to the SIM/operator used, the cellular parameters can be updated in the plf_cellular_config.h file that contains all the configurable cellular service parameters.
- define PLF_CELLULAR_APN_USER_DEFINED (=TRUE)
- define PLF_CELLULAR_APN
- define PLF_CELLULAR_CID
- define PLF_CELLULAR_USERNAME
- define PLF_CELLULAR_PASSWORD
1.2.7. How to update the APN name table
The SW embeds an APN name list. In case of remote SIM provisioning, it is possible to find the APN name automatically.
The user can modify the default APN name list and rebuild the firmware to have its own APN list.
APN list mccmnc_apn_a and iccidhead_apn_a can be modified in the file cellular_service_utils.c.
1.2.8. How to use console commands to get the modem and cellular network information
- Open a Tera Term serial terminal and set the right parameters.
- Remove the trace display by typing the commands:
- trace off
- cst poll off
Then type the Cellular Service commands:
- cst
- cst state
- cst info
- cst config
1.2.9. How to configure the modem radio band
- Open a Tera Term serial terminal and set the right parameters
- Start the firmware and select Modem power on option in the boot menu
- Type the modem command to get help of the modem configuration.
1.2.10. How to add FreeRTOS support to Azure RTOS package
Detailed information are provided in this article to allow users to add FreeRTOS support. The main idea is to download an addon from ST Github and to apply it over XCC V7 (based on Azure RTOS) from st.com. It adds all the required files to get Cellular using FreeRTOS / LwIP up & running.
1.2.11. How to setup iSIM for GMS01Q
There are two STMod+ boards with Monarch Sequans modem, one with GM01Q (the default in the X-CUBE-CELLULAR delivery) and one with GMS01Q.
The GMS01Q is a GM01Q with an iSIM.
To use GMS01Q, a small modification must be done in the source code, .h file.
The file to update is Projects\<board>\Demonstrations\<Demonstration name>\STM32_Cellular\Config\plf_cellular_config.h
With <board> = B-L4S5I-IOT01A or 32L496GDISCOVERY or STWINKT1 or ... according to the STM32 board with which you are working on.
With <Demonstration name> = Cellular, CellularIoT, Nx_TCP_Echo_Client ...
Patch the file as below and rebuild the binary.
- define PLF_CELLULAR_SIM_SLOT_NB (1U)
- define PLF_CELLULAR_SIM_INDEX_0 (2U) /*!< SIM SLOT 0 interface */
- define PLF_CELLULAR_SIM_INDEX_1 (99U) /*!< SIM SLOT 1 interface */
- define PLF_CELLULAR_SIM_INDEX_2 (99U) /*!< SIM SLOT 2 interface */
- define PLF_CELLULAR_SIM_INDEX_3 (99U) /*!< SIM SLOT 3 interface */
1.2.12. How to manage EEPROM on B-L462E-CELL1
The EEPROM is filled at factory process with some data, the main information is extracted from the modem, however a PSK automatically generated is also added. Thus, in case of needs to write the EEPROM, backup the parameters to restore them, specially the PSK first.
Below is the EEPROM first bytes structure (length is 274 bytes):
// Global parameters
uint8_t Board[20]; //={"B-L462-CELL1"};
uint8_t Version [20]; // Version FG displayed on sticker {"EBL462ECELL1$KU4"};
uint8_t Revision [20]; // Revision displayed on sticker {"MB1508-L462E-C01"};
uint8_t Serial[20]; // Serial number displayed on sticker {"K192700022"};
// Modem Related
uint8_t BaseBoard[20];//={"LBAD0XX1SE"};
uint8_t Brand[16]; //={"MURATA"};
uint8_t Model[16]; //={"ALT125X"}; // returned by AT+GMM
uint8_t ModemSoftRevNumber[30]; //={"RK_02_01_02_00_57"} // returned by AT+GMR
uint8_t IMEI[16]; // returned by AT+CGSN
uint8_t PSK[20]; // Pre shared Key - randomly generated
// eSim related
uint8_t eICCID[24]; // EMBEDDED SIM CHIP, returned by AT%CCID
uint8_t eIMSI[16]; // EMBEDDED SIM CHIP, returned by AT+CIMI
uint8_t EID [32];   ///262//270
uint32_t signature;  ///266//274
Note that it is easy to read and write (using HAL services HAL_I2C_Mem_Read / HAL_I2C_Mem_Write) the EEPROM after calling the I2C initialization.
1.2.13. How to activate the eSIM with B-L462E-CELL1
Pre-requisite 1: check that the country where the board must run is covered by Truphone Network footprint. You can find the list of covered countries at Truphone Web[1].
Pre-requisite 2: activate the Truphone eSIM as described in the board user manual. To enable the eSIM with Truphone connectivity, users can follow the instructions provided in the B-L462E-CELL1[2] in the chapter eSIM.
This video[3] also shows the available user experience .
Depending on the version of the modem FW configuration, the network operator could be set to "DEFAULT". In some countries, the IMSI switch may not work as expected. To solve the issue, the modem firmware must be configured to use TRUPHONE as network operator. To do this, the end-user is asked to enter the at commands manually as follows:
Step 1: download the latest version of the X-CUBE-CELLULAR
Step 2: connect the device to a PC using the STLINK USB Port and program the binary \Projects\B-L462E-CELL1\Demonstrations\CellularIoT\Binaries\xxx.bin to the board.
The procedure to program the binary is defined in this How To article.
Step 3: start a terminal application on the PC in order to enter the commands to configure the device and also to read logs and traces.
Step 4: When the board boots up, check that the SIM card is successfully identified and CCID is automatically read and displayed on the terminal
 AT%CCID<CR>
   <CR><LF>
   %CCID: 8944477700000005819<CR><LF>
   <CR><LF>
   OK<CR><LF>
Step 5: press the "return" key, the user sees prompt on the terminal as shown below $>
Step 6: enter the command "at at%nwoper?", the user sees the result below:
 $>at at%nwoper?
   ATParser:*** SEND (size=11) ***
   at%nwoper?<CR>
   <CR><LF>
   %NWOPER: "TRUPHONE"<CR><LF>
   <CR><LF>
   <CR><LF>
   OK<CR><LF>
 $>
Step 7: If DEFAULT is shown instead of TRUPHONE then enter the AT command at at%nwoper="TRUPHONE" to force the modem firmware to use TRUPHONE configuration. This setting is persistent as it is stored in the modem flash memory.
 $>at at%nwoper="TRUPHONE"
   ATParser:*** SEND (size=21) ***
   at%nwoper="TRUPHONE"<CR>
   <CR><LF>
   OK<CR><LF>
Step 8: verify that TRUPHONE is correctly written into the modem flash memory by reading the existing nwoper by entering again at at%nwoper. Verify that TRUPHONE is displayed.
Step 9: now Truphone as NWOPERator is set, the user can reboot the board by pressing the reset button (black button) or enter the reset command at the prompt
Step 10: after the restart, let the modem starts normally. It automatically searches network and register to Truphone network. It may take up to 10 to 15 minutes to find a network and register.
Step 11: if the registration is still not successful after the latter step, record the trace from the terminal and share it with ST support team via ST community.
1.2.14. How to use another modem
The aim is to change the current modem in an existing project with a new modem.
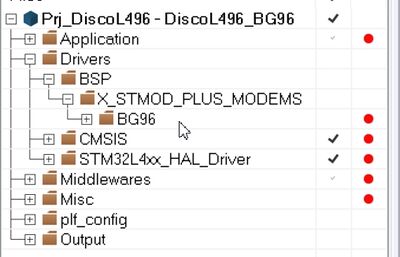
For example to replace BG96 with GM01Q in an IAR (EWARM) L496 project.
Custom files of all the supported modem are available in the package.
- Start IDE by double cliking on .eww (project file)
- In Drivers/BSP/X_STMOD_PLUS_MODEMS, remove BG96 group
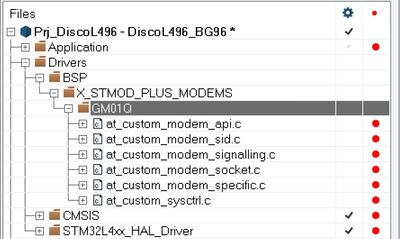
- In Drivers/BSP/X_STMOD_PLUS_MODEMS, create a new group : GM01Q
- Select files for this newly created group, from Drivers/BSP/X_STMOD_PLUS_MODEMS/MONARCH/AT_modem_monarch/Src
- Change path in project options [ Options then C/C++ Compiler]
- Replace $PROJ_DIR$\..\..\..\..\..\Drivers\BSP\X_STMOD_PLUS_MODEMS\BG96\AT_modem_bg96\Inc
- By $PROJ_DIR$\..\..\..\..\..\Drivers\BSP\X_STMOD_PLUS_MODEMS\MONARCH\AT_modem_monarch\Inc
1.3. How To applicable only to FreeRTOS version
1.3.1. How to change default behavior of the application
The delivered firmware starts Cellular_App application. The default behavior is that a single echo service is started. This service sends data to an Echo server which replies with the same data. Once an answer from Echo server is received, the echo client resends data to Echo server after a delay. A second instance of the Echo client can be started to test multiple socket configurations. The address of the Echo server can be changed. It is also possible to send a ping command while the Echo client is running. It is also possible to start a perfomance test. To see all the possibilities, type the following in the Tera Term: cellularapp help
1.3.2. How to implement your own application
The easiest way to implement your application is to adapt the Cellular_App content to your requirements.
Another method is to add a new entry task for this new application and start it from main (do not forget to remove entry task start for Cellular_App to avoid conflicts).
Your application is in charge of initializing and starting the Cellular middleware (for this, copy and paste the required lines from Cellular_App).
1.3.3. How to to select components to include in the cellular firmware
The firmware can be customized by adding or removing components or applications.
The configuration files under Projects\<board>\Demonstrations\Cellular\STM32_Cellular\Config allows the selection of the component to include in the cellular firmware by define/undefine environment variables (if using CellularApp overwrites configuration by changing the define in plf_cellular_app_config.h).
Refer to the user manual (UM2426) on how to customize the software.
1.4. How To applicable only to Azure RTOS version
1.4.1. How to implement your own application
Coming soon.
2. References
- ↑ Truphone Web
- ↑ user manual. User manual of the B-L462E-CELL1
- ↑ User experience video

