How to start with STiRoT OEMuRoT on STM32H7S
Literature
- Wiki pages:
- STiRoT STM32H7S How to Intro article
- STiRoT for STM32H7S article
- STiRoT article.
- Debug Authentication for STM32H7RS article
- Debug Authentication STM32H7RS How to Introduction article
- UM2237 STM32CubeProgrammer software description
- UM2238 STM32 trusted package creator (TPC) tool software description
- AN5054 Secure programming using STM32CubeProgrammer
Target description
The purpose of this article is to explain step by step how to use the STM32CubeFW example provided by ST, for STiRoT, using the STM32H7S discovery board.
- Chapter1: describes an example of provisioning using password and a full regression using the STM32CubeFW script.
- Chapter2: describes an example of provisioning using the root key and a certificate.
Based on this STM32CubeFW example, additional exercises are proposed (debugger opening, attach an IDE to make a step-by-step user application execution, modification of the user application and upload of the modified firmware) in the How to start with DA access on STM32H7RS, Debug Opening section article.
As explained later in this article, for the OEMuRoT application code the same application code as for the OEMiRoT has been reused (it explain why the previous article link is pointing to the OEMiRoT use case).
Introduction
Two examples are provided in the STM32Cube_FW:
- An example with a single boot stage: STiRoT
- An example with two boot stages: STiRoT - OEMuRoT
The two boot stages example is used in this "getting started".
Through this practical example you will learn:
- What is STiRoT and OEMuRoT for STM32H7S and how to use the STM32CubeFW example which is provided.
- How to configure the STiRoT and the debug authentication for this example.
- What is the iLoader and its role.
- How to generate an encrypted and signed image for the user application firmware.
- What the device provisioning is and how to perform the setup of the device.
- How the user application is installed.
- How to perform a regression to retrieve an empty board.
Prerequisites
- Hardware
- STM32H7S discovery board: the STM32H7S devices have all the available security features, including the HW crypto accelerator (the HW cryptographic acceleration is not support for STM327R devices).
- Discovery MB1736- STM32H7S (need USBC cable)
- STM32H7S discovery board: the STM32H7S devices have all the available security features, including the HW crypto accelerator (the HW cryptographic acceleration is not support for STM327R devices).
- Required tools
- STM32Cube_FW_H7RS_V1.1.0 or later
- STM32CubeProgrammer_rev2.16.0 or more recent (with trusted package creator (TPC) selected at installation).
- IAR Embedded Workbench® rev 9.60 or later.
- or IAR Embedded Workbench® rev 9.20.1 or later + IAR Patch EWARMv9_STM32H7R-Sxx_Vx.x.x
- IAR patch is available in the STM32CubeFW: STM32Cube_FW_H7RS_Vx.x.x\Utilities\PC_Software
- Tera Term / Putty or equivalent terminal emulator.
- STM32Cube Firmware
- Download the STM32Cube_FW_H7RS Cube firmware (advise is to place it close from the C: in order to avoid long windows paths)
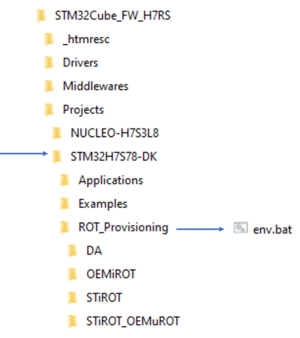
- A directory STM32H7S78-DK is included in "STM32Cube_FW_H7RS\Projects"
- Open the env.bat file
- If the STM32CubeProgrammer has not been installed in the default folder:C:\Program Files\STMicroelectronics\STM32Cube\STM32CubeProgrammer, the customized installation path needs to be updated.
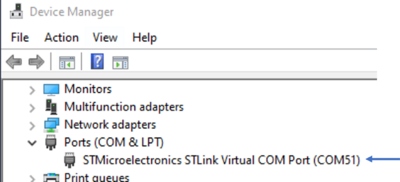
- Update the COM port to be aligned with your COM port number.
- Use the Windows device manager to find out your COM port number, as shown in figure below
- Check that the selected application path is correct: for the following tutorial the ROT/STiROT_Appli must be active.
1. Example with PASSWORD configuration
1.1. STiRoT-OEMuRoT and debug authentication configuration
This chapter explains how to start with the provisioning script.
It is used to configure the STiRoT, OEMuRoT and the debug authentication.
1.1.1. Preliminary stage (Step 0)
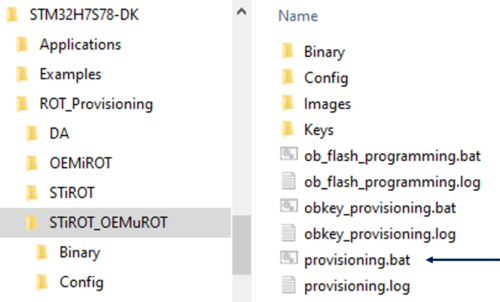
- The different steps to configure and use the STiRoT, OEMuRoT are based on a script provided in the STM32CubeFW: STM32H7S78-DK\ROT_Provisioning\STiROT_OEMuROT\provisioning.bat
- The following documentation is a guide through all the steps of this script, and explains how to perform each of them.
- The figure below shows where the script is located in the STM32CubeFW.
- Launch the script: provisioning.bat (double click) and keep it running during all the following steps.
- Type the product state: CLOSED (don't use LOCKED for this tutorial, this state is used only to set a final product state)
- Type the chosen Debug Authentication: PASSWORD (for explanation about certificate and password refer to intro article)
- Launch the script: provisioning.bat (double click) and keep it running during all the following steps.
1.1.1.1. iLoader
- As explained in the introduction article, an immutable loader code example is provided in the STM32Cube_FW_H7RS (see STiRoT_STM32H7S_How_to_Intro article).
- As explained in the introduction article, an immutable loader code example is provided in the STM32Cube_FW_H7RS (see STiRoT_STM32H7S_How_to_Intro article).
- The role of this application is to handle the transfers between internal RAM and the external flash memory.
- This application will be installed in the user flash and write protected.
- The role of this application is to handle the transfers between internal RAM and the external flash memory.
- Next action required by the script is to compile all the iLoader application example files.
- iLoader compilation using an IDE
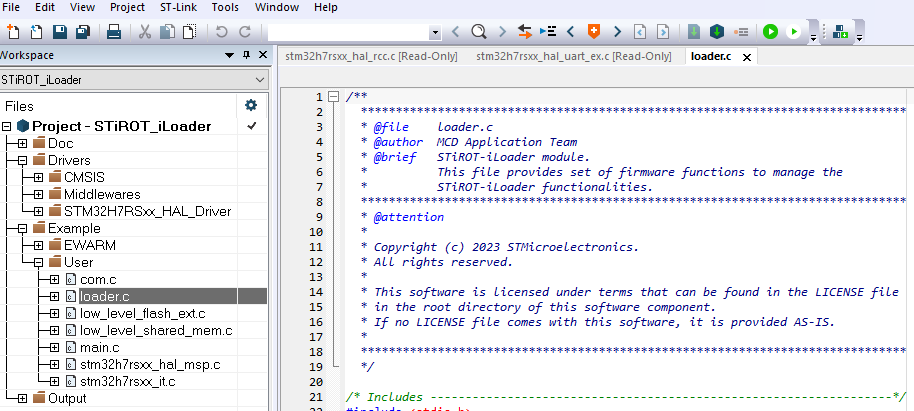
- The figure below shows where the provided iLoader application example is located.
- The figure below shows the example using IAR
- Select "Project-STiROT_iLoader": Project-> Rebuild All => The compilation should be executed without reported warning or error.
1.1.1.2. OEMuRoT Boot
- For the OEMuRoT boot application code (updatable Root of Trust boot), the OEMiRoT application is used.
- OEMiRoT (application used for the OEMuRoT) compilation using an IDE
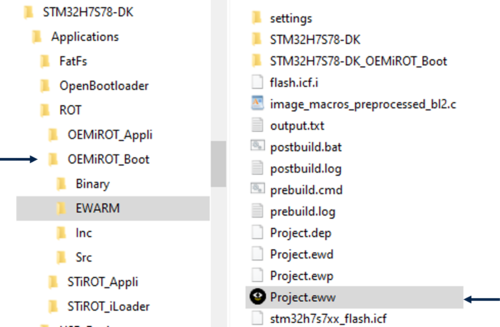
- The figure below shows where the provided application example for IAR is located.
- Open the project with IAR
- Select "Project-STM32H7S78-DK_EOMiROT_Boot": Project-> Rebuild All => The compilation should be executed without reported warning or error.
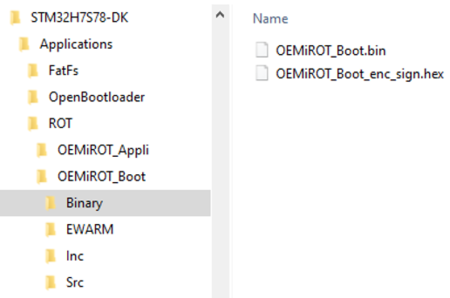
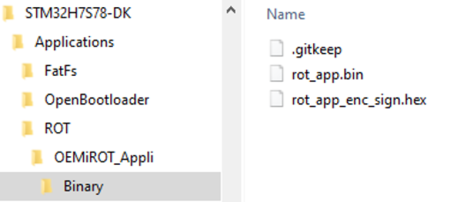
- As shown in the figure below, two files are created. Through the automatically launched Post-build command an encrypted and signed image is created.
1.1.2. Configuration management (Step1)
The next operation performed automatically by the script is the update of "STiROT_Config.xml", "ob_flash_programming.bat" and "stm32h7s7xx_flash.icf" according to the STiROT_iLoader parameters. The mentioned "update_stirot_iloader_setup.log" file is located in the directory: STM32Cube_FW_H7RS_Vx.x.x\Projects\STM32H7S78-DK\ROT_Provisioning\STiROT
1.1.2.1. STiRoT configuration
The next step indicated by the script is to open the STiROT_Config.xml file, update to the wanted configuration and to generate the STiROT_Config.obk (OBKey) file.
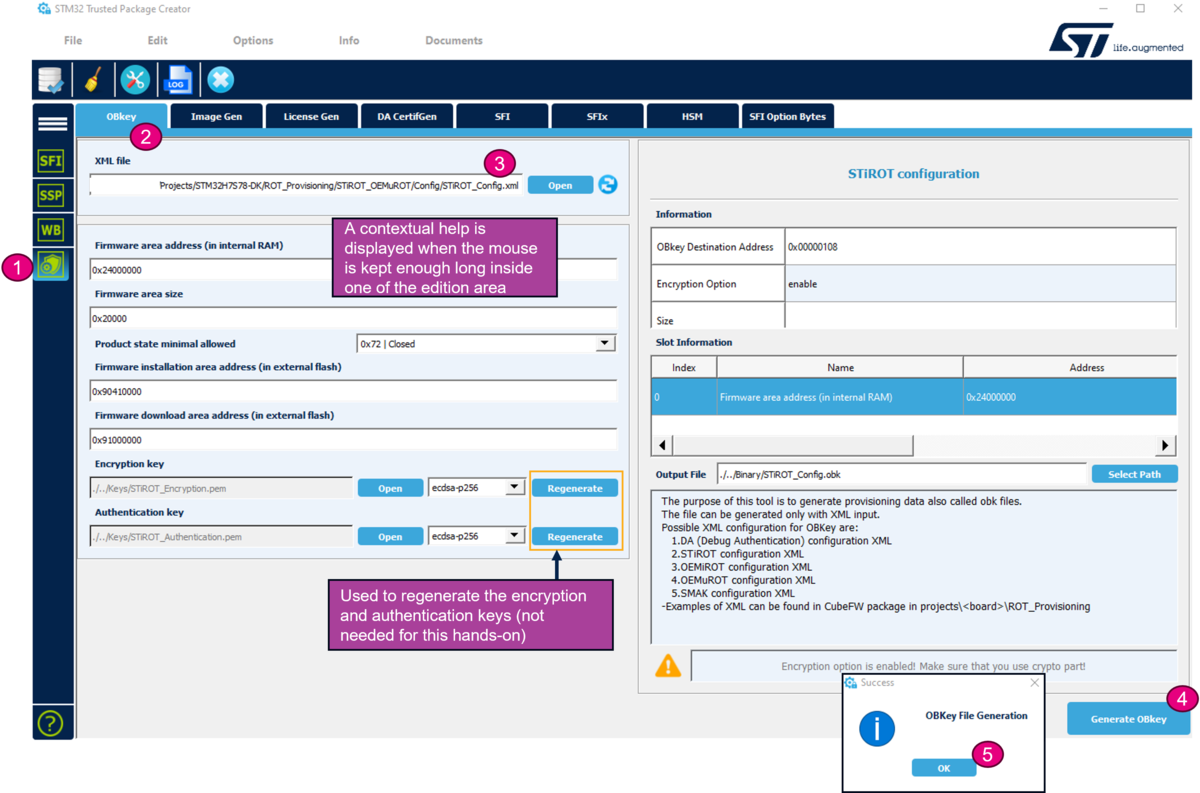
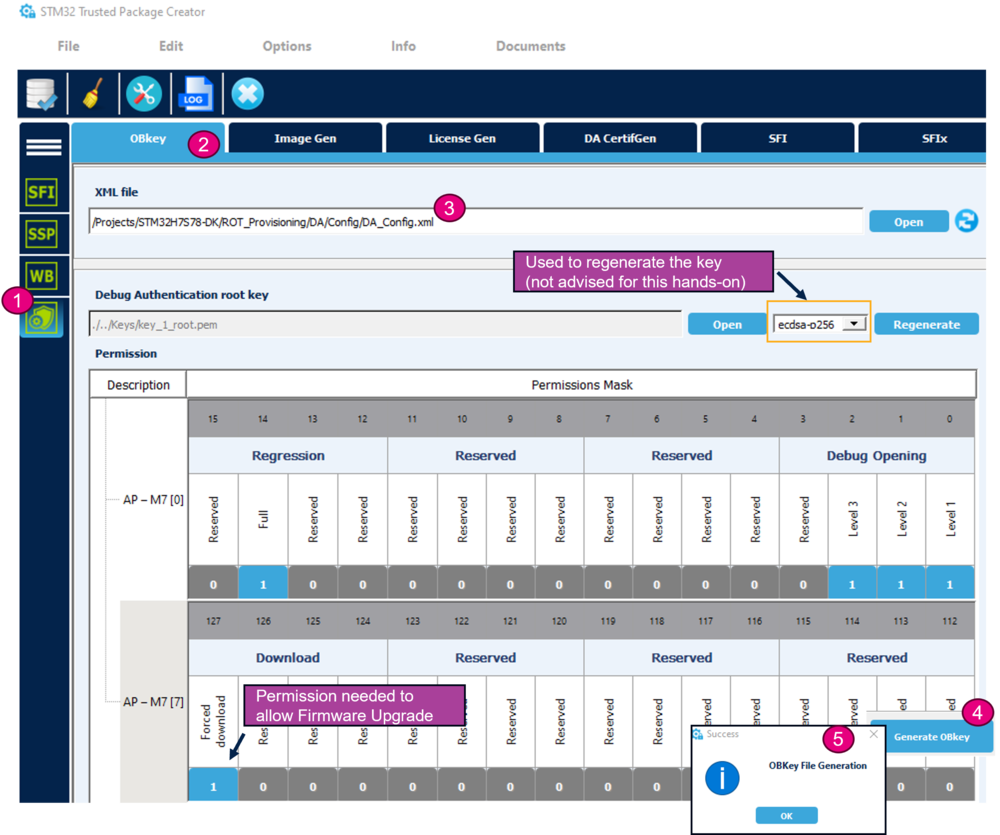
- Open STM32TrustedPackageCreator.
- Select the shield
- Select OBkey tab
- Select the STiRoT_Config.xml configuration file. All the default settings for this hands-on are already filled-in and it is not needed to regenerate the encryption and authentication keys. In case these keys are regenerated, the firmware image needs to be regenerated (in case this image is already available). The image will be generated later on in this handson.
- Generate OBkey
- The confirmation window is displayed
- Note:: The STiROT_Config.xml file is different for a single or two boot (OEMuRoT boot) stages configuration. In this case, take care to take the file located under ROT_Provisioning\STiROT_OEMuROT
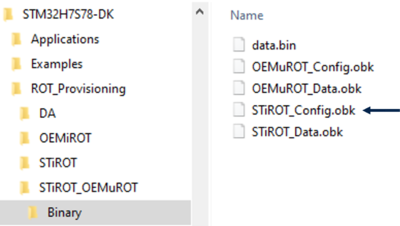
- According to the path specified in the STiROT_Config.xml, a STiROT_Config.obk file is generated as shown in the figure below.
- This file will be used by the script during the provisioning step.
1.1.2.2. Debug Authentication configuration
The Debug Authentication (DA) configuration is the next step of the script.
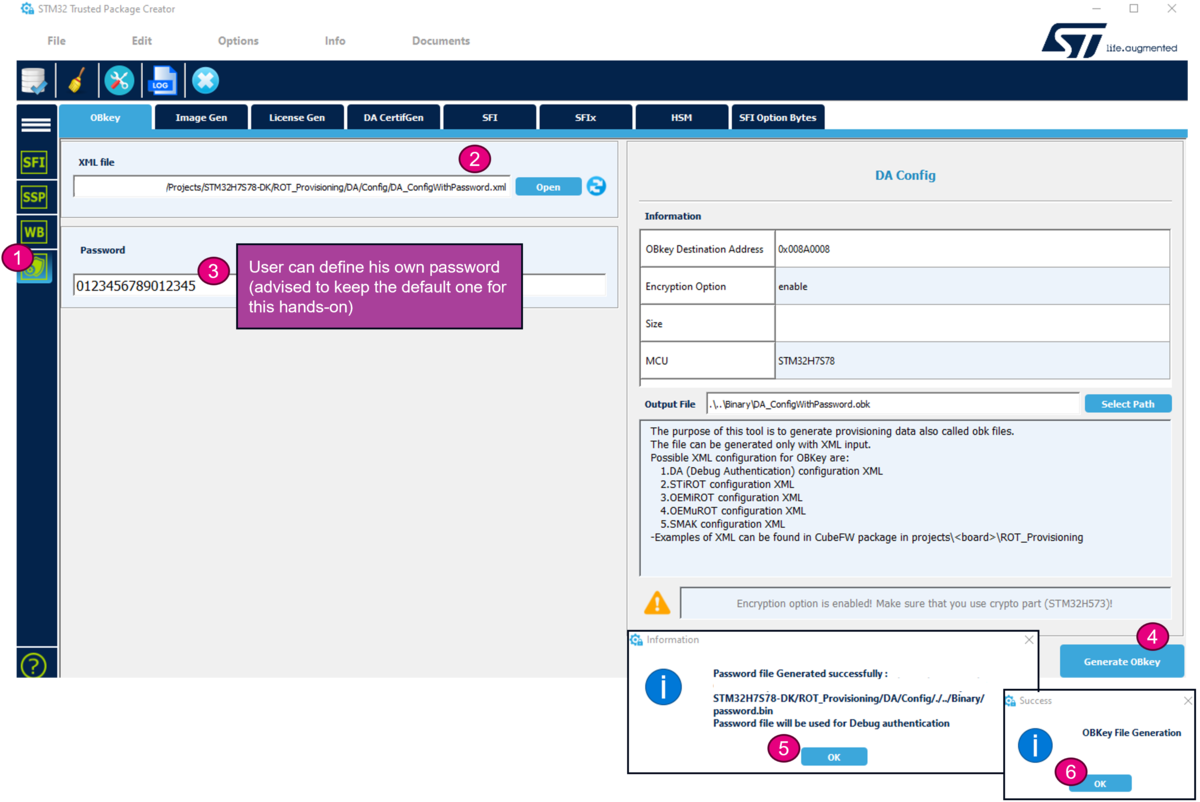
- Using STM32TrustedPackageCreator
- Select the shield
- Select OBkey tab DA_ConfigWithPassword.xml configuration file.
- A default password is provided.
- Generate OBkey
- The confirmation window is displayed
- The second confirmation window is displayed
- Warning: for a commercial product, it is important to define your own password. But for trials it is advised to use the default provided, to avoid blocked regression due to lost password.
- According to the path specified in the DA_Config.xml, a password binary and a DA_Config.obk file are generated as shown in the figure below.
- These files will be used by the script during the provisioning step.
- The option bytes programming script and icf file are automatically updated (for details, see figure below for the related log files)
1.1.2.3. OEMuRoT configuration
The next step indicated by the script is to open the OEMuRoT_Config.xml file, update to the wanted configuration and to generate the STiROT_Config.obk (OBKey) file.
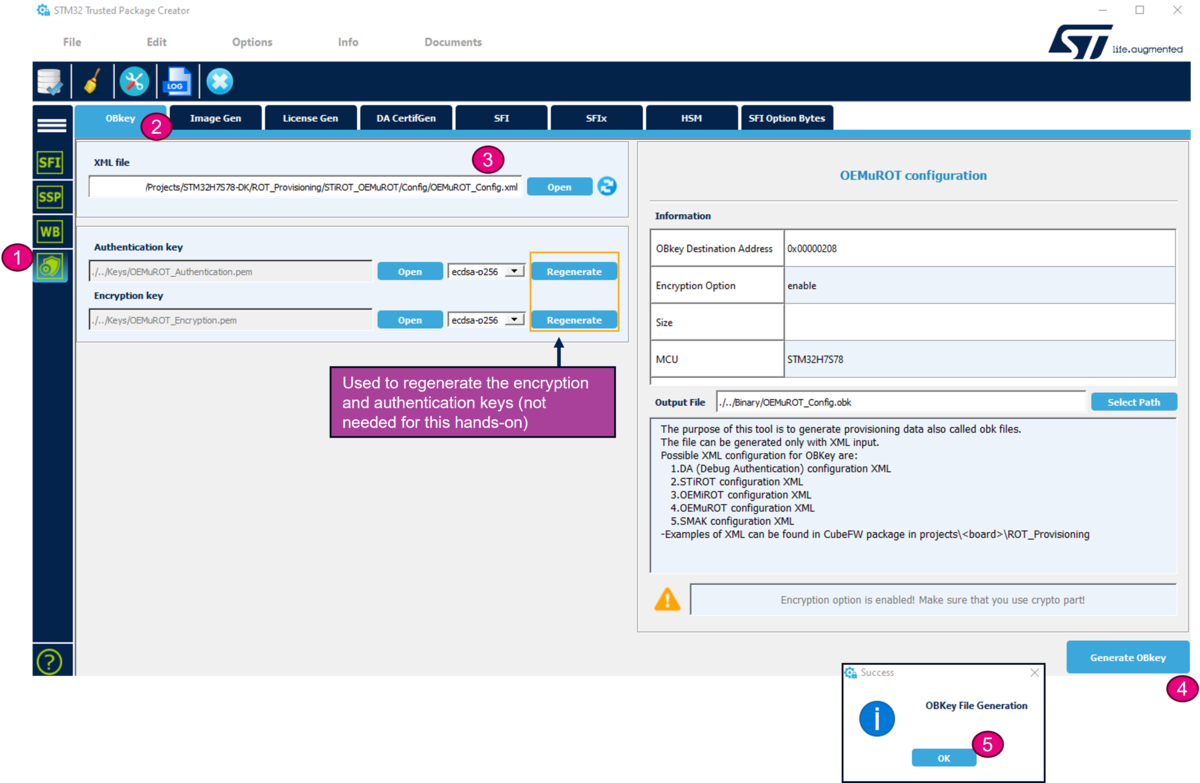
- Open STM32TrustedPackageCreator.
- Select the shield
- Select OBkey tab
- Select the OEMuROT_Config.xml configuration file. All the default settings for this hands-on are already filled-in and it is not needed to regenerate the encryption and authentication keys. In case these keys are regenerated, the firmware image needs to be regenerated (in case this image is already available). The image will be generated later on in this hands-on.
- Generate OBkey
- The confirmation window is displayed
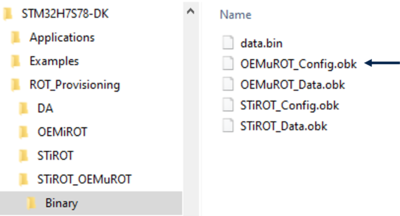
According to the path specified in the OEMuROT_Config.xml, an OEMuROT_Config.obk file is generated as shown in the figure below. This file will be used by the script during the provisioning step.
The STiRoT option byte file and the OEMuRoT imgage configuration file are automatically updated (for details, see figure below for the related log files)
1.2. Image Generation of OEMuROT Application (Step2)
The Step 2 of the script is the generation of the OEMuRoT application firmware image.
- For the OEMuRoT application code example the same application is used as the OEMiRoT application provided example. (see figure below)
- Open the OEMiRoT application example with your IDE (in this example with IAR)
- Select the STiROT_Appli -> Project -> Rebuild All
- The compiled binary file is created and through the postbuild command the encrypted and signed image is automatically generated.
1.3. Board programming
In the next steps the script will automatically perform
- The provisioning of the Option Byte
- Flash the previously generated images in the download areas (areas defined in the .xml configuration files)
- Perform the needed reset to install the code
- Set the final state of the product
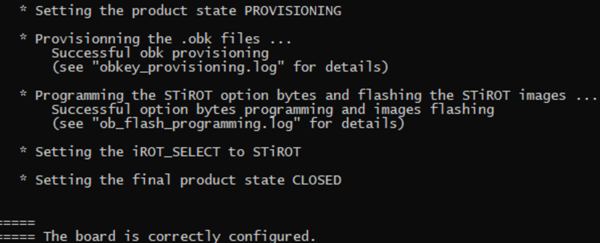
- If all the steps have been executed successfully, a confirmation is displayed as shown in the figure above.
1.4. Application execution
- Close the script
- Launch the Teraterm (or equivalent)
- File => New connection
- The COM port number should be the same as indicated by your Windows device manager and also written in the env.bat file (see Prerequisites chapter)
- Setup => Serial port -> update to 115200 (and see the figure below for other configurations) -> New Setting
- Press the reset button (black button of the discovery board)
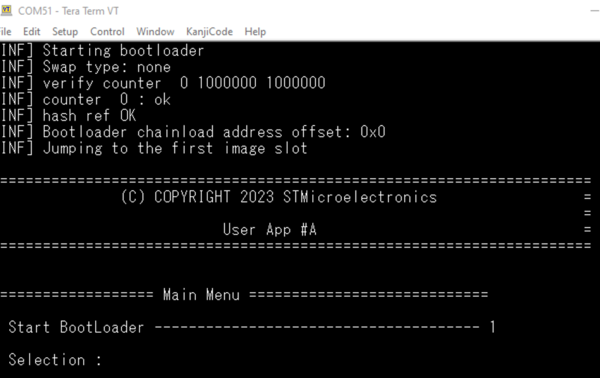
- The STiRoT application is executed (figure below)
- In the figure above you can see the jump into the OEMuRoT application, that is then executed.
- Since the device is in "CLOSED" the menu calling the bootloader makes not sense in this case.
- But it is useful during development phase where the device is kept in "OPEN" state.
- For a CLOSED device a debug opening is needed and an image download procedure is required (see last chapter of this article).
- But it is useful during development phase where the device is kept in "OPEN" state.
Note: reminder: the OEMiRoT provided application code example has been used for the OEMuRoT.
1.5. Full regression
- There are two ways to perform a regression
- Using the graphic interface of the STM32CubeProgrammer. It will be shown in the second part of this handson.
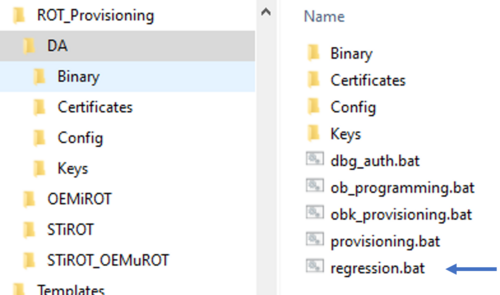
- Using the regression script provided in the STM32CubeFW, shown in the example below.
- Launch the script as shown in the figure below
- You need to specify if the Debug Authentication provisioning as been done with Certificate or Password.
- Type "Password" for this example
- The script is executed and indicate that the regression has been performed successfully.
2. Example with CERTIFICATE configuration
2.1. STiRoT-OEMuRoT and debug authentication configuration
This chapter explains how to start with the provisioning script. It is used to configure the STiRoT, OEMuRoT and the debug authentication (in this case a configuration using a certificate)
2.1.1. Preliminary stage (Step 0)
- The different steps to configure and use the STiRoT, OEMuRoT are based on a script provided in the STM32CubeFW: STM32H7S78-DK\ROT_Provisioning\STiROT_OEMuROT\provisioning.bat
- The following documentation is a guide through all the steps of this script, and explains how to perform each of them.
- The figure below shows where the script is located in the STM32CubeFW.
- Launch the script: provisioning.bat (double click) and keep it running during all the following steps.
- Type the product state: CLOSED (don't use LOCKED for this tutorial, this state is used only to set a final product state)
- Type the chosen Debug Authentication: CERTIFICATE (for explanation about certificate and password refer to intro article)
- Launch the script: provisioning.bat (double click) and keep it running during all the following steps.
2.1.1.1. iLoader
- As explained in the introduction article, an immutable loader code example is provided in the STM32Cube_FW_H7RS (see STiRoT_STM32H7S_How_to_Intro article).
- The role of this application is to handle the transfers between internal RAM and the external flash memory.
- This application will be installed in the user flash and write protected.
- As explained in the introduction article, an immutable loader code example is provided in the STM32Cube_FW_H7RS (see STiRoT_STM32H7S_How_to_Intro article).
- If you have done the hands-on in chapter 1 (configuration with password), you have already compiled and used this application that is the same for all STiRoT CubeFW examples.
- Compile all the iLoader application example files in case not already done during previous hands-on.
- Next action required by the script is to compile all the iLoader application example files.
- iLoader compilation using an IDE
- The figure below shows where the provided iLoader application example is located.
- The figure below shows the example using IAR
- Select "Project-STiROT_iLoader": Project-> Rebuild All => The compilation should be executed without reported warning or error.
2.1.1.2. OEMuRoT Boot
- For the OEMuRoT boot application code (updatable Root of Trust boot), the OEMiRoT application is used.
- If you have done the hands-on in chapter 1 (configuration with password), you have already generated the encrypted and signed image. This image is still valid if the encryption and signature keys have not been regenerated.
- OEMiRoT (application used for the OEMuRoT) compilation using an IDE, in case the image has not yet been generated or the keys have been regenerated.
- The figure below shows where the provided application example for IAR is located.
- Open the project with IAR
- Select "Project-STM32H7S78-DK_EOMiROT_Boot": Project-> Rebuild All => The compilation should be executed without reported warning or error.
- As shown in the figure below, two files are created. Through the automatically launched Post-build command an encrypted and signed image is created.
2.1.2. Configuration Management (Step1)
The next operation performed automatically by the script is the update of "STiROT_Config.xml", "ob_flash_programming.bat" and "stm32h7s7xx_flash.icf" according to the STiROT_iLoader parameters.
The mentioned "update_stirot_iloader_setup.log" file is located in the directory: STM32Cube_FW_H7RS_Vx.x.x\Projects\STM32H7S78-DK\ROT_Provisioning\STiROT
2.1.2.1. STiRoT configuration
The next step indicated by the script is to open the STiROT_Config.xml file, update to the wanted configuration and to generate the STiROT_Config.obk (OBKey) file.
- Open STM32TrustedPackageCreator.
- Select the shield
- Select OBkey tab
- Select the STiRoT_Config.xml configuration file. All the default settings for this hands-on are already filled-in and it is not needed to regenerate the encryption and authentication keys. In case these keys are regenerated, the firmware image needs to be regenerated (in case this image is already available). The image will be generated later on in this hands-on.
- Generate OBkey
- The confirmation window is displayed
- Note:: The STiROT_Config.xml file is different for a single or two boot (OEMuRoT boot) stages configuration. In this case, take care to take the file located under ROT_Provisioning\STiROT_OEMuROT
- According to the path specified in the STiROT_Config.xml, a STiROT_Config.obk file is generated as shown in the figure below.
- This file will be used by the script during the provisioning step.
2.1.2.2. Debug Authentication configuration
The Debug Authentication (DA) configuration is the next step of the script.
- If you have done the hands-on in chapter 1 (configuration with password), you have already generated the Option Byte configuration file (obk) that is still valid. Unless the Debug Authentication root key has been changed or you want to change the configuration.
- Using STM32TrustedPackageCreator
- Select the shield
- Select OBkey tab
- Select the DA_Config.xml configuration file (file for the DA configuration with Certificate). All the default settings for this hands-on are already filled-in and a default Debug Authentication root key is provided.
- Generate OBkey
- The confirmation window is displayed
- Warning: for a commercial product, it is important to regenerate your own Debug Authentication root key. But for trials it is advised to use the default provided, to avoid blocked regression due to lost key.
- According to the path specified in the DA_Config.xml, a DA_Config.obk file is generated as shown in the figure below.
- This file will be used by the script during the provisioning step.
- According to the path specified in the DA_Config.xml, a DA_Config.obk file is generated as shown in the figure below.
- The option bytes programming script and icf file are automatically updated (for details, see figure below for the related log files)
2.1.2.3. OEMuRoT configuration
The next step indicated by the script is to open the OEMuRoT_Config.xml file, update to the wanted configuration and to generate the OEMuRoT_Config.obk (OBkey) file.
- If you have done the hands-on in chapter 1 (configuration with password), you have already generated the Option Byte configuration file (OBKey) that is still valid. Unless you have regenerated the encryption and authentication keys or want to do it.
- Open STM32TrustedPackageCreator.
- Select the shield
- Select OBkey tab
- Select the OEMuROT_Config.xml configuration file. All the default settings for this hands-on are already filled-in and it is not needed to regenerate the encryption and authentication keys. In case these keys are regenerated, the firmware image needs to be regenerated (in case this image is already available). The image will be generated later on in this hands-on.
- Generate OBkey
- The confirmation window is displayed
According to the path specified in the OEMuROT_Config.xml, an OEMuROT_Config.obk file is generated as shown in the figure below. This file will be used by the script during the provisioning step.
The STiRoT option byte file and the OEMuRoT image configuration file are automatically updated (for details, see figure below for the related log files)
2.2. Image Generation of OEMuROT Application (Step2)
The Step 2 of the script is the generation of the OEMuRoT application firmware image.
- If you have done the hands-on in chapter 1 (configuration with password), you have already generated the OEMuRoT application image that is still valid. Unless you have regenerated the encryption and authentication keys during the OEMuRoT configuration in previous section.
- For the OEMuRoT application code example the same application is used as the OEMiRoT application provided example. (see figure below)
- Open the OEMiRoT application example with your IDE (in this example with IAR)
- Select the STiROT_Appli -> Project -> Rebuild All
- The compiled binary file is created and through the postbuild command the encrypted and signed image is automatically generated.
2.3. Board programming
In the next steps the script will automatically perform
- The provisioning of the Option Byte
- Flash the previously generated images in the download areas (areas defined in the .xml configuration files)
- Perform the needed reset to install the code
- Set the final state of the product
- If all the steps have been executed successfully, a confirmation is displayed as shown in the figure above.
2.4. Application execution
- Close the script
- Launch the Teraterm (or equivalent)
- File => New connection
- The COM port number should be the same as indicated by your Windows device manager and also written in the env.bat file (see Prerequisites chapter)
- Setup => Serial port -> update to 115200 (and see the figure below for other configurations) -> New Setting
- Press the reset button (black button of the discovery board)
- The STiRoT application is executed (figure below)
- In the figure above you can see the jump into the OEMuRoT application, that is then executed.
- Since the device is in "CLOSED" state, the menu calling the bootloader makes not sense in this case.
- But it is useful during development phase where the device is kept in "OPEN" state.
- For a CLOSED device a debug opening is needed and an image download procedure is needed (see next chapter)
- But it is useful during development phase where the device is kept in "OPEN" state.
Note: reminder: the OEMiRoT provided application code example has been used for the OEMuRoT.
- Close Teraterm
2.5. Debug Authentication and firmware modification or full regression
- How to open the debugger, attach an IDE to make a step-by-step user application execution, make a modification of the user application and upload the modified firmware is explained in the following chapters.
- If you decide to not perform the tutorial proposed below, it is advised to make a regression to retrieve an empty board.
- The following section of this article is describing how to proceed. Full regression using the STM32CubeFW script.
3. Debug Opening (intrusive debug)
Since the device is in closed state, the debugger is no open and you have an error message if you try to connect STM32CubeProgrammer.
- If the device has been provisioned with Password Debug Authentication, only a full regression is possible and a debug opening is not allowed.
- If the device has been provisioned with Root key/Certificate Debug Authentication, the owner of the key and certificate can open the debugger.
3.1. Debug Opening procedure
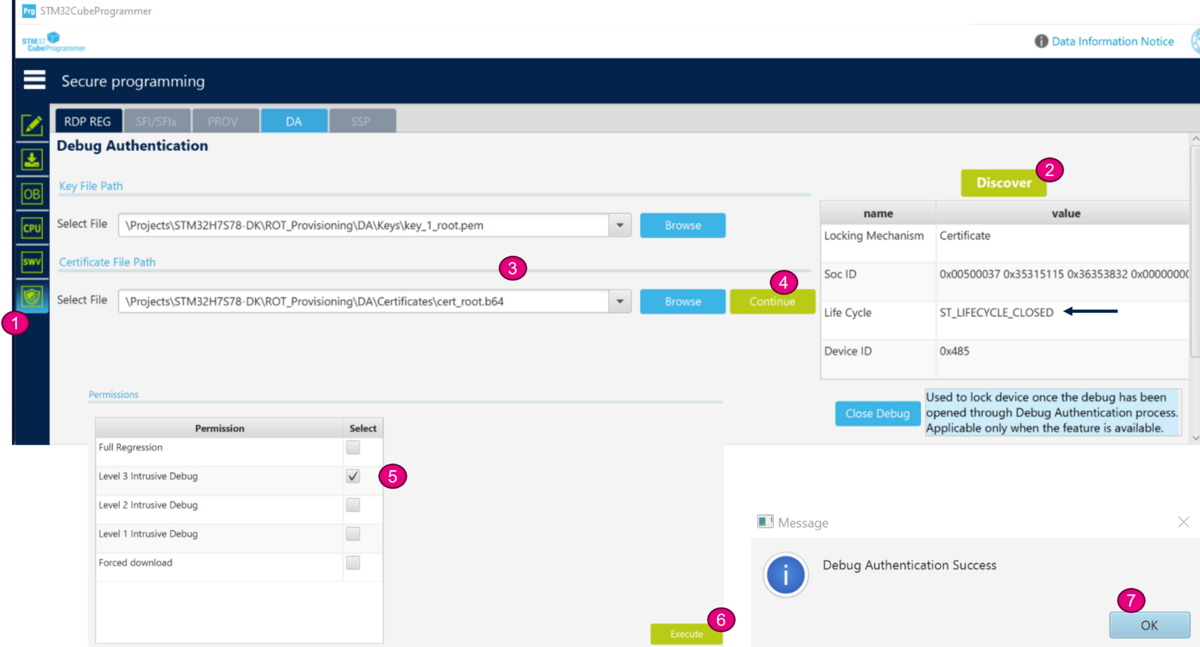
- Open STM32CubeProgrammer
- Select the shield
- Click on "Discover" -> the product state "Closed" is displayed
- Browse the paths for the root key and the certificate, as indicated in the figure below.
- Click on continue -> the permission window is open
- Select "Level 3 Intrusive Debug" (the OEMuRoT application is executed in HDPL3 see STiRoT_for_STM32H7RS article)
- Click Execute -> A Debug Authentication Success message is displayed.
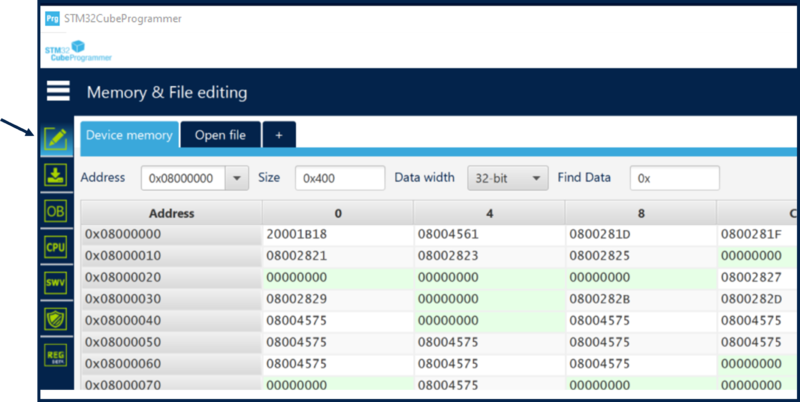
- The debugger is open and the content of the flash can be readout, as shown in figure below
The debugger will stay open until the next power-on (POR) reset.
- Disconnect STM32CubeProgrammer
3.2. IAR connection, step by step user application execution
The debugger is open in level3, so application running in HDPL3 can be accessed.
- Launch IAR, open the OEMiRoT_Appli project (reminder: this application example is used as OEMuRoT application)
- Select Project -> Attach to Running Target (see figure below) (the STM32CubeProgrammer must be disconnected first)
- Set a break as for instance shown in the figure below
- Push the discovery reset button (black button)
- The OEMuRoT application execution is stopped at the break point as shown in the figure below
- Click on "Reset" in the IAR tool bar
- Click on "Step Over" in the IAR tool bar and try out some step by step execution
- Click on "Go" -> the execution will stop again at the break point.
- Make a modification of the code, for instance as shown in the figure below (reminder the OEMiRoT application example is used for the OEMuRoT application)
- In the IAR menu: Project -> Rebuild all
- A new encrypted and signed image is created. This new image is used in the next section.
4. Firmware Update for a Closed device
The following description shows how to perform a Firmware Update.
At the date of wirting this article, the GUI graphical interface is not yet functional to perform a firmware update.
The following example shows how to proceed using the debug authentication script and updating the firmware through command line.
4.1. Debug Authentification
- In the previous section the encrypted and signed image has been created for the modified OEMuRoT application firmware. If it's not the case, open the STiRoT_Appli, make some modifications and rebuild all the file -> image creation through postbuild command.
- If applicable: close IAR or Disconnect STM32CubeProgrammer
- Unplug/ replug the Discovery board USB cable to make a power-on reset. If the debugger was open, it will be closed again.
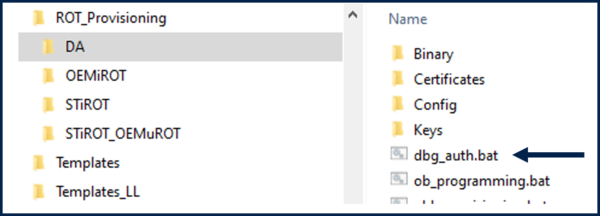
- Launch the dbg_auth.bat script
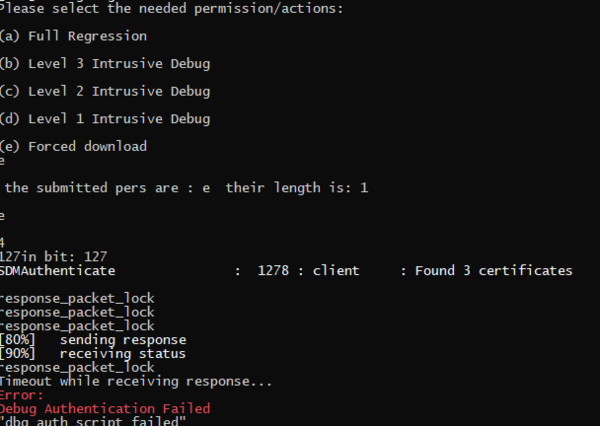
- Type "e" to select the Forced Download. (See the permission set during the certificate generation, DA setting using TPC)
- The script will indicate an error. Ignore it, this will be fixed in later script version
4.2. New application code image download
- In a command prompt: execute the command indicated below
- Depending on your PC administrator rights, you need to run it from the STM32CubeProgrammer installation directory: C:\Program Files\STMicroelectronics\STM32Cube\STM32CubeProgrammer_revx.x.x-H7RS-xxx\bin
- Command to execute: STM32_Programmer_CLI.exe -c port=COMxx br=921600 -elbl "ExternalLoader\MX66UW1G45G_STM32H7S78-DK_XSPIM1-SFIx.stldr" -d C:\Users\xxxxx\STM32Cube_FW_H7RS_Vx.x.x\Projects\STM32H7S78-DK\Applications\ROT\OEMiROT_Appli\Binary\rot_app_enc_sign.hex
Note: the xxx needs to be adapted for your configuration.
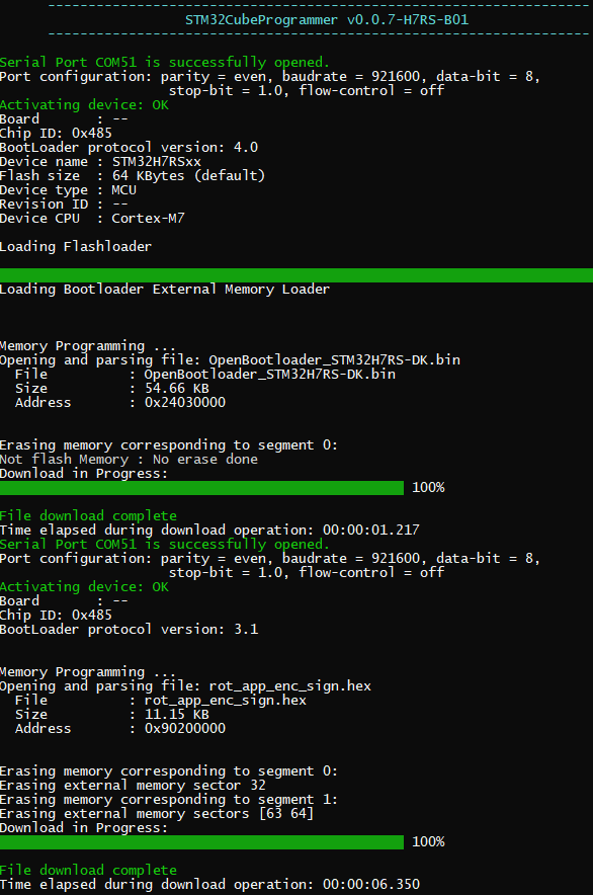
- The new image of the application code is downloaded in the external flash download area.
- At next reset the new firmware is installed
4.3. New installed application code execution
- Launch the Teraterm (or equivalent)
- Reminder:
- File => New connection
- The COM port number should be the same as indicated by your Windows device manager and also written in the env.bat file (see Prerequisites chapter)
- Setup => Serial port -> update to 115200 (and see the figure below for other configurations) -> New Setting
- Press the reset button (black button of the discovery board)
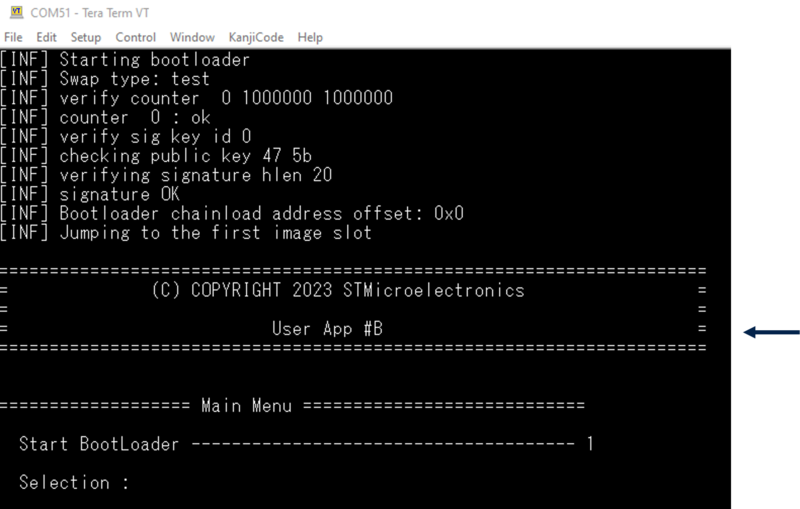
- The new STiRoT application is executed as shown in the figure below
4.4. Full regression using graphic interface
Previously the regression script has been used.
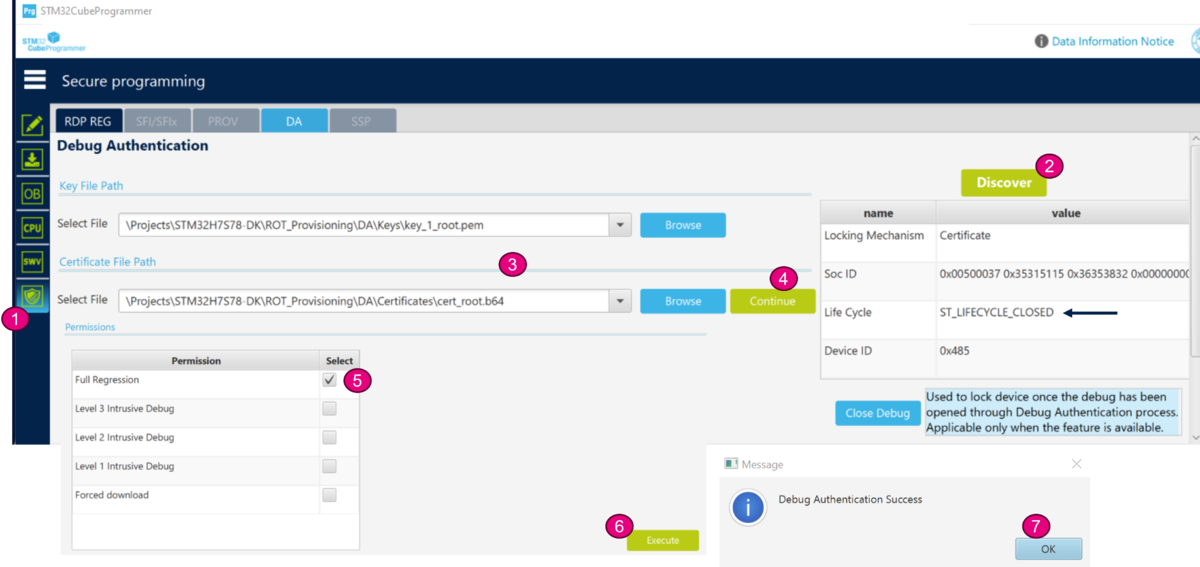
Following an example showing how to proceed using the graphic interface of STM32CubeProgrammer.
- Close Teraterm
- Start STM32CubeProgrammer
- Select the shield
- Click on "Discover" -> the product state "Closed" is displayed
- Browse the paths for the root key and the certificate, as indicated in the figure below.
- Click on continue -> the permission window is open
- Select Full Regression
- Click Execute -> A Debug Authentication Success message is displayed.
- Using STM32CubeProgrammer, you can verify that the flash is empty and that the device is back in "Open" state.
- Note: It is a good habit to make a full regression after completing trials. Reminder that it is important if you have regenerated the root key, to not loose this key in order to be able to make a regression or a debugger opening.


