This message will disappear after all relevant tasks have been resolved.
Semantic MediaWiki
There are 1 incomplete or pending task to finish installation of Semantic MediaWiki. An administrator or user with sufficient rights can complete it. This should be done before adding new data to avoid inconsistencies.| Coming soon |
The purpose of this article is to show an integration of Secure Manager in ecosystem using STM32CubeMX.
Read Secure Manager for STM32H5 before starting the practical example described below.
Prerequisites
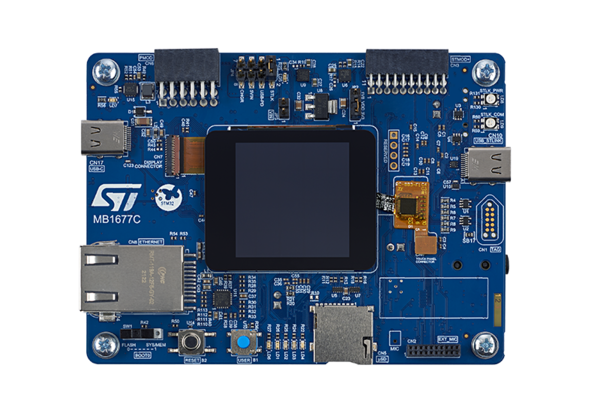
To execute the example described below, you'll need an STM32H573I-DK discovery board:
You'll also need the following tools:
- STM32CubeMX_6.9.2 or later (see STM32CubeMX ST web page[1])
- IAR Embedded Workbench rev 9.20.1 or later
- STM32CubeProgrammer rev 2.14.0
Note:
- STM32 Trusted Package Creator (TPC) is automatically installed during the STM32CubeMX installation. This TPC version is dedicated to STM32CubeMX and installed in the STM32CubeMX/utilities folder.
- The latest STM32Cube_FW revision is installed through STM32CubeMX (see appendix).
- If needed, set the Windows environment variable (see appendix). It is required in case the H5 doesn’t appear in the STM32CubeMX Access to MCU Selector
1. Introduction
- Start by reading the Secure Manager STM32H5 How to Intro article.
- For technical background, please refer to the Secure Manager for STM32H5 article.
2. Prerequisites
- Hardware
- STM32H573 discovery board: the STM32H573 devices have all the available security features, including the HW crypto accelerator. (Note: the Secure Manager is not supported for STM32H56x devices, the HW crypto is not available)
- Discovery MB1677- STM32H573 (USB-C cable not included)
- STM32H573 discovery board: the STM32H573 devices have all the available security features, including the HW crypto accelerator. (Note: the Secure Manager is not supported for STM32H56x devices, the HW crypto is not available)
- In case your board has already been used for other handsons:
- Perform a regression in case the board is in another state than OPEN (using the script provided for the last handson done).
- If the board is in OPEN state, verify that the SECBOOT_LOCK option byte is not set (use STM32CubeProgrammer).
- Required tools
- STM32Cube_H5_V1.1.0 with STM32Cube_H5_V1.1.1 patch, or later
- STM32CubeProgrammer_rev2.14.0 or more recent (with STM32TrustedPackageCreator (TPC) selected at installation).
- One of the supported IDE:
- EWARM (IAR) : V9.20.1 and the patch EWARMv8_STM32H5xx_V1.1.0 or later to support the STM32H5 series
- STM32CubeIDE : 1.13.0 or later
- MDK_ARM : V5.37.0.0 and the patch Keil_STM32H5_DFP.1.0.0 or later to support the STM32H5 series
- Tera Term / Putty or equivalent UART terminal emulator.
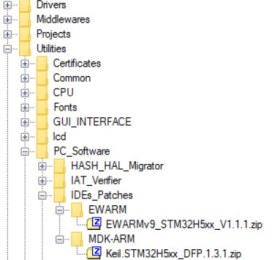
The IDE patches can be found in the STM32CubeFW_H5 Cube firmware:
- STM32Cube Firmware
- Download the STM32CubeFW_H5 Cube firmware
- With STM32Cube_H5_V1.1.0 you must also download the STM32Cube_H5_V1.1.1 patch and copy all the files into V1.1.0
- For later STM32Cube_H5_V1.1.x, when available, it is delivered as a single zip file.
- A directory STM32H573I-DK is included in the “Projects” directory
- If the STM32CubeProgrammer is not installed in the default folder:
- C:\Program Files\STMicroelectronics\STM32Cube\STM32CubeProgrammer.
- The customized installation path must be updated in the environment variable: env.bat (see the example in the figure below).
- Download the STM32CubeFW_H5 Cube firmware
3. Setting up the STM32CubeMX project
Launch STM32CubeMX
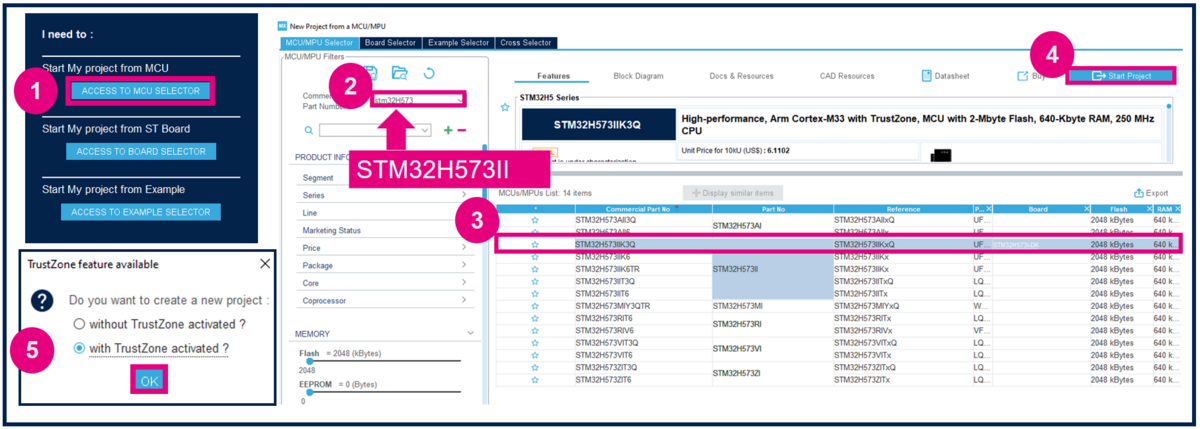
- Click on Access to MCU Selector (for this example, it's easier to enable only the necessary GPIOs, so it's advised to use the MCU selector instead of the board selector).
- From the Series column, select STM32H5, and select the device used in STM32H5-DK.
- Click start project.
- Enable TrustZone, as shown in Figure 3. (For the STiROT boot path, TrustZone needs to be enabled.)
Create the STM32CubeMX project:
- Type the name of the project (if it doesn't already exist, the related folder will be created).
- Choose a folder for the project (avoid a long path).
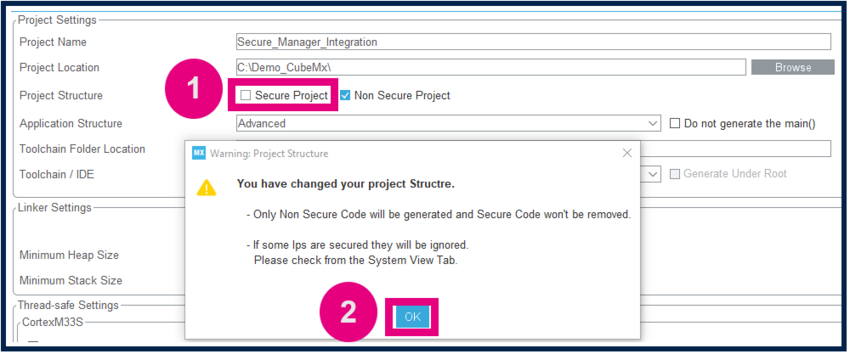
- Check that both the Secure Project and Nonsecure Project checkboxes are checked (they should be checked by default).
- Select the relevant toolchain; for this example EWARM is used.
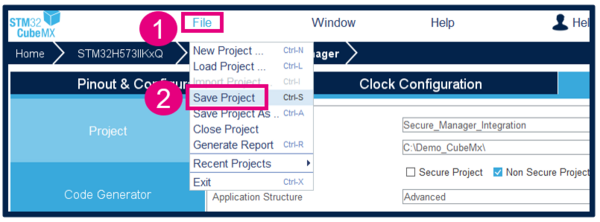
- Go to File > Save Project. The project folder (if it doesn't already exist) and the STM32H5_STiROT_SLed_NSLed.ioc file will be created.
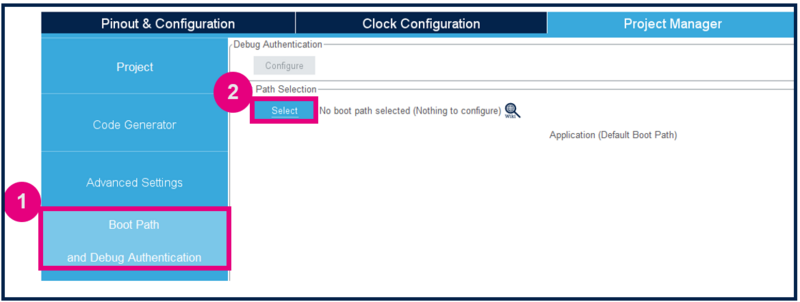
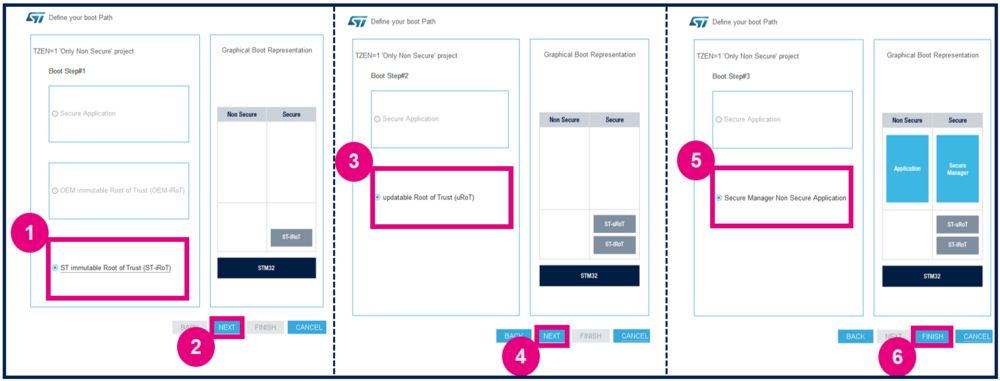
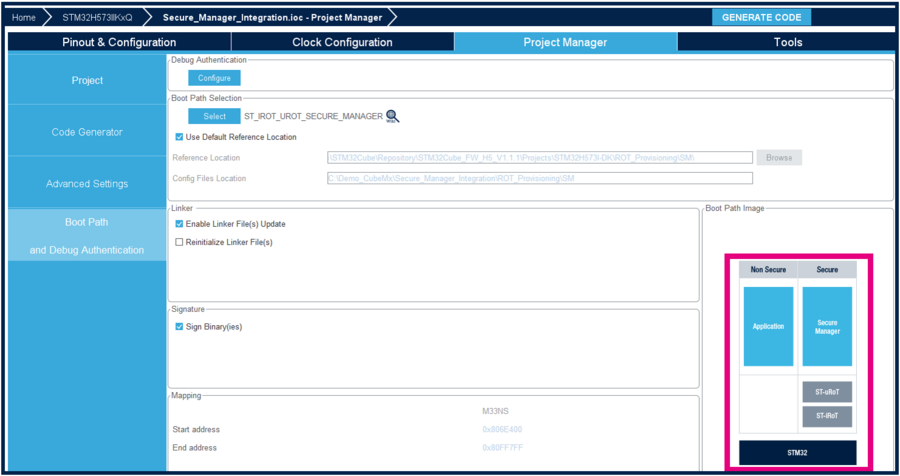
4. Boot path configuration

