How to start with STiROT on STM32H573![]() 85min
85min
Target description
The purpose of this article is to explain step by step, how to use the STM32CubeFW provided example for STiROT using the STM32H57 Discovery board.
- How to use the provided script and perform all the required steps.
- How to install and run the provided user application example.
- How to perform a regression to retrieve an empty board with initial settings.
Based on this STM32CubeFW example, additional exercises are proposed
- To generate a certificate chain.
- To reopen the debugger for product states different than OPEN
- To attach an IDE
- To perform a firmware upgrade using the bootloader
Introduction
- Please start by reading the STiROT STM32H5 How to intro article.
- For more details and to get an overview about STiROT, it is advised to read the STiROT for STM32H5 and STiROT articles.
Two examples are provided in the STM32Cube_FW:
One example with a secure and non-secure application code and one with a full secure application code (Both examples without uROT).
The full secure application code example is used in this getting started.
Through this practical example you will learn:
- What STiROT is and how to use the provided STM32CubeFW example.
- How to configure the STiROT and the Debug Authentication for this example.
- How to generate an encrypted and signed image for user application firmware and user data.
- What is the device provisioning and how to perform the setup of the device.
- How the user application and user data are installed.
- How to perform a Debug Authentication and reopen the debugger.
- How to read the installed user application firmware using STM32CubeProgrammer
- How to attach an IDE on a running target and execute step by step, the secure user application
- How to perform a regression to retrieve an empty board
- The principle of certificate chain
Prerequisites
- Hardware
- STM32H573 discovery board: STM32H573 devices have all the security features available, including all the HW crypto accelerator. (for STM32H56x the HW crypto is not available)
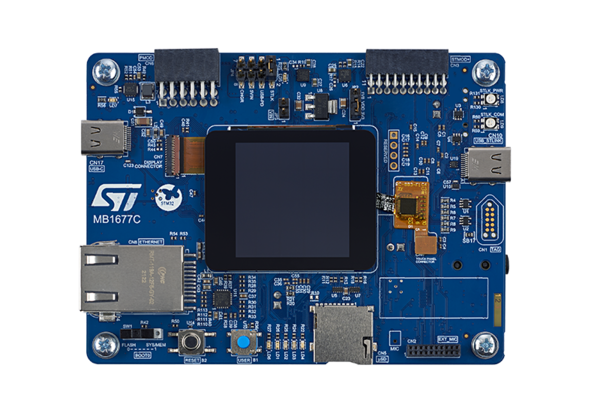
- Discovery MB1677- STM32H573 (need USBC cable)
- STM32H573 discovery board: STM32H573 devices have all the security features available, including all the HW crypto accelerator. (for STM32H56x the HW crypto is not available)
- Required tools
- STM32Cube_FW_H5_V1.0.0 or later
- STM32CubeProgrammer_rev2.13.0 or more recent (with Trusted Package Creator selected at installation).
- IAR Embedded Workbench rev 9.20.1 or later.
- Tera Term / Putty or equivalent terminal emulator.
- STM32Cube Firmware
- Download the STM32CubeFW_H5 Cube firmware (Place it preferably close to the C: root, in order to avoid long windows path).
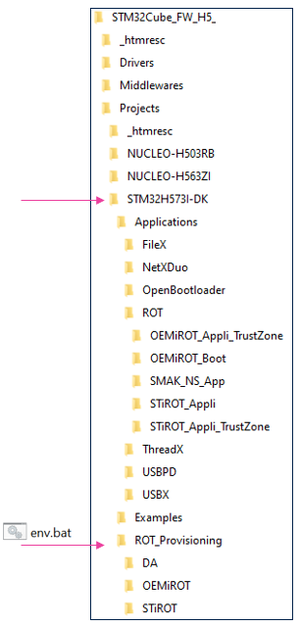
- A directory STM32H573I-DK is included in the “Projects” directory
- If the STM32CubeProgrammer has not been installed in the default folder:C:\Program Files\STMicroelectronics\STM32Cube\STM32CubeProgrammer. The customized installation path needs to be updated in the environment variable: env.bat
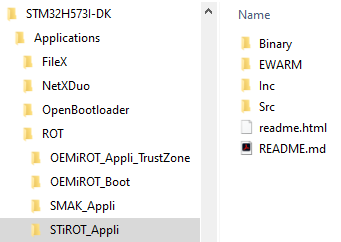
- Check that the selected application path is correct: for the following tutorial the STiROT full secure example is described => The STiROT_Appli needs to be active.
- Check that the selected application path is correct as shown in the figure below: for the following tutorial the STiROT full secure example is described => The STiROT_Appli needs to be active.
Literature
- Wiki pages:
- STiROT STM32H5 How to intro article.
- STiROT for STM32H5 article.
- STiROT article.
- Debug Authentication STM32H5 How to Introduction article.
- UM2237 STM32CubeProgrammer software description
- UM2238 STM32 Trusted Package Creator tool software description
- AN5054 Secure programming using STM32CubeProgrammer
Step by step instructions
- The different stages to configure and use the STiROT are based on a script provided in STM32CubeFW (provisioning.bat)
- The following documentation is a guide through all the steps of this script, and explains how to perform each of them.
1. STiROT and Debug Authentication configuration
This chapter explains how to start with the provisioning script.
It is used to first configure the STiROT and the Debug Authentication.
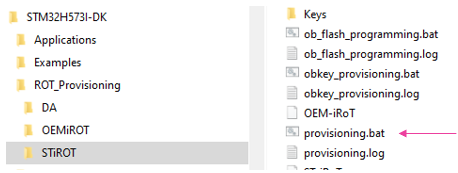
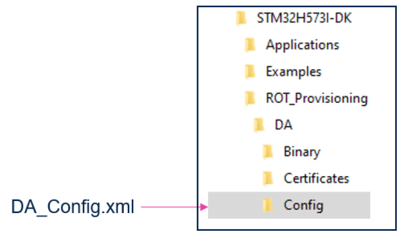
The figure below shows where the script is located in the STM32CubeFW.
- Launch the provisioning.bat (double click) and keep it running during all the following steps
1.1. STiROT configuration
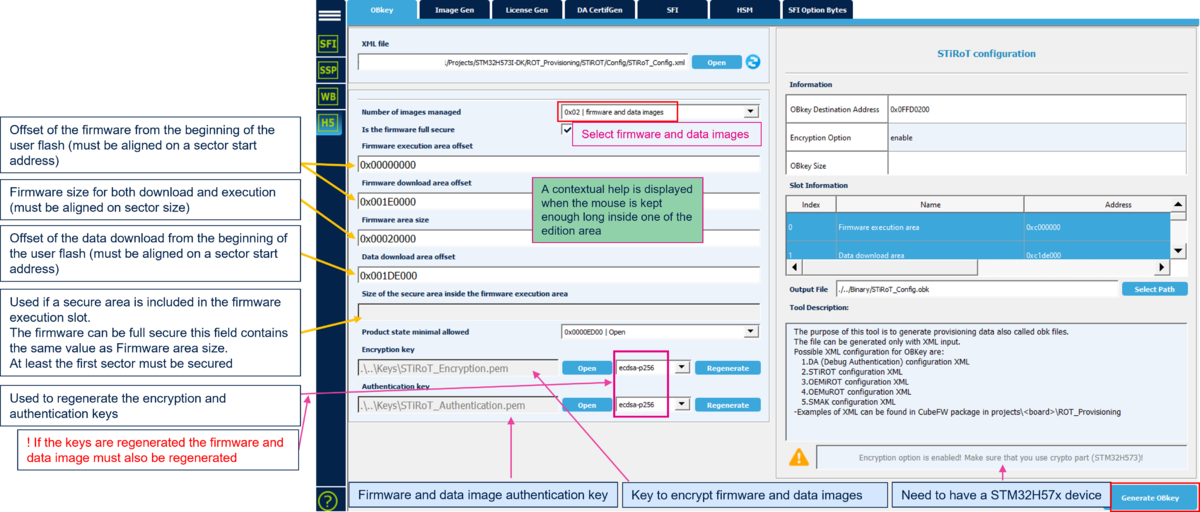
As indicated by the script, the first step is to define the wanted STiROT configuration and to generate the related STiROT_Config.obk file. This file will be used in a later step to configure the MCU and to set the related option bytes.
thumb|center|1000px|Figure 5 STM32H573 STiROT configuration
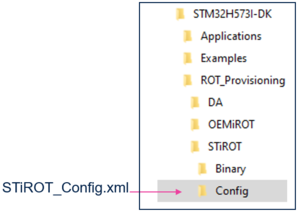
The STiROT configuration is based on the STiROT_Config.xml file.
A default file is provided in the STM32Cube_FW.
The STiROT_Config.xml file can be opened and updated using STM32 Trusted Package Creator but modifying this file using a text editor is possible.
The following parameters can be defined in the STiROT_Config.xml
- The number of images managed (code image only or code & data images)
- Mapping information (offset & size of each execution and download slots)
- Size of the secure area when the firmware is not fully secure.
- Product state minimum allowed
- ECDSA-256 encryption key
- ECDSA-256 authentication key
- High speed boot (240Mhz vs 64Mhz) capability
- SRAM2 erasing in case of reset activation
- SRAM2 ECC management activation
Note:
In order to mitigate the risk of attacks, some major information are duplicated between option bytes and Obkeys configuration such as sram2_ecc, sram2_rst, secure watermark, product_state.
The STiROT does not start (reset generated) if an error is detected during the control of these information. In this case, a regression must be done before restarting the provisioning process with a correct configuration.
This does not happen if the product is used according to specifications and if the product is not subject to an attack.
To understand what happens during the boot sequence, the status provided through the Discovery command of the Debug Authentication needs to be analyzed.
The Debug Authentication and Discovery command launched with STM32CubeProgrammer are explained later in this article.
The Discovery command can be launched through an STM32CubeProgrammer CLI command (.\STM32_Programmer_CLI.exe -c port=swd debugauth=2)
1.1.1. STiROT configuration file generation (STiROT_Config.obk)
To generate a customized configuration file the following steps need to be done:
- Open Trusted Package Creator and select H5 (TPC installed together with CubeProgrammer)
- Open Obkey tab
- Select the STiROT_Config.xml file
- Update the parameters (this example is for a full secure code and datas)
- The default encryption and authentication keys can be regenerated
- Generate the file clicking "Generate OBkey".
The STiROT_Config.obk file is generated, and the modified parameters are saved in STiROT_Config.xml file
(Click on the picture to view it in full screen)
- Note: The user application is full secure, so the code is execute at 0x0C00 0000 address alias (see SECBOOTADD in RM0481)
- When the STiROT_Config.obk file generation is completed, a "Sucess OBKey File Generation" window will be displayed.
Note: with multiple screen it could be that this window appears on another screen or behind an open file (before clicking OK, Trusted Package Creator will stay freezed)
1.2. Debug Authentication configuration
- A default working configuration enabling all the DA capabilities (regression, debug opening) is provided in the STM32CubeFW. Configuration that you can use for this tutorial.
- Warning: for your own application, it is mandatory to define you own custom DA configuration. For a commercial product, it is important to regenerate the debug authentication root key (key_1_root.pem, as explained in next section)
- The following sections, explains how to define a custom configuration.
- Press any key in the provisioning script window. The next step to be done is indicated: Debug Authentication configuration. The following section describes how to complete this step
At this step the Debug Authentication will be configured and the related (DA_Config.obk) will be generated.
The DA_Config.obk is used to configure the conditions to reopen a protected device and the debugger. This file will be used in a later step to configure the MCU and to set the related option bytes.
The Debug Authentication configuration is based on the DA_Config.xml file used as input for Trusted Package Creator. A default file is provided in the STM32Cube_FW.
Two files are included in the “DA\Config” directory:
- DA_Config.xml : configuration based on certificates for H5 crypto parts (this file is used for this tutorial)
- DA_ConfigWithPassword.xml : not used for STiROT (only for use cases with Trust Zone not activated)
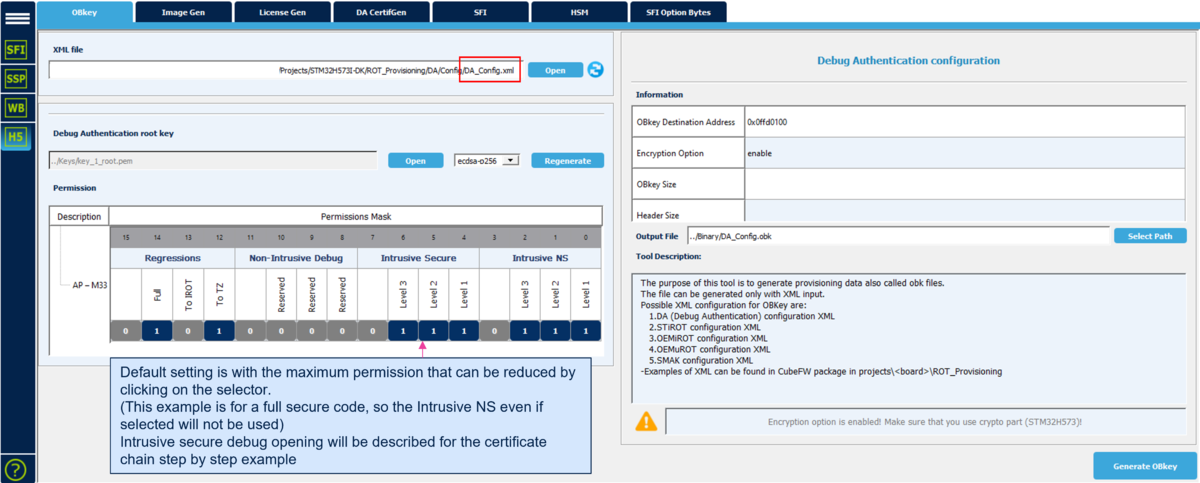
1.2.1. DA configuration file generation (DA_Config.obk)
To generate a customized configuration file the following steps need to be done:
- Open Trusted Package Creator and select H5 (installed through CubeProgrammer Installation)
- Open Obkey tab
- Select the DA_Config.xml file
- Update the parameters
- Generate the file clicking "Generate OBkey".
The DA_Config.obk file is generated, and the modified parameters are saved in DA_Config.xml file
(Click on the picture to view it in full screen)
- Note:: the level 1 (HDPL1) is reserved for the STiROT, a debug opening in level 1 is not allowed (even if selected in the permission mask). (see wiki article dedicated to lifecycle).
- Warning: for a commercial product, it is important to regenerate the debug authentication root key (key_1_root.pem), since the key provided in the STM32CubeFW is public. Obviously you need to store it securly and to not loose it.
1.2.2. Short explanations about the permission masks
For more explanations about the Debug Authentication and related permission masks, refer to the Debug Authentication for STM32H5 MCUs article.
During the step above, the permissions to reconnect a debugger and to make a regression are chosen.
This permission mask is called the "SOC_MASK".
The SOC permissions are included in the DA_Config.obk generated file and used for the configuration stored into the device.
The owner of the root key (key_1_root.pem) and the related certificate (cert_root.b64) can request these defined permissions.
It is possible to define different permission for different users, for instance different OEMs or final customer. Refer to Debug Authentication and certificate chain chapter.
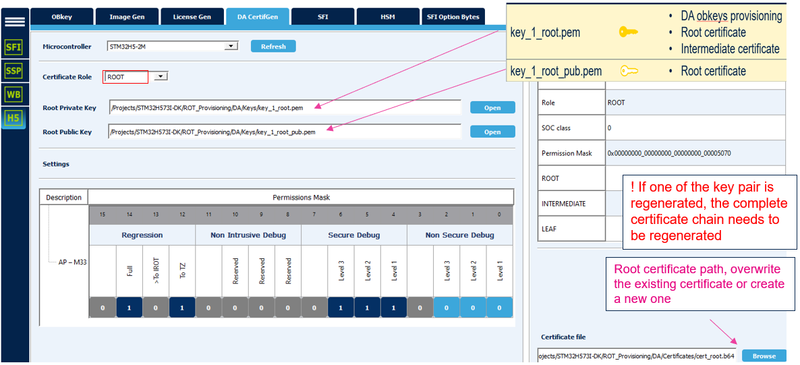
- Note: if the root key is regenerated (see "regenerate" button in figure above), it's important to also regenerate the root certificate (cert_root.b64) using STM32 Trusted Package Creator, as shown in next section.
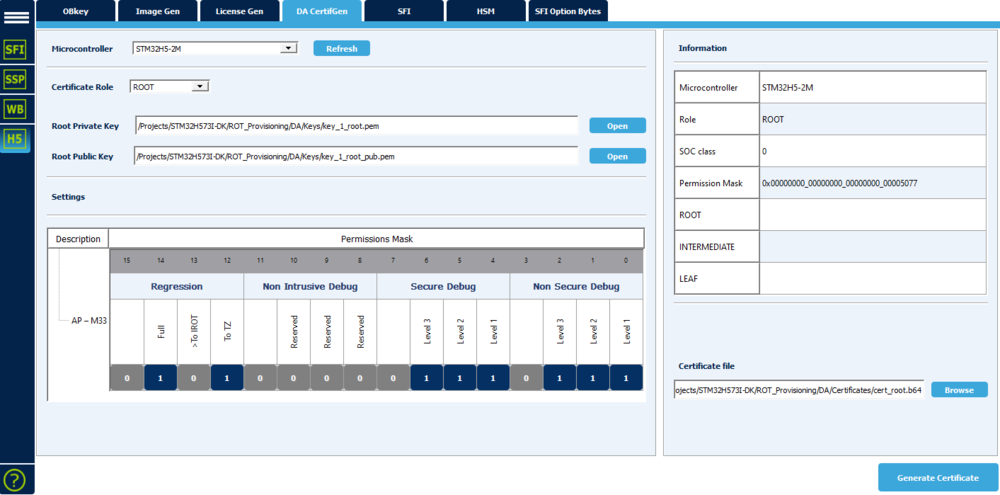
1.2.3. Regenerate the root certificate in case the root key is regenerated
- The following steps are only required if the root key (key_1_root.pem) has been regenerated
- In STM32 Trusted Package Creator select the DA CertifGen
- Open the link to the private and public root key located in the CubeFW DA/Keys folder, as shown in the figure below.
- Select the certificate file in the CubeFW DA/Certificates folder, as shown in the figure below. A warning message is displayed, confirm to overwrite the existing certificate.
- Click "Generate Certificate"
(Click on the picture to view it in full screen)
1.3. STiROT and DA configuration completion
- Press any key in the provisioning script window
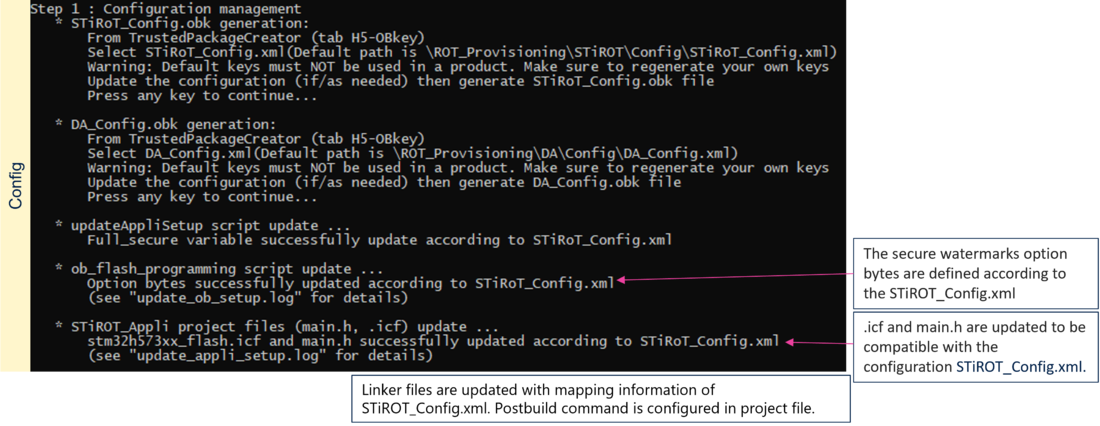
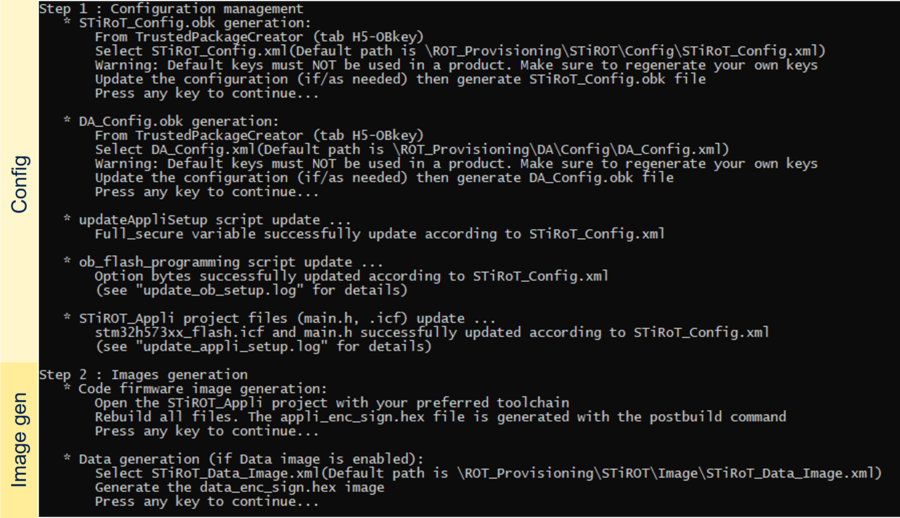
- The operations described in the following figure are executed by the script, completing the step1 actions
(Click on the picture to view it in full screen)
2. User application code and data images generation
- User application code:
- Two user application code examples are provided in the STM32Cube_FW_H5
- STiROT_Appli, full secure application code (used for this tutorial)
- STiROT_Appli_Trustzone®, secure and non-secure application code examples
- This user application will be compiled. Through a postbuild command called by the IDE (in this case IAR) this binary will be signed and encrypted. This is what is meant by image creation. The postbuild command is using STM32 Trusted Package Creator, but it will be transparent for the user. Just in the compilation window it will be mentioned that the postbuild is executed.
- If a user application code binary is available, the generation of a signed and encrypted binary can be done using directly STM32 Trusted Package Creator.
- User data:
- An example of data file is provided in the STM32Cube_FW_H5.
- These data have no meaning in this example. It just intended to be read out to show the principle. But in a real case application, these data could be keys or any other secret data.
2.1. STM32CubeFW provided user application code compilation
- Press any key in the provisioning script window.
- Open the Project.eww located in the EWARM directory
- All the settings should be correct by default, but following points can be crosschecked
- Open Project -> Option -> General Options. The device and CPU core should be automatically recognized (see figure below)
- Open Project -> Option -> Build Actions. Check the path for the postbuild script. This script is using the env.bat where the path to CubeProgrammer is defined.
- Open Project -> Option -> C/C++Compiler. Check the included directories. For a Discovery board: USE_STM32H73I_DK
- Perform: Project -> Rebuild all (don’t upload the code to the device using the IDE, only perform a compilation to generate the image)
The following binary files are created:
- \STM32H573I-DK\Applications\ROT\STiROT_Appli\Binary\appli.bin
- \STM32H573I-DK\Applications\ROT\STiROT_Appli\Binary\appli_enc_sign.hex
2.2. User application code encrypted and signed image generation
Previous section describes the two generated binaries.
The "appli.bin" is the binary obtained by compilation of the used application code with the IDE.
The "appli_enc_sign.hex" is the signed and encrypted binary obtained by the launch of the postbuild command. This postbuild is launched directly by the IDE and is using STM32 Trusted Package Creator.
This section shows how to perform manually the operations done by the postbuild.
An encrypted and signed binary is generated starting from a compiled binary file.
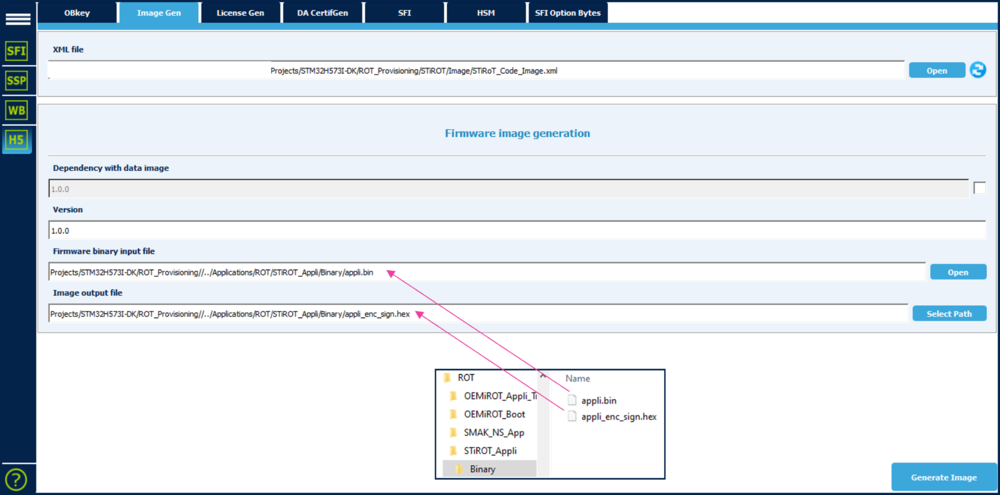
The image generation is based on the STiROT_Code_Image.xml file.
- Open Trusted Package Creator select H5
- Open tab ImageGen
- Select the template for the relevant image: STiRoT_Code_Image.xml (directory: \STM32H573I-DK\ROT_Provisioning\STiROT\Image)
- Update the default configuration if required
- Update the version number if wanted
- Enable the dependency with the other (Data) image when simultaneous installation is required for compatibility reasons.
- Select the binary file to be used as input file
- Select the output file to be filled with the signed and encrypted binary (hex format)
- Launch the generation: click "Generate Image"
- An encrypted signed file is created: \STM32H573I-DK\Applications\ROT\STiROT_Appli\Binary\appli_enc_sign.hex
(Click on the picture to view it in full screen)
2.3. User data encrypted and signed image generation
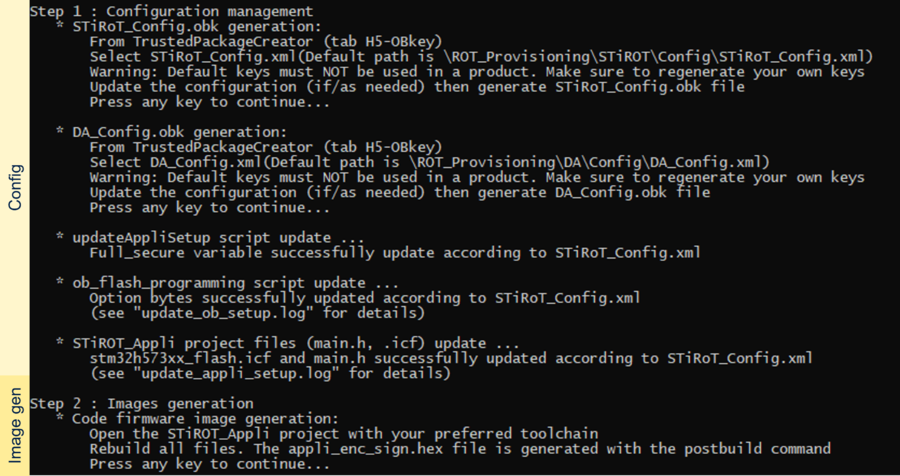
- Press any key in the provisioning script window. The script describes the last action for step 2, to be done manually
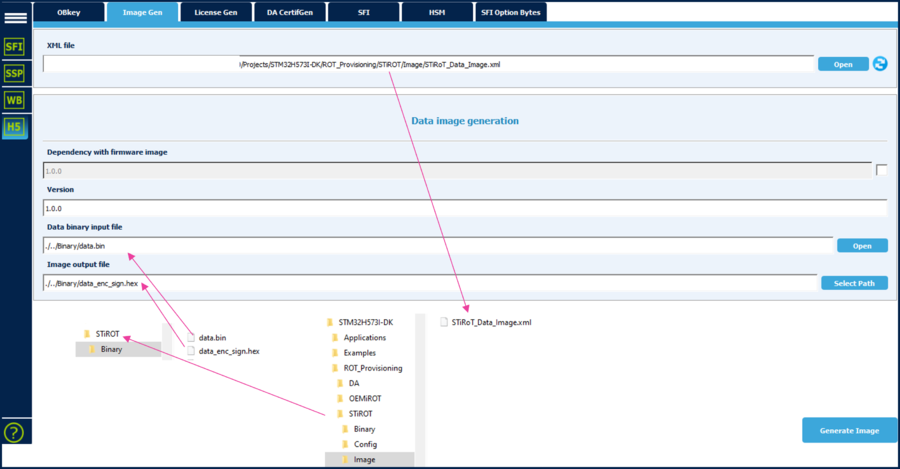
(Click on the picture to view it in full screen)
- During the step 1.1 the configuration firmware and data image had been selected (see figure 7)
- The data file provided as example contain data without any meaning. These data will be read back and displayed when the application code is executed.
An encrypted and signed binary is generated starting from the provided example data binary file
The image generation is based on the STiROT_Data_Image.xml file.
- Open Trusted Package Creator, select H5
- Open tab ImageGen
- Select the template for the relevant image: STiRoT_Data_Image.xml (STiROT directory)
- Update the default configuration if required
- Update the version number
- Enable the dependency with the other (Code) image when simultaneous installation is required for compatibility reasons.
- Select the binary file to be used as input file
- Select the output file to be filled with the signed and encrypted binary (hex format)
- Launch the generation: click "Generate Image"
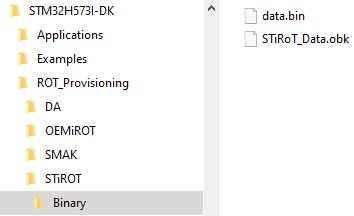
- An encrypted signed file is created: \STM32H573I-DK\ROT_Provisioning\STiROT\Binary\data_enc_sign.hex
3. Device provisioning, code and data image download into Flash, product state setting
During this step,
- The option bytes is programmed into the STM32H573 Discovery board device
- The encrypted and signed user application code and data images are flashed into the device
- The final product status is chosen
- For a user, the STiROT is executed as a "black box". If all the previous steps have been done correctly, the device provisioning and boot are straightforward. But in case of issue, the status provided through the discovery command of the Debug Authentication needs to be analyzed. Details about the discovery status commands are available in following article appendix: Introduction to STiROT for STM32H5 STiROT execution status
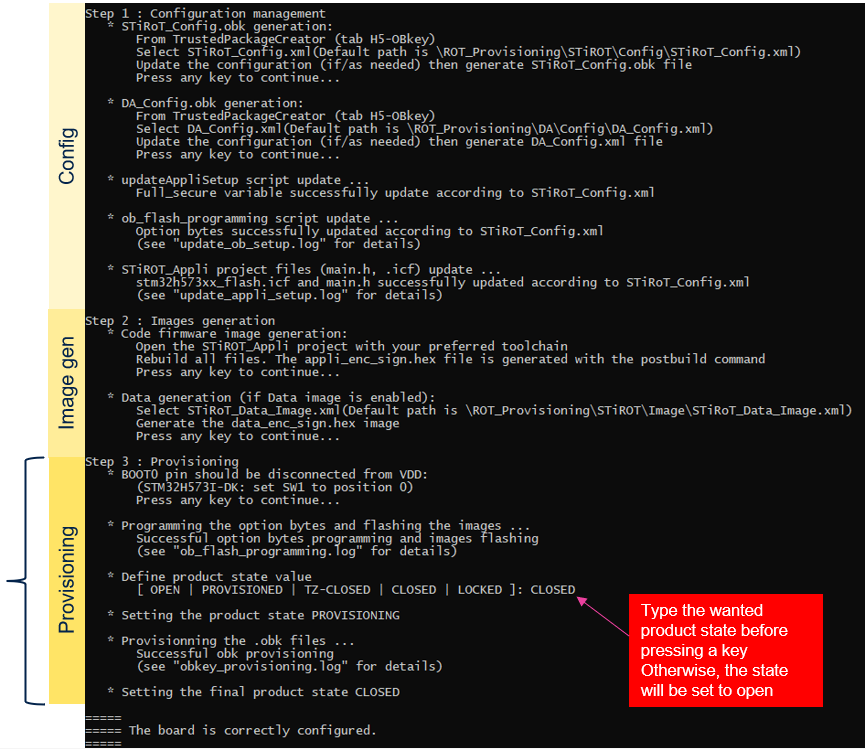
3.1. Device programming using the script
- Press any key in the provisioning script window.
- The previously generate option byte files are used by the script to program the option bytes accordingly.
- The user application code and user data are flashed into the device.
- The wanted product state is typed in the script.
- If no text is entered, the device will stay in OPEN state.
- Select the OPEN state during the development phase. In this product status, modifications can be done without performing any regression.
- !! LOCKED is a definitive product stage that can’t be changed anymore, the embedded FW and product configuration can’t be modified anymore by any method.
- Press any key in the provisioning script window.
- This finalizes the device configuration.
3.2. Some explanations about the images flashing
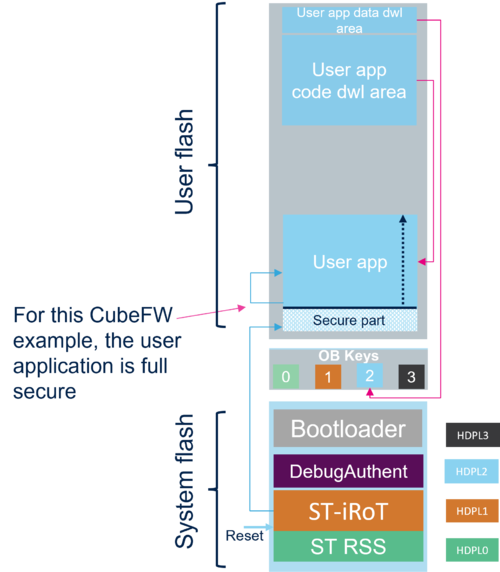
The figure shows the operations done by the STiROT
- The encrypted user application code is written in the download area
- After authenticity and integrity verifications, the user application code is decrypted and written in the user flash execution area
- The encrypted data are written in the download area
- The data authenticity and integrity are verified. Then the data are decrypted and re-encrypted with the DHUK (Derived Hardware Unique Key) and stored in the secure storage (OB Keys area)
4. Execution of the installed user application
- Open Tera term (or another terminal emulator)
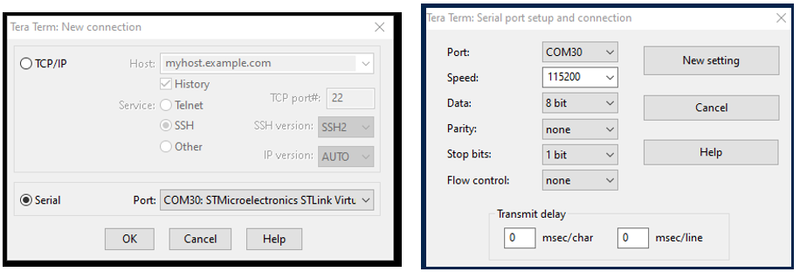
- Select “ Serial” and the COMxx port
- Setup -> Serial port …
- Set speed to 115200 and data to 8 bit
- Click: New Setting
- Reset the board (black reset button)
- The code installed during previous steps is executed
- The menu 1 will launch the standard bootloader located in the system flash. At next reset the STiROT will decrypt and install the new versions of the user application and user data images after successful check of the authenticity and the integrity of each image.
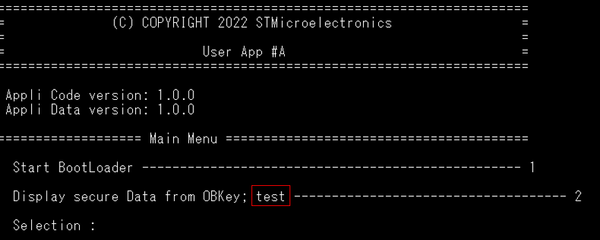
- The menu 2 displays the first 32 bytes of the data.bin file as shown in figure above.
- Note: about the menu launching the bootloader: if the device is set in another state than OPEN, connection is not possible through ST-LINK since a Debug Authentication is needed (explained in next chapters). But it's possible to connect the device through CubeProgrammer (e.g. USB DFU).
- Disconnect the Tera term since not needed for the next steps
4.1. Product in OPEN state, user application code modification
If the device is in Open Product State the application code can be modified and re-flashed without specific Debug Opening procedure.
Note: for a real case development phase, refer to the appendix section 8.1 of the STiROT introduction article Introduction to STiROT Application development phase
To make a modification of the user application code proceed as following:
- Start the IDE (e.g IAR)
- Select: Project -> Attach to running target
- Set a break point
- Click on the reset button of the board (black reset button)
- The code execution will stop at the break point.
- Make a modification, for instance in a printf
- Rebuild the user application code, the postbuild command will be launched and the new signed and encrypted image will be generated.
- There are different solutions to upload the new code image for this tutorial example. (The code will be installed by the STiROT at next hardware reset)
- Through the bootloader as shown in next section
- Through manually flash the new image in the download area
- But the simplest way for this example is to just rerun the provisioning script (no need to perform a regression)
Note: if no other modification than the user application code has been done, the STiROT_Config.obk and STiROT_Config.obk don't need to be regenerated, the script can just be run through. But in case of any doubt, follow all the steps indicated in the provisioning script.
4.2. Product in state different than OPEN, using the Bootloader to flash a new user application image
If the device is not in OPEN state (like in this tutorial)
- A Debug Authentication is required to connect a debugger or an IDE on the running target
- How to reopen the debug under some specific conditions, is explained in chapter 6.
- An example of firmware update using the Bootloader is shown in section 6.5
- But it is possible to upload a new firmware/data image(s) using the bootloader without opening the debugger:
- The prerequisite is that the STiROT and DA configuration have not been changed since the previous provisioning. Also, that the authentication and encryption keys have not been regenerated. (If it's not the case a regression and new provisioning are required)
- Perform the following steps
- Open the user application code using the IDE
- Modify the code and compile it. The encrypted image will be generated through the postbuild.
- Connect the teraterm and execute the application as described at the beginning of this chapter (see figure 23)
- Selecting "1" in the menu will launch the bootloader
- Disconnect Teraterm (advised but only need if UART connection is used) and launch STM32CubeProgrammer
- Upload the new image. This new encrypted image is flashed in the download user flash area (see figure 22)
- Disconnect STM32CubeProgrammer
- Perform a hardware reset (black button). It will launch the STiROT. The STiROT detects that a new image is available and installs it.
- Connect Teraterm, after a reset the new installed user application is executed.
5. Full regression
This chapter explains how to perform a full regression of the device. The STiROT CubeFW example used in this getting started is for a full secure user application code. So a partial regression removing all non-secure code and data makes no sense. The opening of the debug, to access to the secure user application code is explained in the Debug Authentication chapter.
As mentioned previously, if the device is in OPEN state, there is no need to perform a regression. A new provisioning of option byte and image flashing can be done using the script. If a regression trial is done, it will no be executed and an error message will be displayed. For all other product states a regression is needed to make any change in the STiROT configuration, in the user code or for the data.
- A full regression will erase the user stored contents and secrets.
- Erase the obkeys.
- Erase the complete user flash content.
- Erase the data of the secure storage (HDPL1 to HDPL3)
- Reset the secure option bytes to their default value.
- Set the product in open state.
5.1. Full regression using script (included in the STM32CubeFW)
There are two ways to perform a full regression
- Using the script provided in the STM32CubeFW, or
- Using CubeProgrammer (explained in next section)
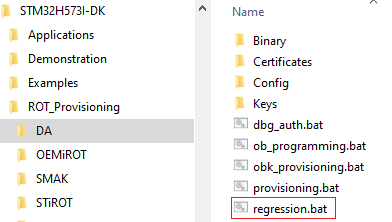
The figure below shows where to find the regression script
- To perform a full regression
- Launch the regression script (double click)
- Reply “Y” to the question “The TrustZone® feature is enabled?”
- A regression success confirmation message is displayed in the script
- Connecting the STM32CubeProgrammer, it can be seen that the user flash is erased and that the product is back in open state.
5.2. Full regression using STM32CubeProgrammer
Instead of using the script as described in previous section, STM32CubeProgrammer can be used as shown below.
- Disconnect the STM32CubeProgrammer, remove/plug the USB cable.
- Rerun the provisioning script and set the product state to "CLOSED"
- Open STM32CubeProgrammer and select “Debug Authentication”
- Click “Discover” the information window will be filled showing that the device is in CLOSED state.
- Enter the path for the root key and the root certificate
(Click on the picture to view it in full screen)
- Click Continue
- Select "Full Regression" and click "Execute"
- Connecting the STM32CubeProgrammer, it can be seen that the user flash is erased and that the product is back in open state.
This ends the first part of this tutorial about how to use the provided STM32CubeFW example.
Based on this example you can proceed with further exercises described in next sections.
It will be described how to reopen the debugger, attach an IDE, perform a firmware upgrade, how to generate and use a certificate chain.
6. Debug Authentication
The possibility to make a regression or a debug opening in a secure way is ensured by the Debug Authentication.
There are two cases:
- When the Trust Zone is disabled: only a regression is possible. This is done using a password.
- When the Trust Zone is enabled: unless a product is in LOCKED state, a regression or debug opening is possible by the owner having the right key, certificate and related permission.
For an STiROT use case, the Trust Zone is implicitly enabled, so a key and related certificate is used
The permission of the root key and root certificate owner is defined during the Debug Authentication configuration (see section 1.2). The permission to make a full regression has been used in last section.
For detail explanations about the Debug Authentication, please refer to following articles:
The owner of the root key and root certificate can use the permissions defined during the Debug Authentication configuration (see figure 10).
6.1. Debug opening using STM32CubeProgrammer and ROOT certificate
To perform an intrusive debug opening and to read the flash content using STM32CubeProgrammer, proceed as following:
- A full regression has been done previously, if it's not the case start by doing a full regression
- Redo the previous steps 1 to 3 and set the device in "CLOSED" state
- STM32CubeProgrammer: select “Debug Authentication”
- Click “Discover” the ST_LIFECYCLE_CLOSED is displayed in the information window.
- Enter the path for the root private key and root certificate
- Click Continue
- Select intrusive debug level2 (for the STM32CubeFW STiROT example, the secure user application is executed in HDPL2)
- Click execute
- The debug is open and the flash content can be read out.
- ! The debug remains open as long as you don’t perform a power-on reset.
- Reset the board (HW reset), black button of the discovery board.
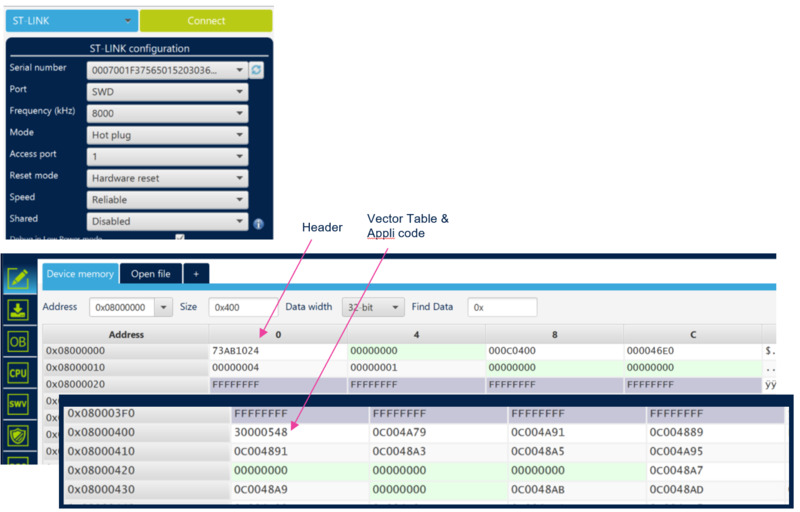
- STM32CubeProgrammer click connect, (crosscheck: access port 1; Hot plug).
- The flash content is now visible.
6.1.1. IDE attachment, read flash content, user application code execution with break point and code modification
6.1.1.1. Attach an IDE and read device memory content
- Disconnect STM32CubeProgrammer
- Open the IDE
- Reset the board (HW reset), black button on discovery board. To reopen the secure code, this one must be currently executed.
- If IAR is used:
- Select: Project -> Attach to running target
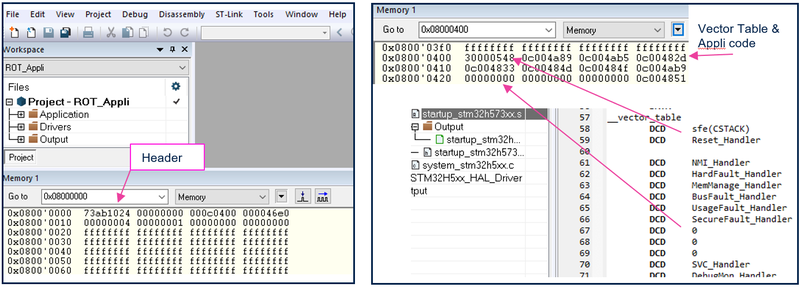
- Select: View Memory1 -> enter the flash address => flash content will be visible
6.1.1.2. Execute the user application and set a break point
- Open the main.c
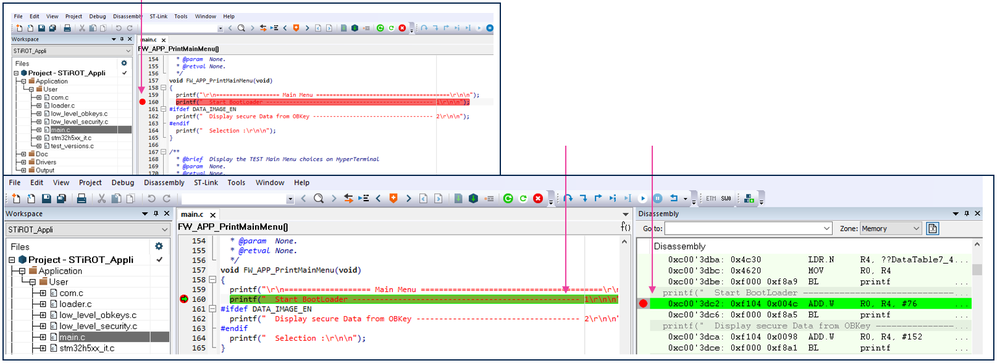
- Set a break point, perform a hardware reset (Discovery board black button), the execution will stop at the break point and the assembler code will also be visible.
(Click on the picture to view it in full screen)
6.1.1.3. User application modification and new compilation
It is possible to directly update the code and compile it using the IDE to generate a new image.
But since the device is set in a state different than OPEN, this modified user application can't be uploaded directly using the IDE.
It needs an encrypted and signed image (see section 2.1 and 2.2) to be uploaded in the download area (see section 3.2).
The authentication and encryption keys defined during the STiROT configuration (see section 1.1.1) needs to be used.
The STiROT will not install a firmware if the image has not been encrypted and signed with the provisioned keys.
How to upload and install a new user application code image is described in chapter 6.5.
To modify the user application and generate a new image, proceed as following:
- Make a modification in the code; for instance add “test” in one printf as shown in the figure below.
- Recompile the application, a new code image will be generated automatically through the postbuild command.
- Close IAR
6.1.2. Close the debugger performing a power-on reset
- In STM323CubeProgrammer click on "Discover", the Life Cycle indicates that the debug is still open
- Disconnect/reconnect the USB cable. A power-on reset will close again the debugger
- Click again on "Discover", the indicated Life Cycle is "CLOSED"
6.1.3. Upload the new image using the bootloader
- Connect the teraterm and execute the application installed previously
- Selecting "1" in the menu will launch the bootloader
- Disconnect Teraterm (advised but only need if UART connection is used) and launch STM32CubeProgrammer
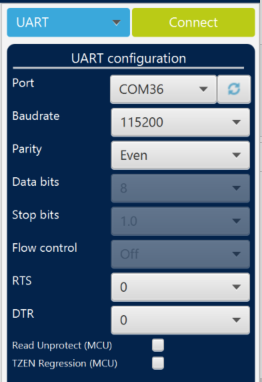
- Connect the board via UART on STM32CubeProgrammer without performing any reset or power OFF power ON (don't disconnect the board from your laptop).
- In STM32CubeProgrammer, select the
 “Erasing & Programming” tab.
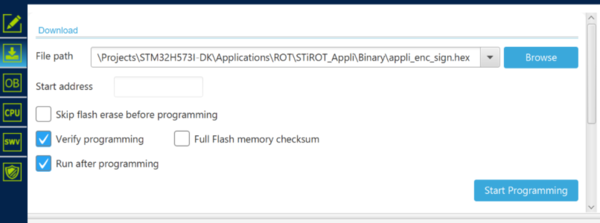
 - Click on "Browse" and select the path location of the new encrypted and signed user application code
- Click Start Programming.
- Disconnect STM32CubeProgrammer.
- Perform a HW reset (black button), the STiROT is executed, detects a new image in the download area and install it (after authentication and integrity verification)
- Connect the Teraterm
- Reset the board (black button), the new application is executed and displayed by the Teraterm
6.2. How to generate a certificate chain
The previous sections explains how to use the configured permissions for the owner of the root key and the root certificate.
How to give different permissions to an OEM or to the field can be solved using a certificate chain.
This section explains how to generate a certificates chain using STM32 Trusted Package Creator (TPC).
6.2.1. Root certificate
- Select STM32H5 and ROOT
- Enter the path for the private key, the public root key and where the certificate will be stored (overwrite the default stored certificate)
- Set the permission mask for the ROOT certificate. Setting 1 will give the permission.
The STiROT example described in this tutorial is for a full secure user application code, so the non-secure debug is not applicable (no difference if selected or not)
- Click "Generate Certificate"
(Click on the picture to view it in full screen)
Note:
- Permissions set as not allowed for the SOC mask (see section 1.2 and figure 10) are also not allowed using this new root certificate. (Even if the new certificate has set it as allowed).
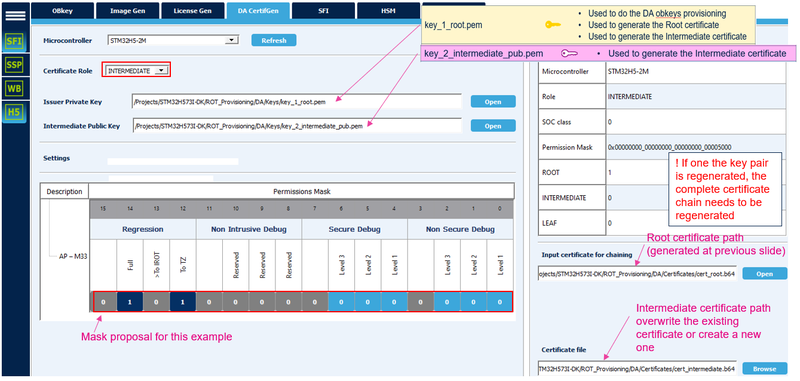
6.2.2. Intermediate certificate
The principle is that the owner of the root key defines the permission for the owner of the intermediate key.
- The owner of the root key receives the public key of the intermediate.
- The owner of the root key generates the intermediate certificate, in the following way:
- Select INTERMEDIATE and enter the path for the private root key and the intermediate public keys
- Set the permission mask for the INTERMEDIATE certificate
- Enter the path to the root certification (cert_root.b64)
- Enter the path to the intermediate certificate for replace (cert_intermediate.b64)
- Click: "Generate Certificate"
Note:
- Every permission set as not allowed for the SOC mask or not allowed for the root certificate will also be not allowed for the intermediate certificate, even if the intermediate certificate set it as allowed. In other word a certificate in the chain can only define equal or less permission than the previous certificate of the chain.
In this tutorial, one intermediate certificate is used. But the same steps can be done several time to add several intermediate certificates, each with his own key pair and permission mask.
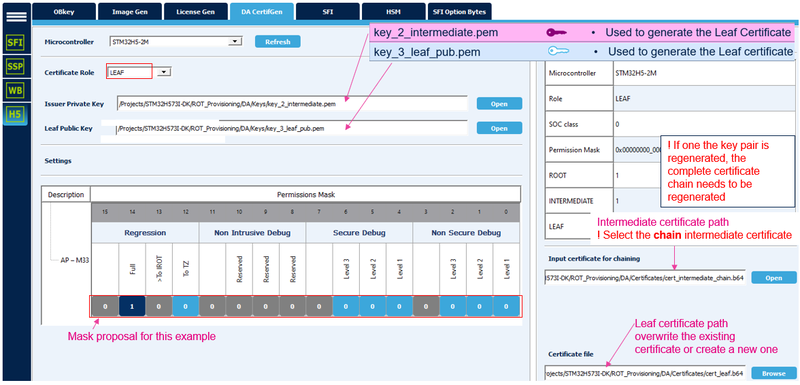
6.2.3. Leaf certificate
The principle is that the owner of intermediate private key defines the permission for the owner of the private leaf key.
- The owner of the intermediate private key receives the public key of the leaf.
- The owner of the intermediate private key generates the leaf certificate, in the following way:
- Select LEAF and enter the path for the private intermediate key and for the public leaf key
- Set the permission mask for the LEAF certificate
- Click: "Generate Certificate"
Note:
- The LEAF certificate can have equal or less permission than the intermediate certificate chained with the LEAF. In other words the permission of the leaf certificate is the result of the permission of all the masks (if one permission is not allowed in one of the mask it is also not allowed for the leaf certificate).
- This certificate is the last of the certificate chain
A debug authentication can be performed using the root certificate and related private key (as shown in section 6.1) or using the leaf certificate and related private key (as shown in next section).
6.3. Full regression using the leaf key and certificate chain
The goal of this last part is to show that the owner of the leaf private key and related certificate can only perform a full regression as defined during the certificate chain configuration.
- Select “Debug Authentication” in STM32CubeProgrammer
- Click “Discover” the information window will be filled
- Enter the path for the leaf private key and leaf chain certificate
- Click Continue
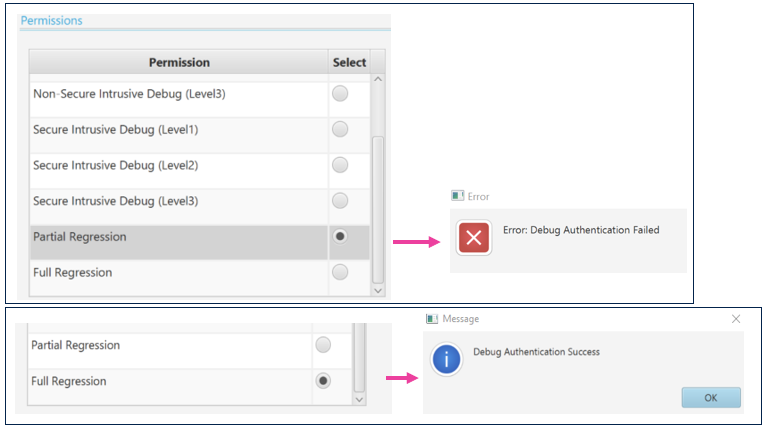
- Select partial regression -> click Execute
- Reminder: the permission is the aggregation of the complete certification chain, so the least permission (for instance, if the partial regression is not allowed in one of the mask of the certificates chain, the partial regression is not performed, and an error message is displayed (even if the leaf certificate allows it)
- An error message is displayed since the partial regression is not set as allowed by the leaf mask during the certificate chain generation (only a full regression allowed) (see figure below)
- Select full regression -> click Execute
- STM32CubeProgrammer shows that the user flash is erase and that the device is set back in "OPEN" state
- Note: a regression will not be possible anymore if regenerated key(s) or certificate are lost. So, it is advised to make a full regression after completion of a tutorial.
