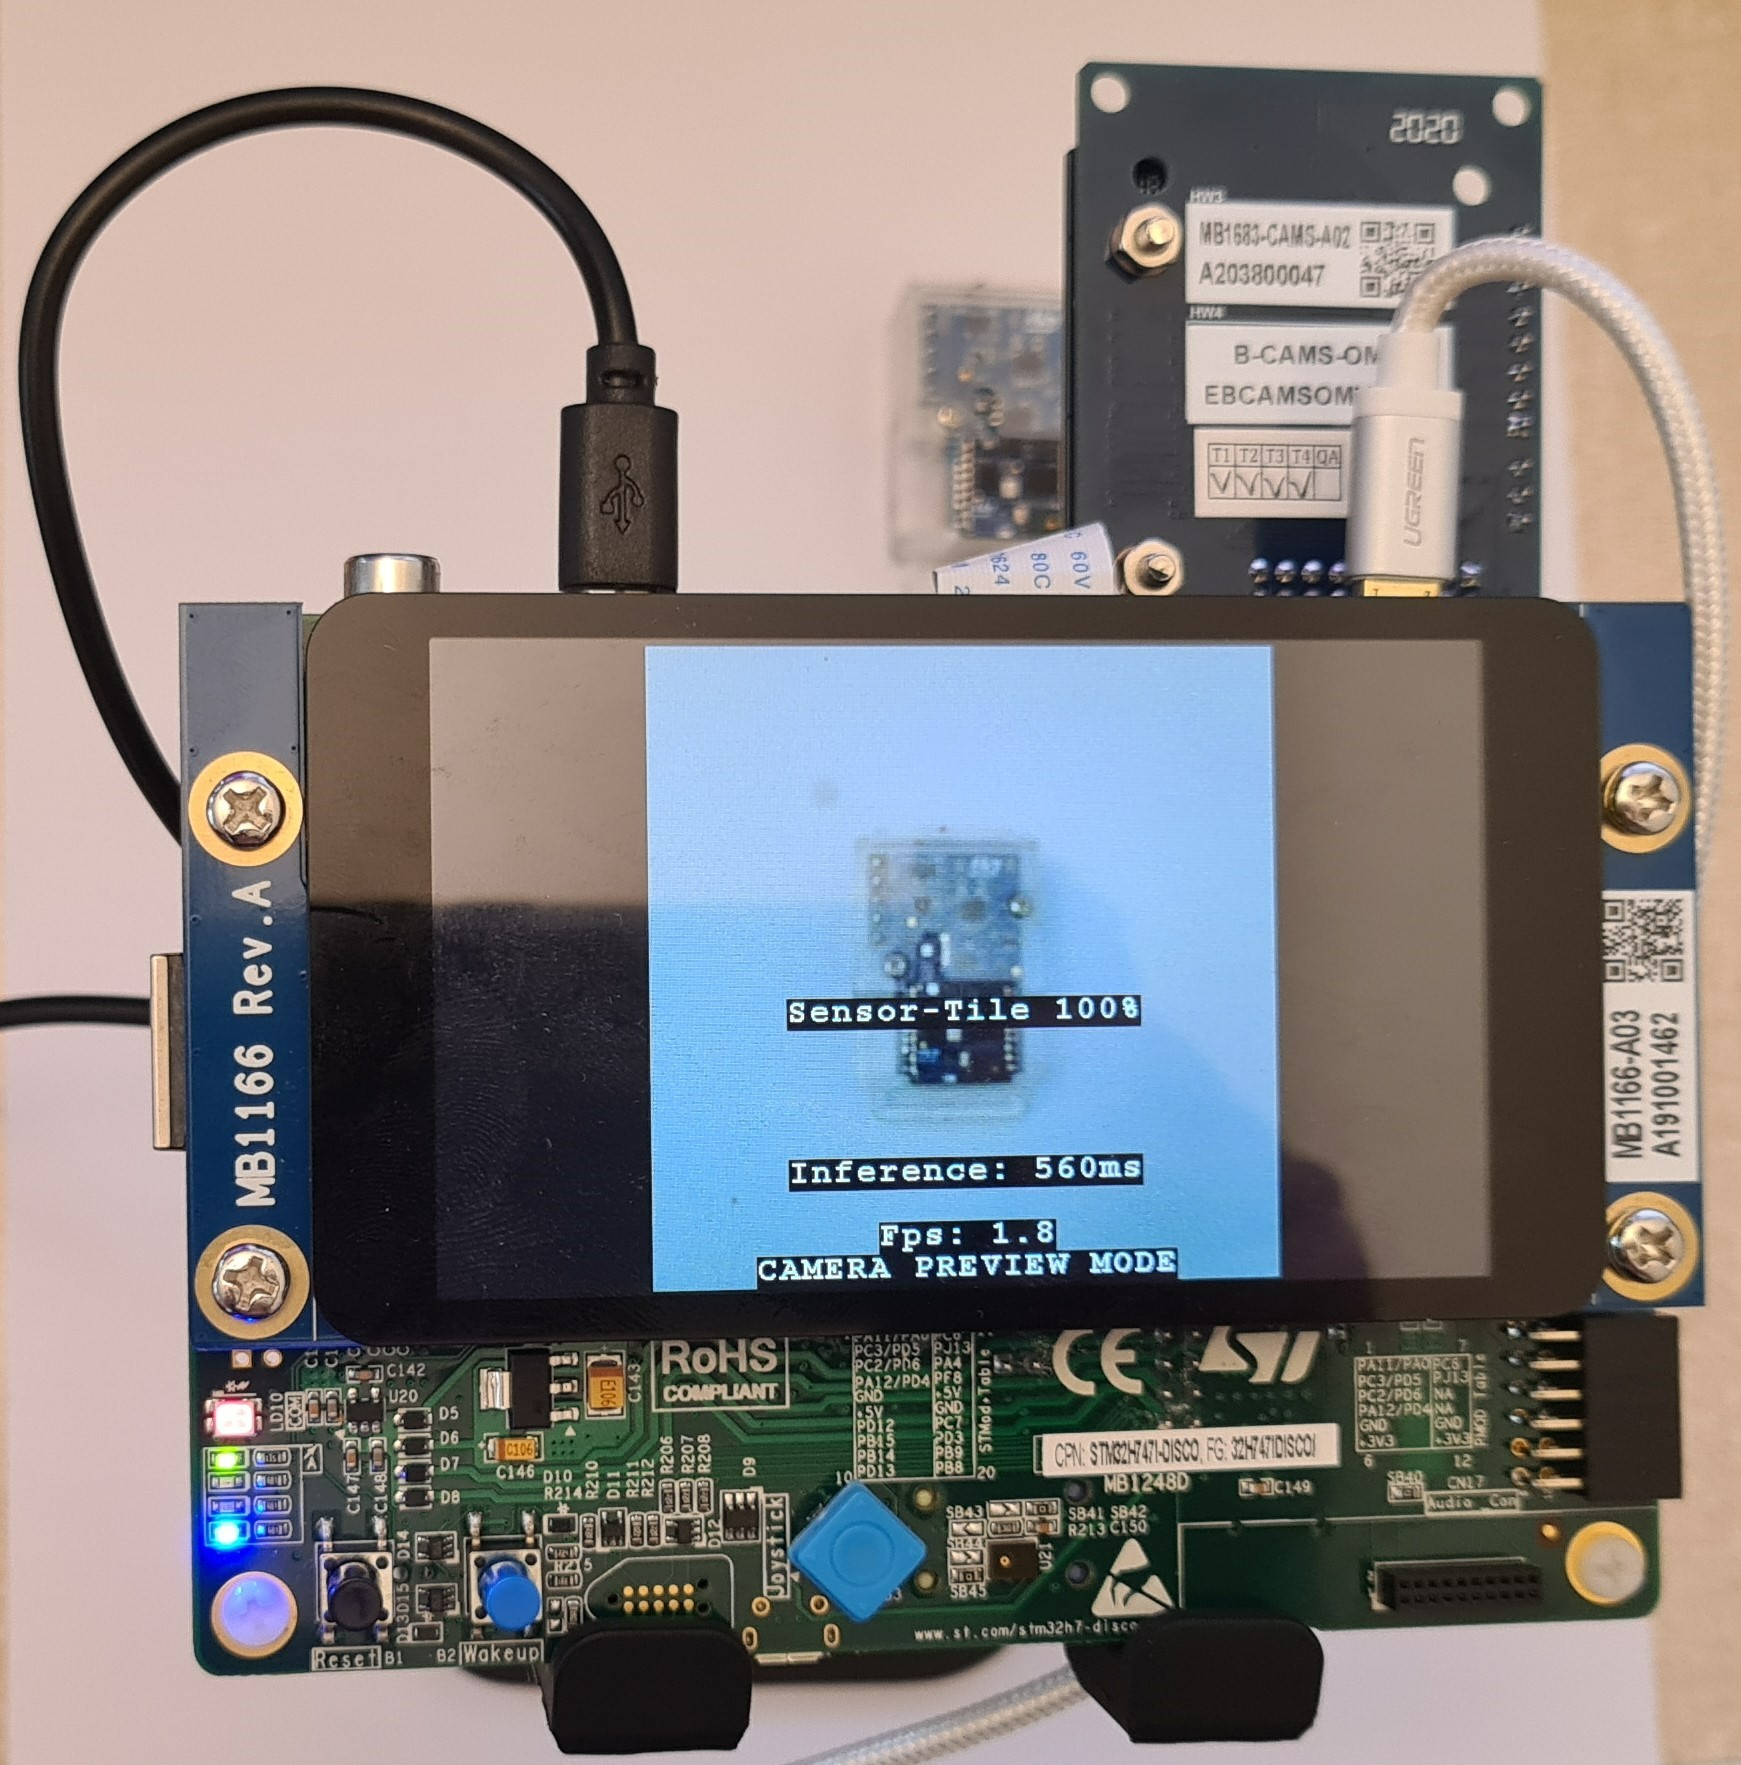
This article shows how to use the Teachable Machine online tool with STM32Cube.AI through the STM32 Model Zoo to create an image classifier running on the STM32H747I-DISCO board.
This tutorial is divided into two parts: the first part shows how to use the Teachable Machine to train and export a deep learning model. The last part explains how to deploy this new model using the STM32 Model Zoo and perform live inference on an STM32 board with a camera. The whole process is described below:
1. Prerequisites
1.1. Hardware
- STM32H747I-DISCO Discovery kit
- B-CAMS-OMV Flexible Camera Adapter board
- A Micro-USB to USB cable
- Optional: a webcam
1.2. Software
- STM32CubeIDE
- X-CUBE-AI
- STM32CubeProgrammer (STM32CubeProg)
- ST Model Zoo Version 2
2. Training a model using Teachable Machine
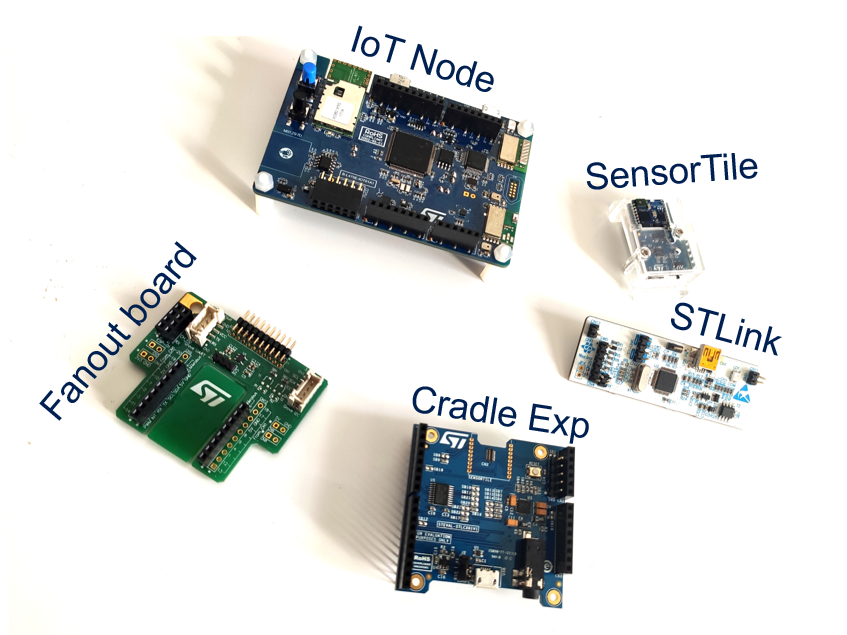
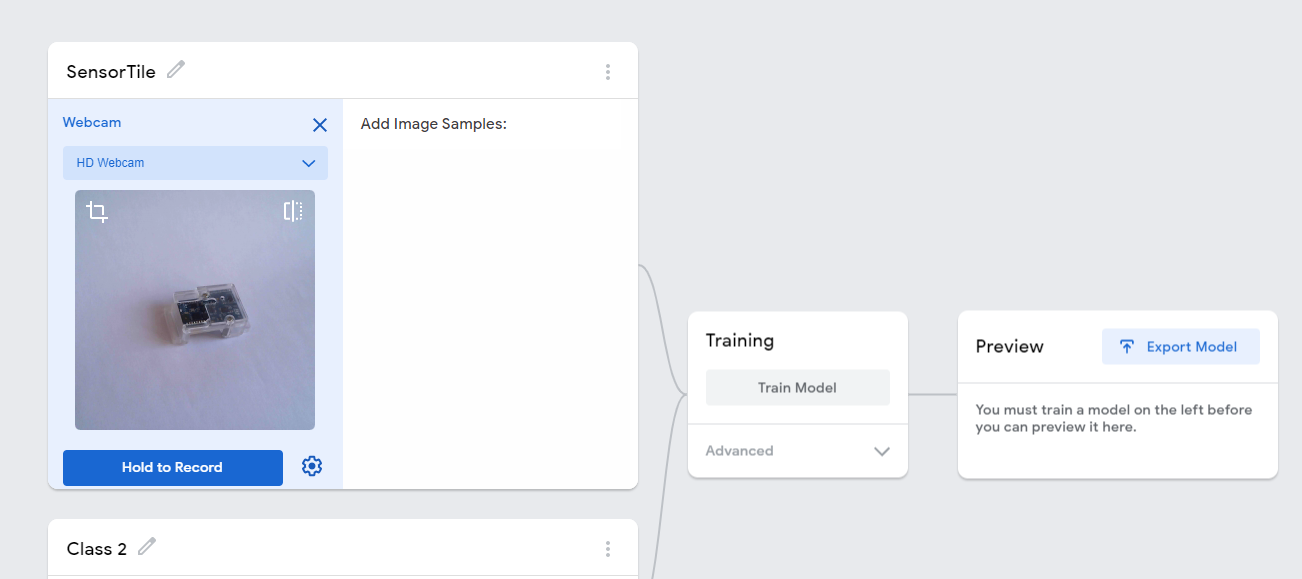
In this section, we will train deep neural network in the browser using Teachable Machine. We first need to choose something to classify. In this example, we will classify ST boards and modules. The chosen boards are shown in the figure below:
You can choose whatever object you want to classify it: fruits, pasta, animals, people, and others.
Let's get started. Open https://teachablemachine.withgoogle.com/, preferably from Chrome browser.
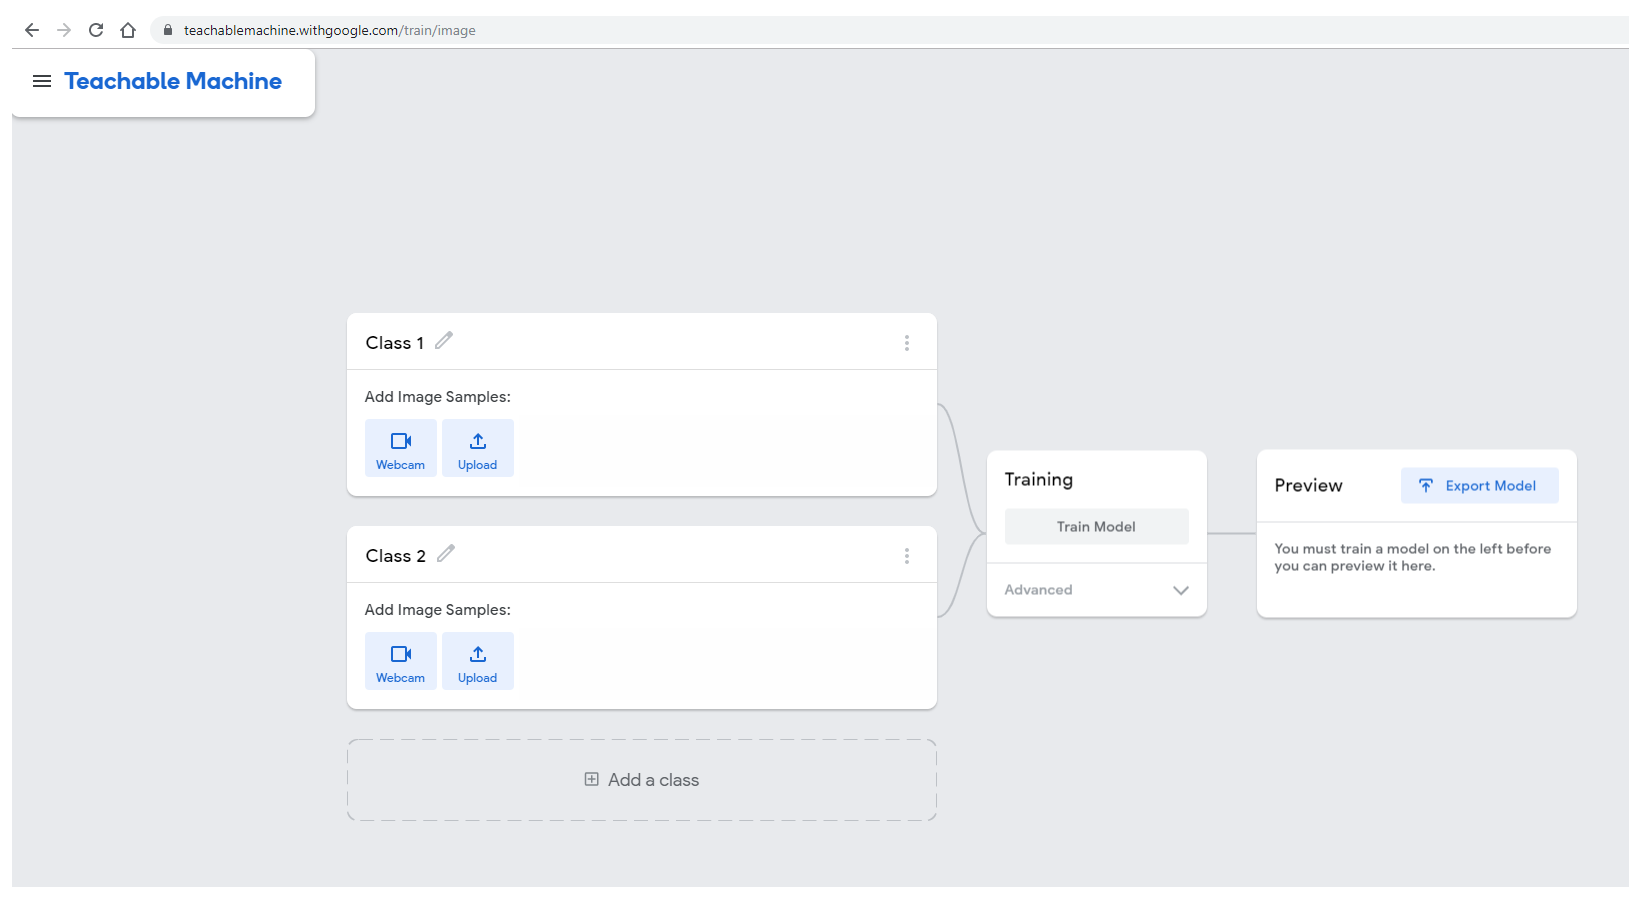
Click Get started, then select Image Project, then Standard image model (224x244px color images). You will be presented with the following interface.
2.1. Adding training data
For each category you want to classify, edit the class name by clicking the pencil icon. In this example, we choose to start with SensorTile.
To add images with your webcam, click the webcam icon and record some images. If you have image files on your computer, click upload and select the directory containing your images.
The STM32H747 discovery kit combined with the B-CAMS-OMV camera daughter board can be used as a USB webcam. Using the ST kit for data collection will help to get better results as the same camera will be used for data collection and inference when the model will have been trained.
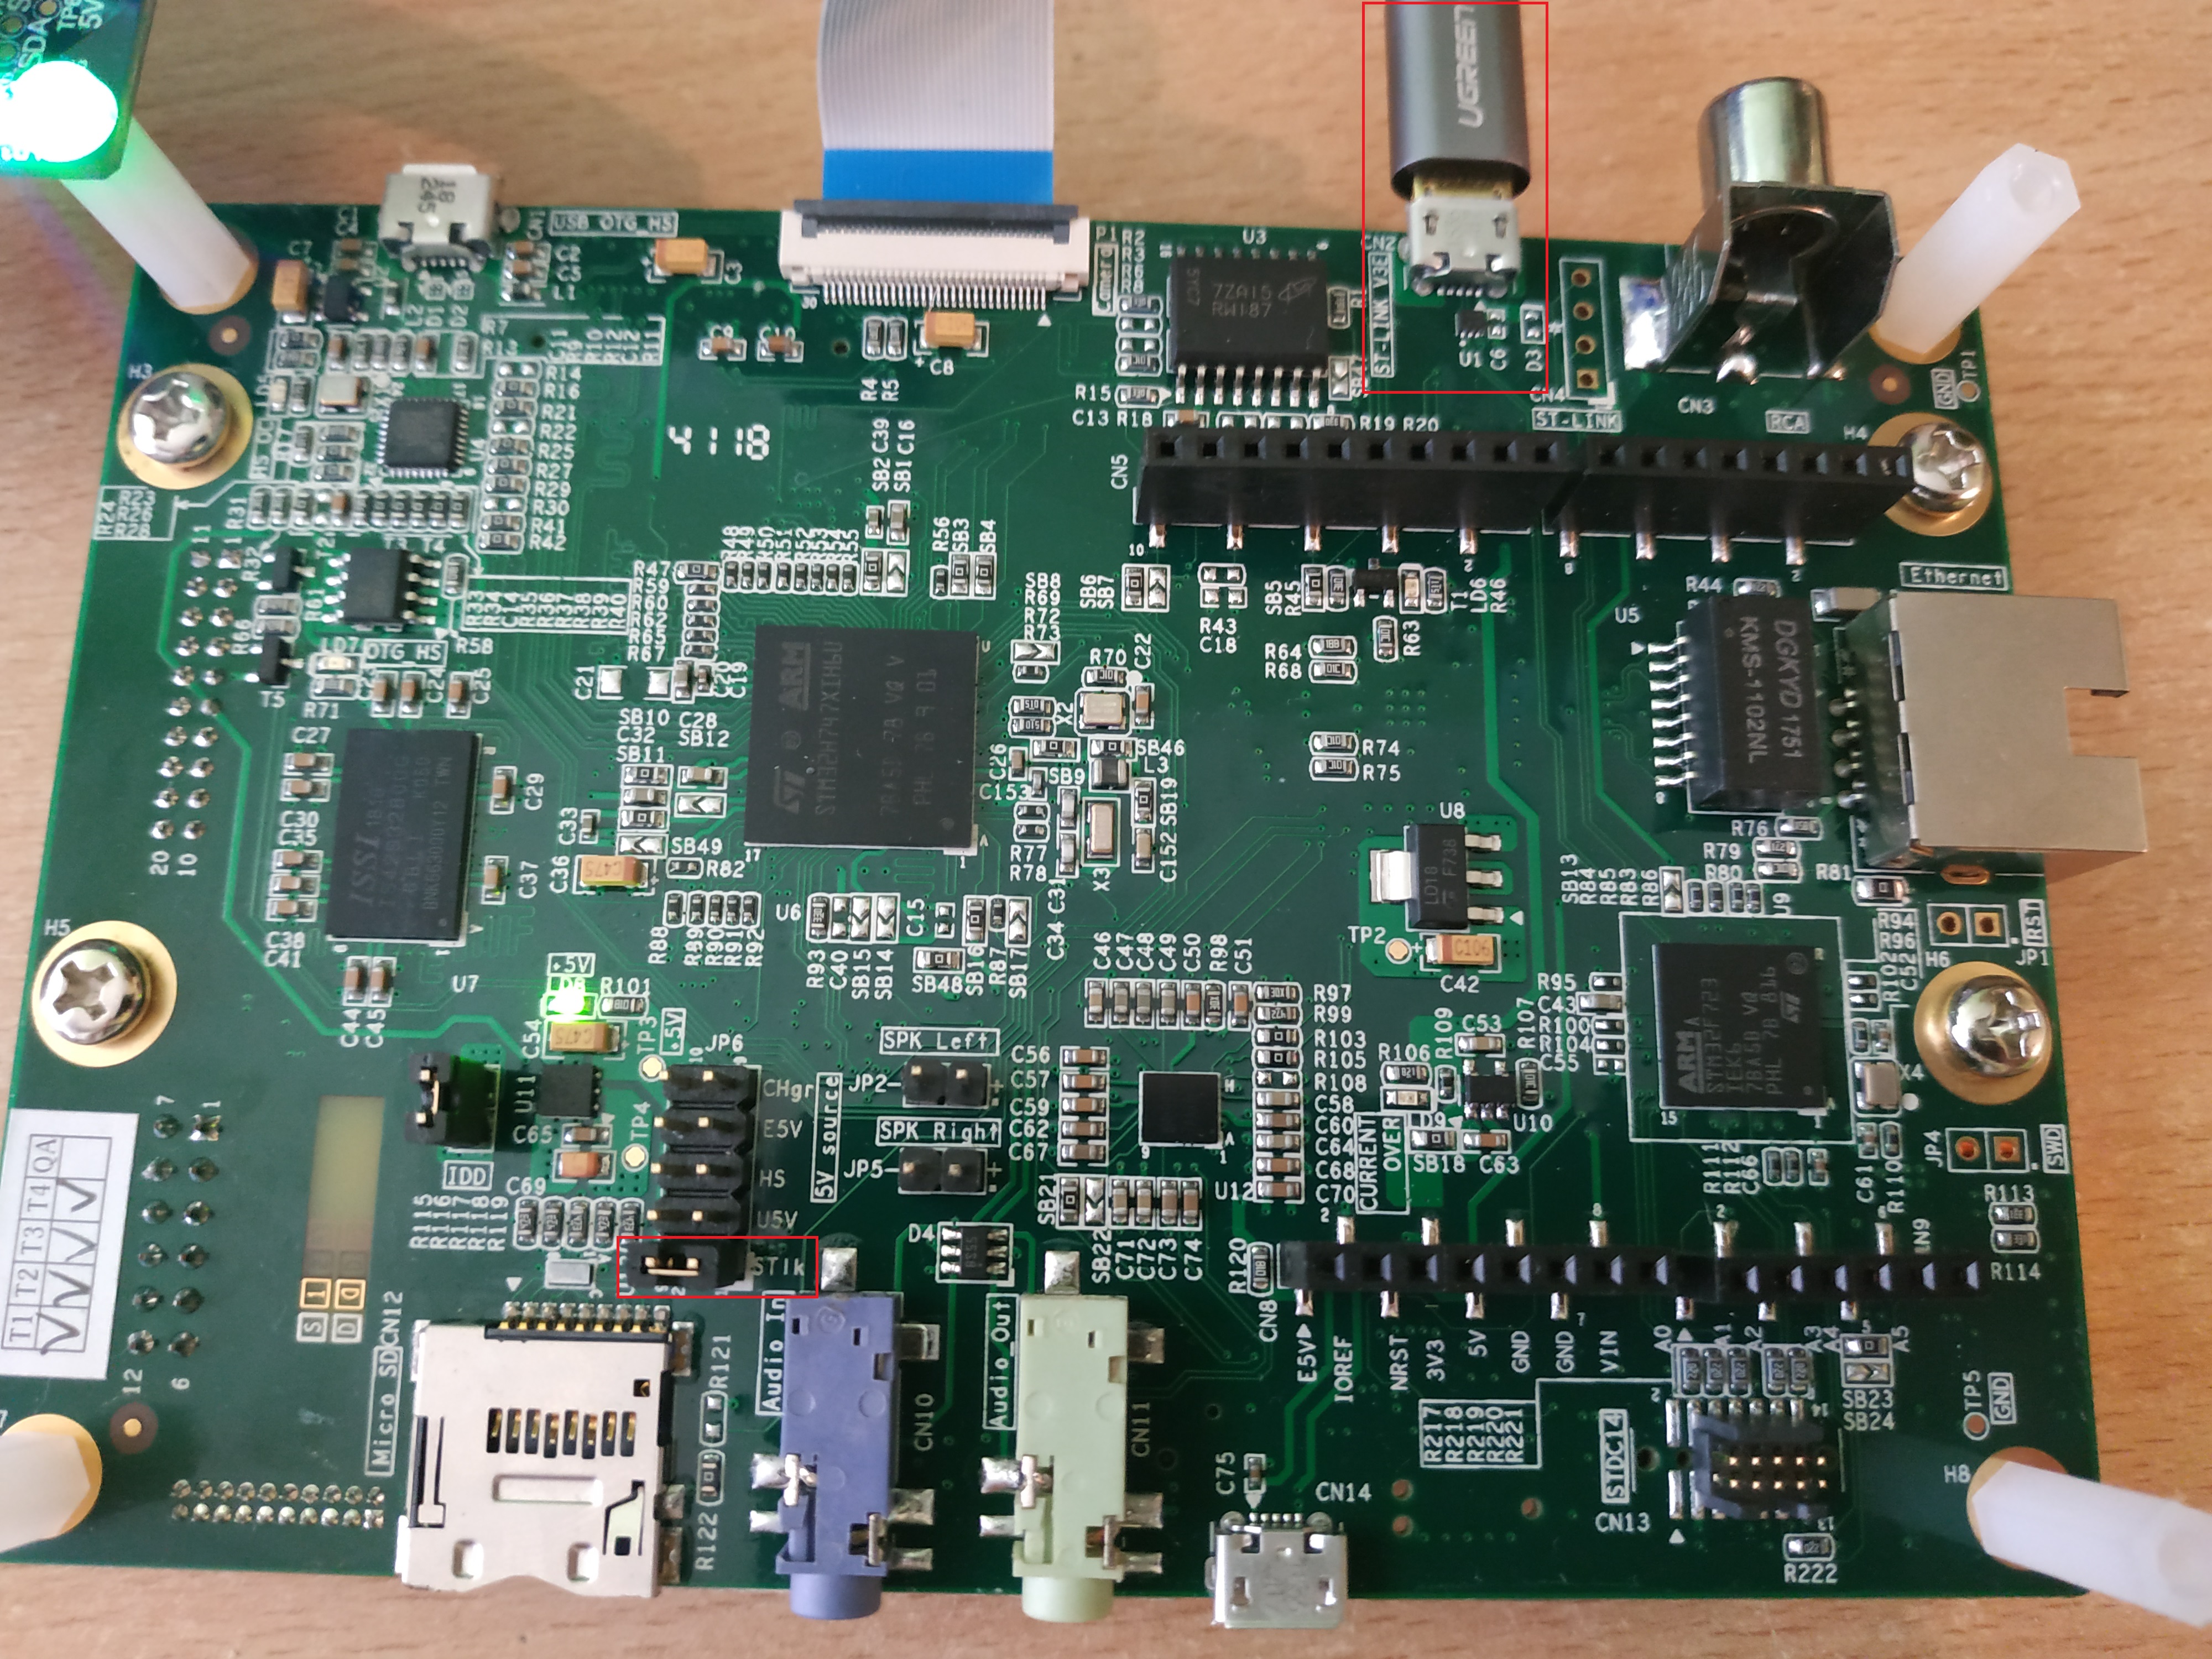
To use the ST kit as a webcam, simply program the board with the following binary of the STMicroelectronics Github repository. First plug your board onto your computer using the ST-LINK port. Make sure the JP6 jumper is set to ST-LINK.
After plugging the USB cable onto your computer, the board appears as a mounted device.
Download the repository through USB Webcam application.
The binary is located under x-cube-wecam/Binary/STM32H747I-DISCO_Webcam.bin.
Drag and drop the binary file onto the board mounted device. This flashes the binary on the board.
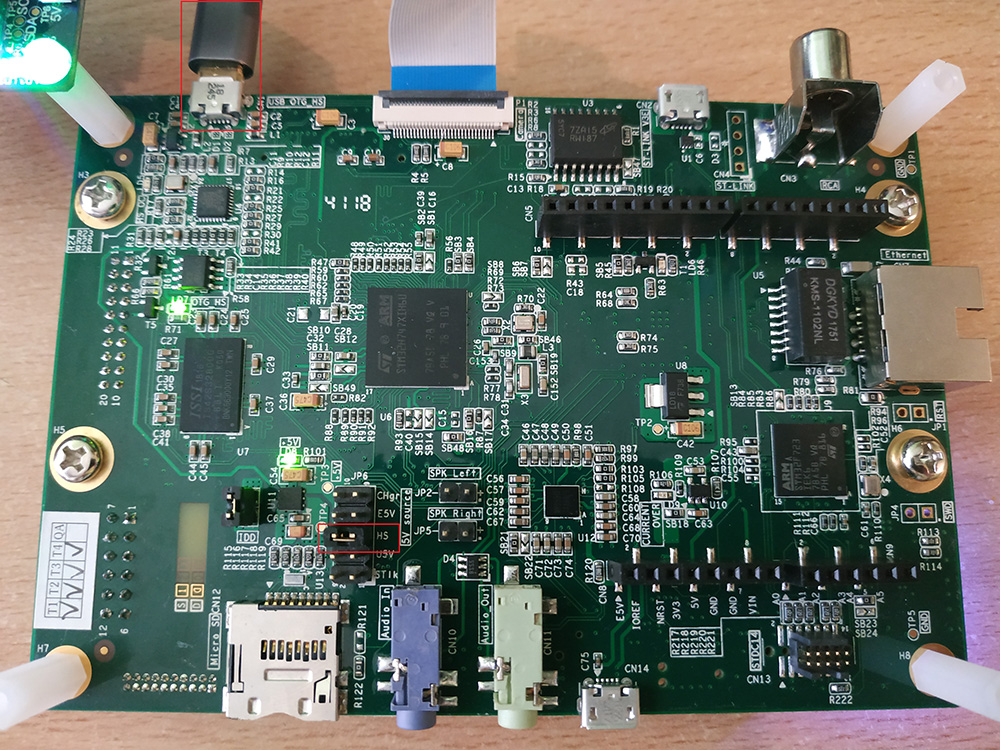
Unplug the board, change the JP6 jumper to the HS position, and plug your board using the USB OTG port.
For convenience, you can plug simply two USB cables, one on the USB OTG port, the other on the USB ST-LINK and set the JP6 jumper to ST-LINK. In this case, the board can be programmed and switch from USB webcam mode to test mode without the need to change the jumper position.
Depending on how you oriented the camera board, you might prefer to flip the image. If you do so you need to use the same option when generating the code on STM32.
Once you have a satisfactory amount of images for this class, repeat the process for the next one until your dataset is complete. Note the class order which you train your model with, you will need to apply names in the same order during the deployment.
2.2. Training the model
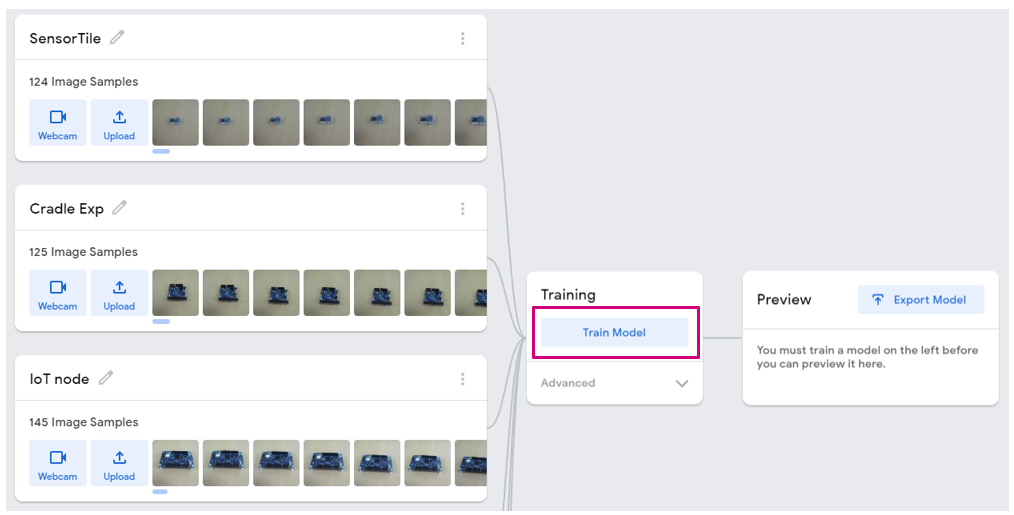
Now that we have a good amount of data, we are going to train a deep learning model for classifying these different objects. To do this, click the Train Model button as shown below:
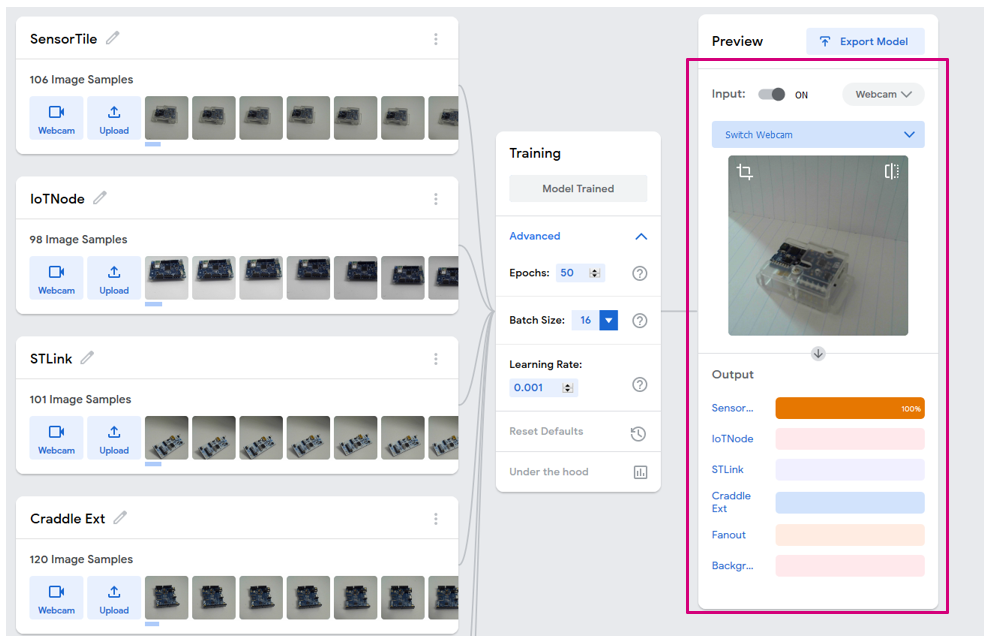
This process can take a while, depending on the amount of data you have. To monitor the training progress, you can select Advanced and click Under the hood. A side panel displays training metrics.
When the training is complete, you can see the predictions of your network on the "Preview" panel. You can either choose a webcam input or an imported file.
2.2.1. What happens under the hood (for the curious)
Teachable Machine is based on Tensorflow.js to allow neural network training and inference in the browser. However, as image classification is a task that requires a lot of training time, Teachable Machine uses a technique called transfer learning: The webpage downloads a MobileNetV2 model that was previously trained on a big image dataset of 1000 categories. The convolution layers of this pre-trained model are very good at doing feature extraction so they do not need to be trained again. Only the last layers of the neural network are trained using Tensorflow.js, thus saving a lot of time.
2.3. Exporting the model
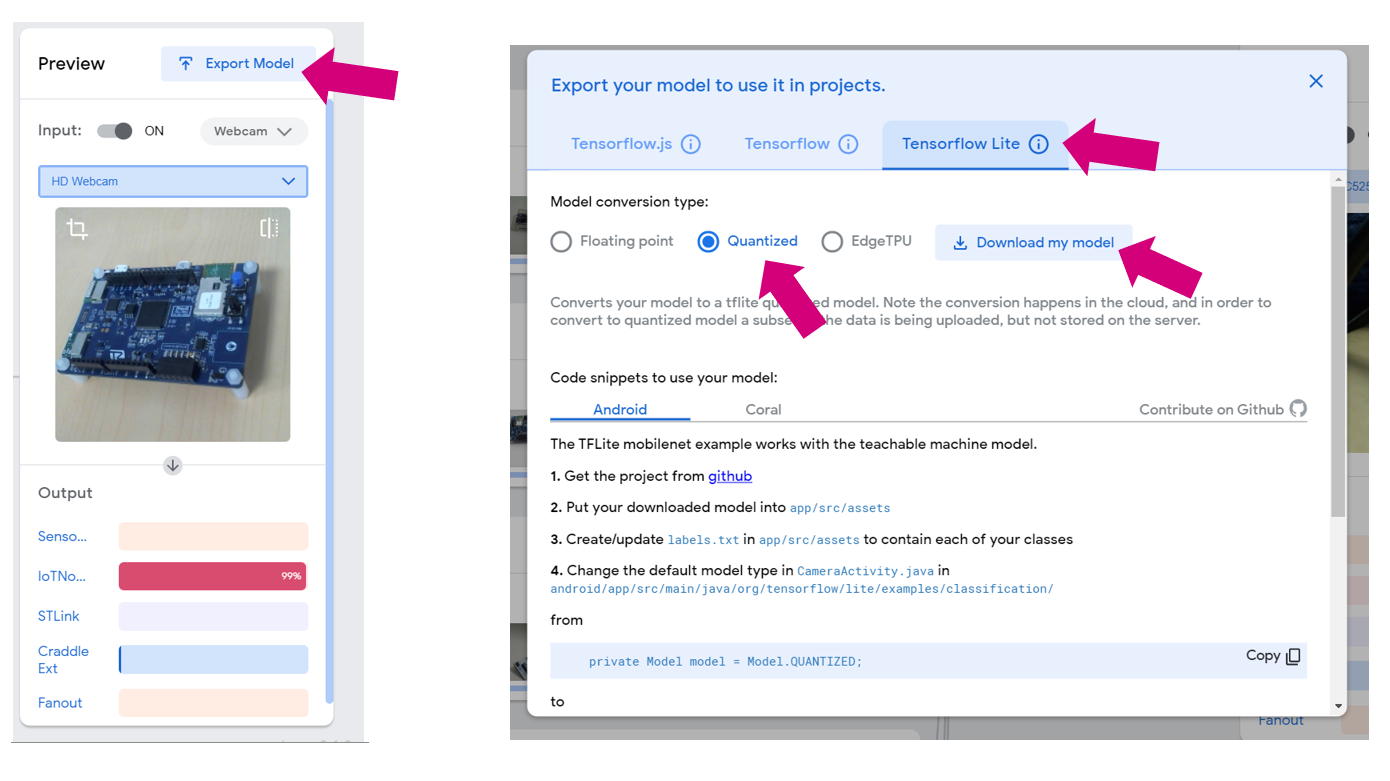
If you are happy with your model, it is time to export it. To do so, click the Export Model button. In the pop-up window, select Tensorflow Lite, check Quantized and click Download my model.
Since the model conversion is done in the cloud, this step can take a few minutes.
Your browser downloads a zip file containing the model as a .tflite file and a .txt file containing your label. Extract these two files in an empty directory that we will call workspace in the rest of this tutorial.
2.3.1. Inspecting the model using Netron (optional)
It is always interesting to take a look at a model architecture as well as its input and output formats and shapes. To do this, use the Netron webapp.
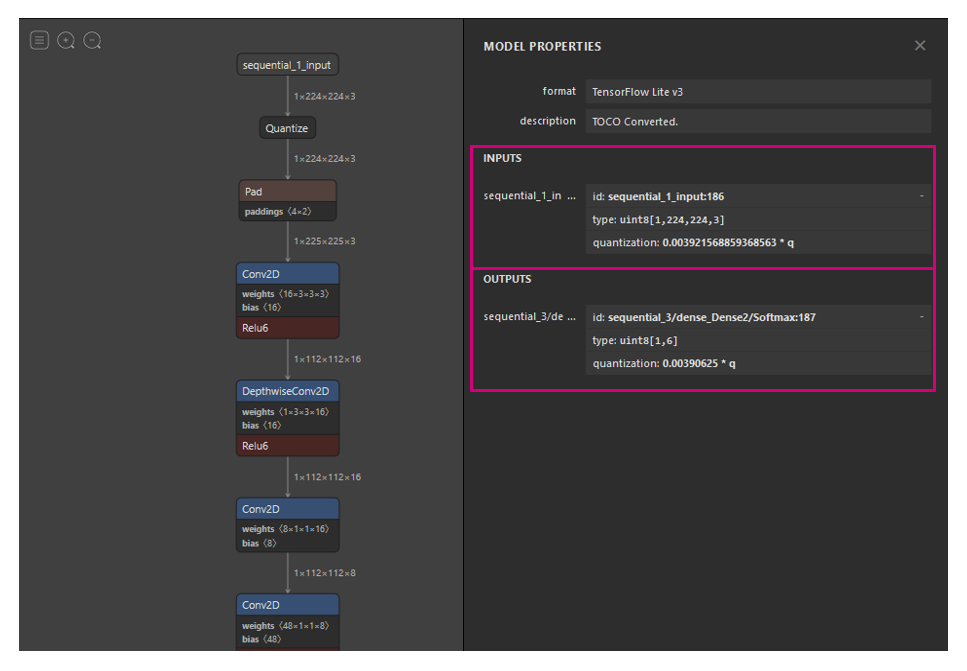
Visit https://lutzroeder.github.io/netron/ and select Open model, then choose the model.tflite file from Teachable Machine. Click sequental_1_input: we observe that the input is of type uint8 and of size [1, 244, 244, 3]. Now let's look at the outputs: in this example we have 6 classes, so we see that the output shape is [1,6]. The quantization parameters are also reported. Refer to part 3 for how to use them.
3. Porting to a target STM32H747I-DISCO
In this chapter, the user deploys its application on target through the STM32 Model Zoo.
The ST Model Zoo is a collection of pre-trained machine learning models and a set of tools which aims at enabling the ST Customers to easily implement AI on STM32 MCUs. It is available through Github at https://github.com/STMicroelectronics/stm32ai-modelzoo.
Download the Model Zoo. We will reference the path to your installatio.n by %MODEL_ZOO_DIR%. In the root of %MODEL_ZOO_DIR% you will find the README.MD file which will describe extensively the structure of the Zoo. For the purpose of the current deployment on STM32, we will focus on the bare minimum for this activity.
The Zoo is written in Python programming language compatible with its version 3.9 or 3.10. Download and Install Python. It also requires a set of additional Python packages enumerated in the file "requirements.txt".
pip install -r requirements.txt
The Zoo is organized by AI Use Cases. With Teachable Machine, we have trained a model for Image Classification.
cd %MODEL_ZOO_DIR%\image_classification.
In this directory you will have access to various models of image classification and scripts to manipulate them. The scripts are located in the src directory
cd src
The main entry point for image classification is stm32ai_main.py. The actions executed by the script are described in a configuration file. There are many config files example standing in the config_file_examples directory.
We will deploy our model on the board, therefore we will select the config_file_examples/deployment_config.yaml and edit it.
For this activity the model zoo will perform a succession of action on your behalf:
- Transforming your quantized Model to C Code that will efficiently run on STM32;
- Integrate this library into an already existing image classification application:
- Compile the binary and generate the firmware for the STM32H747I-DISCO:
- Flash the board;
- Run the application.
The configuration of the deployment of the Model Zoo is performed by editing the script config_file_examples/deployment_config.yaml standing in this directory. The README.MD file describes all the possible configurations into details. For the purpose of this documentation we will go strait to the required changes.
3.1. Configuring the conversion from model description to C Code
There is two way to convert a TensorflowLite model to optimized C code for STM32 usage :
- STM32Cube.AI Developer Cloud : an online platform and services allowing the creation, optimization, benchmarking, and generation of AI for the STM32 microcontrollers.
- STM32Cube X-Cube-AI package : A CubeMX package similar to STM32Cube.AI Developer Cloud but offline and integrated into CubeMX.
3.1.1. STM32Cube.AI Developer Cloud
In the config_file_examples/deployment_config.yaml configuration file in the keys tools/stm32ai, the key on_cloud is set to True.
tools:
    stm32ai:
      version: 8.1.0
      optimization: balanced
      on_cloud: True
Prepare your ST website credentials. You are asked for them during the deployment using the developer cloud.
3.1.2. X-CUBE-AI
Alternatively to the developer cloud, on local installation of X-Cube-AI can be used. The X-CUBE-AI is installed from STM32Cube-MX by default, on a Windows environment it is therefore located into:
- C:/Users\<USERNAME>/STM32Cube/Repository
If we assume that we are using its version 8.1.0, the base directory would be:
- C:/Users/<USERNAME>/STM32Cube/Repository/Packs/STMicroelectronics/X-CUBE-AI/8.1.0
Inside the package, since we are running a Microsoft Windows computer, the path to the STM32Cube.AI executable is :
- C:/Users/<USERNAME>/STM32Cube/Repository/Packs/STMicroelectronics/X-CUBE-AI/8.1.0/Utilities/windows/stm32ai.exe
For X-CUBE-AI version 9.0 and above, the executable is named stedgeai.exe instead of stm32ai.exe', so the path to the executable is:
- C:/Users/<USERNAME>/STM32Cube/Repository/Packs/STMicroelectronics/X-CUBE-AI/9.0.0/Utilities/windows/stedgeai.exe
Inside the Model Zoo, in the config_file_examples/deployment_config.yaml file, move the value of STM32AI_PATH in the stm32ai key :
tools:
   stm32ai:
      version: 8.1.0
      optimization: balanced
      on_cloud: False
      path_to_stm32ai: C:/Users/<USERNAME>/STM32Cube/Repository/Packs/STMicroelectronics/X-CUBE-AI/<*.*.*>/Utilities/windows/stm32ai.exe
3.2. Compiler Configuration
Whatever alternative you choose for the conversion of the AI model to C code, this code will be compile. The STM32 model zoo requires STM32CubeIDE to build the application for the board. The key path_to_stm32ai must be set for the this purpose :
- On MS Windows the path looks like : C:/ST/STM32CubeIDE_X.XX.X/STM32CubeIDE/stm32cubeide.exe, where X stands for the version number of the IDE.
- On Linux the typical path is : /opt/st/STM32CubeIDE_X.XX.X/stm32cubeide
tools:
   ...
   path_to_cubeIDE: C:/ST/STM32CubeIDE_1.15.1/STM32CubeIDE/stm32cubeide.exe
3.3. Using your own model
Again in the config_file_examples/deployment_config.yaml file in the following section but the path of the model that you exported from teachable machine.
general:
   model_path: path_to_the_model
3.4. Naming the class for the Application Display
Still in config_file_examples/deployment_config.yaml update this key with your own class names :
dataset:
   class_names: [SensorTile, IoTNode, STLink, Craddle_Ext, Fanout, Background]
3.5. Cropping the image
Teachable Machine crops the webcam image to fit the model input size. In deployment application of the model zoo, by default the image is resized to the model input size, hence losing the aspect ratio. We will change this default behavior and implement a crop of the camera image. Still in config_file_examples/deployment_config.yaml update this key :
preprocessing:
   rescaling:
      scale: 1/127.5
      offset: -1
   resizing:
      interpolation: nearest
      aspect_ratio: crop
   color_mode: rgb
3.6. Deployment
To deploy your new model on target, the model zoo is going to program the board. First plug your board onto your computer using the ST-LINK port. Make sure the JP6 jumper is set to ST-LINK.
Then you can start the deployment by :
$> python stm32ai_main.py --config-path ./config_file_examples/ --config-name deployment_config.yaml
The expected output is :
[INFO] : Running `deployment` operation mode
The random seed for this simulation is 123
[INFO] : Generating C header file for Getting Started...
[I] loading model.. model_path="C:/Users/vanhaele/my_tree/project/teachable_machine/model/model.tflite"
[I] loading conf file.. "../../stm32ai_application_code/image_classification/stmaic_STM32H747I-DISCO.conf" config=""
[I] "cm7.release" configuration is used
[INFO] : Selected board :  "STM32H747I-DISCO Getting Started Image Classification (STM32CubeIDE)" (stm32_cube_ide/cm7.release/stm32h7)
[INFO] : Compiling the model and generating optimized C code + Lib/Inc files:  C:/Users/vanhaele/my_tree/project/teachable_machine/model/model.tflite
[INFO] : Establishing a connection to STM32Cube.AI Developer Cloud to launch the model benchmark on STM32 target...
[INFO] : To create an account, go to https://stm32ai-cs.st.com/home. Enter your credentials:
Username: username@domain.com
Password: **********
[INFO] : Successfully logged
[INFO] : Starting the model memory footprints estimation...
[INFO] : STM32Cube.AI version 8.1.0 used.
[I] setting STM.AI tools.. root_dir="", req_version=""
[INFO] Offline CubeAI used; Selected tools:  8.1.0 (x-cube-ai pack)
[INFO]: Dispatch activations in different ram pools to fit the large model
[I] compiling.. "model_tflite" session
[I]  model_path  : ['C:/Users/vanhaele/my_tree/project/teachable_machine/model/model.tflite']
[I]  tools       : 8.1.0 (x-cube-ai pack)
[I]  target      : "STM32H747I-DISCO Getting Started Image Classification (STM32CubeIDE)" (stm32_cube_ide/cm7.release/stm32h7)
[I]  options     : ../../stm32ai_application_code/image_classification/mempools_STM32H747I-DISCO.json
[I]  results -> RAM=703,660 IO=0:0 WEIGHTS=539,024 MACC=58,587,516 RT_RAM=34,068 RT_FLASH=113,488 LATENCY=0.000
[INFO]: Weights fit in internal flash
[INFO] : Optimized C code + Lib/Inc files generation done.
[INFO] : Building the STM32 c-project..
[I] deploying the c-project.. "STM32H747I-DISCO Getting Started Image Classification (STM32CubeIDE)" (stm32_cube_ide/cm7.release/stm32h7)
[I] updating.. cm7.release
[I]  -> s:copying file.. "network_config.h" to ..\..\stm32ai_application_code\image_classification\Application\Network\Inc\network_config.h
[I]  -> s:copying file.. "network.h" to ..\..\stm32ai_application_code\image_classification\Application\Network\Inc\network.h
[I]  -> s:copying file.. "network.c" to ..\..\stm32ai_application_code\image_classification\Application\Network\Src\network.c
[I]  -> s:copying file.. "network_data.h" to ..\..\stm32ai_application_code\image_classification\Application\Network\Inc\network_data.h
[I]  -> s:copying file.. "network_data.c" to ..\..\stm32ai_application_code\image_classification\Application\Network\Src\network_data.c
[I]  -> s:copying file.. "network_data_params.h" to ..\..\stm32ai_application_code\image_classification\Application\Network\Inc\network_data_params.h
[I]  -> s:copying file.. "network_data_params.c" to ..\..\stm32ai_application_code\image_classification\Application\Network\Src\network_data_params.c
[I]  -> s:copying file.. "network_generate_report.txt" to ..\..\stm32ai_application_code\image_classification\Application\Network\Src\network_generate_report.txt
[I]  -> s:removing dir.. ..\..\stm32ai_application_code\image_classification\Middlewares\ST\STM32_AI_Runtime\Lib
[I]  -> s:copying dir.. "Lib" to ..\..\stm32ai_application_code\image_classification\Middlewares\ST\STM32_AI_Runtime\Lib
[I]  -> s:removing dir.. ..\..\stm32ai_application_code\image_classification\Middlewares\ST\STM32_AI_Runtime\Inc
[I]  -> s:copying dir.. "Inc" to ..\..\stm32ai_application_code\image_classification\Middlewares\ST\STM32_AI_Runtime\Inc
[I]  -> u:copying file.. "ai_model_config.h" to ..\..\stm32ai_application_code\image_classification\Application\STM32H747I-DISCO\Inc\CM7\ai_model_config.h
[I]  -> updating cproject file "C:\Users\vanhaele\my_tree\project\teachable_machine\github\modelzoo-V2-github\stm32ai_application_code\image_classification\Application\STM32H747I-DISCO\STM32CubeIDE\CM7" with "NetworkRuntime810_CM7_GCC.a"
[I] building.. cm7.release
[I] flashing.. cm7.release ['STM32H747I-DISCO', 'DISCO-H747XI']
[INFO] : Deployment complete.
Your application is ready to play with.
4. STMicroelectronics references
See also:

