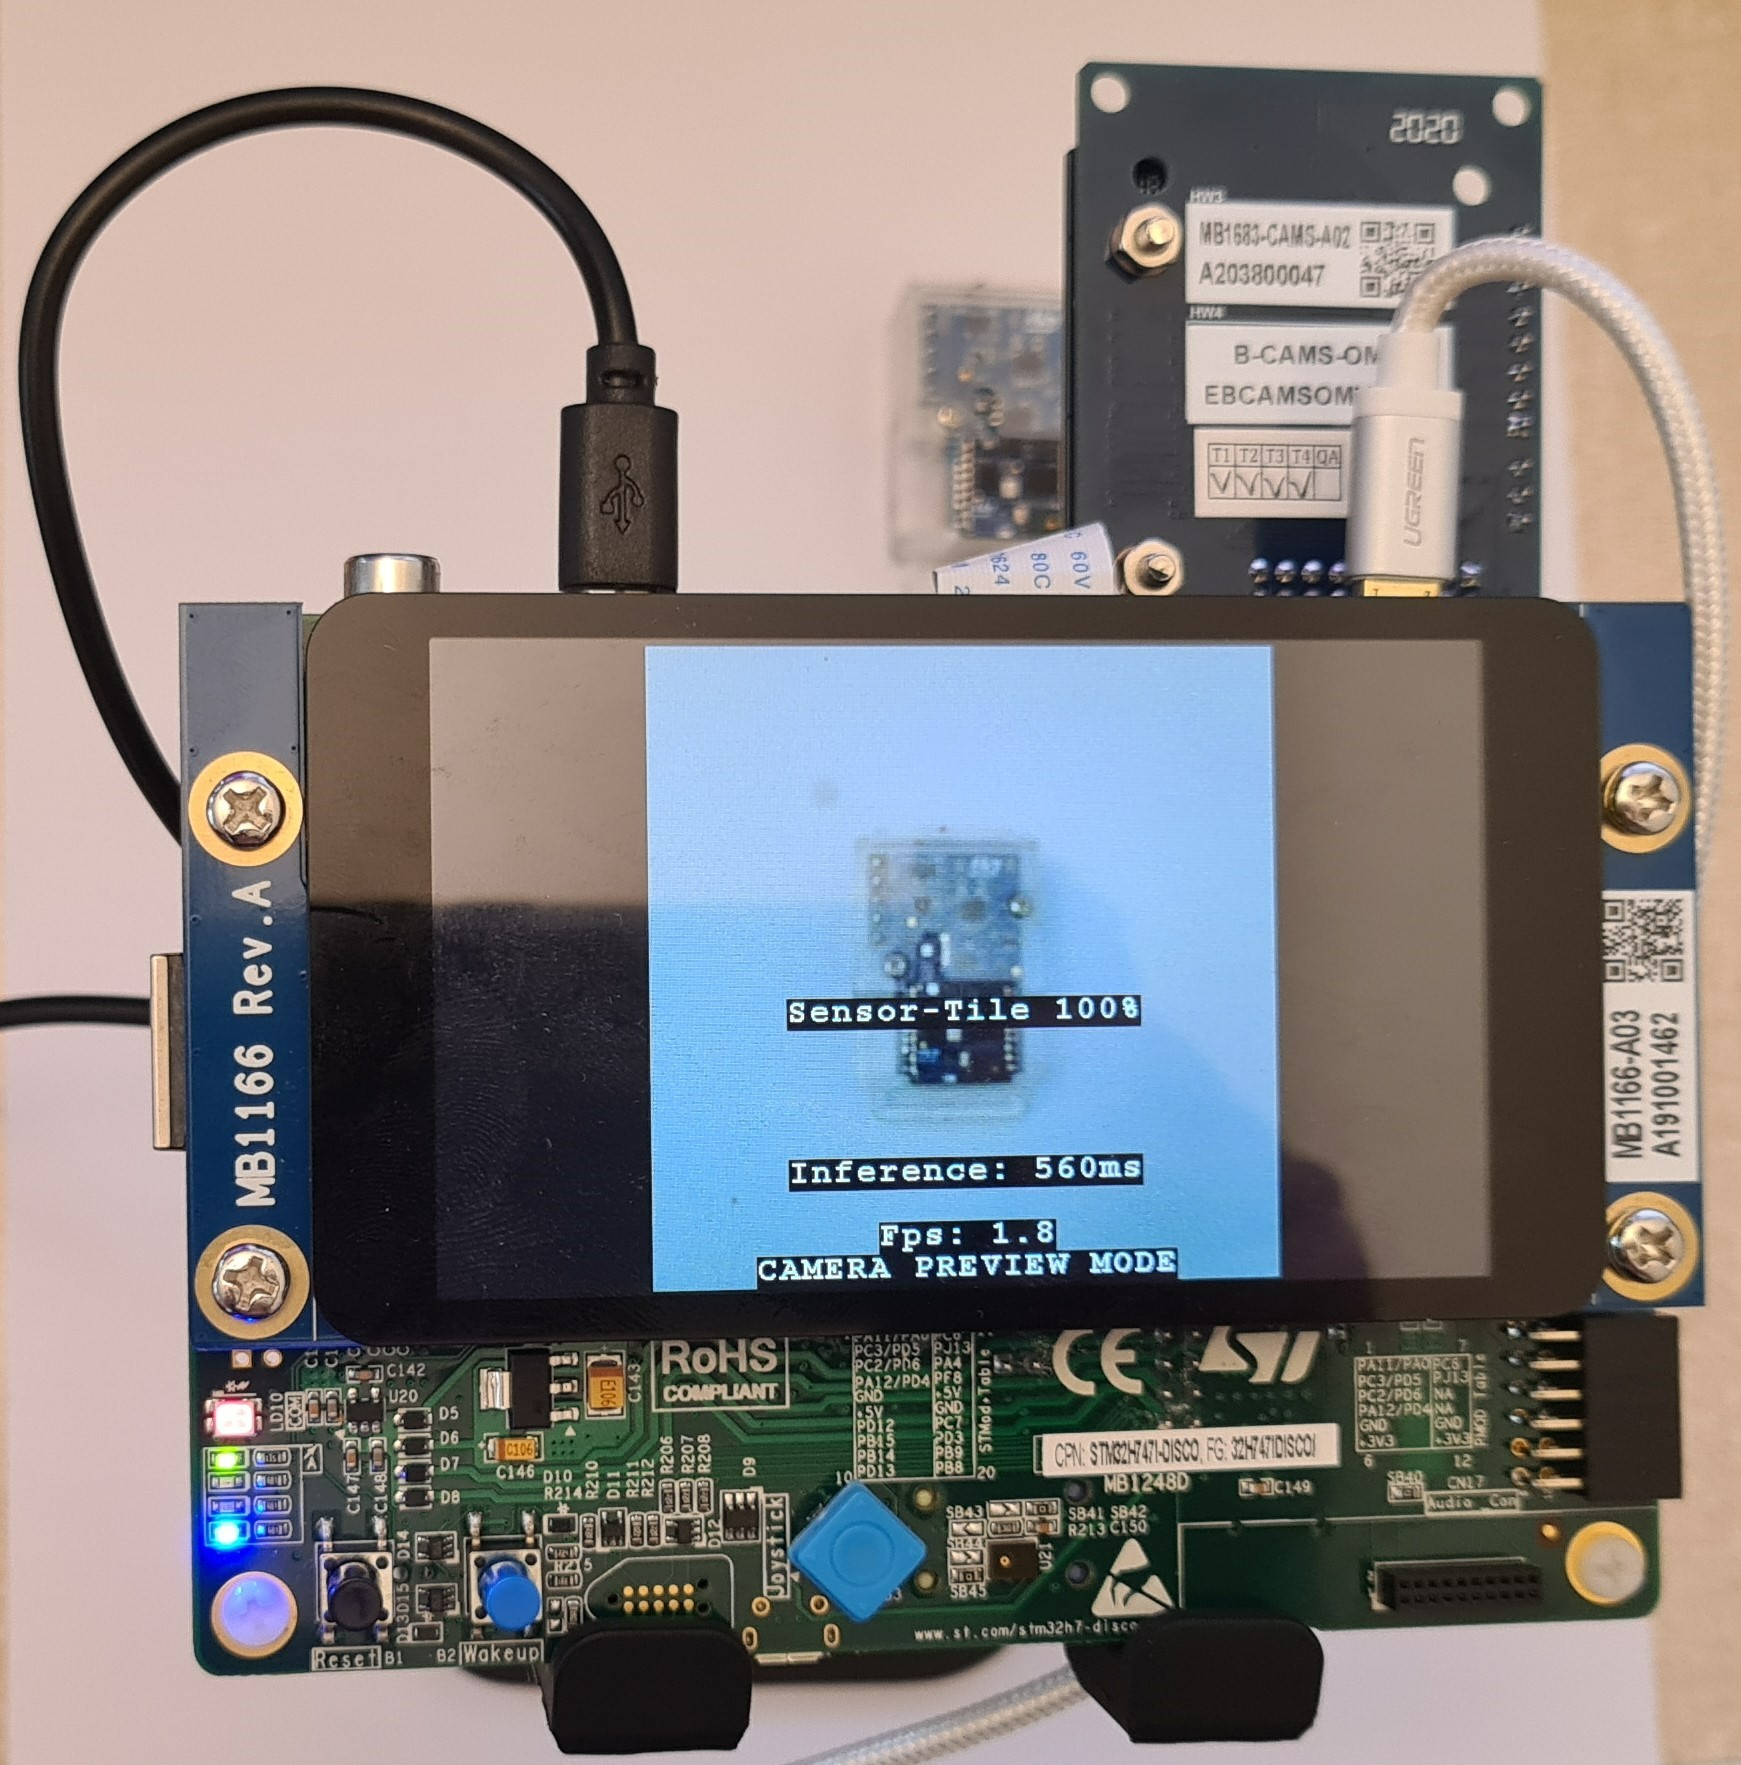
This article shows how to use the Teachable Machine online tool with STM32Cube.AI and the ST Model Zoo function pack to create an image classifier running on the STM32H747I-DISCO board.
This tutorial is divided into three parts: the first part shows how to use the Teachable Machine to train and export a deep learning model, then STM32Cube.AI is used to convert this model into optimized C code for STM32 MCUs. The last part explains how to integrate this new model into the FP-AI-VISION1 to run live inference on an STM32 board with a camera. The whole process is described below:
1. Prerequisites
1.1. Hardware
- STM32H747I-DISCO Board
- B-CAMS-OMV Flexible Camera Adapter board
- A Micro-USB to USB cable
- Optional: a webcam
1.2. Software
- STM32Cube IDE
- X-Cube-AI version 7.3.0 or above command line tool
- FP-AI-VISION1 version 3.1.0
- STM32CubeProgrammer
- ST Model Zoo Version 2
2. Training a model using Teachable Machine
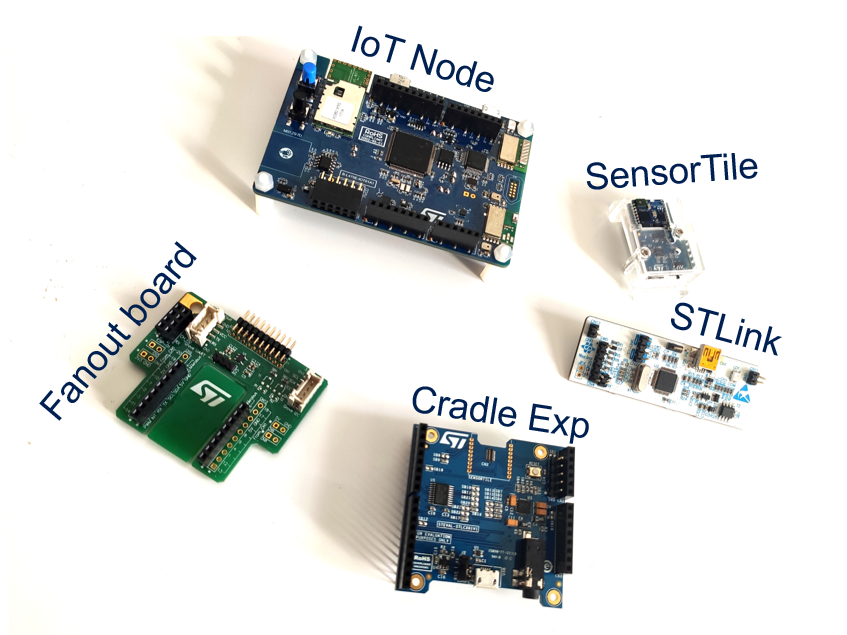
In this section, we will train deep neural network in the browser using Teachable Machine. We first need to choose something to classify. In this example, we will classify ST boards and modules. The chosen boards are shown in the figure below:
You can choose whatever object you want to classify it: fruits, pasta, animals, people, etc...
Let's get started. Open https://teachablemachine.withgoogle.com/, preferably from Chrome browser.
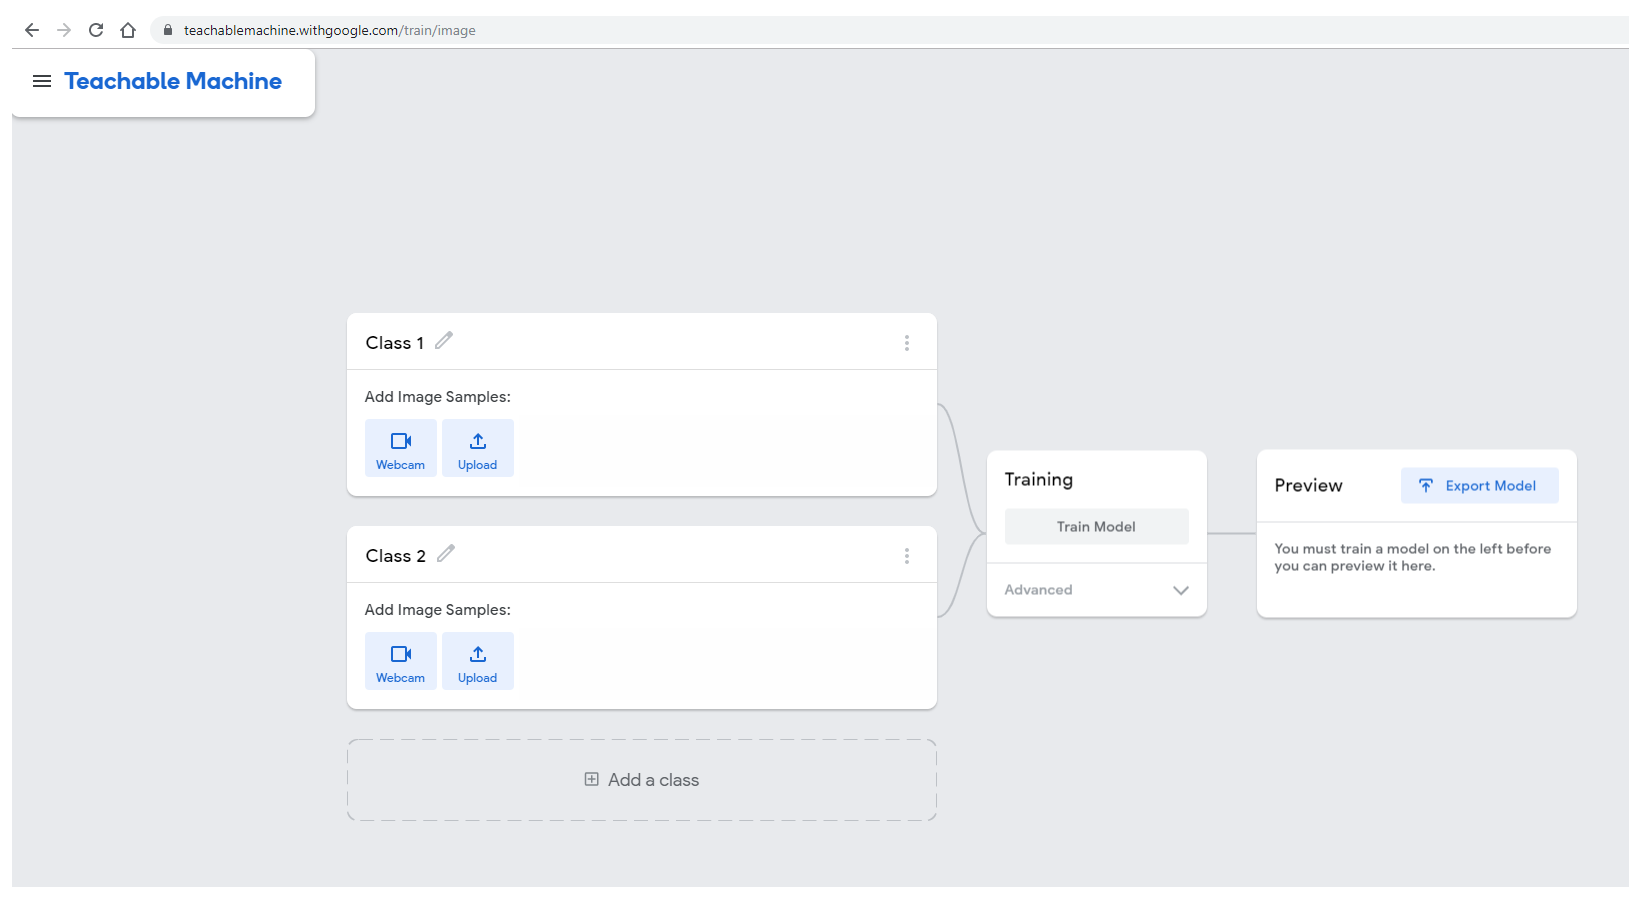
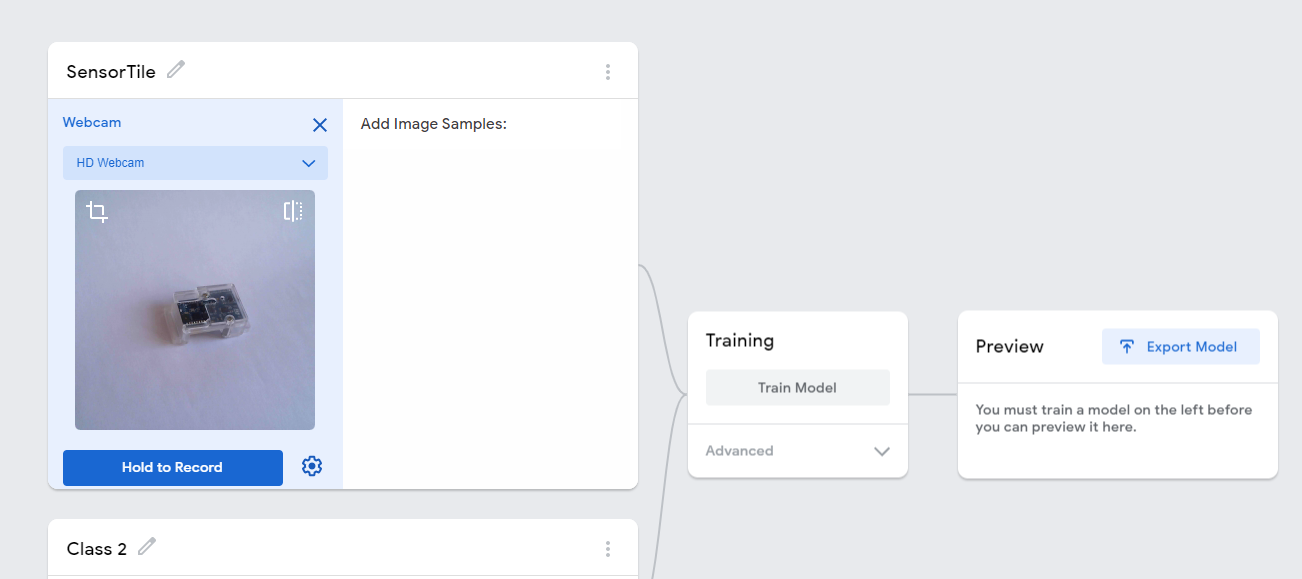
Click Get started, then select Image Project, then Standard image model (224x244px color images). You will be presented with the following interface.
2.1. Adding training data
For each category you want to classify, edit the class name by clicking the pencil icon. In this example, we choose to start with SensorTile.
To add images with your webcam, click the webcam icon and record some images. If you have image files on your computer, click upload and select the directory containing your images.
The STM32H747 discovery kit combined with the B-CAMS-OMV camera daughter board can be used as a USB webcam. Using the ST kit for data collection will help to get better results as the same camera will be used for data collection and inference when the model will have been trained.
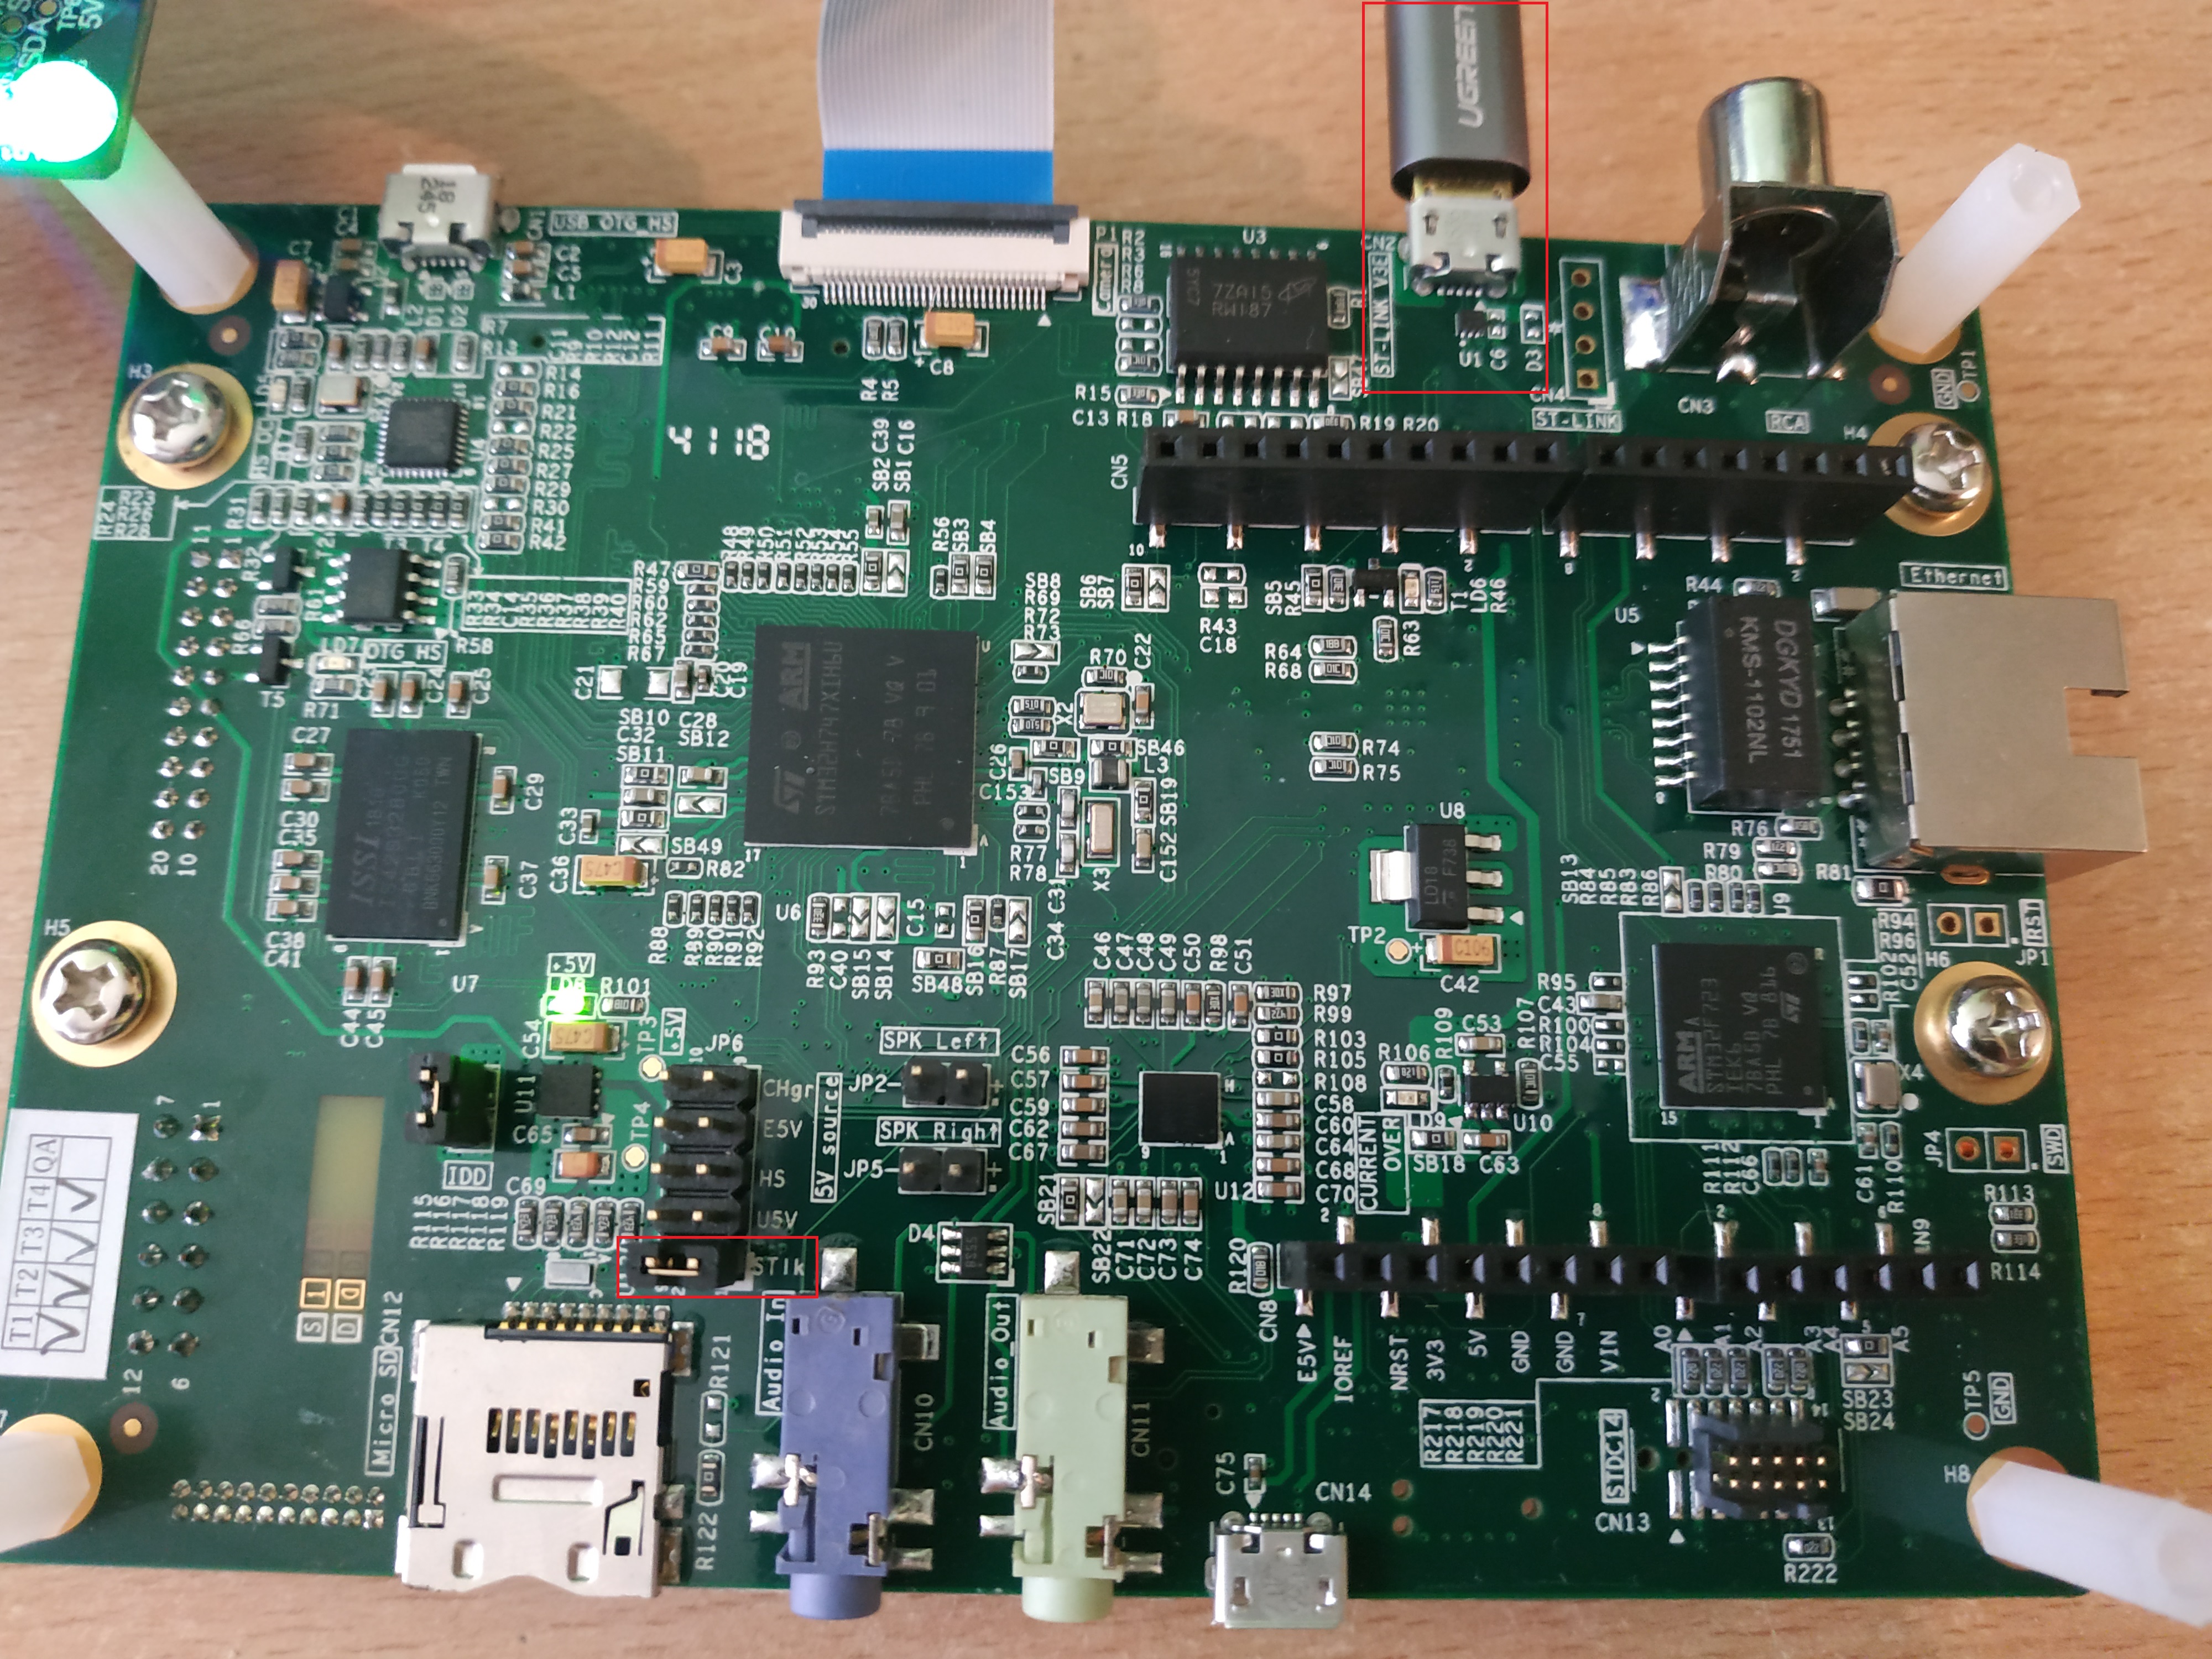
To use the ST kit as a webcam, simply program the board with the following binary of the function pack. First plug your board onto your computer using the ST-LINK port. Make sure the JP6 jumper is set to ST-LINK.
After plugging the USB cable onto your computer, the board appears as a mounted device.
The binary is located under FP-AI-VISION1_V3.1.0\Projects\STM32H747I-DISCO\Applications\USB_Webcam\Binary.
Drag and drop the binary file onto the board mounted device. This flashes the binary on the board.
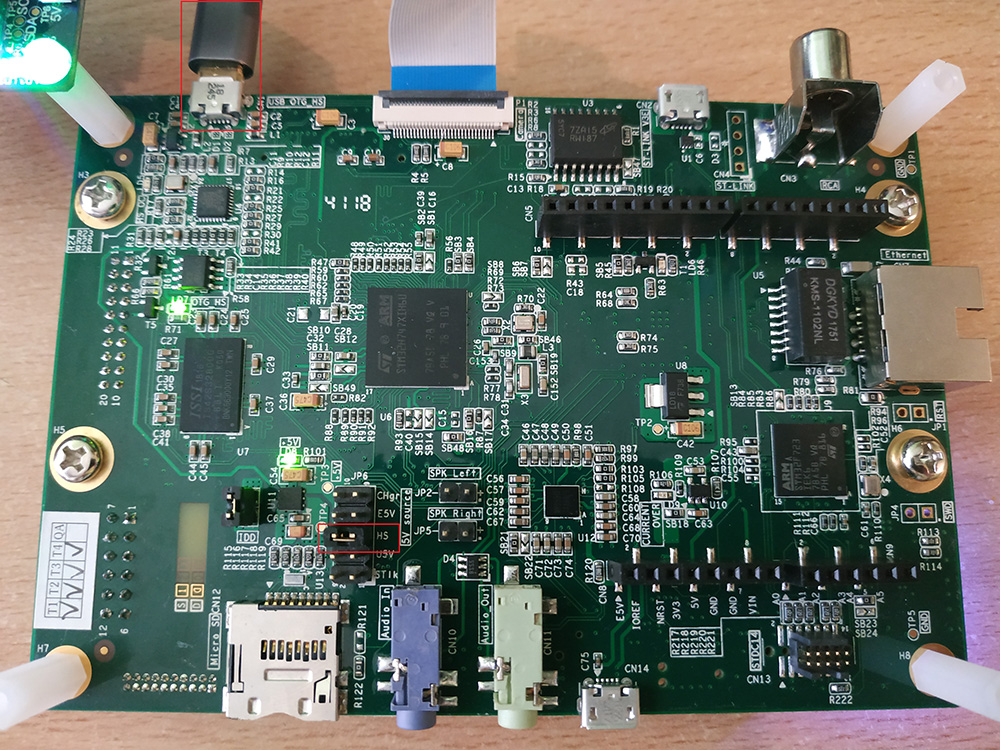
Unplug the board, change the JP6 jumper to the HS position, and plug your board using the USB OTG port.
For convenience, you can plug simply two USB cables, one on the USB OTG port, the other on the USB ST-LINK and set the JP6 jumper to ST-LINK. In this case, the board can be programmed and switch from USB webcam mode to test mode without the need to change the jumper position.
Depending on how you oriented the camera board, you might prefer to flip the image. If you do so you need to use the same option when generating the code on STM32.
Once you have a satisfactory amount of images for this class, repeat the process for the next one until your dataset is complete. Note the class order which you train your model with, you will need to apply names in the same order during the deployment.
2.2. Training the model
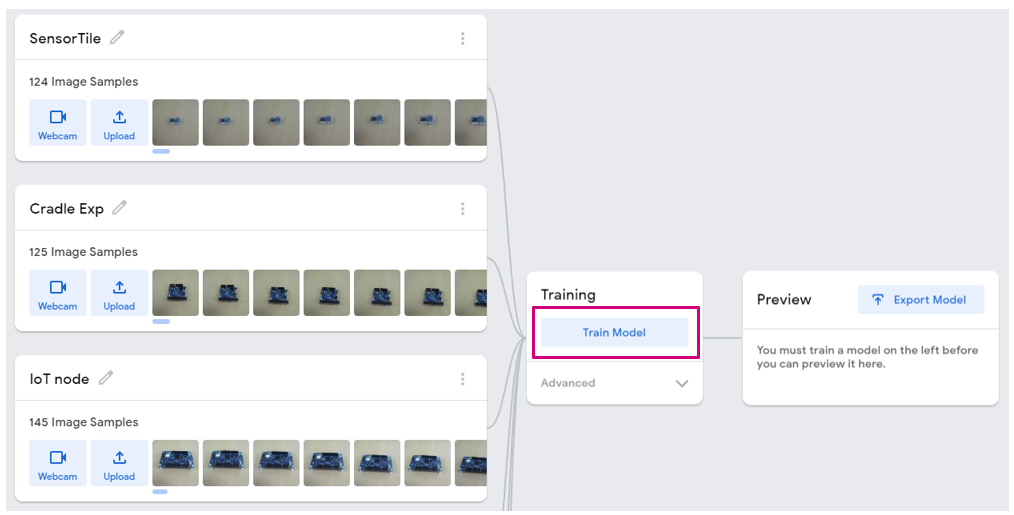
Now that we have a good amount of data, we are going to train a deep learning model for classifying these different objects. To do this, click the Train Model button as shown below:
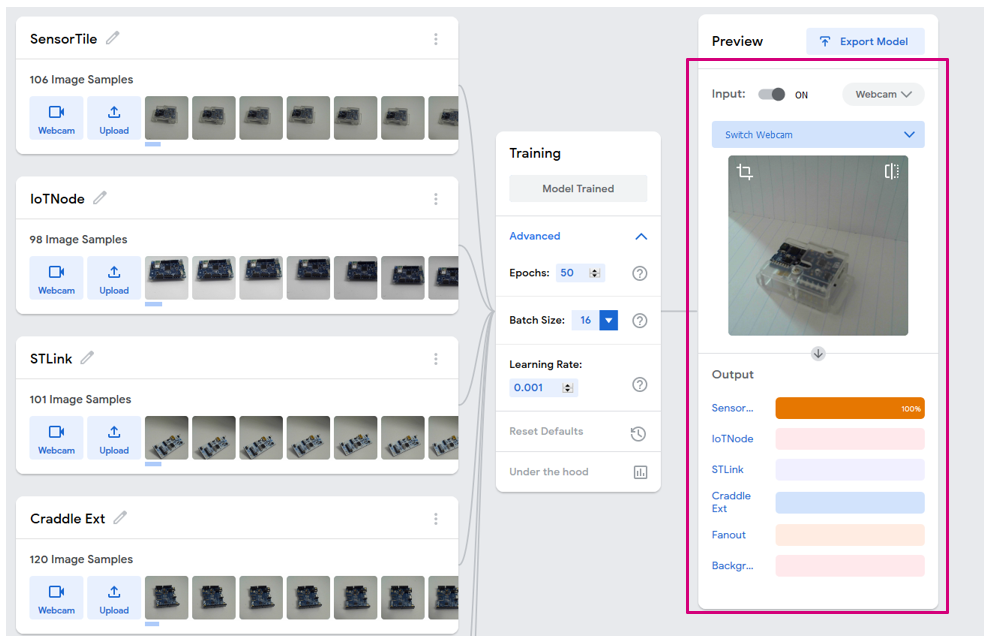
This process can take a while, depending on the amount of data you have. To monitor the training progress, you can select Advanced and click Under the hood. A side panel displays training metrics.
When the training is complete, you can see the predictions of your network on the "Preview" panel. You can either choose a webcam input or an imported file.
2.2.1. What happens under the hood (for the curious)
Teachable Machine is based on Tensorflow.js to allow neural network training and inference in the browser. However, as image classification is a task that requires a lot of training time, Teachable Machine uses a technique called transfer learning: The webpage downloads a MobileNetV2 model that was previously trained on a big image dataset of 1000 categories. The convolution layers of this pre-trained model are very good at doing feature extraction so they do not need to be trained again. Only the last layers of the neural network are trained using Tensorflow.js, thus saving a lot of time.
2.3. Exporting the model
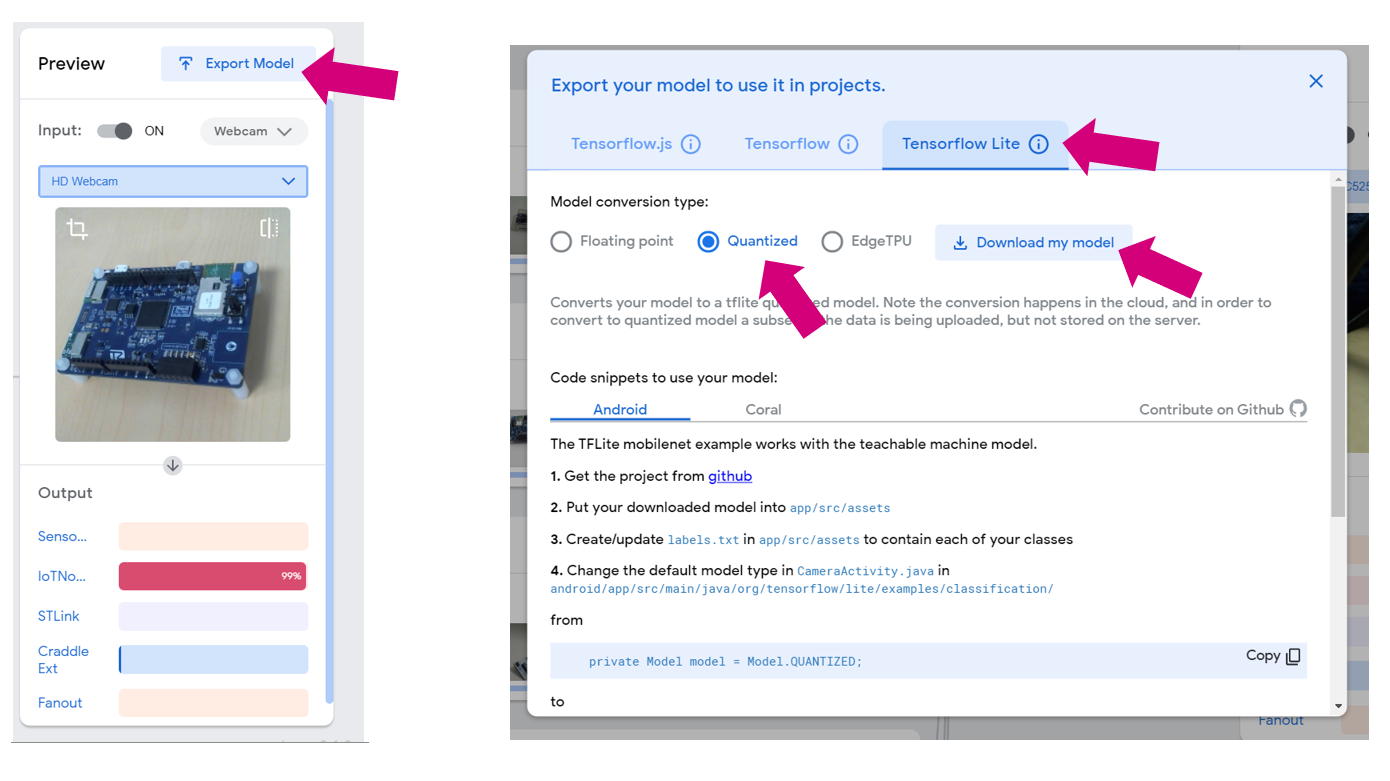
If you are happy with your model, it is time to export it. To do so, click the Export Model button. In the pop-up window, select Tensorflow Lite, check Quantized and click Download my model.
Since the model conversion is done in the cloud, this step can take a few minutes.
Your browser downloads a zip file containing the model as a .tflite file and a .txt file containing your label. Extract these two files in an empty directory that we will call workspace in the rest of this tutorial.
2.3.1. Inspecting the model using Netron (optional)
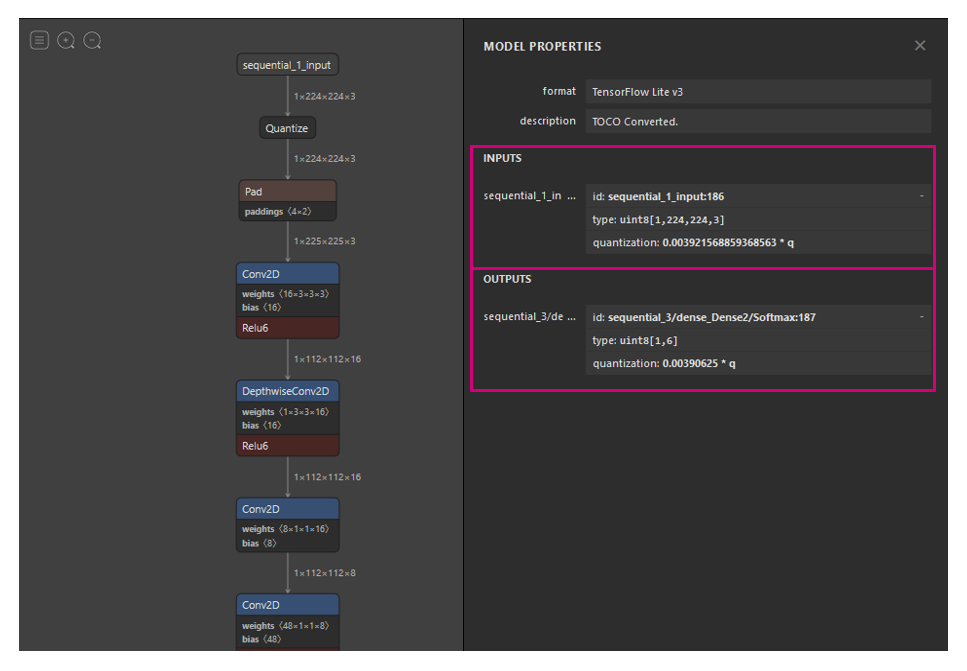
It is always interesting to take a look at a model architecture as well as its input and output formats and shapes. To do this, use the Netron webapp.
Visit https://lutzroeder.github.io/netron/ and select Open model, then choose the model.tflite file from Teachable Machine. Click sequental_1_input: we observe that the input is of type uint8 and of size [1, 244, 244, 3]. Now let's look at the outputs: in this example we have 6 classes, so we see that the output shape is [1,6]. The quantization parameters are also reported. Refer to part 3 for how to use them.
3. Porting to a target STM32H747I-DISCO
There is two way to convert a TensorflowLite model to optimized C code for STM32 usage :
- STM32Cube.AI Developer Cloud : an online platform and services allowing the creation, optimization, benchmarking, and generation of AI for the STM32 microcontrollers.
- STM32Cube X-Cube-AI package : A CubeMX package similar to STM32Cube.AI Developer Cloud but offline and integrated into CubeMX.
3.1. Using STM32Cube.AI Developer Cloud
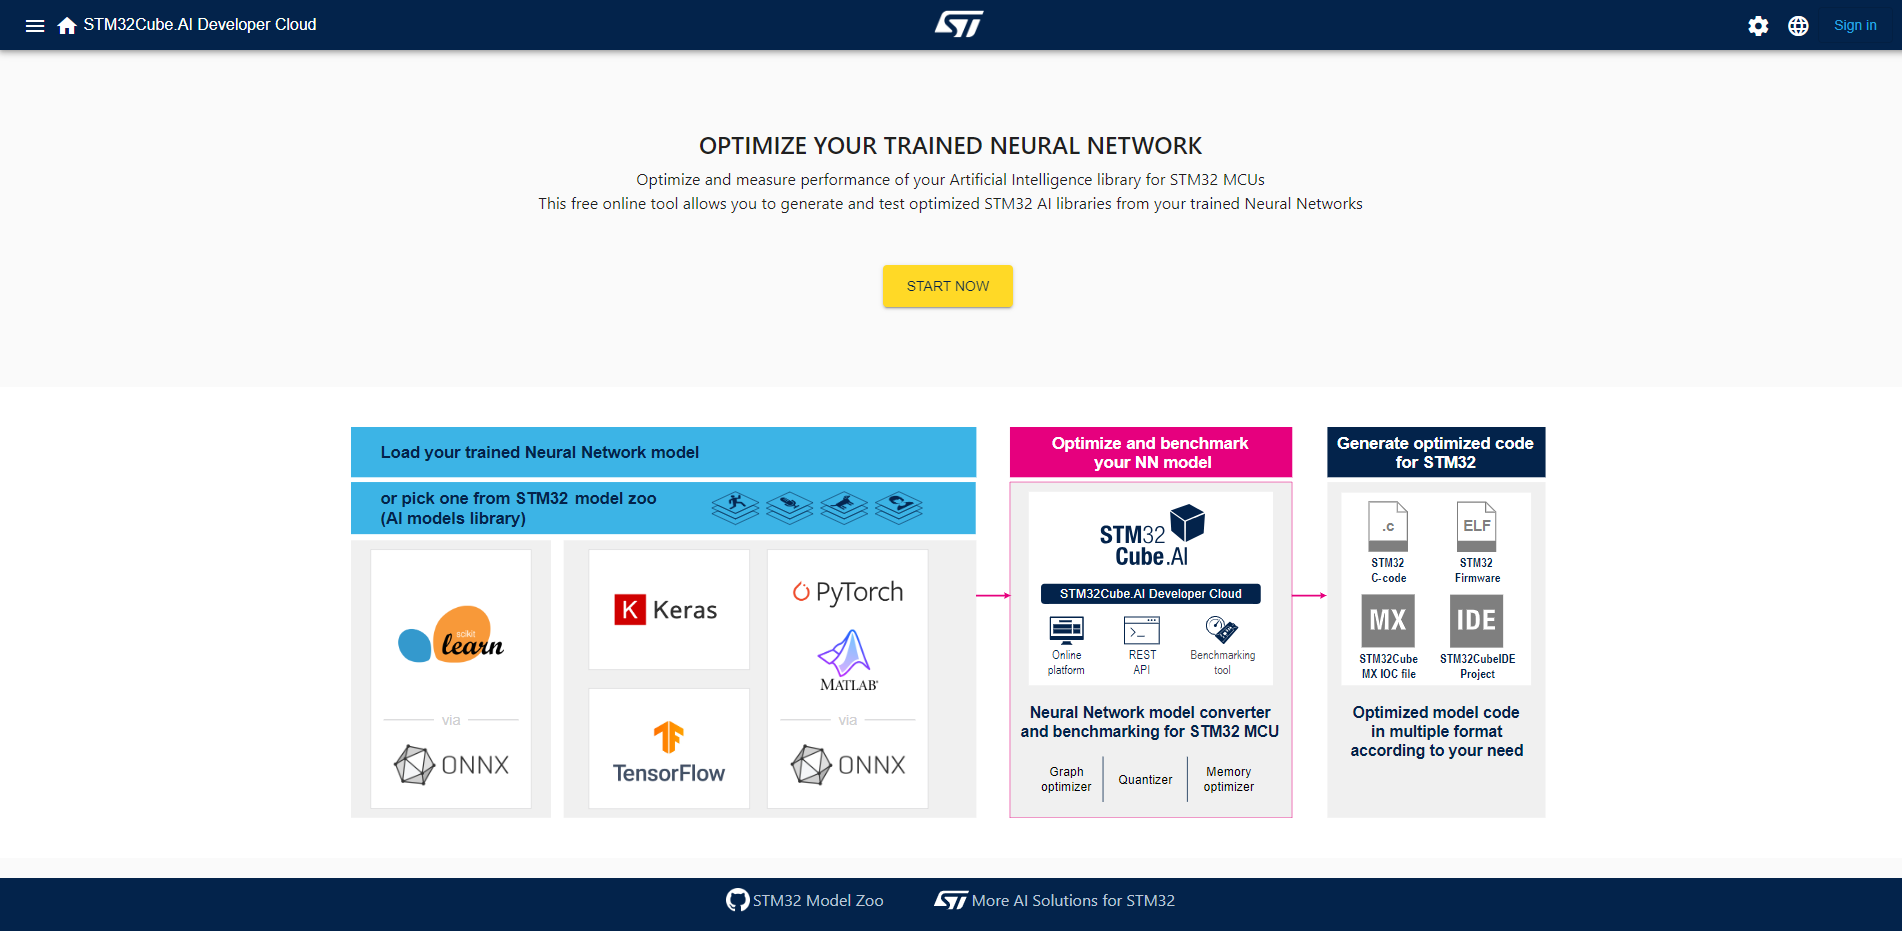
In this part we will use the STM32Cube.AI Developer Cloud to convert the TensorflowLite model to optimized C code for STM32.
Go to the STM32Cube.AI Developer Cloud website and click START NOW.
Login with your ST website credentials or create an account.
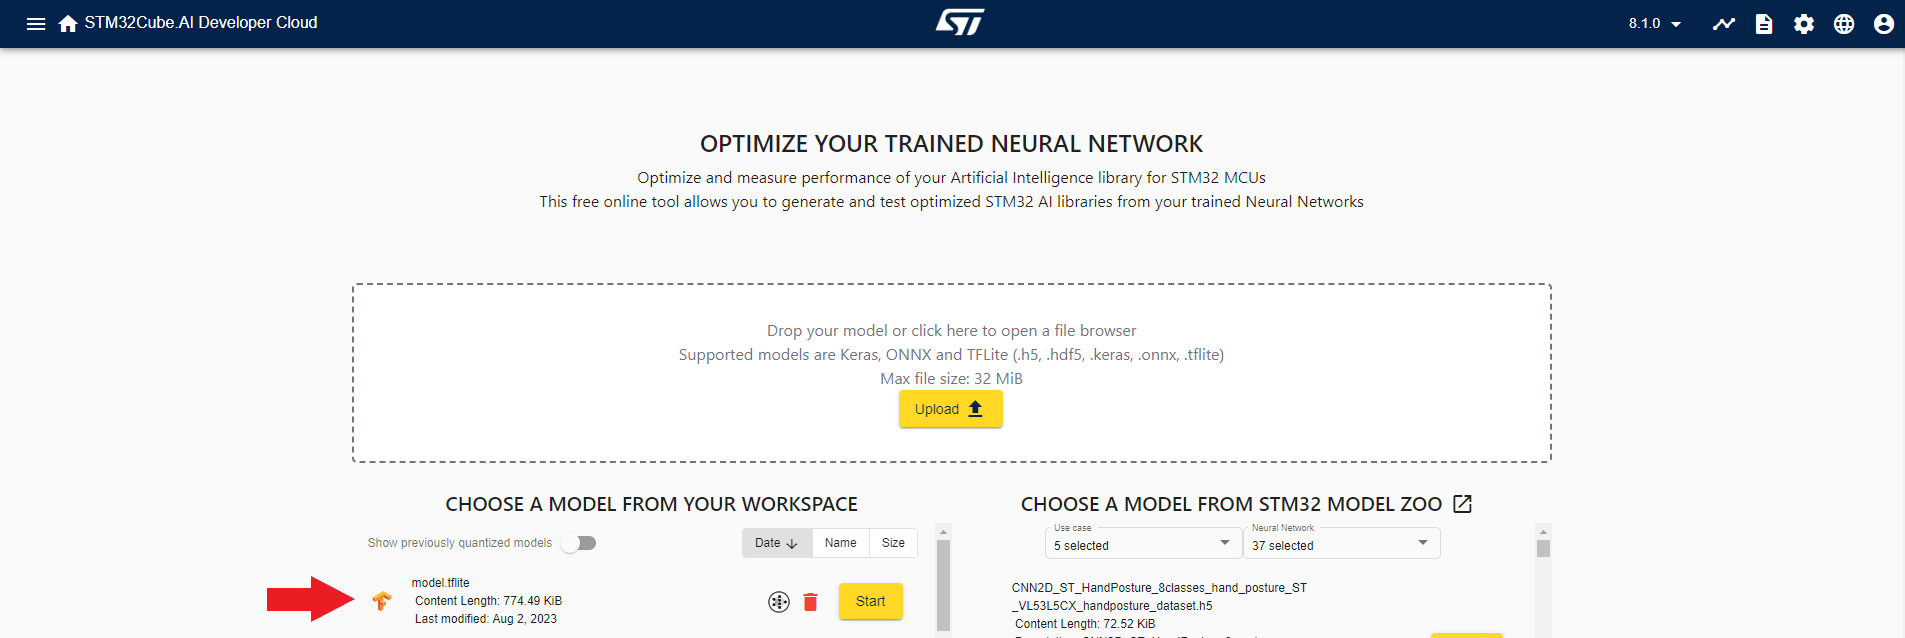
Once logged in, click Upload or drag and drop your model.tflite into the designated area. Your model should appear in your workspace (as below).
Click Start.
On the the next window, leave every options by default and click optimize. Once done, you can optionally click to the benchmark icon on top of the window to test your model on a given board.
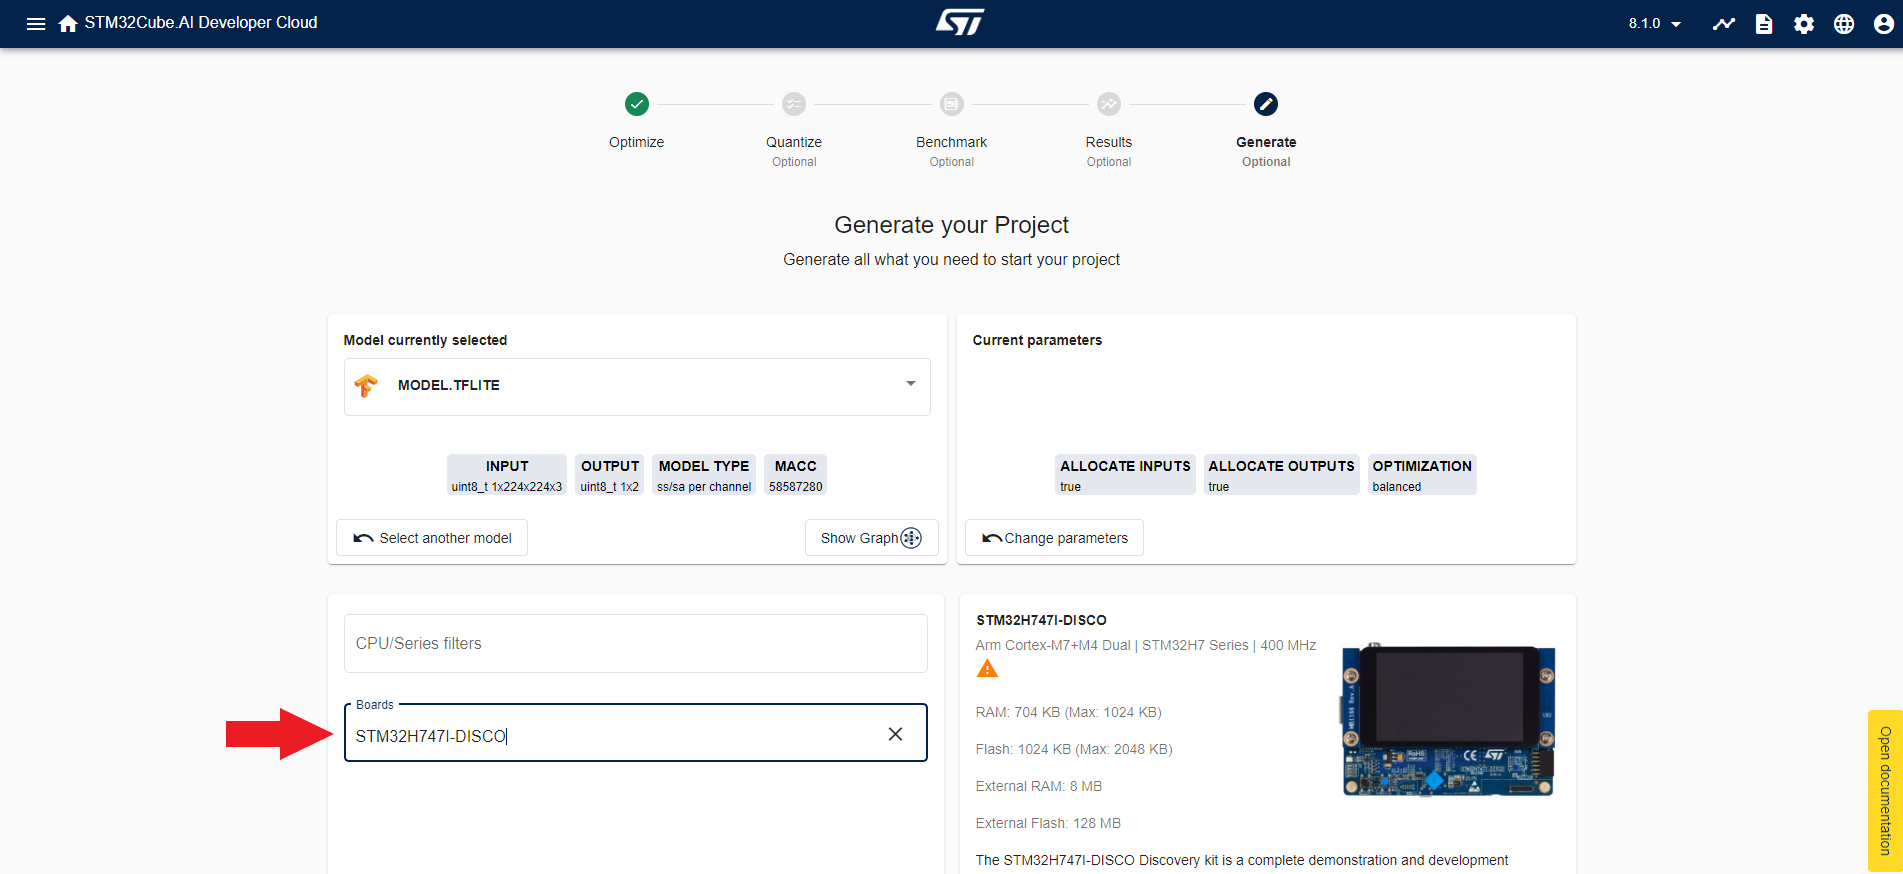
The optimization selected, click on Generate and select the STM32H747I Disco board.
h
Scroll down and click on Download under the Download C Code frame. After a few seconds a zip containing the .C and .H should have been downloaded alongside with the Cube-AI library (.a and its .h, to update the firmware with the according version).
3.1.1. Deployment on Target through the Model Zoo
The ST Model Zoo is a collection of pre-trained machine learning models and a set of tools which aims at enabling the ST Customers to easily implement AI on STM32 MCUs. It is available through Github at https://github.com/STMicroelectronics/stm32ai-modelzoo.
Download the Model Zoo. We will reference the path to your installatio.n by %MODEL_ZOO_DIR%. In the root of %MODEL_ZOO_DIR% you will find the README.MD file which will describe extensively the structure of the Zoo. For the purpose of the current deployment on STM32, we will focus on the bare minimum for this activity.
The Zoo is written in Python programming language compatible with its version 3.9 or 3.10. Download and Install Python. It also requires a set of additional Python packages enumerated in the file "requirements.txt".
pip install -r requirements.txt
The Zoo is organized by AI Use Cases. With Teachable Machine, we have trained a model for Image Classification.
cd %MODEL_ZOO_DIR%\image_classification.
In this directory you will have access to various models of image classification and scripts to manipulate them. The scripts are located in the src directory
cd src
The main entry point for image classification is stm32ai_main.py. The actions executed by the script are described in a configuration file. There are many config files example standing in the config_file_examples directory.
We will deploy our model on the board, therefore we will select the config_file_examples/deployement_config.yaml and edit it.
For this activity the model zoo will perform a succession of action on you behalf:
- Transforming your quantized Model to C Code that will efficiently run on STM32;
- Integrate this library into an already existing image classification application:
- Compile the binary and generate the firmware for the STM32H747I-DISCO:
- Flash the board;
- Run the application.
The configuration of the deployment of the Model Zoo is performed by editing the script config_file_examples/deployement_config.yaml standing in this directory. The README.MD file describes all the possible configurations into details. For the purpose of this documentation we will go strait to the required changes.
3.1.1.1. Configuring the X-CUBE-AI (Tflite -> C code)
The X-CUBE-AI is installed from STM32Cube-MX by default, it is there for located into:
- CUBE_FW_DIR=C:\Users\<USERNAME>\STM32Cube\Repository
If we assume that we are using its version 8.1.0, the base directory would be:
- X_CUBE_AI_DIR=%CUBE_FW_DIR%\Packs\STMicroelectronics\X-CUBE-AI\8.1.0
Inside the package, since we are running a Microsoft Windows computer, the path to stm32ai.exe is :
- STM32AI_PATH=%X_CUBE_AI_DIR%\Utilities\windows\stm32ai.exe
Inside the Model Zoo, in the config_file_examples/deployement_config.yaml file, move the value of STM32AI_PATH in the stm32ai key :
stm32ai:
 c_project_path: ../../getting_started
 serie: STM32H7
 IDE: GCC
 verbosity: 1
 version: 8.0.1
 optimization: balanced
 footprints_on_target: STM32H747I-DISCO # NUCLEO-H743ZI2 and STM32H747I-DISCO supported
 path_to_stm32ai: (STM32AI_PATH)
 path_to_cubeIDE: C:/ST/STM32CubeIDE_1.10.1/STM32CubeIDE/stm32cubeide.exe
3.1.1.2. Using your own model
Again in the config_file_examples/deployement_config.yaml file in the following section but the path of the model that you exported from teachable machine.
model:
 model_type: {name : mobilenet, version : v2, alpha : 0.35}
 input_shape: [128,128,3]
 model_path: (PATH_TO_YOUR_MODEL)
3.1.2. Naming the class for the Application Display
Still in config_file_examples/deployement_config.yaml update this key with your own class names :
dataset:
class_names: [SensorTile, IoTNode, STLink, Craddle_Ext, Fanout, Background]
3.1.3. Cropping the image
Teachable Machine crops the webcam image to fit the model input size. In deployment application of the model zoo, the image is resized to the model input size, hence losing the aspect ratio. We will change this default behavior and implement a crop of the camera image.
Still in config_file_examples/deployement_config.yaml update this key :
preprocessing:
  rescaling:
     scale: 1/127.5
     offset: -1
  resizing:
     interpolation: bilinear
     aspect_ratio: crop
  color_mode: rgb
3.1.4. Deployment
To deploy your new model on target, the model zoo is going to program the board. First plug your board onto your computer using the ST-LINK port. Make sure the JP6 jumper is set to ST-LINK.
Then you can start the deployment by :
$> python stm32ai_main.py --config-path ./config_file_examples/ --config-name deployment_config.yaml
[INFO] : Deployment complete.
Your application is ready to play with.
3.2. Further info on the STM32Cube X-Cube-AI package (for the curious)
Alternatively, we can use the stm32ai command line tool to convert the TensorflowLite model to optimized C code for STM32.
This part section demonstrate how to do it this way.
For ease of usage, add the X-Cube-AI installation folder to your path, for Windows:
- For X-CUBE-AI v8.1.0:
 set CUBE_FW_DIR=C:\Users\<USERNAME>\STM32Cube\Repository
 set X_CUBE_AI_DIR=%CUBE_FW_DIR%\Packs\STMicroelectronics\X-CUBE-AI\8.1.0
 set PATH=%X_CUBE_AI_DIR%\Utilities\windows;%PATH%
Start by opening a shell in your workspace directory, then execute the following command:
 cd <path to your workspace>
 stm32ai generate -m model.tflite -v 2
The expected output is:
Neural Network Tools for STM32AI v1.7.0 (STM.ai v8.0.1-19451)

 Exec/report summary (generate)
 ------------------------------------------------------------------------------------------------------------------------
 model file           : C:\path_to_workspace\model.tflite
 type                 : tflite
 c_name               : network
 compression          : lossless
 workspace dir        : C:\path_to_workspace\stm32ai_ws
 output dir           : C:\path_to_workspace\stm32ai_output
 model_name           : model
 model_hash           : 9c3e32f87a24325232cd870e17dcb45c
 params #           :   517,388 items (526.18 KiB)
 --------------------------------------------------------------------------------------------------------------------
 input 1/1          :   'serving_default_sequential_1_input0' (domain:activations/**default**)
                    :   150528 items, 147.00 KiB, ai_u8, s=0.00593618, zp=168, (1,224,224,3)
 output 1/1         :   'nl_71_0_conversion' (domain:activations/**default**)
                    :   2 items, 2 B, ai_u8, s=0.00390625, zp=0, (1,1,1,2)
 macc               :   58,587,284
 weights (ro)       :   538,816 B (526.19 KiB) (1 segment) / -1,530,736(-74.0%) vs float model
 activations (rw)   :   702,976 B (686.50 KiB) (1 segment) *
 ram (total)        :   702,976 B (686.50 KiB) = 702,976 + 0 + 0
 --------------------------------------------------------------------------------------------------------------------
 (*) 'input'/'output' buffers can be used from the activations buffer
 Model name - model ['serving_default_sequential_1_input0'] ['nl_71_0_conversion']
 ------ ---------------------------------------- ------------------------ ----------------- ----------- -------------------------------------
 m_id   layer (original)                         oshape                   param/size               macc                          connected to
 ------ ---------------------------------------- ------------------------ ----------------- ----------- -------------------------------------
 0      serving_default_sequential_1_input0 ()   [b:1,h:224,w:224,c:3]
        conversion_0 (QUANTIZE)                  [b:1,h:224,w:224,c:3]                          301,056   serving_default_sequential_1_input0
 ------ ---------------------------------------- ------------------------ ----------------- ----------- -------------------------------------
 1      pad_1 (PAD)                              [b:1,h:225,w:225,c:3]                                                           conversion_0
 ------ ---------------------------------------- ------------------------ ----------------- ----------- -------------------------------------
 2      conv2d_2 (CONV_2D)                       [b:1,h:112,w:112,c:16]   448/496             5,419,024                                 pad_1
        nl_2_nl (CONV_2D)                        [b:1,h:112,w:112,c:16]                         200,704                              conv2d_2
 ------ ---------------------------------------- ------------------------ ----------------- ----------- -------------------------------------
 (...)
 72     conversion_72 (QUANTIZE)                 [b:1,c:2]                                            4                                 nl_71
 ------ ---------------------------------------- ------------------------ ----------------- ----------- -------------------------------------
 model/c-model: macc=61,210,642/58,587,284 -2,623,358(-4.3%) weights=538,808/538,816 +8(+0.0%) activations=--/702,976 io=--/0
 Number of operations per c-layer
 ------- ------ ----------------------------------- ------------ -------------
 c_id    m_id   name (type)                                  #op          type
 ------- ------ ----------------------------------- ------------ -------------
 0       0      conversion_0 (converter)                 301,056    smul_u8_s8
 1       2      conv2d_2 (optimized_conv2d)            5,419,024    smul_s8_s8
 (...)
 85      71     nl_71_0_conversion (converter)                 4   smul_f32_u8
 ------- ------ ----------------------------------- ------------ -------------
 total                                                58,587,284
 Number of operation types
 ---------------- ------------ -----------
 operation type              #           %
 ---------------- ------------ -----------
 smul_u8_s8            301,056        0.5%
 smul_s8_s8         58,223,470       99.4%
 op_s8_s8               62,720        0.1%
 smul_s8_f32                 4        0.0%
 op_f32_f32                 30        0.0%
 smul_f32_u8                 4        0.0%
 Complexity report (model)
 ------ ------------------------------------- ------------------------- ------------------------- ----------
 m_id   name                                  c_macc                    c_rom                     c_id
 ------ ------------------------------------- ------------------------- ------------------------- ----------
 0      serving_default_sequential_1_input0   |                  0.5%   |                  0.0%   [0]
 2      conv2d_2                              ||||||||||||       9.2%   |                  0.1%   [1]
 (...)
 71     nl_71                                 |                  0.0%   |                  0.0%   [84, 85]
 ------ ------------------------------------- ------------------------- ------------------------- ----------
 macc=58,587,284 weights=538,816 act=702,976 ram_io=0
 Requested memory size per segment ("stm32h7" series)
 ----------------------------- -------- --------- -------- ---------
 module                            text    rodata     data       bss
 ----------------------------- -------- --------- -------- ---------
 network.o                        5,372    39,403   31,980     1,200
 NetworkRuntime801_CM7_GCC.a     32,892         0        0         0
 network_data.o                      56        48       88         0
 lib (toolchain)*                 1,228       624        0         0
 ----------------------------- -------- --------- -------- ---------
 RT total**                      39,548    40,075   32,068     1,200
 ----------------------------- -------- --------- -------- ---------
 *weights*                            0   538,816        0         0
 *activations*                        0         0        0   702,976
 *io*                                 0         0        0         0
 ----------------------------- -------- --------- -------- ---------
 TOTAL                           39,548   578,891   32,068   704,176
 ----------------------------- -------- --------- -------- ---------
 *  toolchain objects (libm/libgcc*)
 ** RT - AI runtime objects (kernels+infrastructure)
  Summary per memory device type
  ----------------------------------------------
  .\device       FLASH       %       RAM      %
  ----------------------------------------------
  RT total     111,691   17.2%    33,268   4.5%
  ----------------------------------------------
  TOTAL        650,507           736,244
  ----------------------------------------------
Creating txt report file C:\path_to_workspace\network_output\network_analyze_report.txt
elapsed time (analyze): 44.240s
Model file:      model.tflite
Total Flash:     650507 B (635.26 KiB)
    Weights:     538816 B (526.19 KiB)
    Library:     111691 B (109.07 KiB)
Total Ram:       736244 B (718.99 KiB)
    Activations: 702976 B (686.50 KiB)
    Library:     33268 B (32.49 KiB)
    Input:       150528 B (147.00 KiB included in Activations)
    Output:      2 B (included in Activations)

* network_config.h
* network.c
* network_data.c
* network_data_params.c
* network.h
* network_data.h
* network_data_params.h

Let's take a look at the highlighted lines: we learn that the model uses 526.49 Kbytes of weights (read-only memory) and 596.47 Kbytes of activations.
The STM32H747xx MCUs do not have 596.47 Kbytes of contiguous RAM, we need to use the external SDRAM present on the STM32H747-DISCO board. Refer to  [https://www.st.com/resource/en/user_manual/dm00504240-discovery-kit-with-stm32h747xi-mcu-stmicroelectronics.pdf UM2411] section 5.8 "SDRAM" for more information.

{{Info|These figures about memory footprint might be different for your model as it depends on the number of classes you have.}}

{{Info|From X-CUBE-AI v7.2.0, for a given model, the value of the weights (c-table) are now defined in a new specific c-file: network_data_params.c\.h files. Previous network_data.c\.h is always generated but only with the intermediate functions to manage the weights.}}


=== Integration with FP-AI-VISION1 ===

In this part we will import our brand-new model into the FP-AI-VISION1 function pack. This function pack provides a software example for a food classification application. For more information on FP-AI-VISION1, go  [https://www.st.com/en/embedded-software/fp-ai-vision1.html here].

The main objective of this section is to replace the <code>network</code> and <code>network_data</code> files in FP-AI-VISION1 by the newly generated files and make a few adjustments to the code.

<!-- Not used
{{Info| The whole project containing all modifications presented bellow is available for download [http://github_link here]}}
-->
==== Open the project ====

If it is not already done, download the zip file from ST website and extract the content to your workspace. It must now contain the following elements:

* model.tflite
* labels.txt
* stm32ai_output
* stm32ai_ws
* FP_AI_VISION1

If we take a look inside the function pack, we'll start from the '''FoodReco_MobileNetDerivative''' application we can see two configurations for the model data type, as shown below.

<div class="res-img">
[[File:tm_fp_files.png|center|alt=FP-AI-VISION1 model data types|FP-AI-VISION1 model data types]]
</div>

Since our model is a quantized one, we have to select the ''Quantized_Model'' directory.

Go into <code>workspace/FP_AI_VISION1_V3.1.0/Projects/STM32H747I-DISCO/Applications/FoodReco_MobileNetDerivative/Quantized_Model/STM32CubeIDE</code> and double-click <code>.project</code>. STM32CubeIDE starts with the project loaded. You will notice 2 sub-project for each core of the microcontroller : CM4 and CM7, as we don't use CM4, ignore it and work with the CM7 project.

==== Replacing the network files ====

The model files are located in <code>workspace/FP-AI-VISION1_V3.1.0/Projects/STM32H747I-DISCO/Applications/FoodReco_MobileNetDerivative/Quantized_Model/CM7/</code> <code>Src</code> and <code>Inc</code> directory.

Delete the following files and replace them with the ones from <code>workspace/stm32ai_output</code>:

In <code>Src</code>:
* network.c
* network_data.c
* network_data_params.c (for X-CUBE-AI v7.2 and above)

In <code>Inc</code>:
* network.h
* network_data.h
* network_config.h
* network_data_params.h (for X-CUBE-AI v7.2 and above)

==== Updating to a newer version of X-CUBE-AI  ====

FP-AI-VISION1 v3.1.0 is based on X-Cube-AI version 7.1.0, You can check your version of Cube.AI by running <code>stm32ai --version</code>.
If the c-model files were generated with a newer version of X-Cube-AI (> 7.1.0), you need also to update the X-CUBE-AI library (NetworkRuntime720_CM7_GCC.a for X-CUBE-AI version 7.2).

Go to <code>workspace/FP-AI-VISION1_V3.1.0/Middlewares/ST/STM32_AI_Runtime</code> then for a Windows command prompt:
 {{PC$}} copy %X_CUBE_AI_DIR%\Middlewares\ST\AI\Inc\*  .\Inc\
 {{PC$}} copy %X_CUBE_AI_DIR%\Middlewares\ST\AI\Lib\GCC\ARMCortexM7\NetworkRuntime720_CM7_GCC.a .\lib\NetworkRuntime710_CM7_GCC.a

{{Info|Copying the new runtime library NetworkRuntime720_CM7_GCC.a (for X-CUBE-AI version 7.2) using the same name of the previous version (NetworkRuntime710_CM7_GCC.a) avoids to update the project properties. if not you will need to update the project properties in the panel C/C++ General / Paths and Symbols / Librairies. Edit the library and update with the new name.}}

You also need to add to the project tree the new generated file network_data_params.c.
Simply drag and drop the network_data_params.c within the STM32CubeIDE project in the Applications folder and link to file as shown below:
<div class="res-img">
[[File:Wiki_Add_File.png|center|alt=Adding the file to the project|Adding the file to the project]]
</div>

==== Adapt to the NN input data range ====

The neural network input needs to be normalized accordingly to the training phase.
This is achieved by updating the value of both the <code>nn_input_norm_scale</code> and <code>nn_input_norm_zp</code> variables during initialization. The <code>nn_input_norm_scale</code> and <code>nn_input_norm_zp</code> variables affect the pixel format adaptation stage.
The scale, zero point values should be set {127.5, 127} if the NN model was trained using input data normalized in the range [-1, 1].
They should be set to {255, 0} if the NN model was trained using input data normalized in the range [0, 1].
The food recognition model was trained with input data normalized in the range [0, 1] whereas the Teachable Model was trained in the range of  [-1, 1].

Edit the file <code>fp_vision_app.c</code> and modify the <code>App_Context_Init</code> function (line 328) to update the scale and zero-point values (update the function with the highlighted code bellow) :
{{Snippet | category=AI | component=Application | snippet=
<source lang="c" highlight="1-3">
  /*{scale,zero-point} set to {127.5, 127} since NN model was trained using input data normalized in the range [-1, 1]*/
  App_Context_Ptr->Ai_ContextPtr->nn_input_norm_scale=127.5f; //was 255.0f
  App_Context_Ptr->Ai_ContextPtr->nn_input_norm_zp=127; //was 0
}}
3.2.1. Compiling the project
Before compiling the project, we need to download the latest drivers to ensure the best performances using the board hardware.
Go on the GitHub STM32H747I-DISCO BSP website, and download as zip. Unzip the files and copy them in the project folder workspace/FP-AI-VISION1_V3.1.0/Drivers/BSP/STM32H747I-Discovery by replacing the old files.
Download the OTM8009A LCD drivers on GitHub and place the unzipped files inside the folder workspace/FP-AI-VISION1_V3.1.0/Drivers/BSP/Components/otm8009a by replacing the old files.
Download the NT35510 LCD drivers on GitHub, create the folder workspace/FP-AI-VISION1_V3.1.0/Drivers/BSP/Components/nt35510 and place the unzipped files inside.
Now we need to add these files to the CubeIDE project. From your file explorer, drag and drop the nt35510.c and nt35510_reg.c files in STM32CubeIDE in the folder workspace/FP-AI-VISION1_V3.1.0/Drivers/BSP/Components.
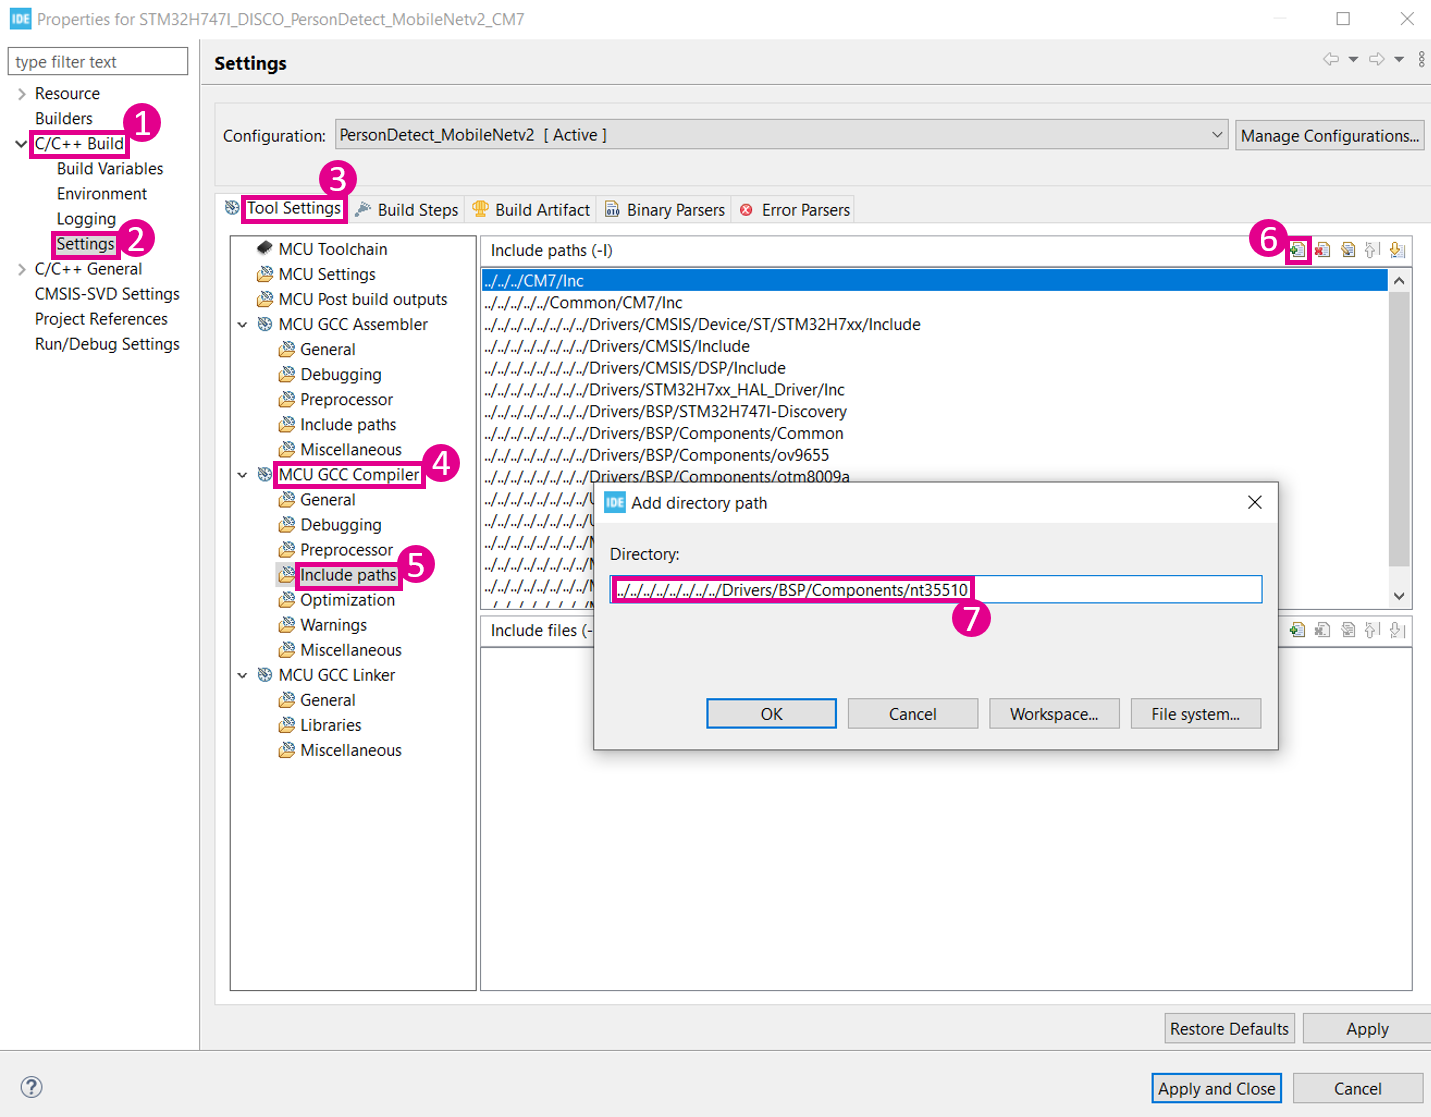
Then add the workspace/FP-AI-VISION1_V3.1.0/Drivers/BSP/Components/nt35510 folder to the include paths, click Project->Properties and follow the instructions below:
The function pack for quantized models comes in four different memory configurations :
- Quantized_Ext
- Quantized_Int_Fps
- Quantized_Int_Mem
- Quantized_Int_Split
As we saw in Part 2, the activation buffer requires more than 512 Kbytes of RAM. For this reason, we can only use the Quantized_Ext configuration to place activation buffer. For more details on the memory configuration, refer to UM2611 section 3.2.5 "Memory requirements".
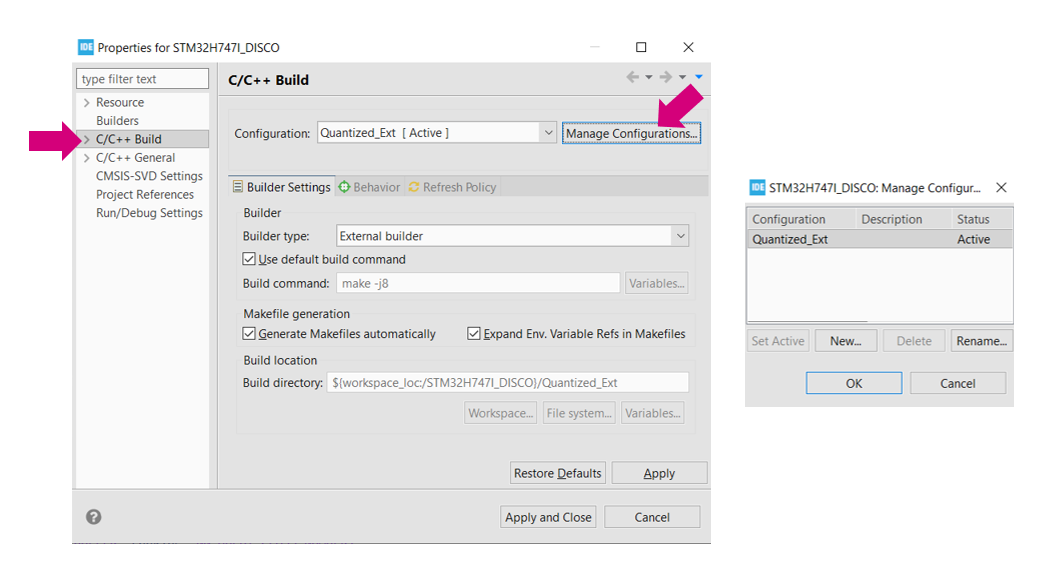
To compile only the Quantized_Ext configuration, select Project > Properties from the top bar. Then select C/C++ Build from the left pane. Click manage configuration and then delete all configurations that are not Quantized_Ext. Only one configuration is left.
Clean the project by selecting Project > Clean... and clicking Clean.
Eventually, build the project by clicking Project > Build All.
When the compilation is complete, a file named STM32H747I_DISCO_FoodReco_Quantized_CM7.elf is generated in
workspace > FP-AI-VISION1_V3.1.0 > Projects > STM32H747I-DISCO > Applications > FoodReco_MobileNetDerivative > Quantized_Model > STM32CubeIDE > STM32H747I_DISCO > Quantized_Ext
3.2.2. Flashing the board
Connect the STM32H747I-DISCO to your PC via a Micro-USB to USB cable. Make sure that your board is connected to the ST-LINK port and properly powered (set the jumper JP6 jumper is set to ST-LINK).
Build the project STM32H747I_DISCO_FoodReco_Quantized_CM7 and run it with the play button :
Alternatively, you can use STM32CubeProgrammer to program the board with the generated .elf file.
3.2.3. Testing the model
Connect the camera to the STM32H747I-DISCO board using a flex cable. To have the image in the upright position, the camera must be placed with the flex cable facing up as shown in the figure below. Once the camera is connected, power on the board and press the reset button. After the "Welcome Screen", you will see the camera preview and output prediction of the model on the LCD Screen.
3.3. Troubleshooting
You may notice that once the model is running on STM32, the performance of the deep learning model is not as expected. The rationale is the following:
- Quantization: the quantization process can reduce the performance of the model, as going from a 32-bit floating point to a 8-bit integer representation means a loss in precision.
- Camera: if the webcam used for training the model is different from the the camera on the Discovery board. This difference of data between the training and the inference can explain a loss in performance.
4. STMicroelectronics references
See also:

