This article goal is to guide a STM32H573 user through first steps of using the secure manager. To learn what is the secure manager and why to use it please read the introduction to secure manager.
1. Installation
This section will walk you through provisioning with secure manager, from the open product state with a clean STM32H57x (either a virgin or after full regression) to a state where the secure manager is installed and the product is in TZ-Closed. When the product is in TZ-Closed state, it is ready for nonsecure application with the development of API calls.
There are several ways to install the secure manager, ranging from step-by-step meticulously following a checklist to simply executing a prepared batch. Very little is configurable in the SMAK form, only the arrangement of the nonsecure application image slots.
1.1. Prerequisites
- To use the secure manager, a compatible STM32 MCU is needed. Only the STM32H573 line currently supports the secure manager.
- On the software side, the STM32CubeMX toolset is needed, complete with STM32CubeProgrammer and the Trusted Package Creator. The STM32CubeMX will download the STM32H5 cube package, containing the HAL and the examples.
- There is no extra cost or licensing hurdle for the SMAK. To use SMDK, contact ST and get qualified to sign an NDA.
2. Batch installation
Automated installation using prepared script is ready for the STM32H573I-DK development kit in the STM32H5 Cube package.
2.1. Environment configuration
A batch file called env.bat is by default placed at the following location:
C:\Users\***\STM32Cube\Repository\STM32Cube_FW_H5_V1.0.1\Projects\STM32H573I-DK\ROT_Provisioning
This batch file needs to be modified first:
Both the addresses and the communication virtual port number must be changed to continue with the installation.
2.2. SMAK Keys configuration
The keys are in the SMAK/Keys sub-folder. The easiest way to modify the keys is to open the STM32 Trusted Package Creator tool:
- Select H5 in the leftmost pane, and then the OBkeys tab.
- Open the key configuration file and regenerate the keys as needed:
- SMAK authentication key - used to signed installed application
- SMAK encryption key - used to provide confidentiality on the installed user application
2.3. Memory configuration
The memory layout and partitioning are also configurable. Basic settings are easily accessible by opening another xml file in the STM32 Trusted Package Creator tool:
2.4. DA configuration
Provisioning the Debug authentication keys and certificate is highly recommended step. Details of the process can be found in introduction to Debug Authentication
When modifying the default settings, consider the need to actually debug the NS application in the TZ-Closed state. Removing the debug certificate would block such development.
2.5. Installation process
In the basic scenario, all that is required is to execute the provisioning.bat and follow the instructions on the screen. The process will require you to manipulate the SW1 switch on the DK board to complete the provisioning correctly.
The batch file works in two steps. In step 1 it prepares the SFI package, consisting of:
- Keys configuration
- Layout configuration
- DA configuration
All these are prepared in the STM32 Trusted Package Creator.
Environment configuration updated earlier will be used now to communicate with the STM32H573I-DK board and upload the SFI package. Pay attention to the instruction to manipulate the SW1 to assert correct state on the BOOT0 pin.
When finished, the secure manager is installed.
3. Using the secure manager
Now the secure manager is provisioned and the STM32H573 is in TZ-closed state. It's possible to code and debug in the non-secure domain of the MCU using the usual development tools, for example STM32CubeIDE. The STM32Cube package for STM32H5 contains a template called SMAK_Appli. Just add functionality and download using for example STM32CubeProgrammer.
3.1. Development of the user application
The SMAK_Appli template is by default available at the following path:
C:\Users\***\STM32Cube\Repository\STM32Cube_FW_H5_V1.0.1\Projects\STM32H573I-DK\Templates\ROT\SMAK_Appli\
The project is packed with batch files that automate necessary post-build actions and binary download using the CLI STM32CubeProgrammer.
One difference compared to the bare-metal development is that you need to manually place a breakpoint to your main to commence the debug session. The debug authentication session is valid while the debugger stays connected to the target.
3.2. The template application
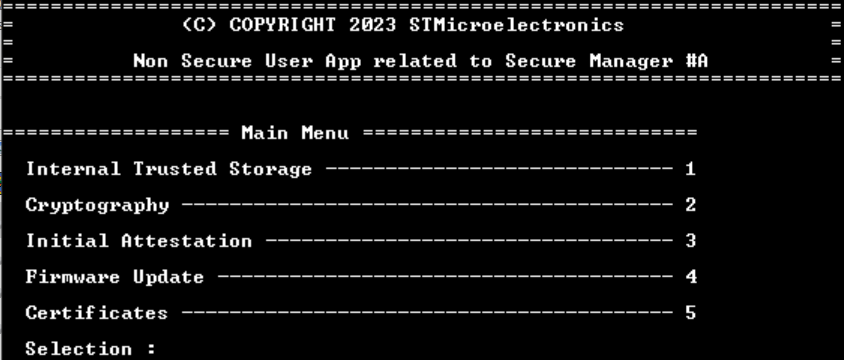
The template application contains a user interface that works with terminal application on host PC and showcases the PSA functionality provided by the secure manager, in service of the user application.
There is a simple exercise you can do as a first step in development loop. Modify the application is way that will be easily visible on the terminal screen. For example, in the main.c edit:
const uint8_t UserAppId = 'A';
to
const uint8_t UserAppId = 'B';
and rebuild the application normally. The postbuild script will produce an encrypted binary.
Running the template application, using the terminal enter '4" to select Firmware update and then 3 to select Download Non-Secure App.
Send the encrypted binary using YMODEM on your terminal SW. Once that is done and test passed, select '2' for Installation Application.
You will observe the result immediately, but unless you select option Validation Non-Secure App, the application will be reverted to the previous version on next reboot. This default behavior of two slot system is implemented to have reset as a panic button in case the newly downloaded firmware is not working properly.
4. Generating from STM32CubeMX
The secure manager can also be configured using the STM32CubeMX visual tool, along with other components of the secure boot. More details are in the following article: How to start with STM32CubeMX and Secure Manager on STM32H573


