1 Serial communication profile
Serial communication applications are proprietary applications used to exchange data entered on the UART of each board.
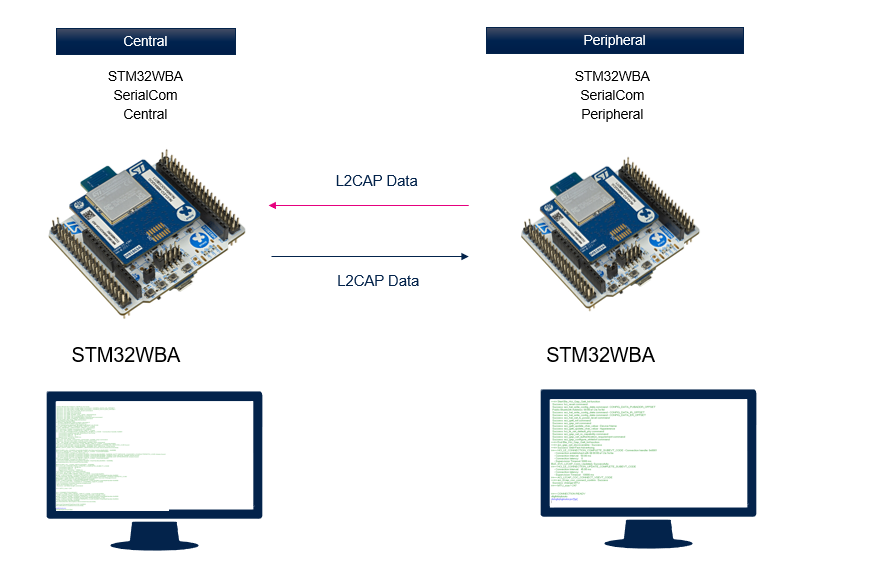
SerialCom applications are named BLE_SerialCom_Central and BLE_SerialCom_Peripheral: One board is configured as central using BLE_SerialCom_Central. The other board is configured as peripheral using BLE_SerialCom_Peripheral.
Both boards support data transfer by sending L2CAP data through a COC (Connection Oriented Channel) link.
- Open VT100 terminals on client and server sides.
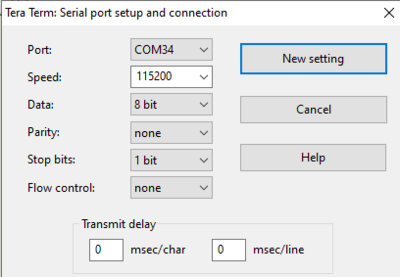
- Connect to ST-LINK via the COM port @115200 bauds/s, 8 data bits, with no parity and 1 stop bit:
| Bluetooth® Serial port configuration |
|---|
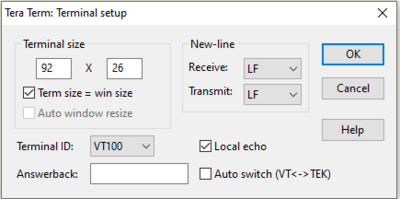
- Configure the terminal with local echo settings:
| Bluetooth® Terminal setup |
|---|
- No service is added.
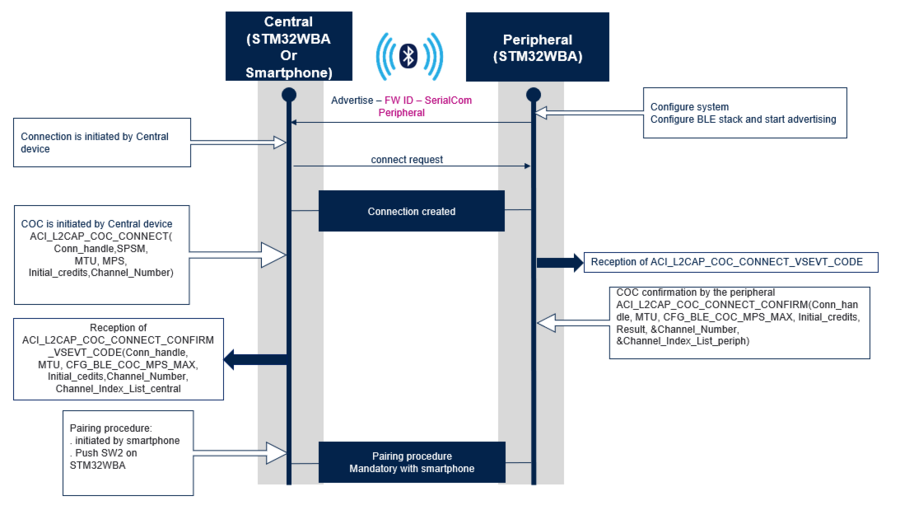
Once a Bluetooth® LE link is established, a Connection Oriented Channel (COC) is established.
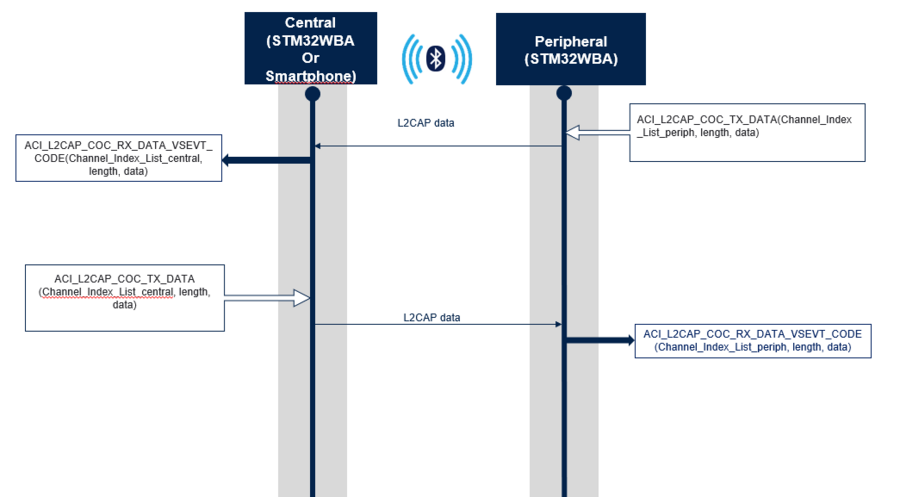
Data are exchanged through the COC link.
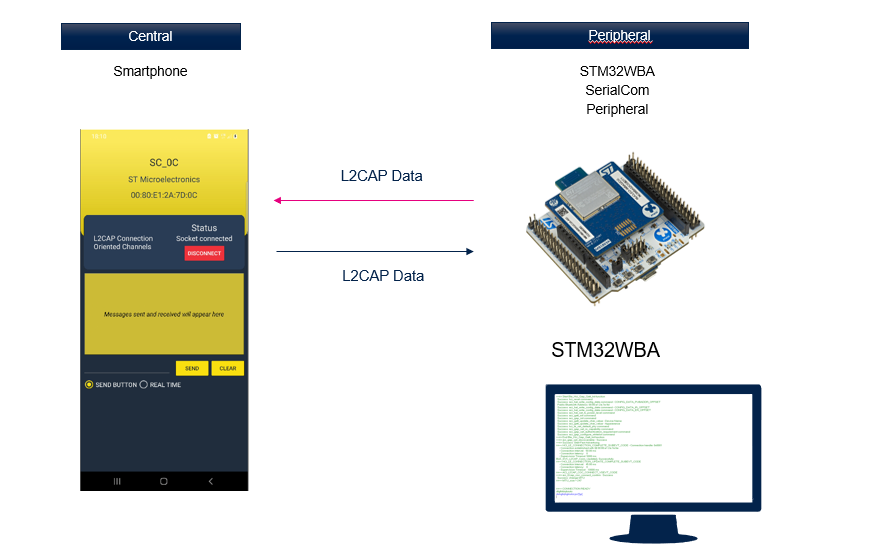
The SerialCom projects provided within the STM32CubeWBA MCU Package[1] are described below:
| Bluetooth® LE SerialCom projects & STM32WBA |
|---|
| Bluetooth® LE SerialCom Peripheral project & Smartphone |
|---|
| Example of COC link establishment between a SerialCom central (STM32WBA or Smartphone) & a SerialCom peripheral (STM32WBA) |
|---|
| Example of COC exchanged data between a SerialCom peripheral (STM32WBA) & a SerialCom central (STM32WBA or Smartphone) |
|---|
1.1 On board buttons configuration
| Button configuration for Bluetooth® Low Energy SerialCom Applications on Nucleo-WBA52CG boards | ||||||||||||||||||||||||
|---|---|---|---|---|---|---|---|---|---|---|---|---|---|---|---|---|---|---|---|---|---|---|---|---|
|
2 Requirements
2.1 Software and system requirements
The following list contains the required software as well as the required minimum IDE version:
- IAR Embedded Workbench for ARM (EWARM) toolchain V9.20.1, plus a patch available in WBA Firmware Package: STM32Cube_FW_WBA_Vx.x.x/Utilities/PC_Software/EWARMv8_STM32WBAx_V1.2.zip
- RealView Microcontroller Development Kit (MDK-ARM) toolchain V5.37, plus a patch available in WBA Firmware package: STM32Cube_FW_WBA_Vx.x.x/Utilities/PC_Software/Keil.STM32WBAx_DFP.1.0.0.zip
- STM32CubeIDE toolchain V1.12.0 [2].
The following programmer software is required to flash the board with an already generated binary:
- STM32CubeProgrammer[3]
2.2 Hardware requirements
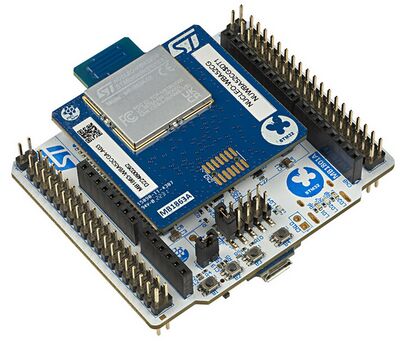
NUCLEO-WBA52CG [4] is required to install the application.
| Hardware platform illustration |
|---|
|
|
2.3 Collector applications compatibility
The STM32CubeWBA SerialCom peripheral application is compatible with the following collector:
3 STM32WBA SerialCom peripheral description
3.1 Project directory
The "BLE_SerialCom_Peripheral" application is available by downloading STM32CubeWBA MCU Package[1].
Refer to How to Build a Bluetooth® LE project wiki page for project directory information.
3.2 Project description
3.2.1 Structure
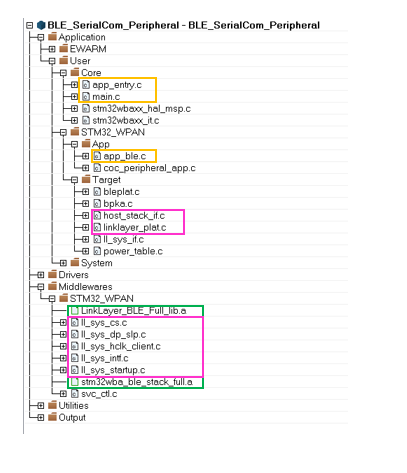
Software project structure with the most important parts:
| SerialCom peripheral project structure |
|---|
|
WARNING: Do not modify the files in the Middlewares folder |
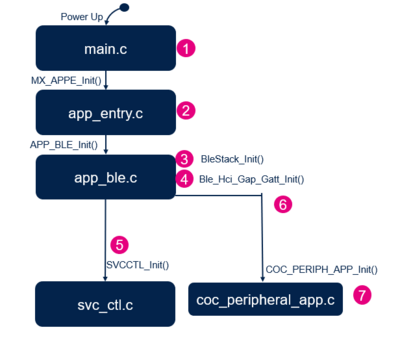
3.2.2 Application initialization
The application initialization steps are described below:
| SerialCom peripheral project initialization |
|---|
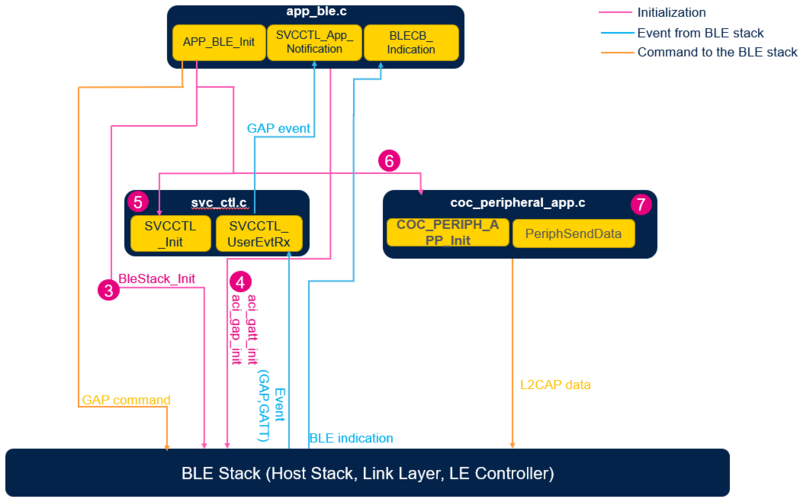
3.2.3 GAP and GATT initialization and interaction
| SerialCom peripheral software module interaction |
|---|
and ![]() The Bluetooth® LE SerialCom peripheral application initialization is done within app_ble.c.
The Bluetooth® LE SerialCom peripheral application initialization is done within app_ble.c.
- Starts the Bluetooth® LE stack:
- Initializes the device as peripheral.
- Configures and starts advertising: ADV parameters, local name, UUID - APP_BLE_init()
- Calls the services controller initialization SVCCTL_Init() - svc_ctl.c
- Manages the GAP event - SVCCTL_App_Notification().
- EVT_LE_CONN_COMPLETE provides information of the connection interval, the slave latency, and the supervision timeout.
- EVT_LE_CONN_UPDATE_COMPLETE provides information about the new connection.
- EVT_DISCONN_COMPLETE communicates link disconnection and its reason to the application.
- EVT_ENCRYPT_CHANGE communicates link encryption to the application.
The Services management is done by the service controller, svc_ctl.c:
- Initializes the number of the registered handler - SVCCTL_SvcInit()
- Manages events - SVCCTL_UserEvtRx()- from the Bluetooth® LE Host Stack and redirects them to the gap event handler - SVCCTL_App_Notification
The application level of the SerialCom peripheral is done with coc_peripheral_app.c:
- Initializes the application context.
- Manages the COC link establishment.
Initializes Rx UART to process data from the terminal.
3.3 How to use the Bluetooth® Low Energy SerialCom Peripheral application
Once the BLE SerialCom Peripheral application is installed on the STM32WBA platform, use BLE SerialCom Central application on STM32WBA platform or a Smartphone.
- Open a VT100 terminal on the central and peripheral sides via the ST-Link Com port, @115200 bauds, 8 data bits, no parity and 1 stop bit:
| Bluetooth® Serial Port Peripheral write data |
|---|
| Bluetooth® Serial Port Central receive data |
|---|
- Press B1 on the central to scan, connect and establish the COC link. When the link is ready, the CONNECTION READY message is displayed.
- Enter data on UART, on the peripheral or central side. Check that the peer device receives data correctly.
Pressing B2 while not connected allows to clear the security database. Pressing B2 while connected allows to send peripheral security request.
There are two different modes to send messages from an STM32WBA: Send button or Real time.
In terminal, when you type the message:
- Send button mode, data are sent when LF is sent
- Real time mode, each character is immediately sent.
Pressing B1 on peripheral side allows data send mode changing.
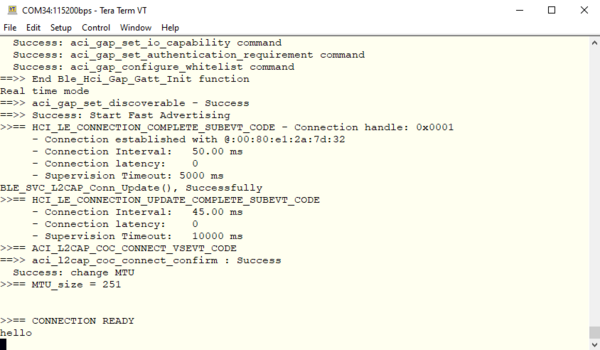
3.4 UART debug trace
The debug log via UART interface ensures the application project is traced.
To enable the traces within the project, enable them within app_conf.h as described below:
/**
 * Enable or Disable traces in application
 */
#define CFG_DEBUG_APP_TRACE         (1)
| SerialCom Peripheral - Initialization phase | Connected Phase |
|---|---|
==>> Start Ble_Hci_Gap_Gatt_Init function Success: hci_reset command Success: aci_hal_write_config_data command - CONFIG_DATA_PUBADDR_OFFSET Public Bluetooth Address: 00:80:e1:2a:7e:6e Success: aci_hal_write_config_data command - CONFIG_DATA_IR_OFFSET Success: aci_hal_write_config_data command - CONFIG_DATA_ER_OFFSET Success: aci_hal_set_tx_power_level command Success: aci_gatt_init command Success: aci_gap_init command Success: aci_gatt_update_char_value - Device Name Success: aci_gatt_update_char_value - Appearance Success: hci_le_set_default_phy command Success: aci_gap_set_io_capability command Success: aci_gap_set_authentication_requirement command Success: aci_gap_configure_whitelist command ==>> End Ble_Hci_Gap_Gatt_Init function ==>> aci_gap_set_discoverable - Success ==>> Success: Start Fast Advertising |
>>== HCI_LE_CONNECTION_COMPLETE_SUBEVT_CODE -
    Connection handle: 0x0001
     - Connection established with @:00:80:e1:2a:7e:9d
     - Connection Interval:   50.00 ms
     - Connection latency:    0
     - Supervision Timeout: 5000 ms
BLE_SVC_L2CAP_Conn_Update(), Successfully
>>== HCI_LE_CONNECTION_UPDATE_COMPLETE_SUBEVT_CODE
     - Connection Interval:   45.00 ms
     - Connection latency:    0
     - Supervision Timeout:   10000 ms
>>== ACI_L2CAP_COC_CONNECT_VSEVT_CODE
==>> aci_l2cap_coc_connect_confirm : Success
  Success: change MTU
>>== MTU_size = 247


>>== CONNECTION READY
|
4 STM32WBA SerialCom Central example description
4.1 Project directory
The "BLE_SerialCom_Central" application is available by downloading STM32CubeWBA MCU Package[1]
Refer to How to Build a Bluetooth® LE project wiki page for project directory information.
4.2 Project description
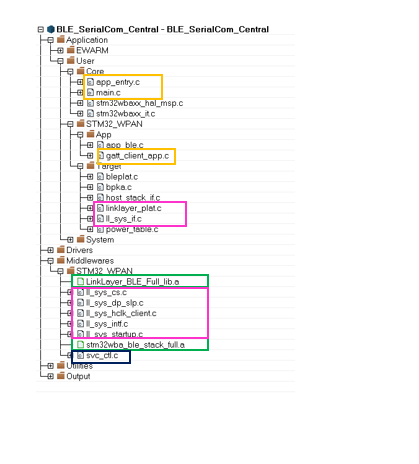
4.2.1 Structure
Software project structure with the most important parts:
| SerialCom central project structure |
|---|
|
WARNING: Do not modify the files in Middlewares folder |
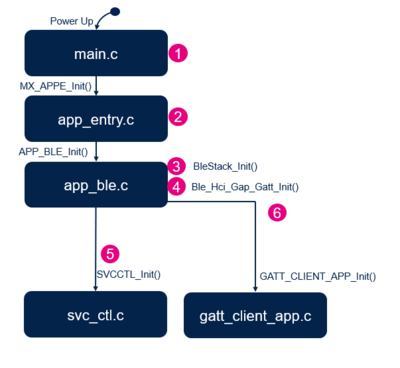
4.2.2 Application initialization
The different steps of the application initialization are described below:
| SerialCom central project initialization |
|---|
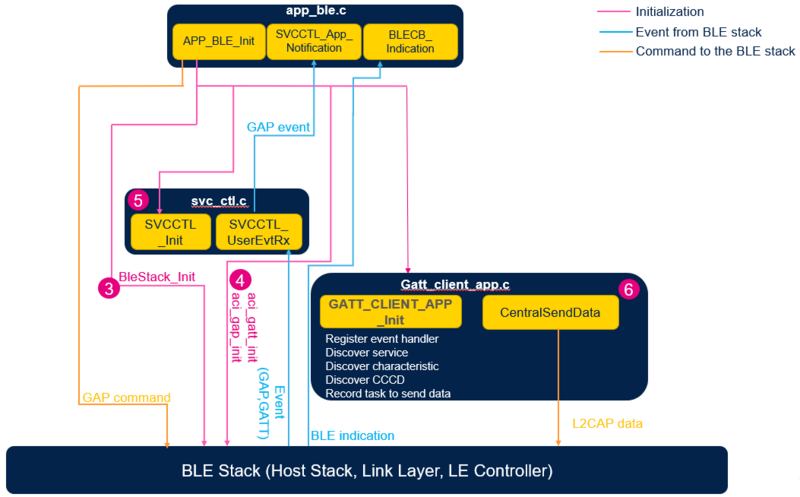
4.2.3 GAP and GATT initialization and interaction
| SerialCom central software module interaction |
|---|
and ![]() The Bluetooth LE SerialCom central application initialization is done within app_ble.c
The Bluetooth LE SerialCom central application initialization is done within app_ble.c
- Start the Bluetooth® LE stack - initialize the device as peripheral - configure and start advertising: ADV parameters, local name, UUID - APP_BLE_init()
- Call the services controller initialization SVCCTL_Init() - svc_ctl.c
- Manage the GAP event - SVCCTL_App_Notification()
- EVT_LE_CONN_COMPLETE - provides information of the connection interval, slave latency, supervision timeout
- EVT_LE_CONN_UPDATE_COMPLETE - provides new information about the connection
- EVT_DISCONN_COMPLETE - informs the application about the link disconnection and the reason
- EVT_ENCRYPT_CHANGE - informs the application weather the link is encrypted
The Services management is done by the service controller, svc_ctl.c
- Initialize the number of registered handler - SVCCTL_SvcInit()
- Manage events - SVCCTL_UserEvtRx()- from the Bluetooth® LE Host Stack and redirect them to the gap event handler - SVCCTL_App_Notification
The application level of the SerialCom central is done with gatt_client_app.c:
- Initialize Gatt Client Application
- Manage COC link establishment
- Initialize Rx UART to process data from terminal
4.3 How to use the Bluetooth® Low Energy SerialCom central application
Once the BLE SerialCom Central application is installed on the STM32WBA platform, use BLE SerialCom Peripheral application on other STM32WBA.
- Open a VT100 terminal on central and peripheral sides via the ST-Link Com Port (Connection is displayed as ST Link), @115200 bauds, 8 data bits, no parity and 1 stop bit:
- Press B1 on the central side to scan, connect and establish COC. Once the link is ready, the CONNECTION READY message is displayed.
- Enter data on the central or the peripheral side, and check that data are correctly received on peer device.
There are two different modes to send messages from an STM32WBA: Send button or Real time.
In terminal, when you type the message:
- Send button mode, data are sent when LF is sent
- Real time mode, each character is immediately sent.
Pressing B1 on central when device is connected allows data send mode changing.
Pressing B2 while not connected allows to clear the security database. Pressing B2 while connected allows to send pairing request.
Pressing B3 while connected allows to send connection update.
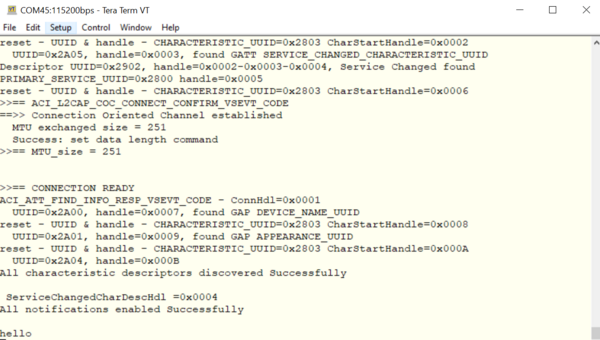
4.4 UART debug trace
Traces are enabled within the project, in app_conf.h as described below:
/**
 * Enable or Disable traces in application
 */
#define CFG_DEBUG_APP_TRACE         (1)
Debugger can also be supported by enabling it within app_conf.h as described below:
/**
 * User interaction
 * When CFG_LED_SUPPORTED is set, LEDS are activated if requested
 * When CFG_BUTTON_SUPPORTED is set, the push button are activated if requested
 * When CFG_DBG_SUPPORTED is set, the debugger is activated
 */
[...]
#define CFG_DBG_SUPPORTED                       (1)
| SerialCom Central - Initialization phase | Press B1. The Connected Phase starts. |
|---|---|
==>> Start Ble_Hci_Gap_Gatt_Init function Success: hci_reset command Success: aci_hal_write_config_data command - CONFIG_DATA_PUBADDR_OFFSET Public Bluetooth Address: 00:80:e1:2a:7e:9d Success: aci_hal_write_config_data command - CONFIG_DATA_IR_OFFSET Success: aci_hal_write_config_data command - CONFIG_DATA_ER_OFFSET Success: aci_hal_set_tx_power_level command Success: aci_gatt_init command Success: aci_gap_init command Success: aci_gatt_update_char_value - Appearance Success: aci_gap_set_io_capability command Success: aci_gap_set_authentication_requirement command Success: aci_gap_configure_whitelist command ==>> End Ble_Hci_Gap_Gatt_Init function -- CENTRAL INITIALIZED |
** START GENERAL DISCOVERY (SCAN) **
--- ST MANUFACTURER data BlueSTv2
-- COC peripheral detected, db addr 0x00:80:E1:2A:7E:6E
>>== ACI_GAP_PROC_COMPLETE_VSEVT_CODE
-- GAP_GENERAL_DISCOVERY_PROC completed
==>> Success: Create connection to SC_WBAxx
>>== ACI_GAP_PROC_COMPLETE_VSEVT_CODE
>>== HCI_LE_CONNECTION_COMPLETE_SUBEVT_CODE -
    Connection handle: 0x0001
     - Connection established with @:00:80:e1:2a:7e:6e
     - Connection Interval:   50.00 ms
     - Connection latency:    0
     - Supervision Timeout: 5000 ms
GATT services discovery
  Success: aci_l2cap_connection_parameter_update_resp command
  Success: aci_hal_set_radio_activity_mask command
  Fail   : aci_l2cap_connection_parameter_update_resp command
ACI_ATT_READ_BY_GROUP_TYPE_RESP_VSEVT_CODE - ConnHdl=0x0001
  1/2 short UUID=0x1801, handle [0x0001 - 0x0004],
  GENERIC_ATTRIBUTE_SERVICE_UUID found
  2/2 short UUID=0x1800, handle [0x0005 - 0x000B],
  GAP_SERVICE_UUID found
PROC_GATT_DISC_ALL_PRIMARY_SERVICES
 services discovered Successfully

DISCOVER_ALL_CHARS ConnHdl=0x0001
 ALLServiceHandle[0x0001 - 0x000B]
ACI_ATT_READ_BY_TYPE_RESP_VSEVT_CODE - ConnHdl=0x0001
  ConnHdl=0x0001, number of value pair = 3
    1/3 short UUID=0x2A05, Properties=0x0020,
    CharHandle [0x0002 - 0x0003],
    GATT SERVICE_CHANGED_CHARACTERISTIC_UUID charac found
    2/3 short UUID=0x2A00, Properties=0x000A,
    CharHandle [0x0006 - 0x0007],
    GAP DEVICE_NAME charac found
    3/3 short UUID=0x2A01, Properties=0x0002,
    CharHandle [0x0008 - 0x0009],
    GAP APPEARANCE charac found
ACI_ATT_READ_BY_TYPE_RESP_VSEVT_CODE - ConnHdl=0x0001
  ConnHdl=0x0001, number of value pair = 1
    1/1 short UUID=0x2A04, Properties=0x0002,
    CharHandle [0x000A - 0x000B]
All characteristics discovered Successfully

DISCOVER_ALL_CHAR_DESCS [0x0001 - 0x000B]
>>== HCI_LE_CONNECTION_UPDATE_COMPLETE_SUBEVT_CODE
     - Connection Interval:   45.00 ms
     - Connection latency:    0
     - Supervision Timeout:   10000 ms
==>> Start Connection Oriented Channel
  Success: aci_l2cap_coc_connect command
ACI_ATT_FIND_INFO_RESP_VSEVT_CODE - ConnHdl=0x0001
reset - UUID & handle - CHARACTERISTIC_UUID=0x2803
  CharStartHandle=0x0002
  UUID=0x2A05, handle=0x0003, found
  GATT SERVICE_CHANGED_CHARACTERISTIC_UUID
Descriptor UUID=0x2902, handle=0x0002-0x0003-0x0004,
 Service Changed found
PRIMARY_SERVICE_UUID=0x2800 handle=0x0005
reset - UUID & handle - CHARACTERISTIC_UUID=0x2803
 CharStartHandle=0x0006
>>== ACI_L2CAP_COC_CONNECT_CONFIRM_VSEVT_CODE
==>> Connection Oriented Channel established
  MTU exchanged size = 247
  Success: set data length command

>>== MTU_size = 247


>>== CONNECTION READY
ACI_ATT_FIND_INFO_RESP_VSEVT_CODE - ConnHdl=0x0001
  UUID=0x2A00, handle=0x0007, found GAP DEVICE_NAME_UUID
reset - UUID & handle - CHARACTERISTIC_UUID=0x2803
  CharStartHandle=0x0008
  UUID=0x2A01, handle=0x0009, found GAP APPEARANCE_UUID
reset - UUID & handle - CHARACTERISTIC_UUID=0x2803
  CharStartHandle=0x000A
  UUID=0x2A04, handle=0x000B
All characteristic descriptors discovered Successfully

 ServiceChangedCharDescHdl =0x0004
All notifications enabled successfully
|
5 STM32WBA SerialCom peripheral with ST BLE Toolbox smartphone app
Required: phone with Android 10 or newer.
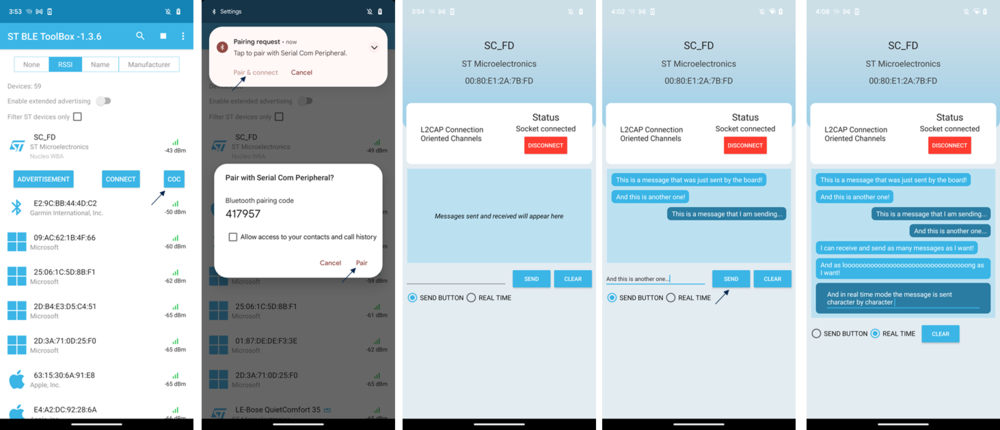
ST BLE ToolBox is a user-friendly application which interacts with and debugs ST Bluetooth®LE devices.
| ST BLE Toolbox screenshots about the COC feature |
|---|
On ST BLE Toolbox, when clicking on a device corresponding to an ST board with a firmware ID SerialCom Peripheral (0x87), a "COC" button appears (next to the "Connect" button).
After accepting the pairing with the device (which is mandatory), a special page for COC appears. This means the L2CAP socket has been created and you can now receive and send data via the L2CAP channel.
Messages sent by the board will immediately appear in the chat.
2 different modes can be used to send messages from the phone: Send button and Real time.
In Send button mode, you can type your message in the text field at the bottom of the chat, then sending this message by clicking on the "Send" button.
In the Real time mode, each character you write is immediately sent.
You can erase all messages by clicking on "Clear".
Data format:
When sending the message "hello", what is actually sent is 0x 05 00 68 65 6C 6C 6F.
- 0x 05 00 is the length of the message in little endian (05 00 in little endian => 00 05 => 5 => number of letters of "hello").
- 0x 68 65 6C 6C 6F is "hello" in ascii ("h" = 0x68, "e" = 0x65, "l" = 0x6C, "o" = 0x6F).
6 References
