This article describes how to obtain and use the Distribution Package for Android of the STM32MPU Embedded Software for any STM32MP1 family (STM32MP15 boards) development platform, in order to modify or add pieces of software, and to create the right Android distribution for the targeted product.
It lists some prerequisites in terms of knowledge and development environment, and gives step-by-step instructions to download and install the STM32MPU Embedded Software packages for this Package.
1. Distribution Package content[edit source]
If you are not familiar with the STM32MPU Embedded Software for Android distribution and its Packages, please read the following articles:
- Which STM32MPU Embedded Software Package for Android better suits your needs (and especially the Distribution Package chapter)
- STM32MPU Embedded Software distribution for Android
In summary, this Distribution Package provides:
- An Android build framework (aka distribution builder)
- For the STM32MPU distribution for Android (development on Arm Cortex-A processor):
- the BSP (Linux kernel, U-Boot, TF-A, optionally OP-TEE) pieces in binary (prebuilt). Several scripts are provided to load source code and re-build them
- the application frameworks (including hardware abstraction code) pieces in source code
- For the STM32Cube MPU Package (development on Arm Cortex-M processor), all pieces of software in source code: BSP, HAL, middlewares and applications
- A toolset to tune the system for your needs, and to handle the built image (for example STM32CubeProgrammer to install the built image on the board).
2. Prerequisites[edit source]
2.1. Knowledge[edit source]
The STM32MP1 Distribution Package aims to create an Android distribution for the targeted product: solid knowledge of Linux and Android are recommended to make the most of this Package.
The STM32MPU distribution for Android is an Android distribution based on the Android build framework: a short introduction about Android is available in AOSP[1].
Reading the STM32MPU Embedded Software for Android architecture overview is also highly recommended.
2.2. Development setup[edit source]
The recommended setup for the development PC (host) is specified in the following article: PC prerequisites.
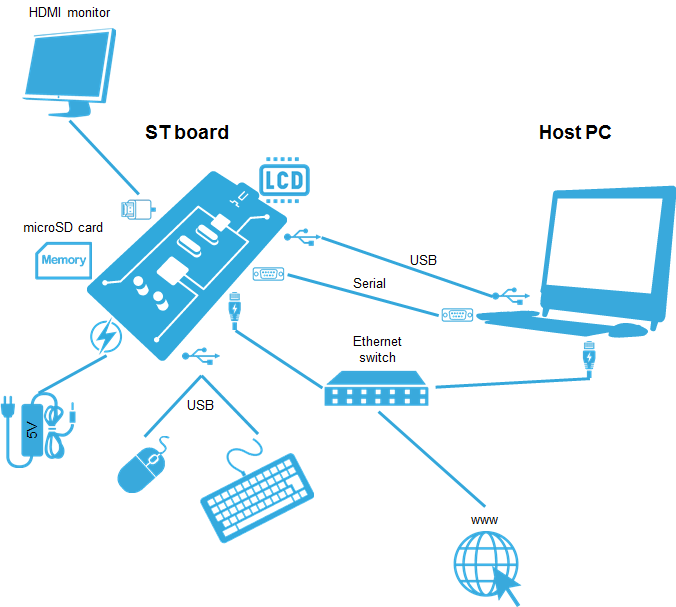
Whatever the development platform (board) and development PC (host) used, the range of possible development setups is illustrated by the picture below.
The following components are mandatory:
- Host PC for cross-compilation and cross-debugging, installed as specified above
- Board assembled and configured as specified in the associated Starter Package article
- Mass storage device (for example, microSD card) to load and update the software images (binaries)
The following components are optional, but recommended:
- A serial link between the host PC (through Terminal program) and the board for traces (even early boot traces), and access to the board from the remote PC (command lines)
- An Ethernet link between the host PC and the board for cross-development and cross-debugging through a local network. This is an alternative or a complement to the serial (or USB) link
- A display connected to the board, depending on the technologies available on the board: DSI LCD display, HDMI monitor (or TV) and so on
- A mouse and a keyboard connected through USB ports
Additional optional components can be added by means of the connectivity capabilities of the board: cameras, displays, JTAG, sensors, actuators, and much more.
3. Installing the STM32MPU distribution for Android[edit source]
The software package is provided AS IS, and by downloading it, you agree to be bound to the terms of the software license agreement (SLA). The detailed content licenses can be found here.
The installation relies on the repo command. If the Repo tool (a Google-built repository management tool that runs on top of Git) is not already installed and configured on the host PC, refer to the PC prerequisites article.
Create a working directory for the distribution (we recommended using the distribution name):
 mkdir <working directory>
 cd <working directory>
3.1. Use manifest[edit source]
1- Initialize repo in the working directory:
repo init -u https://github.com/STMicroelectronics/android-manifest -b refs/tags/<Tag> -m stm32mp1droid.xml
With
- <Tag> = tag selecting the required version of the STM32MPU distribution for Android™ (see following table)
| STM32MPU distribution for Android™ | ||
| Tag | android-<version> | Release note |
| st-android-11.0.0-2021-01-29 | android-11.0.0_r27 | st-android-11.0.0-2021-01-29 release note (v2.0.0) |
| st-android-11.0.0-2021-06-01 | android-11.0.0_r37 | st-android-11.0.0-2021-06-01 release note (v2.0.1) |
| st-android-11.0.0-2021-08-31 | android-11.0.0_r37 | st-android-11.0.0-2021-08-31 release note (v2.0.2) |
2- Synchronize the local project directories with the remote repositories specified in the manifest:
repo sync
This may take several hours.
3.2. Use packages[edit source]
If you have been provided with an archive <STM32MPU delivery version>.tar.gz, you need to follow those steps:
1- Download the official Android version compatible with the provided package (with or without mirror):
 repo init -u https://android.googlesource.com/platform/manifest -b android-<version>
 repo sync
For more info on available version please refer to the official page[2].
This may take several hours.
2- Download the archive depending on the required version (tag):
| STM32MPU distribution for Android™ | |||
| Tag | Link | android-<version> | Release note |
| st-android-11.0.0-2021-01-29 | en.st-android-11.0.0-2021-01-29-source.tar.gz | android-11.0.0_r27 | st-android-11.0.0-2021-01-29 release note |
3- Extract the archive inside the <working directory>:
tar xzf en.<Tag>-source.tar.gz
4. Local mirror[edit source]
It can be of interest to create a local mirror of the different repositories used.
There are two possible kinds of cache:
- REPO mirror: mirror of list of modules in repositories based on provided manifest (for example Android AOSP)
- GIT mirror: mirror of one module (for example Linux kernel)
4.1. REPO mirror[edit source]
It's mainly used to mirror the Android AOSP sources.
1- Create and go to the cache directory
 mkdir <PathToRepoCacheDir>
 cd <PathToRepoCacheDir>
2- Mirror the required sources
case AOSP sources needed for the required version (recommended)
 repo init -u https://android.googlesource.com/platform/manifest -b <Tag> --mirror
 repo sync -q
case full AOSP sources
 repo init -u https://android.googlesource.com/platform/manifest --mirror
 repo sync -q
3- Create environment variable for this cache directory
export CACHE_DIR=<PathToRepoCacheDir>
4- Use the cache directory
Add --reference=$CACHE_DIR option to your repo init command.
repo init --reference=$CACHE_DIR -u https://github.com/STMicroelectronics/android-manifest -b refs/tags/<Tag> -m stm32mp1droid.xml
or
repo init --reference=$CACHE_DIR -u https://android.googlesource.com/platform/manifest -b android-<version>
4.2. GIT mirror[edit source]
While the distribution has been installed, a helper script cachesetup is available for this purpose, which creates / updates the mirrors based on the configuration file device/stm/<STM32Series>/scripts/cache/android_cache.config.
Take care that if you change the environment variable name, you have to adapt the associated scripts load_xxxx available in device/stm/<STM32Series>-xxxx/source directory.
Create the mirrors by executing the following commands:
 source build/envsetup.sh
 cachesetup --new
Regular updating of your mirror is recommended by executing:
cachesetup
For more information on how to use this command, look at the cachesetup usage (execute cachesetup -h).
5. Building the STM32MPU distribution for Android[edit source]
When the installation is complete, please refer to the How to build STM32MPU distribution for Android page to learn how to build it.
6. Flashing the built image[edit source]
When the distribution has been built, please refer to the How to populate boards for Android page to learn how to flash your device.
7. References[edit source]
Arm® is a registered trademark of Arm Limited (or its subsidiaries) in the US and/or elsewhere. ![]()
Arm® is a registered trademark of Arm Limited (or its subsidiaries) in the US and/or elsewhere. ![]()