This article describes how to get and use the Distribution Package of the STM32MPU Embedded Software for any development platform of the STM32MP1 family (STM32MP15 boards), in order to modify or add pieces of software, and to create the right Linux distribution, for the targeted product.
It lists some prerequisites in terms of knowledges and development environment, and gives the step-by-step approach to download and install the STM32MPU Embedded Software packages for this Package.
Finally, it proposes some guidelines to upgrade (add, remove, configure, improve...) any piece of software.
1. Distribution Package content[edit source]
If you are not yet familiar with the STM32MPU Embedded Software distribution and its Packages, please read the following articles:
- Which STM32MPU Embedded Software Package better suits your needs (and especially the Distribution Package chapter)
- STM32MPU Embedded Software distribution
If you are already familiar with the Distribution Package for the STM32MPU Embedded Software distribution, the fast links to essential commands might interest you.
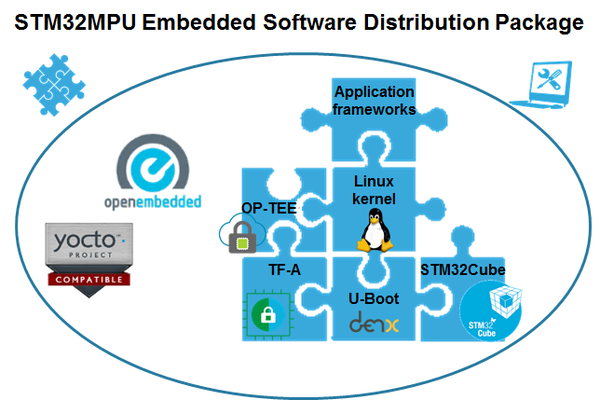
To sum up, this Distribution Package provides:
- a build framework based on OpenEmbedded (aka distribution builder)
- for the OpenSTLinux distribution (development on Arm Cortex-A processor), all pieces of software in source code: the BSP (Linux kernel, U-Boot, TF-A, optionally OP-TEE), and the application frameworks (Wayland-Weston, GStreamer, ALSA...)
- for the STM32Cube MPU Package (development on Arm Cortex-M processor), all pieces of software in source code: BSP, HAL, middlewares and applications
- a toolset to tune the system for your needs, and to handle the built image (e.g. STM32CubeProgrammer to install the built image on the board)
2. Distribution Package step-by-step overview[edit source]
The steps to get the STM32MPU Embedded Software packages ready for your developments, are:
☐ Checking the prerequisites
☐ Installing the Starter Package for your board
☐ Installing the OpenSTLinux distribution
☐ Building the OpenSTLinux distribution
☐ Flashing the built image
☐ Checking the boot sequence
Once these steps are achieved, you are able to:
- modify software running on Arm Cortex-A
- modify software running on Arm Cortex-M
- create your own Linux distribution
- generate your own Starter and Developer Packages
3. Checking the prerequisites[edit source]
3.1. Knowledges[edit source]
The STM32MP1 Distribution Package aims at creating a Linux distribution for the targeted product: solid knowledges about Linux are recommended to make the most of this Package.
The OpenSTLinux distribution is a Linux distribution based on the OpenEmbedded (/Yocto Project) build framework for embedded Linux: a short introduction about OpenEmbedded and links towards the standard documentation and trainings are available in the OpenEmbedded article.
Having a look at the STM32MPU Embedded Software architecture overview is also highly recommended.
3.2. Development setup[edit source]
The recommended setup for the development PC (host) is specified in the following article: PC prerequisites.
Whatever the development platform (board) and development PC (host) used, the range of possible development setups is illustrated by the picture below.
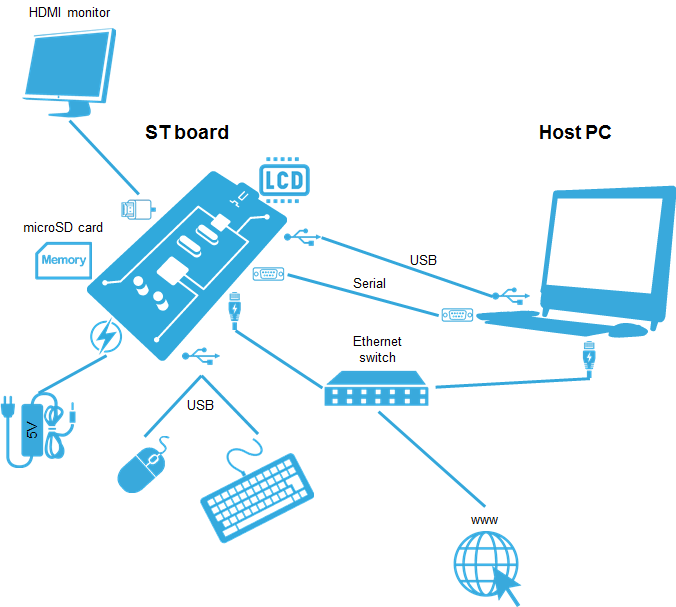
The following components are mandatory:
- Host PC for cross-compilation and cross-debugging, installed as specified above
- Board assembled and configured as specified in the associated Starter Package article
- Mass storage device (for example, microSD card) to load and update the software images (binaries)
The following components are optional, but recommended:
- A serial link between the host PC (through Terminal program) and the board for traces (even early boot traces), and access to the board from the remote PC (command lines)
- An Ethernet link between the host PC and the board for cross-development and cross-debugging through a local network. This is an alternative or a complement to the serial (or USB) link
- A display connected to the board, depending on the technologies available on the board: DSI LCD display, HDMI monitor (or TV) and so on
- A mouse and a keyboard connected through USB ports
Additional optional components can be added by means of the connectivity capabilities of the board: cameras, displays, JTAG, sensors, actuators, and much more.
4. Installing the Starter Package[edit source]
Before installing and using the Distribution Package, it is essential to get familiar with your board thanks to its Starter Package. All articles relative to Starter Packages are found in Category:Starter Package: find the one that corresponds to your board, and follow the installation instructions (if not yet done), before going further.
In brief, it means that:
- your board boots successfully
- the flashed image comes from the same release of the STM32MPU Embedded Software distribution than the OpenSTLinux distribution that will be downloaded in this article
Thanks to the Starter Package, all Flash partitions are populated.
Then, with the Distribution Package, it is possible to modify or to upgrade any of these partitions independently one from the others.
5. Installing the OpenSTLinux distribution[edit source]
- The STM32MP1 OpenSTLinux distribution is delivered through a manifest repository location and a manifest revision (openstlinux-5.4-dunfell-mp1-20-11-12).
- The installation relies on the repo command. In case the Repo tool (a Google-built repository management tool that runs on top of git) is not yet installed and configured on the host PC, refer to the PC prerequisites article.
- The OpenSTLinux distribution is massively using open source software (OSS) packages that are downloaded from a variety of open source repositories; so it is required that the IT infrastructure proxies do not forbid such accesses. If some proxy-related issues are suspected, refer to the How to avoid proxy issues article.
- Install the STM32MP1 OpenSTLinux distribution
| STM32MP1 Distribution Package OpenSTLinux distribution - STM32MP15-Ecosystem-v2.1.0 release | |
|---|---|
| Installation |
$ cd <working directory path>/Distribution-Package
$ mkdir openstlinux-5.4-dunfell-mp1-20-11-12
$ cd openstlinux-5.4-dunfell-mp1-20-11-12
$ repo init -u https://github.com/STMicroelectronics/oe-manifest.git -b refs/tags/openstlinux-5.4-dunfell-mp1-20-11-12
$ repo sync
|
| Release note |
Details about the content of this software package are available in the associated STM32MP15 ecosystem release note.
|
- The OpenSTLinux distribution installation directory is in the <Distribution Package installation directory>, and is named openstlinux-5.4-dunfell-mp1-20-11-12:
openstlinux-5.4-dunfell-mp1-20-11-12  OpenSTLinux distribution
├── layers
│    ├── meta-openembedded                Collection of layers for the OpenEmbedded-Core universe (OpenEmbedded standard)
│    ├── meta-qt5                         QT5 layer for OpenEmbedded (standard)
│    ├── meta-st
│    │   ├── meta-st-openstlinux          STMicroelectronics layer that contains the frameworks and images settings for the OpenSTLinux distribution
│    │   ├── meta-st-stm32mp              STMicroelectronics layer that contains the description of the BSP for the STM32 MPU devices
│    │   │   ├── recipes-bsp
│    │   │   │   ├── alsa                 Recipes for ALSA control configuration
│    │   │   │   ├── drivers              Recipes for Vivante GCNANO GPU kernel drivers
│    │   │   │   ├── trusted-firmware-a   Recipes for TF-A
│    │   │   │   └── u-boot               Recipes for U-Boot
│    │   │   ├── recipes-extended
│    │   │   │   ├── linux-examples       Recipes for Linux examples for STM32 MPU devices
│    │   │   │   ├── m4coredump           Recipes for script to manage coredump of cortexM4
│    │   │   │   └── m4projects           Recipes for firmware examples for Cortex M4
│    │   │   ├── recipes-graphics
│    │   │   │   ├── gcnano-userland      Recipes for Vivante libraries OpenGL ES, OpenVG and EGL (multi backend)
│    │   │   │   └── [...]
│    │   │   ├── recipes-kernel
│    │   │   │   ├── linux                Recipes for Linux kernel
│    │   │   │   └── linux-firmware       Recipes for Linux firmwares (example, Bluetooth firmware)
│    │   │   ├── recipes-security
│    │   │   │   └── optee                Recipes for OPTEE
│    │   │   ├── recipes-st
│    │   │   │   └── images               Recipes for the bootfs and userfs partitions binaries
│    │   │   └── [...]
│    │   ├── meta-st-stm32mp-addons       STMicroelectronics layer that helps managing the STM32CubeMX integration
│    │   └── scripts
│    │       ├── envsetup.sh              Environment setup script for Distribution Package
│    │       └── [...]
│    ├── meta-timesys                     Timesys layer for OpenEmbedded (standard)
│    └── openembedded-core                Core metadata for current versions of OpenEmbedded (standard)
5.1. Initializing the OpenEmbedded build environment[edit source]
The OpenEmbedded environment setup script must be run once in each new working terminal in which you use the BitBake or devtool tools (see later):
DISTRO=openstlinux-weston MACHINE=stm32mp1 source layers/meta-st/scripts/envsetup.sh
The BSP for STM32MP1 depends on packages and firmwares which are covered by a software license agreement (SLA). You will be asked to read and to accept this EULA.
Note that:
- openstlinux-weston (OpenSTLinux distribution featuring Weston/Wayland) and stm32mp1 (machine configuration for all STM32MP1 hardware configurations) are the default values for DISTRO and MACHINE
- The software packages for the Starter Package (image) and for the Developer Package (SDK...) have been built with this configuration
- Other values for DISTRO and MACHINE are proposed in OpenSTLinux distribution
Among other things, the environment setup script creates the build directory named build-<distro>-<machine> directory (build-openstlinuxweston-stm32mp1 here). After the script runs, the current working directory is set to this build directory. Later, when the build completes, it contains all the files created during the build.
The local configuration file (build-<distro>-<machine>/conf/local.conf) contains all local user settings. The layers configuration file (build-<distro>-<machine>/conf/bblayers.conf) tells BitBake what layers must be considered during the build.
openstlinux-[...]             OpenSTLinux distribution
├── build-<distro>-<machine>  Build directory
│   ├── conf
│   │   ├── bblayers.conf     Local configuration file
│   │   ├── local.conf        Layers configuration file
│   │   └── [...]
│   └── workspace
├── layers
│   ├── meta-openembedded
│   ├── [...]
6. Building the OpenSTLinux distribution[edit source]
The bitbake <image> command is used to build the image. <image> specifies the targeted image, st-image-weston here (Weston image for OpenSTLinux with basic Wayland support).
bitbake st-image-weston
BitBake is a core component of the Yocto Project and is used by the OpenEmbedded build system to build images. This build engine executes shell and Python tasks according to provided metadata stored in recipe (.bb), configuration (.conf), and class (.bbclass) files. The BitBake cheat sheet article introduces some BitBake command-line options, describes shortly the syntax of the recipes (.bb), and gives links towards standard documentation.
Note that:
- The software packages for the Starter Package (image) and for the Developer Package (SDK...) have been built for this st-image-weston image
- Other values for <image> are proposed as examples in OpenSTLinux distribution (take care of the compatibility between the value selected for DISTRO and the value targeted for <image>)
By default, every BitBake task is accomplished in the build directory (see more information about the build directory structure in Yocto Project Mega-Manual[1]).
7. Flashing the built image[edit source]
The build-<distro>-<machine>/tmp-glibc/deploy/images/stm32mp1 directory receives complete file system images.
Build directory structure: images
build-<distro>-<machine>/tmp-glibc/deploy
└── images
|   └── stm32mp1
|       ├── flashlayout_st-image-weston                                 Flash layout files (description of the partitions) for the supported flash devices
|       │   ├── FlashLayout_emmc_stm32mp157c-ev1-optee.tsv              Flash layout file for eMMC and OP-TEE → STM32MP15 Evaluation boards
|       │   ├── FlashLayout_emmc_stm32mp157c-ev1-trusted.tsv            Flash layout file for eMMC and trusted boot chain → STM32MP15 Evaluation boards
|       │   ├── FlashLayout_nand-4-256_stm32mp157c-ev1-optee.tsv        Flash layout file for NAND Flash and OP-TEE → STM32MP15 Evaluation boards
|       │   ├── FlashLayout_nand-4-256_stm32mp157c-ev1-trusted.tsv      Flash layout file for NAND Flash and trusted boot chain → STM32MP15 Evaluation boards
|       │   ├── FlashLayout_nor-emmc_stm32mp157c-ev1-optee.tsv          Flash layout file for NOR Flash (and eMMC) and OP-TEE → STM32MP15 Evaluation boards
|       │   ├── FlashLayout_nor-emmc_stm32mp157c-ev1-trusted.tsv        Flash layout file for NOR Flash (and eMMC) and trusted boot chain → STM32MP15 Evaluation boards
|       │   ├── FlashLayout_nor-nand-4-256_stm32mp157c-ev1-optee.tsv    Flash layout file for NOR Flash (and NAND Flasdh) and OP-TEE → STM32MP15 Evaluation boards
|       │   ├── FlashLayout_nor-nand-4-256_stm32mp157c-ev1-trusted.tsv  Flash layout file for NOR Flash (and NAND Flasdh) and trusted boot chain → STM32MP15 Evaluation boards
|       │   ├── FlashLayout_nor-sdcard_stm32mp157c-ev1-optee.tsv        Flash layout file for NOR Flash (and microSD card) and OP-TEE → STM32MP15 Evaluation boards
|       │   ├── FlashLayout_nor-sdcard_stm32mp157c-ev1-trusted.tsv      Flash layout file for NOR Flash (and microSD card) and trusted boot chain → STM32MP15 Evaluation boards
|       │   ├── FlashLayout_sdcard_stm32mp157c-dk2-basic.tsv            Flash layout file for microSD card and basic boot chain → STM32MP15 Discovery kits
|       │   ├── FlashLayout_sdcard_stm32mp157c-dk2-optee.tsv            Flash layout file for microSD card and OP-TEE → STM32MP15 Discovery kits
|       │   ├── FlashLayout_sdcard_stm32mp157c-dk2-trusted.tsv          Flash layout file for microSD card and trusted boot chain (recommended setup) → STM32MP15 Discovery kits
|       │   ├── FlashLayout_sdcard_stm32mp157c-ev1-basic.tsv            Flash layout file for microSD card and basic boot chain → STM32MP15 Evaluation boards
|       │   ├── FlashLayout_sdcard_stm32mp157c-ev1-optee.tsv            Flash layout file for microSD card and OP-TEE → STM32MP15 Evaluation boards
|       │   └── FlashLayout_sdcard_stm32mp157c-ev1-trusted.tsv          Flash layout file for microSD card and trusted boot chain (recommended setup) → STM32MP15 Evaluation boards
|       │   └── [...]
|       ├── scripts
|       │   └── create_sdcard_from_flashlayout.sh
|       ├── splash.bin                                                  U-Boot splash screen picture (file in BMP format with a .bin extension) for NOR Flash
|       ├── st-image-bootfs-openstlinux-weston-stm32mp1.ext4            Binary for bootfs partition
|       ├── st-image-userfs-openstlinux-weston-stm32mp1.ext4            Binary for userfs partition
|       ├── st-image-vendorfs-openstlinux-weston-stm32mp1.ext4          Binary for vendorfs partition
|       ├── st-image-weston-openstlinux-weston-stm32mp1.ext4            Binary for rootfs partition
|       ├── stm32mp157c-d[*].dtb                                        Linux kernel device tree blob files for bootfs partition → STM32MP15 Discovery kits
|       ├── stm32mp157c-e[*].dtb                                        Linux kernel device tree blob files for bootfs partition → STM32MP15 Evaluation boards
|       ├── tf-a-bl2-optee.elf                                          Debug symbol file for TF-A and OP-TEE → trusted boot firmware stage
|       ├── tf-a-bl2-trusted.elf                                        Debug symbol file for TF-A → trusted boot firmware stage
|       ├── tf-a-bl32-trusted.elf                                       Debug symbol file for TF-A → trusted boot firmware stage
|       ├── tf-a-stm32mp157c-dk2-optee.stm32                            TF-A binary for FSBL partition (OP-TEE) → STM32MP15 Discovery kits
|       ├── tf-a-stm32mp157c-dk2-trusted.stm32                          TF-A binary for FSBL partition (trusted boot chain) → STM32MP15 Discovery kits
|       ├── tf-a-stm32mp157c-ev1-optee.stm32                            TF-A binary for FSBL partition (OP-TEE) → STM32MP15 Evaluation boards
|       ├── tf-a-stm32mp157c-ev1-trusted.stm32                          TF-A binary for FSBL partition (trusted boot chain) → STM32MP15 Evaluation boards
|       ├── u-boot-spl.stm32-stm32mp157c-dk2-basic                      U-Boot binary for FSBL partition (basic boot chain) → STM32MP15 Discovery kits
|       ├── u-boot-spl.stm32-stm32mp157c-ev1-basic                      U-Boot binary for FSBL partition (basic boot chain) → STM32MP15 Evaluation boards
|       ├── u-boot-stm32mp157c-dk2-basic.img                            U-Boot binary for SSBL partition (basic boot chain) → STM32MP15 Discovery kits
|       ├── u-boot-stm32mp157c-dk2-optee.stm32                          U-Boot binary for SSBL partition (OP-TEE) → STM32MP15 Discovery kits
|       ├── u-boot-stm32mp157c-dk2-trusted.stm32                        U-Boot binary for SSBL partition (trusted boot chain) → STM32MP15 Discovery kits
|       ├── u-boot-stm32mp157c-ev1-basic.img                            U-Boot binary for SSBL partition (basic boot chain) → STM32MP15 Evaluation boards
|       ├── u-boot-stm32mp157c-ev1-optee.stm32                          U-Boot binary for SSBL partition (OP-TEE) → STM32MP15 Evaluation boards
|       ├── u-boot-stm32mp157c-ev1-trusted.stm32                        U-Boot binary for SSBL partition (trusted boot chain) → STM32MP15 Evaluation boards
|       ├── uImage                                                      Linux kernel binary image file (with U-Boot wrapper) for bootfs partition
|       ├── vmlinux                                                     Debug symbol file for Linux kernel
|       └── [...]
└── [...]
Note that the build of the Distribution Package generates the images and the Flash layout files for the OP-TEE (expand the "Build directory structure: images" above to see these files *optee*): if you are interested by this configuration, see How to populate and boot a board with OP-TEE.
The STM32CubeProgrammer tool is used to flash the STM32MP15 board with the built image. It's assumed that this tool has been installed through the Starter Package associated with your board.
Depending on the board, several Flash devices (microSD, eMMC...) might be available. The microSD card is considered as the Flash device in the rest of this article.
The procedure to flash your board is explained in the Starter Package article that corresponds to your board (remember that all articles relative to Starter Packages are found in Category:Starter Package):
- Flashing the built image on the STM32MP157x-EV1 Evaluation board
- Flashing the built image on the STM32MP157x-DKx Discovery kit
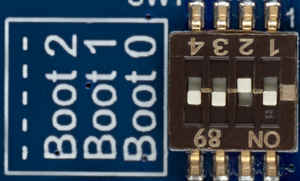
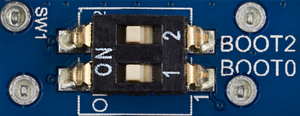
Once the flashing is terminated, the boot switches must be configured so that the Flash device (e.g. microSD card) on which the image has been flashed, is selected as the boot source:
- Boot switches on the STM32MP157x-EV1 Evaluation board
- Boot switches on the STM32MP157x-DKx Discovery kit
The figures below show the configuration of the boot switches for a boot from microSD card on different boards:
| Boot from microSD card on STM32MP157x-EV1 Evaluation board | Boot from microSD card on STM32MP157x-DKx Discovery kit |
8. Checking the boot sequence[edit source]
You can check the build by executing the same basic commands as the ones described in the Starter Package article for your board: Category:Starter Package.
9. Modifying software running on Arm Cortex-A[edit source]
Now that the OpenSTLinux distribution is installed and built, let's customize it thanks to standard OpenEmbedded methods (e.g. creating a layer) and utilities (e.g. devtool).
9.1. Creating a layer[edit source]
Your software packages developed on top of the OpenSTLinux distribution shall be added in one (or more) custom layer(s). In the same way, your modifications (add-ons, improvements, customizations) in packages that already exist in layers of the OpenSTLinux distribution, shall be appended in custom layer(s), especially to ease the maintenance.
The How to create a new open embedded layer article proposes different ways to create and manage these custom layer(s).
9.2. devtool utility[edit source]
OpenEmbedded is a build framework used to create Linux distributions for embedded devices, and is originally not a development environment. An OpenEmbedded companion utility named devtool aids in developing, building, and testing code that is going to be integrated into an image built using the OpenEmbedded build system.
The OpenEmbedded - devtool article gives an overview of this tool, and introduces the way to add, modify and integrate new application or library in a distribution.
The following article describes same examples as the ones in "How to cross-compile with the Developer Package" but in the Distribution Package context:
9.3. Integrating developments made with the Developer Package[edit source]
To integrate some developments described in previous chapter 9.2 in Yocto build process, we explain here how to:
10. Modifying software running on Arm Cortex-M[edit source]
Refer to Distribution Package for STM32CubeMP1 to understand how the STM32Cube MPU package is integrated to the STM32MPU embedded software distribution with Yocto project.
It can be useful if you want to:
- remove the STM32Cube MPU Package from your own distribution
- install your own Cube Cortex-M project for your own distribution
- modify the STM32Cube MPU Package delivered by ST for your own distribution
11. Creating your own Linux distribution[edit source]
First, it is possible to customize your software to fit hardware modification with article: How to create your own machine.
How to create your own distribution is the next step to do if you want to enable some framework (like wayland or x11) and some features (like alsa, nfs, wifi, bluetooth, ipv6, ...).
Then to add some missing userland tools (like libdrm, evtests, iptables, i2c-tools, ...), you can customize some existing images. You have to go to this article: How to create your own image.
12. Generating your own Starter and Developer Packages[edit source]
Now that either the OpenSTLinux distribution has been modified, or a new distribution has been created, it might be time to provide the developers with new Starter and Developer Packages, that are enriched with the additional or improved features of the new distribution.
Prerequisites:
- It is assumed here that your recipes have been updated with patches that reflect changes you make to the source files, thanks to the devtool update-recipe command
- So, either original recipes (.bb) have been modified with your changes, or recipes of your own layers (How to create a new open embedded layer) have been modified with your changes, so that the custom recipes (.bbappend) and your patches are clearly isolated from the original ones (recommended method to ease the maintenance)
- Run the environment setup script; select, for DISTRO and MACHINE, the values for which you want to generate the Starter and Developer Packages (see OpenSTLinux distribution for all possible values)
 DISTRO=<distro> MACHINE=<machine> source layers/meta-st/scripts/envsetup.sh
Example:
 DISTRO=openstlinux-weston MACHINE=stm32mp1 source layers/meta-st/scripts/envsetup.sh
- Modify the build-<distro>-<machine>/conf/local.conf file to enable archiver for recipes that are configured to use it; the objective is to generate the "source code" software packages for the Developer Package (Linux kernel, U-Boot, TF-A)
ST_ARCHIVER_ENABLE = "1"
- Build the image to ensure that your last developments integrated in the distribution are reflected in the image, and to generate the "source code" software packages for the Developer Package; select, for <image>, the value for which you want to generate the Starter and Developer Packages (see OpenSTLinux distribution for all possible values)
 bitbake <image>
Example:
 bitbake st-image-weston
- The image (binaries) for the Starter Package are available in the build-<DISTRO>-<MACHINE>/tmp-glibc/deploy/images/stm32mp1 directory
Note that the structure of this images/stm32mp1 directory is obviously similar to the directory structure of the Starter Package.
- The "source code" for the Developer Package software packages (Linux kernel, U-Boot and TF-A) are available in the build-<distro>-<machine>/tmp-glibc/deploy/sources/arm-ostl-linux-gnueabi directory
Note that the structure of this sources/arm-ostl-linux-gnueabi directory is obviously similar to the directory structure of the Developer Package for TF-A, Linux kernel and U-Boot.
Build directory structure: sources
build-<distro>-<machine>                                                             Build directory
├── tmp-glibc
│   │   ├── deploy
│   │   │   ├── sources
│   │   │   │     └── arm-ostl-linux-gnueabi
│   │   │   │         ├── linux-stm32mp-4.14-48                                      Linux kernel software package (source code, patches, helper file...)
│   │   │   │         ├── tf-a-stm32mp-2.0-release.AUTOINC+dbc8d9496e                TF-A software package (source code, patches, makefile, helper file...)
│   │   │   │         └── u-boot-stm32mp-2018.09-release.AUTOINC+f88b6facb8          U-Boot software package (source code, patches, makefile, helper file...)
│   │   │   └── [...]
│   │   └── [...]
│   └── [...]
└── [...]
- Optionally, compress the different "source code" directories to get the Developer Package software packages
- Generate the last element namely the new software development kit (SDK) for the Developer Package with the How to create an SDK for OpenSTLinux distribution article
13. Fast links to essential commands[edit source]
If you are already familiar with the Distribution Package for the STM32MPU Embedded Software distribution, fast links to the essential commands are listed below.
14. References[edit source]
Arm® is a registered trademark of Arm Limited (or its subsidiaries) in the US and/or elsewhere. ![]()
Arm® is a registered trademark of Arm Limited (or its subsidiaries) in the US and/or elsewhere. ![]()