| Coming soon |
This article explains some of the basics of STM32CubeIDE. It is an all-in-one multi-OS development tool, which is part of the STM32Cube software ecosystem. STM32CubeIDE is an advanced C/C++ development platform with peripheral configuration, code generation, code compilation, and debug features for STM32 microcontrollers and microprocessors. It is based on the ECLIPSE™/CDT framework and GCC toolchain for the development, and GDB for the debugging. It allows the integration of the hundreds of existing plugins that complete the features of the ECLIPSE™ IDE. STM32CubeIDE integrates all STM32CubeMX functionalities to offer all-in-one tool experience and save installation and development time.
1. Prerequisites[edit source]
The following tools are prerequisites for understanding the tutorial on this wiki page and developing an application based on the STM32MP1 Series:
- STM32CubeIDE 1.1.0 or newer
- STM32Cube_FW_MP 1.1.0 or newer
- STM32CubeMX 5.4.0 or newer
2. How to get started with STM32CubeIDE[edit source]
This section links to two different how to articles depending on if you are moving from SW4STM32 to STM32CubeIDE or if you are starting a new project with STM32CubeIDE.
2.1. How to get started with STM32CubeIDE from scratch[edit source]
How to get started with STM32CubeIDE from scratch.
2.2. How to move from SW4STM32 to STM32CubeIDE[edit source]
How to move from SW4STM32 to STM32CubeIDE.
3. Project structure[edit source]
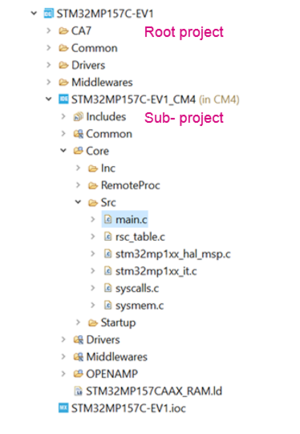
When an MPU project is created, its structure is automatically made hierarchical. The project structure for single-core projects is flat. On the contrary, in a multi-core project, the hierarchical project structure is used. When the user creates or imports an MPU project, it consists of one root project together with sub-projects, referred to as MCU projects, for each core. A hierarchical structure example is shown below.
4. Debug Cortex-M on MPU[edit source]
Two modes are used to debug MCU (Cortex-M based) firmware detailed in the chapters below.
4.1. Engineering mode[edit source]
Engineering mode dedicated to preliminary Cortex-M debug, it implies a specific Boot Mode: the Engineering boot where Cortex-M only is started and its firmware is loaded via JTAG/SWD into dedicated RAM.
4.2. Production mode[edit source]
Production mode targeting product, it means to use rich OS running on MPU side (Cortex-A based), typically Linux in order to load the Cortex-M Firmware. It means a Flash Memory boot mode.
4.2.1. RemoteProc[edit source]
This mode provides debug for MCU (Cortex-M) when running in exact production mode. Here STM32MP1 device boots following the target product boot mode, MPU Cortex-A is up and running. It is in charge of overall clock management and of MCU (Cortex-M) firmware load.
In order to download Cortex-M firmware to the Embedded Linux it uses serial link also used for the Linux Console. Both can not be used at the same time and you need to close any Console View when starting debugging in this mode. Note that when debugging in Debug perspective, you have access to the Linux Console again.
4.2.1.1. Network Usage[edit source]
If a network connection is available, the corresponding IP address is proposed. This is the recommended solution.
- Click on the Startup tab the initialization and select "thru Linux core (Production mode)".
- Select the serial console to the target.
- The button at the right of Inet Address allows to update it with the live IP detected on the target.
4.2.1.2. Serial Link Usage[edit source]
This is only available with Linux host.
In case no network connection to the target is available, it is possible from Linux host only to use the serial link for the firmware download. This link is slow and not recommended.
In order to enter this mode, the Inet Address has to be removed.
If any change is made, click on Apply to save the configuration.
4.2.2. Cortex-FW remote location[edit source]
In order to benefit from the new project property “Remote Setting > Remote location”, allowing to set-up the target path where to download the M4 firmware, you will need to update the .project file with a new nature:
<natures>
<nature>org.eclipse.cdt.core.cnature</nature>
<nature>org.eclipse.cdt.managedbuilder.core.managedBuildNature</nature>
<nature>org.eclipse.cdt.managedbuilder.core.ScannerConfigNature</nature>
<nature>fr.ac6.mcu.ide.core.MCUProjectNature</nature>
<nature>com.st.stm32ide.mpu.ide.core.MPUEmbeddedMCUProjectNature</nature>
</natures>
Note that you can enrich your implementation with a README file & a load / unload script file: fw_cortex_m4.sh. Those files are managed inside the IDE under Remoteproc/ directory, to be created in case of STM32CubeMX generated project. Those two files are automatically downloaded and used during the Debug in “Production Mode”.
4.2.3. Target status[edit source]
See the how to use the STM32CubeIDE target status.
4.2.4. Process for using Remote Proc[edit source]
- Make sure to check that the target is booted and the network is connected to the PC. The Target Status has a green light.
- Define your Debug Configuration - Debugger tab should propose discovered Console & IP value
- Launch the Debug Session
Engineering Mode - Launch
Debugging in Engineering Mode is very similar to the MCU Debug in term of functionality.
Production Mode - Launch
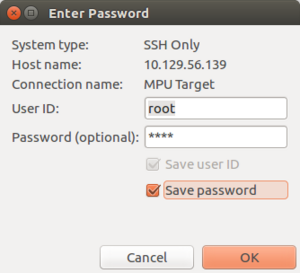
The Debug in Production Mode adds the cortex-M firmware transfer to the embedded Linux. This means also in case of network usage some specific pop-up appearing:
- The SSH Password is to complete: the default one is root.
- The RSA key is to be approved.
4.3. ST-Link Server support[edit source]
5. FAQ[edit source]
How to copy/paste in the STM32CubeIDE console


