This article describes how to obtain and use the Developer Package of the STM32MPU Embedded Software for Android™ for any STM32MP1 family development platform (STM32MP15 boards) in order to develop applications on it.
It details some prerequisite knowledge and the development environment, and gives step-by-step instructions to download and install the STM32MPU Embedded Software for Android components for the Package.
Finally, it gives guidelines on upgrading (to add, remove, configure, or improve) any piece of software.
1. Developer Package content[edit source]
If you are not familiar with the STM32MPU Embedded Software for Android distribution and its Packages, please read the following articles:
- Which STM32MPU Embedded Software Package for Android better suits your needs (and especially the Developer Package chapter)
- STM32MPU Embedded Software distribution for Android
In summary, this Developer Package provides:
- for the STM32MPU distribution for Android™ (development on Arm® Cortex®-A processor):
- the software development kit (SDK) update associated with Android Studio IDE, adding a service to connect your application to the coprocessor (customization)
- for the STM32Cube MPU Package (development on Arm® Cortex®-M processor):
- source code for all pieces of software (BSP, HAL, middleware and applications)
- the integrated development environment (IDE) (STM32-CoPro-MPU Eclipse plugin)
- a pre-configured project for CubeMx including default resources allocations for the Arm® Cortex®-M4
- a multicore application example using the coprocessor service (Android application linked with a Arm® Cortex®-M4 firmware)
2. Prerequisite knowledge[edit source]
The STM32MP1 Developer Package aims to enrich Linux-based software for the targeted product. A basic knowledge of Linux and Android is recommended in order to make the most of this Package. Reading the STM32MPU Embedded Software for Android architecture overview is also highly recommended.
3. Installing the components to develop software running on Arm Cortex-A (STM32MPU distribution for Android)[edit source]
3.1. Installing the Android Studio IDE[edit source]
The IDE is available in the Android developer site[1].
3.2. Installing the SDK update[edit source]
The official SDK for Android must be loaded through Android Studio using the SDK manager, selecting the correct version for the Starter package version used.
The SDK can then be updated by replacing the android.jar file (JAVA archive file for Android) of the loaded SDK with the one provided within the Developer package (adding the coprocessor service classes). Refer to Install SDK in Android Studio.
The software package is provided AS IS, and by downloading it, you agree to be bound to the terms of the software license agreement (SLA). The detailed content licenses can be found here.
| STM32MPU distribution for Android™ | |||
| Tag | API version | Link | Release note |
| st-android-10.0.0-2020-02-21 | API 29 | en.st-android-10.0.0-2020-02-21-sdk-api29.zip | st-android-10.0.0-2020-02-21 release note |
4. Installing the components needed to develop software running on the Arm Cortex-M4 (STM32Cube MPU Package)[edit source]
4.1. Installing the Eclipse IDE[edit source]
The table below explains how to download and install the System Workbench for the STM32 IDE, which is the AC6 product addressing the STM32 MCU, and the STM32-CoPro-MPU plugin, which provides support for Cortex-M inside the STM32 MPU.
| IDE for Linux® host PC | IDE for Windows® host PC | |
|---|---|---|
| Download |
STM32-CoPro-MPU plugin in SW4STM32 2.9.0
|
STM32-CoPro-MPU plugin in SW4STM32 2.9.0
|
| Installation |
$ chmod +x install_sw4stm32_linux_64bits-v2.9.run
$ ./install_sw4stm32_linux_64bits-v2.9.run
|
$ install_sw4stm32_win_64bits-v2.9.exe
|
| Detailed release notes | Details about the content of this tool version are available on openstm32.org |
Details about the content of this tool version are available on openstm32.org |
4.2. Installing the STM32Cube MPU Package[edit source]
Prerequite: the Eclipse IDE is installed.
- The STM32CubeMP1 Package is delivered through an archive file named en.stm32cubemp1_v1-2-0.zip.
- Download and install the STM32CubeMP1 Package
The software package is provided AS IS, and by downloading it, you agree to be bound to the terms of the software license agreement (SLA). The detailed content licenses can be found here.
.
| STM32MP1 Developer Package STM32CubeMP1 Package - v1.2.0 release | |
|---|---|
| Download |
You need to be logged on my.st.com before accessing the following link: |
| Installation |
$ cd <working directory path>/Developer-Package
$ unzip en.stm32cubemp1_v1-2-0.zip
|
| Release note |
Details about the content of the STM32CubeMP1 Package are available in the STM32Cube_FW_MP1_V1.2.0/Release_Notes.html file.
|
- The STM32CubeMP1 Package installation directory is in the <Developer Package installation directory> directory, and is named STM32Cube_FW_MP1_V1.2.0:
STM32Cube_FW_MP1_V1.2.0                             STM32CubeMP1 Package: details in STM32CubeMP1 Package content article
├── Drivers
│   ├── BSP                                         BSP drivers for the supported STM32MP1 boards
│   │   └── [...]
│   ├── CMSIS
│   │   └── [...]
│   └── STM32MP1xx_HAL_Driver                       HAL drivers for the supported STM32MP1 devices
│       └── [...]
├── _htmresc
│   └── [...]
├── License.md
├── Middlewares
│   └── [...]
├── package.xml
├── Projects
│   ├── STM32CubeProjectsList.html                  List of examples and applications for STM32CubeMP1 Package
│   ├── STM32MP157C-DK2                             Set of examples and applications → STM32MP15 Discovery kits
│   │   └── [...]
│   └── STM32MP157C-EV1                             Set of examples and applications → STM32MP15 Evaluation boards
│       └── [...]
├── Readme.md
├── Release_Notes.html                              Release note for STM32CubeMP1 Package
└── Utilities
    └── [...]
The STM32Cube MPU Package is now installed: let's develop software running on Arm Cortex-M.
5. Developing multi-core applications using the coprocessor service (CoproManager)[edit source]
STM32MP1 Platforms for Android propose an environment for developing Android applications running on the Arm Cortex-A7, combined with a remote firmware offloaded in the Arm Cortex-M4.
This is based in the coprocessor service. Please check How to use coprocessor service for Android page for details.
A STCoproM4Example project, containing both Android application and Cortext-M4 firmware, is given with the STM32MP1 Developer Package for Android, and is used to illustrate below chapters.
5.1. Software running on Arm Cortex-M4 with STM32CubeMP1 Developer Package[edit source]
This is possible to develop Arm Cortex-M4 software based on the default resources allocated in the Linux kernel device-tree (detailed in Default resources allocation for Arm Cortex-M4 in Developer Package for Android).
5.1.1. Prerequisites[edit source]
Main components to be used:
- STM32CubeMX
- Eclipse IDE (See Installing the Eclipse IDE)
- Developer Package for STM32CubeMP1 (eclipse plugin for IDE software, i.e. System workbench for STM32)
5.1.2. Creating project from CubeMx[edit source]
STM32CubeMX install is done and environment is available.
As an initial CubeMx default configuration project which include supported resources allocations for Cortext-M4, please load the ioc file adapted to your used delivery.
The software package is provided AS IS, and by downloading it, you agree to be bound to the terms of the software license agreement (SLA). The detailed content licenses can be found here.
| STM32MPU distribution for Android™ | |||
| Tag | Board | Link | Release note |
| st-android-10.0.0-2020-02-21 | STM32MP157x-EV1 Evaluation boards | en.st-android-10.0.0-2020-02-21-eval-cubemx.zip | st-android-10.0.0-2020-10-21 release note |
5.1.3. Using the Eclipse IDE for building the project[edit source]
The STCoproM4Example project, which is using the coprocessor service (CoproManager), is taken as example in this paragraph.
5.1.3.1. Get the source code of the example[edit source]
Source code of the Arm Cortex-M4 software example is available on github: STCoproM4Example.
5.1.3.2. Install and build project[edit source]
- Open the folder containing the example and double-click on file .project to open Eclipse IDE.
- When project is loaded on the eclipse IDE, then click on build button to build the example
In case of issue, please find complete view with similar exmaple in How to rebuild example page
5.1.3.3. Connect the target board[edit source]
- The board is booted, ST-Link connected to your PC (for getting console through virtual communication port), and USB OTG also connected to your PC (for getting ADB link)
- Open the serial console to check connection to the board is ok
- Click Open console on serial device button
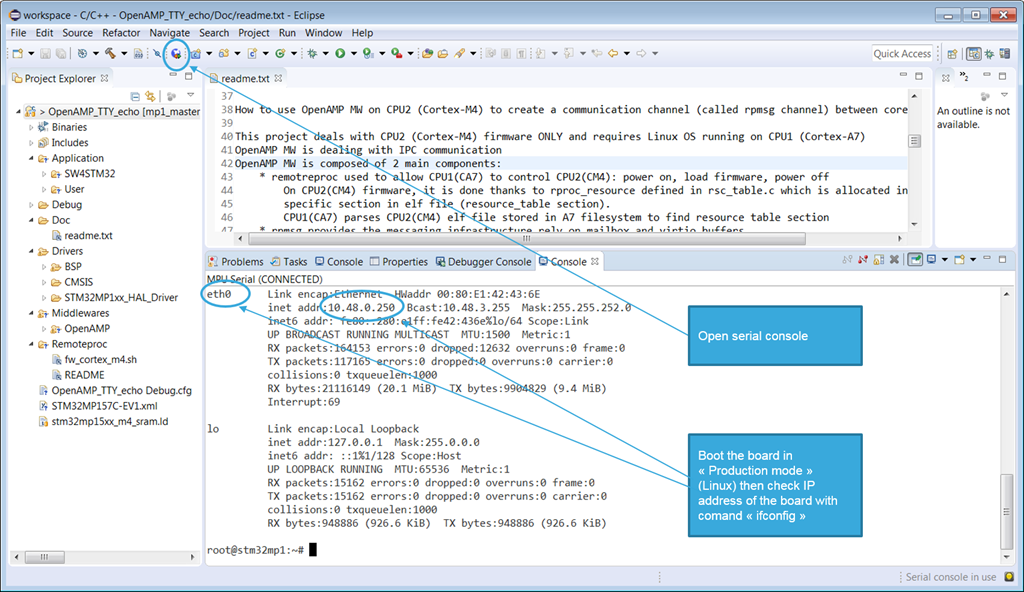
- A dedicated Console panel is open with prompt. You can then check you are connected to the board
:/ $ ls /
 acct       data            init.recovery.stm.rc oem         storage
 bin        default.prop    init.usb.configfs.rc postinstall sys
 bugreports dev             init.usb.rc          proc        system
 cache      etc             init.zygote32.rc     product     ueventd.rc
 charger    init            lost+found           res         vendor
 config     init.environ.rc mnt                  sbin
 d          init.rc         odm                  sdcard
5.1.3.4. Download and run the project image on the target[edit source]
The download of the project image (Arm Cortex-M4 firmware) on the target has to be done via command line in the STM32MP1 Developer Package for Android.
- Connect ADB to the remote target board via USB OTG through Android Studio
- Check for the adb link:
 adb devices
List of devices attached
<your_device_id>	device
- Load the Arm Cortex-M4 firmware on the target in the dedicated path: /vendor/firmware/copro.
- Example for STCoproM4Example firmware:
- Note: root access right required for creating directory in /vendor to be able to create any new directory in /vendor
 adb root; adb remount
 adb push <path_to>/copro_m4example.elf /vendor/firmware/copro/
5.1.3.5. How to test the Cortex-M4 firmware in standalone (without Android application)[edit source]
This is possible to test the Cortex-M4 firmware independently from the Android application, and via the console in the IDE:
- Enable root access rights
- - Using ADB shell is ADB link available:
 adb root
 adb shell
 ...
- - or Using uart console shell:
 su
 ...
- Configure the firmware to be loaded by Linux in the Cortex-M4
:/ # echo copro/copro_m4example.elf > /sys/class/remoteproc/remoteproc0/firmware
- Start the example and check in log that the firmware is running:
 echo start > /sys/class/remoteproc/remoteproc0/state
 dmesg
...
[13366.032915] remoteproc remoteproc0: powering up m4
[13366.038707] remoteproc remoteproc0: Booting fw image copro/copro_m4example.elf, size 2410460
[13366.052612] rproc-srm-dev m4@0:m4_system_resources:dac@40017000: Linked as a consumer to regulator.9
[13366.060918] rproc-srm-dev m4@0:m4_system_resources:adc@48003000: Linked as a consumer to regulator.9
[13366.081654] rproc-srm-core m4@0:m4_system_resources: bound m4@0:m4_system_resources:timer@40000000 (ops rproc_srm_dev_ops)
[13366.081683] rproc-srm-core m4@0:m4_system_resources: bound m4@0:m4_system_resources:timer@40005000 (ops rproc_srm_dev_ops)
[13366.081706] rproc-srm-core m4@0:m4_system_resources: bound m4@0:m4_system_resources:serial@4000f000 (ops rproc_srm_dev_ops)
[13366.081727] rproc-srm-core m4@0:m4_system_resources: bound m4@0:m4_system_resources:i2c@40015000 (ops rproc_srm_dev_ops)
[13366.084560] rproc-srm-core m4@0:m4_system_resources: bound m4@0:m4_system_resources:dac@40017000 (ops rproc_srm_dev_ops)
[13366.084591] rproc-srm-core m4@0:m4_system_resources: bound m4@0:m4_system_resources:spi@44004000 (ops rproc_srm_dev_ops)
[13366.084614] rproc-srm-core m4@0:m4_system_resources: bound m4@0:m4_system_resources:dma@48001000 (ops rproc_srm_dev_ops)
[13366.084641] rproc-srm-core m4@0:m4_system_resources: bound m4@0:m4_system_resources:adc@48003000 (ops rproc_srm_dev_ops)
[13366.084662] rproc-srm-core m4@0:m4_system_resources: bound m4@0:m4_system_resources:hash@4c002000 (ops rproc_srm_dev_ops)
[13366.084682] rproc-srm-core m4@0:m4_system_resources: bound m4@0:m4_system_resources:rng@4c003000 (ops rproc_srm_dev_ops)
[13366.084703] rproc-srm-core m4@0:m4_system_resources: bound m4@0:m4_system_resources:crc@4c004000 (ops rproc_srm_dev_ops)
[13366.084723] rproc-srm-core m4@0:m4_system_resources: bound m4@0:m4_system_resources:cryp@4c005000 (ops rproc_srm_dev_ops)
[13366.084744] rproc-srm-core m4@0:m4_system_resources: bound m4@0:m4_system_resources:qspi@58003000 (ops rproc_srm_dev_ops)
[13366.084762] rproc-srm-core m4@0:m4_system_resources: bound m4@0:m4_system_resources:button (ops rproc_srm_dev_ops)
[13366.084780] rproc-srm-core m4@0:m4_system_resources: bound m4@0:m4_system_resources:m4_led (ops rproc_srm_dev_ops)
[13366.085683] m4@0#vdev0buffer: assigned reserved memory node vdev0buffer@10044000
[13366.086750] virtio_rpmsg_bus virtio0: rpmsg host is online
[13366.087508] m4@0#vdev0buffer: registered virtio0 (type 7)
[13366.087525] remoteproc remoteproc0: remote processor m4 is now up
[13366.088987] virtio_rpmsg_bus virtio0: creating channel rpmsg-tty-channel addr 0x0
[13366.090313] rpmsg_tty virtio0.rpmsg-tty-channel.-1.0: new channel: 0x400 -> 0x0 : ttyRPMSG0
- Stop the example and check in log that the firmware is stopped:
 echo stop > /sys/class/remoteproc/remoteproc0/state
 dmesg
...
[13431.354096] rpmsg_tty virtio0.rpmsg-tty-channel.-1.0: rpmsg tty device 0 is removed
[13431.862382] remoteproc remoteproc0: warning: remote FW shutdown without ack
[13431.869044] rproc-srm-dev m4@0:m4_system_resources:dac@40017000: Dropping the link to regulator.9
[13431.873046] rproc-srm-dev m4@0:m4_system_resources:adc@48003000: Dropping the link to regulator.9
[13431.883389] remoteproc remoteproc0: stopped remote processor m4
5.1.3.6. How to debug an example with IDE[edit source]
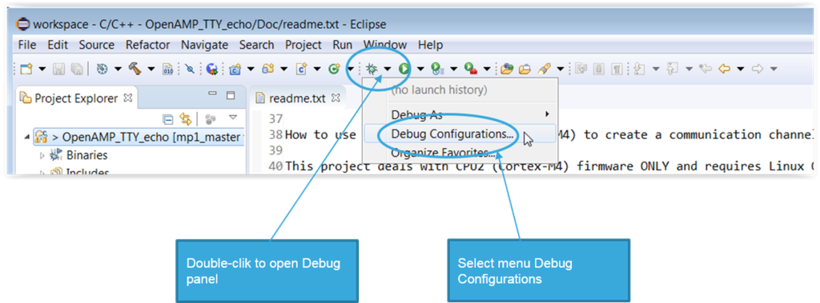
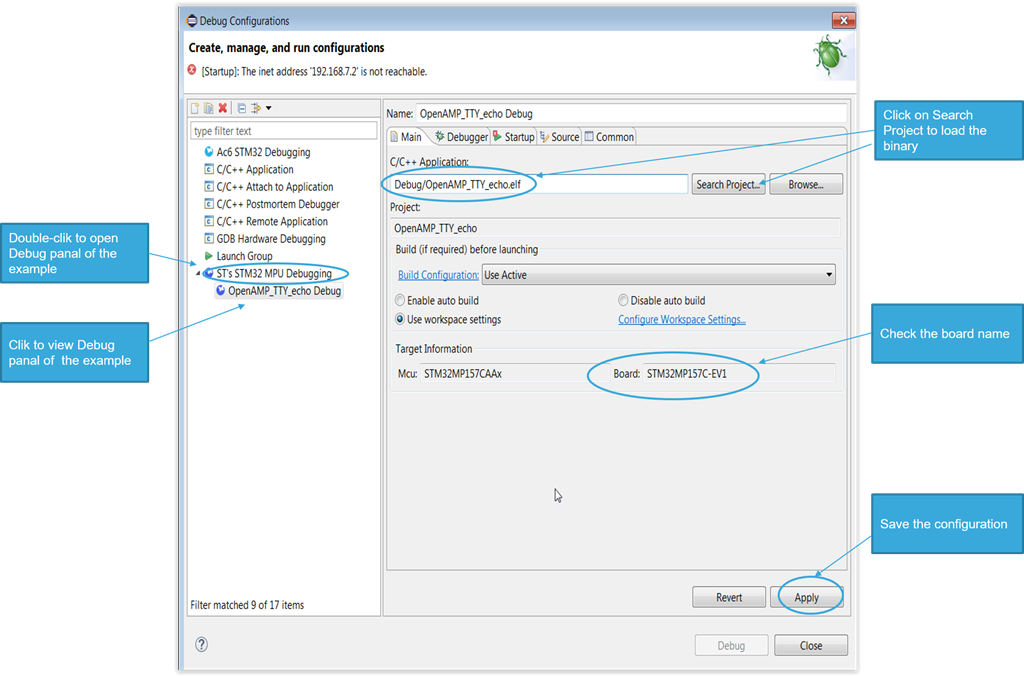
- Configure Main tab of the Debug Configurations panel to add the firmware binary
- Menu > Run > Debug configuration... / [ Main ] tab
- Configure Startup tab of the Debug Configurations panel
- Menu > Run > Debug configuration... / [ Starter ] tab
- Unselect Load image
- Ensure the example firmware is running on the target.
- Run the debug mode on IDE side.
The IDE will attach the current running firmware on the Arm Cortex-M4. It is then possible to break software execution and make step by step debug.
5.2. Android application running on Arm Cortex-A7[edit source]
Please refer to the Android developer guide[2] for generic informations about standard Android application development.
Then based on the SDK delivered within the Developer Package for Android (see Installing the SDK update), this is possible to develop an application which can use the coprocessor service (CoproManager), in order to interact with remote Arm Cortex-M4 core software.
Coprocessor service detailed information and API are described in dedicated page. Please see How to use coprocessor service for Android.
You can refer to the STCoproM4Example application for Android, and corresponding source code to get example for implementation.
Source code of the Arm Cortex-A7 software example is available on github: STCoproM4Example.
6. How to go further[edit source]
Now that your developments are ready, you may switch to the STM32MP1 Distribution Package for Android in order to create your own distribution and to generate your own SDK and image.
7. References[edit source]