This article explains some of the basics of STM32CubeIDE. It is an all-in-one multi-OS development tool, which is part of the STM32Cube software ecosystem.
1 STM32CubeIDE purpose[edit source]
STM32CubeIDE is an advanced C/C++ development platform with peripheral configuration, code generation, code compilation, and debug features for STM32 microcontrollers and microprocessors. It is based on the ECLIPSE™/CDT framework, GCC toolchain for the development and GDB for the debugging.
It allows the integration of the hundreds of existing plugins that complete the features of the ECLIPSE™ IDE. STM32CubeIDE integrates all STM32CubeMX functionalities to offer all-in-one tool experience and to save installation and development time.
With STM32CubeIDE, you can
- select the appropriate STM32 device corresponding to your needs,
- configure the device using STM32CubeMX,
- develop and debug applications on top on Arm® Cortex®-M
2 Prerequisites[edit source]
To take all advantages of explanations given in the wiki page and to develop some application based on the STM32 MP1 Series, following packages must constitute the development environment :
- STM32CubeIDE v1.1.0 or newer
- STM32CubeMP1 Package v1.1.0 or newer
- STM32CubeMX v5.4.0 or newer
3 How to install STM32CubeIDE[edit source]
| STM32CubeIDE for Linux® host PC | STM32CubeIDE for Windows® host PC | |
|---|---|---|
| Download |
Version 1.3.0
|
Version 1.3.0
|
| Installation guide | ||
| User manual | ||
| Detailed release note |
| |
4 How to get started with STM32CubeIDE[edit source]
This section links to two different how to articles depending on if you are moving from SW4STM32 to STM32CubeIDE or if you are starting a new project with STM32CubeIDE.
4.1 How to get started with STM32CubeIDE from scratch[edit source]
How to get started with STM32CubeIDE from scratch.
4.2 How to move from SW4STM32 to STM32CubeIDE[edit source]
How to move from SW4STM32 to STM32CubeIDE.
5 Project structure[edit source]
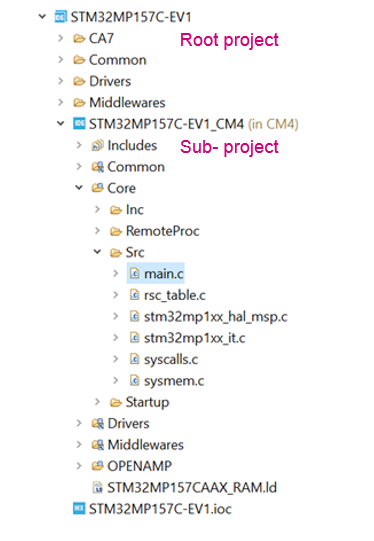
A hierarchical project structure is created in same time as the creation of an STM32 MPU project.
The project structure for single-core projects is flat. On the contrary, in a multi-core project, the hierarchical project structure is used. When the user creates or imports an STM32 MPU project, it consists of one root project together with sub-projects, referred to STM32 MCU projects, for each core. A hierarchical structure example is shown below.
6 Arm® Cortex®-M debug on STM32 MPU device[edit source]
Two modes are used to debug Arm® Cortex®-M firmware on STM32 MPU device.
6.1 Engineering mode[edit source]
Very powerful to debug preliminary Arm® Cortex®-M, the engineering mode implies a specific boot mode: the Engineering Boot Mode where only Cortex-M is started. Firmware is loaded via JTAG/SWD into its dedicated RAM.
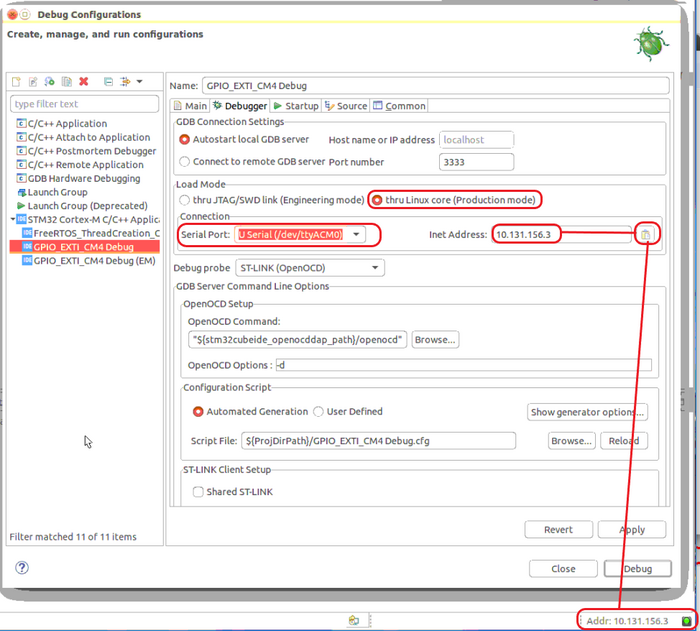
This mode is not the default one, it has to be set via the "Debug Configuration" menu, in "Debugger" tab , "thru JTGA/SWD link (Engineering mode)" option selected.
Debugging in Engineering Mode in STM32 MPU device is very similar to a standard STM32 MCU debug in term of functionality, expect that here Arm Cortex-M has only a dedicated memory, no flash memory type.
6.2 Production mode[edit source]
Production mode targets a debug close to final product. It means to have an STM32 MPU board up and running on the Cortex-A (Linux) and a Cortex-M firmware to debug (usually an STM32CubeIDE project).
Board, aka named as "target", is booted in Production mode from flash memory (e.g. SD card) ; it is network and JTAG/SWD connected.
ST-Link automatically brings support for Cortex-A Linux console via VCP (Virtual COM Port). This enables Target Status widget, from the bottom-right of STM32CubeIDE, allowing target IP address discovery.
Network connection can be set up by 2 ways:
- Ethernet
- managed network: IP address attributed by DHCP server
- unmanaged network: IP address to be manually configured
- USB
- using the dedicated USB OTG connection for Ethernet point to point.
Debug is performed thanks to the following workflow:
1. The firmware built binary is transferred to the target using the network (ssh protocol), more precisely to the Cortex-A Linux file system.
2. The firmware is loaded to Cortex-M core thanks to the “remoteproc” framework.
3. Finally the Debug session is started via JTAG/SWD connection
The production mode is the default one when you create a new debug configuration. It is automatically set via the "Debug Configuration" menu.
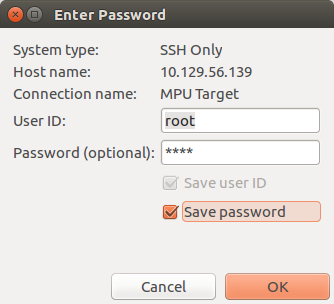
At debug launch, some specific pop-up appear:
- The SSH Password has to be completed: the default one is root.
- The RSA key has to be approved.
6.2.1 Update STM32 MPU target for Arm Cortex-M[edit source]
Defining an Arm Cortex-M project in a STM32 MPU context also means to define where are downloaded on Arm Cortex-A Linux file system:
- the Cortex-M Firmware: <ProjectName>.elf
- the load/unload script fw_cortex_m4.sh used by the STM32CubeIDE if present it can be customized
- and a README, informing a user having a direct connection onto the target.
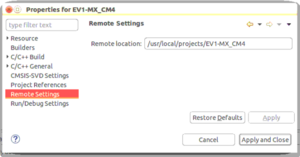
This is the purpose of "Remote Path Setting" property which is linked to the project. Its default value at creation is /usr/local/project/<ProjectName>, but can also be changed thanks to the Remote Settings properties item.
Inside project structure,directory "<ProjectName>_CM4/Core/RemoteProc/" defines the tree downloaded when debugging in Production Mode.
6.3 ST-Link Server support[edit source]
From STM32CubeIDE v1.2.0, it is possible to connect to ST-Link via 'ST-Link Server' just like on standard STM32 MCU. This is enable by checking "Shared ST-Link inside Debug Configuration > Debugger > ST-Link Client Setup".


