This package contains the frameworks to enable a LoRaWAN® gateway that can be run on STM32MP1 Series with a local server or TheThingsNetwork.
This package consists of an OpenEmbedded metalayer, named meta-st-stm32mpu-app-lorawan, that must be added on top of the STM32MP1 Distribution Package. It brings a complete, consistent, easy-to-build and install LoRaWAN gateway for STM32MP1 Series.
The metalayer contains the frameworks, tools and applications to run the LoRaWAN gateway. Various images are available for different use cases such as single Arm® Cortex®-A7 core, dual Arm® Cortex®-A7 and -M4 cores, and the possibility to choose between an Ethernet or a Wi-Fi connection.
1. Hardware requirements[edit source]
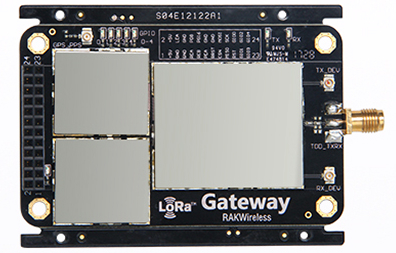
The concentrator LoRaWan RAK831
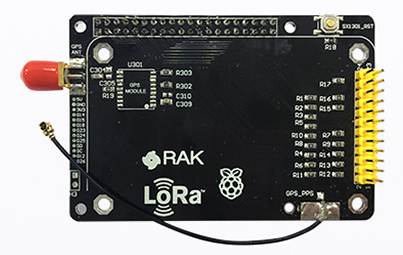
The converter board
This bundle enables to start with all the required hardware components (pick your geographic area).
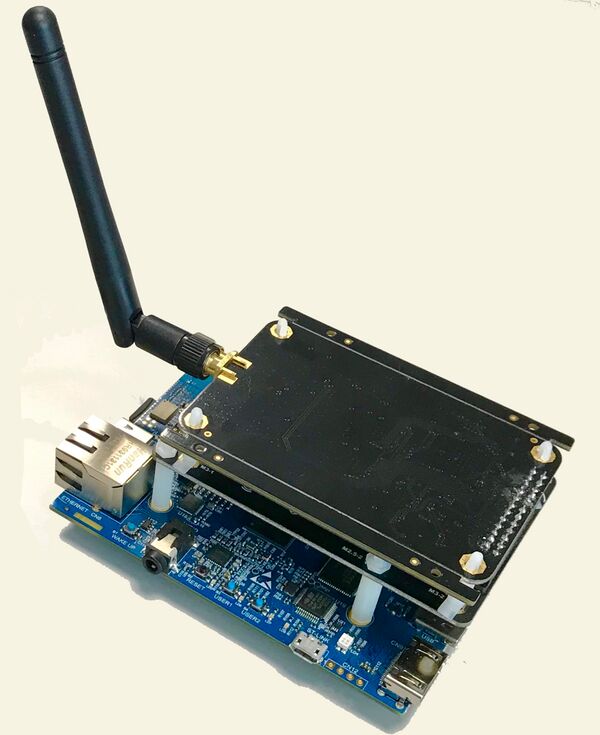
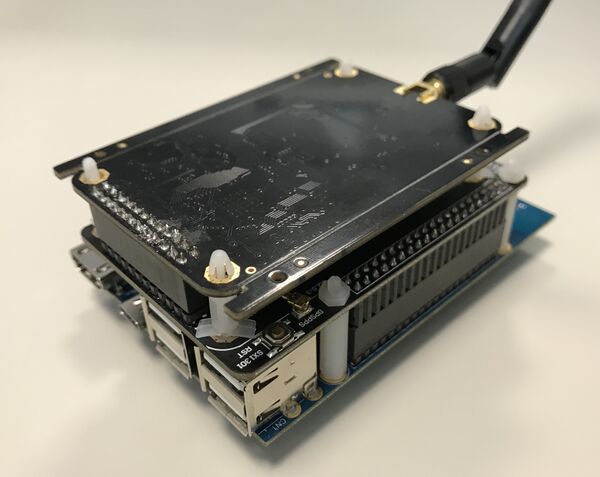
You can now assemble the modules on the board.
This is how it should look like:
2. Software prerequisites[edit source]
Install the STM32MP1 Distribution Package, but do not initialize the OpenEmbedded environment (sourcing the envsetup.sh) before having installed the meta-st-stm32mpu-app-lorawan meta layer (see next chapter).
3. Installing the metalayer[edit source]
- First, clone the git repositories to <Distribution Package installation directory>/layers/meta-st.
If you have a Linux® Virtual Machine, modify your Virtual Machine administrator username to match your Gerrit account. This way you can generate the ssh-rsa key. Your Gerrit username is in the id_rsa and id_rsa.pub keys.
To do so, change the username of the session. Proceed as follows:
1.If you have only one user on the Virtual Machine, create a new one to be allowed to modify the administrator user:
sudo adduser temporary
Then set the password
2. Allow the temporary user to run sudo by adding the user to sudo group:
sudo adduser temporary sudo
3. Log out with the command exit, and log in again as temporary user.
4. Change your username:
sudo usermod -l newUsername oldUsername
… and home-folder name
sudo usermod -d /home/newHomeDir -m newUsername
5. Log out, go back to administrator user, and delete the temporary user:
 sudo deluser temporary
 sudo rm -r /home/temporary
Then generate a new ssh-rsa key here, add it to your Gerrit account and run the following commands:
 cd <Distribution Package installation directory>/layers/meta-st
 git clone https://github.com/STMicroelectronics/meta-st-stm32mpu-app-lorawan -b thud
4. Building the software image[edit source]
First set up the LoRaWan gateway build environment:
cd <Distribution Package installation directory>
Different OpenSTLinux expansion packages are available to target different use cases. The following commands need to be executed in the build environment.
You can choose between two different machines:
- stm32mp1-lorawan-a7 To use only the Arm Cortex-A7 core for the whole application process:
 DISTRO=openstlinux-weston MACHINE=stm32mp1-lorawan-a7 source layers/meta-st/scripts/envsetup.sh
 bitbake st-image-lorawan
- stm32mp1-lorawan-m4 To use both the Arm Cortex-A7 and Cortex-M4 cores, the Arm Cortex-A7 managing the communications with TheThingsNetwork server and the Arm Cortex-M4 the real-time communications with the concentrator:
 DISTRO=openstlinux-weston MACHINE=stm32mp1-lorawan-m4 source layers/meta-st/scripts/envsetup.sh
 bitbake st-image-lorawan
5. Flash the built image[edit source]
Follow this link to know how to flash the built image.
6. Launch the LoRaWAN gateway's software[edit source]
- Power the board
- To connect to the board and run commands, you can use SSH over USB. Connect a USB/micro-USB cable between the Windows machine and the ST-LINK port.
- Then you launch Tera Term (you can download it here), and start a serial communication with a baud rate of 115200. Restart the board and you will access to the command line.
- Depending on how you want to connect your board to the internet
- Ethernet connection
- Connect the ethernet cable
cd /usr/local/lorawan-gateway/
./LoRaWAN_gateway_launcher.sh ethernet
- Wifi connection
- Do not connect the ethernet cable
cd /usr/local/lorawan-gateway/
./LoRaWAN_gateway_launcher.sh wifi
- During the launcher script, enter your preferred server, up and down ports when it is asked.
- Important: copy your EUI before the restart of the gateway
All those informations can be found or changed manually in the global_conf.json and local_conf.json files in /usr/local/lorawan-gateway/ on the board.
Your gateway will reboot and after a short time, you we will be able to receive or transmit informations through LoRaWAN.
7. Source code of the firmware running on the M4[edit source]
If you want to access or modify the code of the firmware running on the M4
 cd <working directory>
 repo init -u https://github.com/STMicroelectronics/STM32MP1_LoRaWAN-manifests -b refs/tags/STM32MP15-Ecosystem-v1.2.0 -m default.xml
 repo sync
8. LoRaWAN Node[edit source]
This chapter is an example of how to create a test node. An important thing is that you can choose how to define the Device EUI, address, network session key and application session key.
- Either by defining them by your own in the Commissioning.h of your code and then copy the fields during the registration of the node on TheThingsNetwork or the local server
- Either to let TheThingsNetwork or the local server defining them randomly during the registration of the node and then put them in the Commissioning.h of your code before compiling it.
Example for creating a test device. Be careful with your end node’s applications, the duty cycle is regulated by governments. This one is regulated so that it can send a new LoRaWAN message minimum every 3 minutes with this low amount of data. But you can change the APP_TX_DUTYCYCLE variable if you want to lengthen the delay between two dispatch.
9. LoRaWAN server[edit source]
You can choose between two different types of server. The following instructions show how to use them.
9.1. How to proceed on The Things Network[edit source]
Login or create an account on https://www.thethingsnetwork.org
- Go into your CONSOLE.
- Clic on GATEWAYS.
- Clic on register gateway.
- Check I'm using the legacy packet forwarder and enter your EUI you previously copied. If it is not available, create one and change it in the global_conf.json and local_conf.json files in /usr/local/lorawan-gateway/. You will need to reboot your board afterwards.
- Enter a description of the gateway, this is the name you can see on the map of the site.
- Select your Frequency Plan.
- Select your Router (for europe choose ttn-router-eu).
- You can place your gateway on the map by clicking on it or by entering directly the precise coordinates.
- Tell if your antenna is indoor or outdoor.
- Not mandatory: for your application's devices, you can use cayenne, this is a framework that store the data and you can easily visualize them.
9.2. How to proceed with the LoRaWAN local server[edit source]
9.2.1. Configuration of the server[edit source]
A local LoRaWAN server is available natively with this layer.
In the first part you need to start postgresql in order to use psql
 sudo -i -u postgres
 initdb -D /var/lib/postgresql/data
 pg_ctl -D /var/lib/postgresql/data -l logfile start
You need now to create all the roles and databases for this application.
 psql
 create role loraserver_as with login password '<PASSWORD>';
 create role loraserver_ns with login password '<PASSWORD>';
 create database loraserver_as with owner loraserver_as;
 create database loraserver_ns with owner loraserver_ns;
 \c loraserver_as
 create extension pg_trgm;
 create extension hstore;
 \q
 logout
 cp /etc/loraserver/config/eu868.toml /etc/loraserver/loraserver.toml
You can now start the different parts of this local LoRaWAN server.
 sudo systemctl enable lora-gateway-bridge
 sudo systemctl start lora-gateway-bridge
 sudo systemctl enable loraserver
 sudo systemctl start loraserver
 sudo systemctl enable lora-app-server
 sudo systemctl start lora-app-server
Your Local LoRaWAN is now running.
9.2.2. Configuration of the lora-app-server[edit source]
To access your application site on a web browser, with a computer on the same network.
ifconfig
The line above allows to know the IP address.
Then access the application web site : IP_address:8080. By default the login and password are admin.
On the application site:
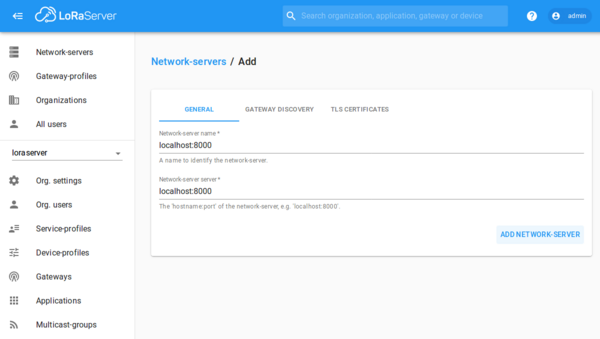
- Go to Network-servers, click ADD and then put localhost:8000 for the name and the server. Click on ADD NETWORK-SERVER.
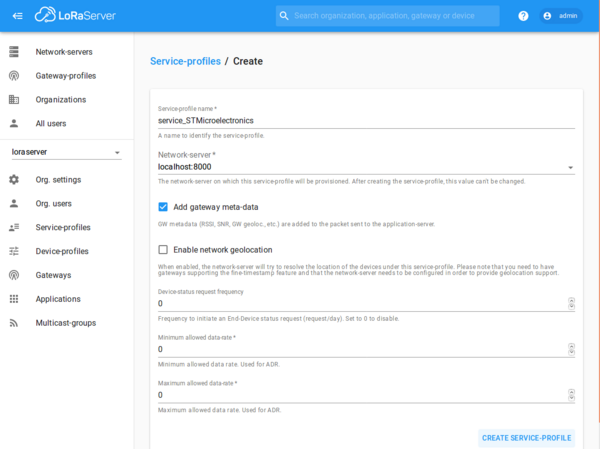
- Go to Service-profiles, click CREATE. Choose a name, take the localhost:8000 server. Select Add gateway meta-data. All the rest is empty. Click on CREATE SERVICE-PROFILE.
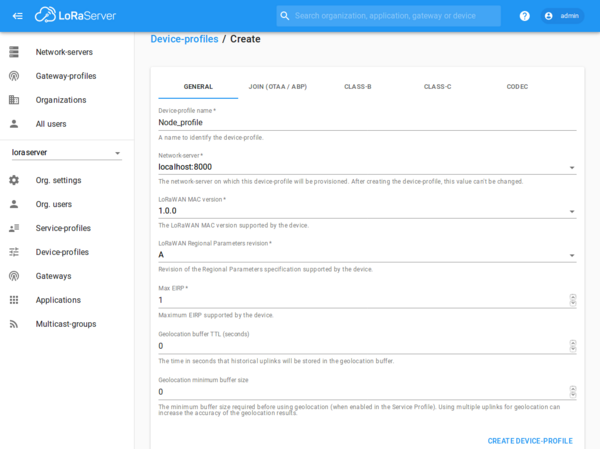
- Go to Device-profiles, click CREATE. Enter the informations relative to your Node. You need to save and re-click on you Node to unlock some configuration features. Click on CREATE DEVICE-PROFILE.
If you have a decode or Encode fonction for your node, you can put them in the CODEC section.

Decode function example:
function Decode(fPort, bytes) {
// Decode an uplink message from a buffer
// (array) of bytes to an object of fields.
var decoded = {};;
// Decode bytes to int
var batteryInt = bytes[7]
var humidityInt = (bytes[5] << 8) | bytes[6];
var pressureInt = (bytes[1] << 8) | bytes[2];
var temperatureInt = (bytes[3] << 8) | bytes[4];
// Decode int to float
decoded.battery = (batteryInt*100)/254        // Battery in %
decoded.humidity = humidityInt / 10;          // Humidity in %
decoded.pressure = pressureInt / 10;          // Pressue in hPa
decoded.temperature = temperatureInt / 100;   // Temperature in °C
return decoded;
}
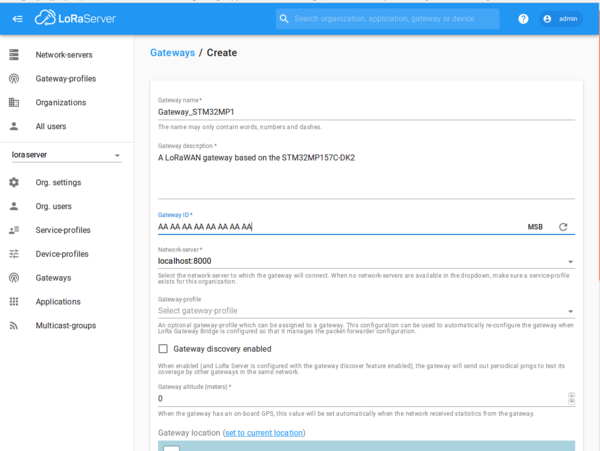
- Go to Gateways, click CREATE. Choose a name, a description, the Gateway_ID of your gateway (you can find it in global_conf.json or local_conf.json) and take the localhost:8000 server. No gateway profile and discovery enabled is needed. Click on CREATE GATEWAY.
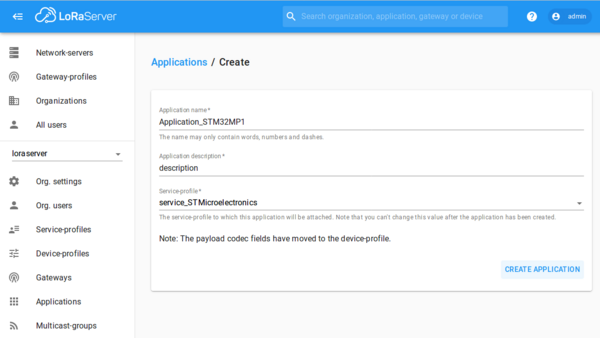
- Go to Applications, click CREATE. Choose a name, a description, take your service-profile and a codec if you use one. Click on CREATE APPLICATION.
- Click on your 'application's name. Click CREATE in the DEVICES menu. Choose a name, a description, enter the Device EUI of your Node and you Device-profile. Check Disable frame-counter validation and then click on CREATE DEVICE.

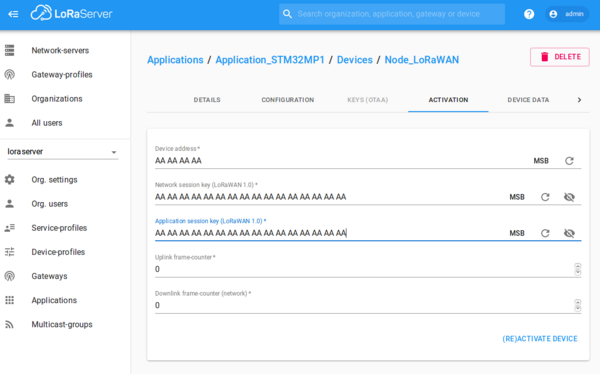
- Click on your created node just above. In ACTIVATION, enter the device address, Network session key and Application session key of your node. The Uplink frame-counter will incremente itself. Click on (RE)ACTIVATE DEVICE.
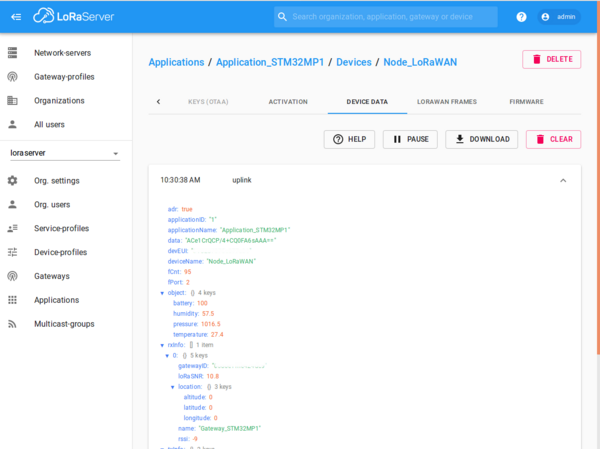
- You can now visualize your Node frames in LORAWAN FRAMES on each node section.
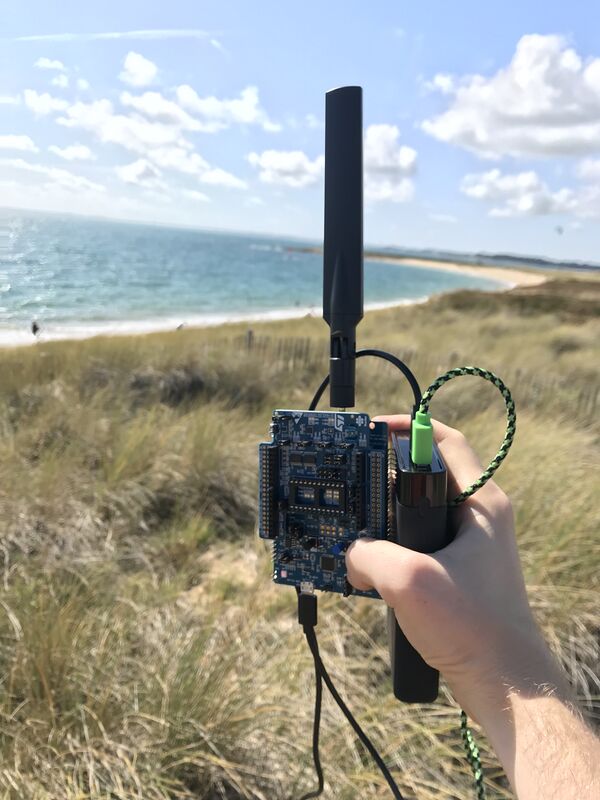
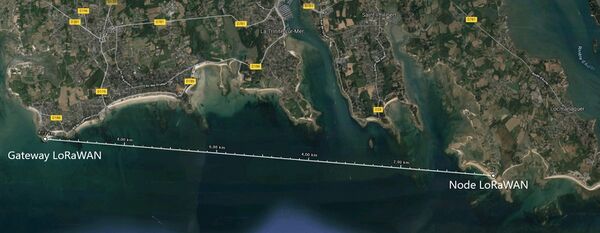
10. Field test[edit source]
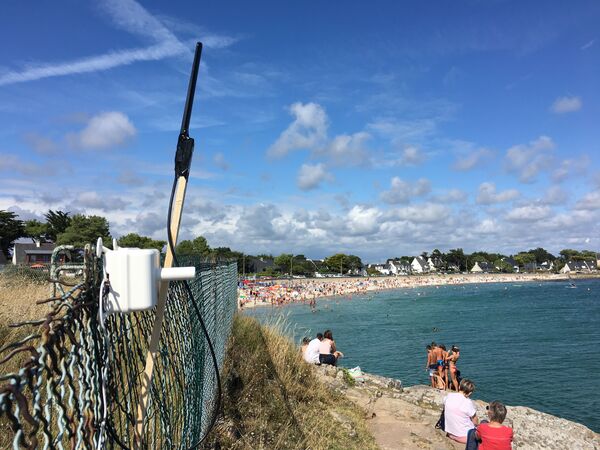
A successful 10 kilometers distance test without obstacles have been realized. It is recommended to put the gateway the highest possible.