This message will disappear after all relevant tasks have been resolved.
Semantic MediaWiki
There are 1 incomplete or pending task to finish installation of Semantic MediaWiki. An administrator or user with sufficient rights can complete it. This should be done before adding new data to avoid inconsistencies.This article explains what WDG is and how to use it through examples.
1. What is a HRTIM ?
HRTIM stands for High Resolution Timer. HRTIM is a highly accurate timer which can generate complex waveforms such as PWM, phase-shifted, constant Ton... with highly very fine timing resolution (184 ps on the STM32G4 series). In
1.1. HRTIM modes
Up-counters can operate in three modes :
- Continuous (also called Free-running) : it rolls over to zero when it exceeds the value
- Non-retriggerable :
- Retriggerable :
1.2. Block diagram overview
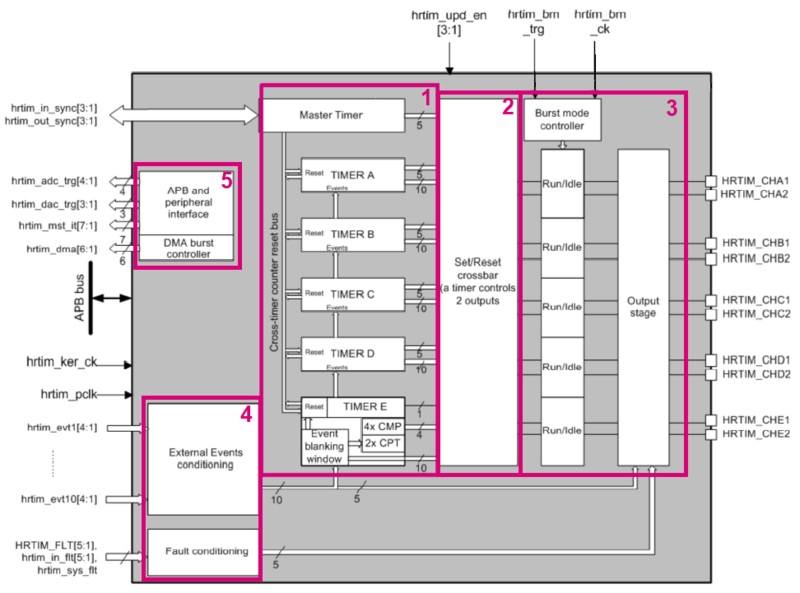
As we can see on the figure below, the HRTIM have a modular architecture. Let's have a look at each block :
- Block 1 Timing units are six 16-bits up or down counter and a master timer (independent of each other).
- Block 2 Set/Reset Crossbar allows to have the output pairs controlled not only by related timing unit but by external event and other timers.
- Block 3 Output stage manage pair of outputs with any kind of logic (polarity, safe states, asynchronous fault protection...).
- Block 4 Input block includes ten external events, five fault signals (protect the power stages and shutdown PWM outputs).
- Block 5 Interface part link the HRTimer with other timers, DMA, ADC and DAC with internal STM32 connections.
2. Configure the HRTIM to generate a simple PWM
2.1. Objective
- In this project, you will learn how to setup WWDG in STM32CubeIDE
- How to Generate Code in STM32CubeIDE and use HAL functions
- Create a simple application to test and periodically refresh the WWDG
- Verify the correct functionality on toggling LED
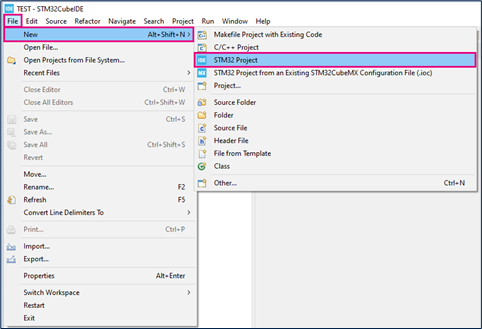
2.2. Creating the project in STM32CubeIDE
- File > New > STM32 Project in main panel.
2.3. Configure HRTIM
2.4. Generate project and edit main.c
The easiest way to generate the code is to save your current project : Ctrl + S
2.5. Compile and flash
3. References

