| Coming soon |
This article explains how to use the RTC. It provides code examples to use RTC Alarm with interrupt.
1. RTC definition
A real-time clock (RTC) is an independent binary-coded decimal (BCD) timer/counter. For that, the RTC provides a time-of-day clock/calendar with programmable alarm interrupt. Also, the RTC can provide an automatic wakeup to manage all low-power modes. The STM32L476 integrated RTC peripheral can be used for different main features are the following:
- Calendar with subseconds, seconds, minutes, hours, day, date of day in month, month and year.
- Daylight saving compensation programmable by software.
- Programmable alarm with interrupt function.
- Automatic wakeup unit generating a periodic flag that triggers an automatic wakeup interrupt.
- Reference clock detection: a more precise second source clock (50 or 60 Hz) can be used to enhance the calendar precision.
- Accurate synchronization with an external clock using the subsecond shift feature.
- Digital calibration circuit (periodic counter correction).
- Time-stamp function for event saving.
- Tamper detection event with configurable filter and internal pull-up.
- 32 backup registers.
- Maskable interrupts/events:
- Alarm A
- Alarm B
- Wakeup interrupt
- Time-stamp
- Tamper detection
2. Configure RTC and Alarm with interrupt
2.1. Objectives
The objectives of this wiki article are to know how to setup RTC with interrupt in STM32CubeIDE and how to create a simple RTC project with periodic alarm interrupt.
2.2. How
Configure the LED pin and the RTC alarm interrupts in STM32CubeIDE and generate code.
Verify the correct functionality by periodic RTC alarm interrupts and by toggle the LED.
2.3. Create the project in STM32CubeIDE
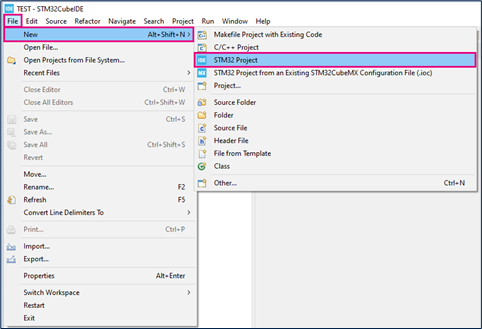
- File>New>STM32 Project in main panel.
In this example the NUCLEO-L476RG board is used to test RTC Alarm with interrupt.
- For that, Select NUCLEO-L476RG board using Board Selector as shown in the below figure.
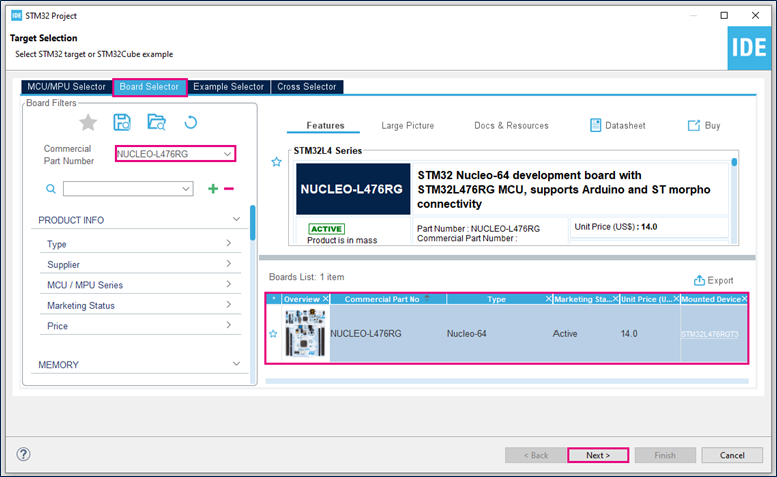
In case you haven't downloaded the STM32L476 Cube library, it will be downloaded automatically, it may take some time.
Once the download is done, you can select NUCLEO-L476RG in board Selector.
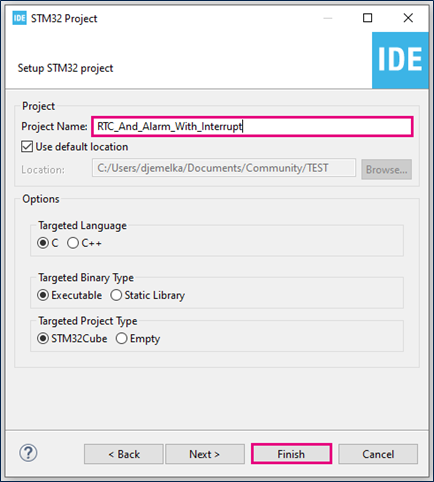
- Enter a name for the project, for example “RTC_And_Alarm_With_Interrupt”.
- Initialize all peripherals with their default settings.
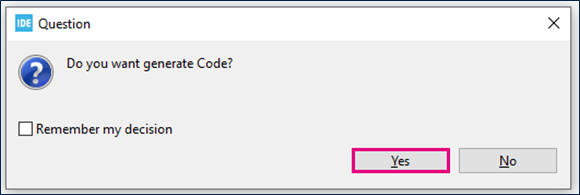
Answer “Yes” to initialize all peripherals with their default mode? Popup as below:

2.4. RTC Configuration
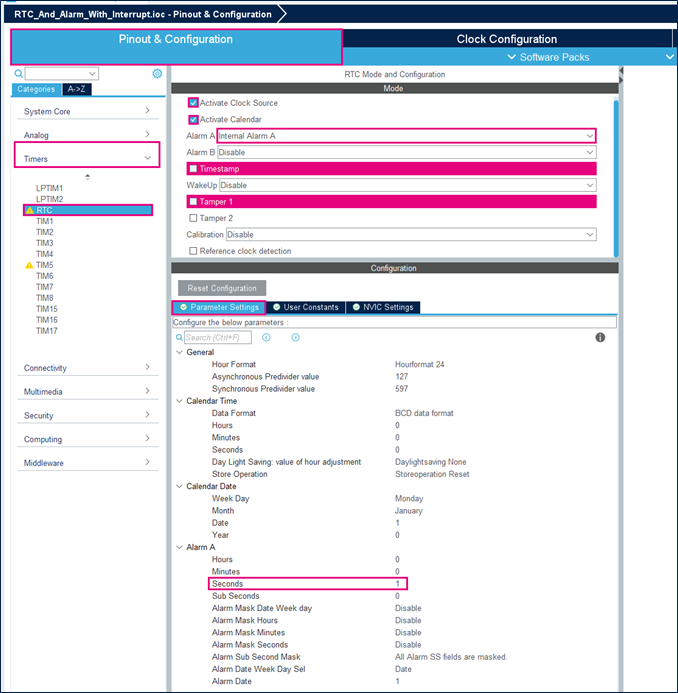
- Set Internal Alarm on Alarm A.
- Modify the seconds Alarm value to 1 in the parameter settings to set first Alarm to 1s.
- Enable alarm interrupt.
To enable the alarm interrupt, it is necessary to refer to the reference manual and precisely vectors table to choose the correct interrupt RTC alarm.
For the STM32L476 the RTC alarm interrupt is connected to EXTI line as shown below.

2.5. GPIO configuration
Green Led of NUCLEO-L476RG board is connected to PA5. Configure it in output push-pull to toggle as alarm indication.
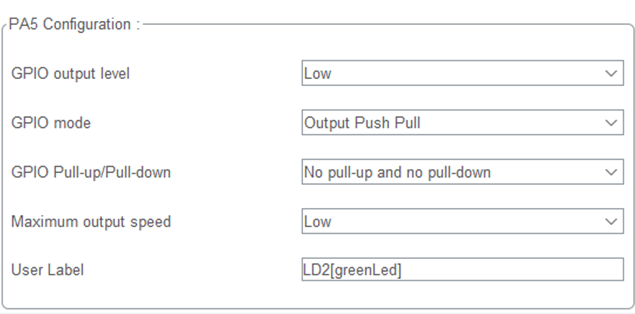
File:GPIO configuration2.png
2.6. Generate source code
- Click "Ctrl+S" to generate the project.
2.7. Edit main.c
- Add these lines of code to toggle the LED to indicate the RTC alarm is done between USER CODE BEGIN 4 and USER CODE END 4.
/* USER CODE BEGIN 4 */
void HAL_RTC_AlarmAEventCallback(RTC_HandleTypeDef *hrtc){
RTC_AlarmTypeDef sAlarm;
 HAL_RTC_GetAlarm(hrtc,&sAlarm,RTC_ALARM_A,FORMAT_BIN);
 if(sAlarm.AlarmTime.Seconds>58){
   sAlarm.AlarmTime.Seconds=0;
  }else{
    sAlarm.AlarmTime.Seconds=sAlarm.AlarmTime.Seconds+1;
  }
 while(HAL_RTC_SetAlarm_IT(hrtc, &sAlarm, FORMAT_BIN)!=HAL_OK){}
 HAL_GPIO_TogglePin(GPIOA, GPIO_PIN_5);
}
/* USER CODE END 4 */
2.8. Compile and flash
First of all, build your project File:Built Button
Then debug it File:Debug Button
Finally, run it File:Run Button
Every 1 second the green LED state changes and for 1 minute.
This project allows the LED to flash for a single minute. So, the counting stops after 1 minute.
To create alarm every 1 second for an infinite time it is possible, we only need to modify the Alarm mask to ignore Days, Hours and Minutes. To do that the “sAlarm.AlarmMask = RTC_ALARMMASK_NONE;” line of code should be “sAlarm.AlarmMask = RTC_ALARMMASK_DATEWEEKDAY|RTC_ALARMMASK_HOURS|RTC_ALARMMASK_MINUTES;”
This modification can be do directory in the main.c or in the STM32cube IDE configuration by enabled Alarm Mask Date Weak day, Alarm Mask Hours and Alarm Mask Minutes as shown in the below figure.
[[category:Getting_started_with_STM32_system_peripherals | 15]]
