Registered User mNo edit summary |
Registered User mNo edit summary |
||
| Line 1: | Line 1: | ||
<bookshelf src="Book:Getting started" /> | <bookshelf src="Book:Getting started" /> | ||
{| class=" | {| class="st-table" style="text-align:center; margin: auto" | ||
| colspan="7" style=" | | colspan="7" style="border-style: hidden;" | [[Image:STM32MP157X-DK2.png | 80px | link=]] | ||
|- | |- | ||
| colspan="4" style="text-align:left; | | colspan="4" style="border-style: hidden; text-align:left;" | [[Getting started/STM32MP1 boards/STM32MP157C-DK2/Develop on Arm® Cortex®-A7 | {{GSModuleCurrent|Develop on Arm® Cortex®-A7}}]] | ||
| colspan="3" style="text-align:right; | | colspan="3" style="border-style: hidden; text-align:right;" | [[Getting started/STM32MP1 boards/STM32MP157C-DK2/Develop on Arm® Cortex®-M4 | {{GSModuleNext|Develop on Arm® Cortex®-M4}}]] | ||
|- | |- | ||
| style="border- | | style="border-style: hidden;" | [[Image:step_category_in.png|link=]] | ||
| style=" | | style="border-style: hidden; width:150px;" | [[Getting started/STM32MP1 boards/STM32MP157C-DK2/Develop on Arm® Cortex®-A7/Install the SDK | {{GSStepNext|Install the SDK}}]] | ||
| style="border- | | style="border-style: hidden; " | [[Image:step.png|link=]] | ||
| style=" | | style="border-style: hidden; width:150px;" | [[Getting started/STM32MP1 boards/STM32MP157C-DK2/Develop on Arm® Cortex®-A7/Create a simple hello-world application | {{GSStepCurrent|Create a simple hello-world application}}]] | ||
| style="border- | | style="border-style: hidden; " | [[Image:step.png|link=]] | ||
| style=" | | style="border-style: hidden; width:150px;" | [[Getting started/STM32MP1 boards/STM32MP157C-DK2/Develop on Arm® Cortex®-A7/Modify, rebuild and reload the Linux® kernel | {{GSStepNext|Modify, rebuild and reload the Linux® kernel}}]] | ||
| style="border- | | style="border-style: hidden;" | [[Image:step_category_out.png|link=]] | ||
|} | |} | ||
<br> | <br> | ||
| Line 19: | Line 19: | ||
<br> | <br> | ||
{| class=" | {| class="st-table" style="margin: auto" | ||
| style="border- | | style="border-style: hidden; width:120px; text-align:left" | [[Image:back_button.png|link=Getting started/STM32MP1 boards/STM32MP157C-DK2/Develop on Arm® Cortex®-A7/Install the SDK]] | ||
| style="border- | | style="border-style: hidden; width:360px; text-align:center" | [[Image:overview_button.png|link=Getting started/STM32MP1 boards/STM32MP157C-DK2]] | ||
| style="border- | | style="border-style: hidden; width:120px; text-align:right" | [[Image:next_button.png|link=Getting started/STM32MP1 boards/STM32MP157C-DK2/Develop on Arm® Cortex®-A7/Modify, rebuild and reload the Linux® kernel]] | ||
|} | |} | ||
Revision as of 16:27, 27 January 2020
1. Overview[edit | edit source]
This stage explains how to create, build and execute a simple C code application using the freshly installed SDK.
2. Code[edit | edit source]
2.1. For STM32MP1 series[edit | edit source]
- Create a directory that will host your source codes
mkdir $HOME/STM32MPU_workspace/STM32MPU-Ecosystem-v6.1.0/Developer-Package/stm32mp1-openstlinux-25.06.11
mkdir $HOME/STM32MPU_workspace/STM32MPU-Ecosystem-v6.1.0/Developer-Package/stm32mp1-openstlinux-25.06.11/sources
- Create a directory for your user space example
mkdir $HOME/STM32MPU_workspace/STM32MPU-Ecosystem-v6.1.0/Developer-Package/stm32mp1-openstlinux-25.06.11/sources/gtk_hello_world_example
cd $HOME/STM32MPU_workspace/STM32MPU-Ecosystem-v6.1.0/Developer-Package/stm32mp1-openstlinux-25.06.11/sources/gtk_hello_world_example
- Create the source code file for your user space example: gtk_hello_world.c
#include <gtk/gtk.h>

static void
print_hello (GtkWidget *widget,
             gpointer   data)
{
  g_print ("Hello World\n");
}

static void
activate (GtkApplication *app,
          gpointer        user_data)
{
  GtkWidget *window;
  GtkWidget *button;
  GtkWidget *button_box;

  window = gtk_application_window_new (app);
  gtk_window_set_title (GTK_WINDOW (window), "Window");
  gtk_window_set_default_size (GTK_WINDOW (window), 200, 200);

  button_box = gtk_button_box_new (GTK_ORIENTATION_HORIZONTAL);
  gtk_container_add (GTK_CONTAINER (window), button_box);

  button = gtk_button_new_with_label ("Hello World");
  g_signal_connect (button, "clicked", G_CALLBACK (print_hello), NULL);
  g_signal_connect_swapped (button, "clicked", G_CALLBACK (gtk_widget_destroy), window);
  gtk_container_add (GTK_CONTAINER (button_box), button);

  gtk_widget_show_all (window);
}

int
main (int    argc,
      char **argv)
{
  GtkApplication *app;
  int status;

  app = gtk_application_new ("org.gtk.example", G_APPLICATION_DEFAULT_FLAGS);
  g_signal_connect (app, "activate", G_CALLBACK (activate), NULL);
  status = g_application_run (G_APPLICATION (app), argc, argv);
  g_object_unref (app);

  return status;
}
2.2. For STM32MP2 series[edit | edit source]
- Create a directory that will host your source codes
mkdir $HOME/STM32MPU_workspace/STM32MPU-Ecosystem-v6.1.0/Developer-Package/stm32mp2-openstlinux-25.06.11
mkdir $HOME/STM32MPU_workspace/STM32MPU-Ecosystem-v6.1.0/Developer-Package/stm32mp2-openstlinux-25.06.11/sources
- Create a directory for your user space example
mkdir $HOME/STM32MPU_workspace/STM32MPU-Ecosystem-v6.1.0/Developer-Package/stm32mp2-openstlinux-25.06.11/sources/gtk_hello_world_example/
cd $HOME/STM32MPU_workspace/STM32MPU-Ecosystem-v6.1.0/Developer-Package/stm32mp2-openstlinux-25.06.11/sources/gtk_hello_world_example/
- Create the source code file for your user space example: gtk_hello_world.c
#include <gtk/gtk.h>

static void
print_hello (GtkWidget *widget,
             gpointer   data)
{
  g_print ("Hello World\n");
}

static void
activate (GtkApplication *app,
          gpointer        user_data)
{
  GtkWidget *window;
  GtkWidget *button;
  GtkWidget *button_box;

  window = gtk_application_window_new (app);
  gtk_window_set_title (GTK_WINDOW (window), "Window");
  gtk_window_set_default_size (GTK_WINDOW (window), 200, 200);

  button_box = gtk_button_box_new (GTK_ORIENTATION_HORIZONTAL);
  gtk_container_add (GTK_CONTAINER (window), button_box);

  button = gtk_button_new_with_label ("Hello World");
  g_signal_connect (button, "clicked", G_CALLBACK (print_hello), NULL);
  g_signal_connect_swapped (button, "clicked", G_CALLBACK (gtk_widget_destroy), window);
  gtk_container_add (GTK_CONTAINER (button_box), button);

  gtk_widget_show_all (window);
}

int
main (int    argc,
      char **argv)
{
  GtkApplication *app;
  int status;

  app = gtk_application_new ("org.gtk.example", G_APPLICATION_DEFAULT_FLAGS);
  g_signal_connect (app, "activate", G_CALLBACK (activate), NULL);
  status = g_application_run (G_APPLICATION (app), argc, argv);
  g_object_unref (app);

  return status;
}
3. Build[edit | edit source]
- Create the makefile for your user space example: Makefile
| All the indentations in a makefile are tabulations |
PROG = gtk_hello_world
SRCS = gtk_hello_world.c

CLEANFILES = $(PROG)

# Add / change option in CFLAGS and LDFLAGS
CFLAGS += -Wall $(shell pkg-config --cflags gtk+-3.0)
LDFLAGS += $(shell pkg-config --libs gtk+-3.0)

all: $(PROG)

$(PROG): $(SRCS)
	$(CC) -o $@ $^ $(CFLAGS) $(LDFLAGS)

clean:
	rm -f $(CLEANFILES) $(patsubst %.c,%.o, $(SRCS))
- Cross-compile the project
make
4. Deploy and execute[edit | edit source]
- Push this binary onto the board (Ethernet connection needed)
scp gtk_hello_world root@<board ip address>:/usr/local
- Execute your user space example by using the user "weston"
cd /usr/local/
su -l weston -c "/usr/local/gtk_hello_world"
- A GTK window is displayed
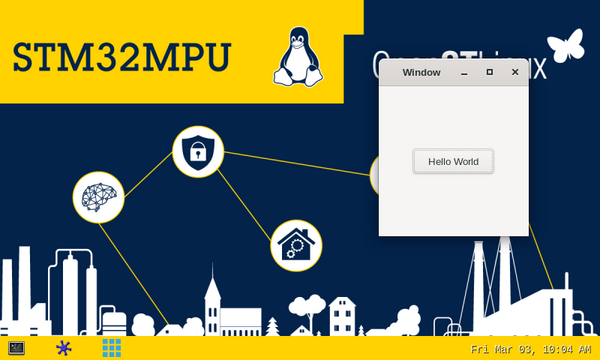
- Click the "Hello world" button to close the window. Hello world is displayed on the console:
Hello world