1. Purpose[edit | edit source]
This article aims to specify how to control the LTDC 3rd layer by Arm®-Cortex® M33 for displaying information (motor speed, camera status, detected events, visual watch dog...) while displaying the standard HMI on OpenSTLinux running on Arm®-Cortex® A35, and using the STM32Cube MPU firmware example.
This article also explains how to configure the LTDC 3rd layer (resolution, window sizing, opacity...) and how to make changes in OP-TEE RIF settings from the External device tree so that the LTDC 3rd layer can be controlled by Arm®-Cortex® M33.
2. Prerequisites[edit | edit source]
To run the STM32Cube example to demonstrate the LTDC 3rd layer controlled by CM33 while displaying standard HMI on OpenSTLinux running on Arm®-Cortex® A35, the required hardware and software stacks are listed below:
- The STM32MP257x-EV1 Evaluation board
 (including the default LVDS display panel)
 - Refer to Installing the STM32CubeMP2 Package to obtain and install the source code
- Refer to the new recommended IDE: STM32CubeIDE
3. LTDC 3rd layer example description[edit | edit source]
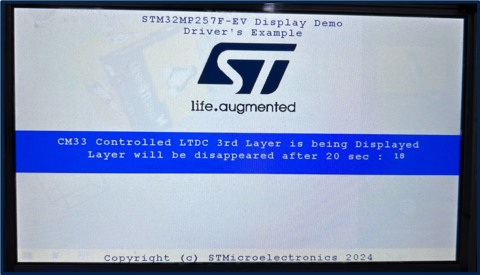
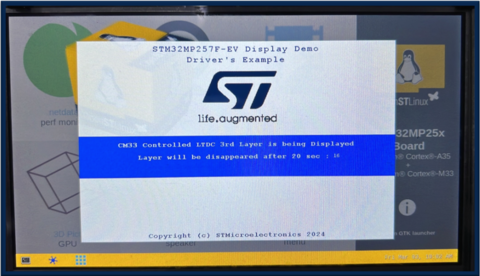
The goal of this example is to demonstrate an Arm®-Cortex® M33 controlled unprotected 3rd layer while displaying standard HMI on OpenSTLinux running on an Arm®-Cortex® A35.
This example displays a splash screen logo and a message during 20 seconds. It can be adapted for various use cases like displaying parameters of a running processes controlled by the Arm®-Cortex® M33 such as motor speed, camera status, detected events, or visual watch dog.
| You can browse this example source code in <CubePackage>/Projects/STM32MP257F-EV1/Examples/LTDC |
.
3.1. Steps to configure the 3rd layer of LTDC[edit | edit source]
- Read back LTDC "common registers" to determine the panel information (height and width). Note that the display panel and the LTDC internal peripheral have already been initialized by OpenSTLinux running on Arm®-Cortex® A35.
- Configure the LTDC 3rd layer with "no Reload trigger".
- Window sizing: full screen and partial screen mode, controlled by "FULLSCREEN" preprocessor
- Opacity: controlled by "constA", set so that OpenSTLinux HMI is visible
- Input pixel format: RGB565 in this example
- Set immediate reload type when LTDC updates are required.
| Refer to the LTDC internal peripheral article for more details. |
3.2. LTDC 3rd layer display content[edit | edit source]
- Splash screen is displayed with content (example description and ST logo).
- Splash screen disappears after 20 second timeout (SUCCESS).
3.3. Operating mode[edit | edit source]
After the LCD initialization, the LCD 3rd layer is configured as follows:
- FULLSCREEN mode (with "FULLSCREEN" preprocessor): 3rd layer is configured to display a framebuffer content read from the DDR memory with direct color (RGB565) as pixel format and 1024x600 as resolution (same resolution as the panel).
- Partial screen mode (with no "FULLSCREEN" preprocessor): 3rd layer is configured to display a framebuffer content read from the DDR memory with direct color (RGB565) as pixel format and 720x480 as resolution (smaller resolution than the panel).
3.4. Display composition[edit | edit source]
The LTDC internal peripheral supports 3 layers of display composition, where the blending order and blending factor of each layer can be configured with each other. The LTDC common registers, layer 1 and layer 2 configuration is controlled by CA35 whereas to demonstrate the LTDC 3rd layer, the layer 3 resource is allocated to Arm®-Cortex® M33.
4. How to configure RIF to use LTDC 3rd layer in a nonsecure context from Arm-Cortex M33[edit | edit source]
The security of the LTDC internal peripheral is determined by the protection of its register map and its master (AXI DMA Engine) access to the system interconnect.
| Refer to Resource Isolation Framework overview and STM32MP25 firewall configuration to learn more on CID definitions and configurations. |
The LTDC_L2_ID resource under RIFSC has been statically allocated to the Arm-Cortex M33 (CM33: CID2 at reset) and set to nonsecure access (NSEC).
The "ltdc_m33_layer" region of 4M bytes size has been used for the framebuffer (fb_address: 0x81300000 of 4MB).
To be able to write by the Arm®-Cortex® M33 and read by the LTDC AXI DMA engine to this framebuffer region, RIF settings are configured as follows:
- RIMU configuration for this example, LTDC AXI master is configured in RIFSC_RIMC_ATTRx as CID4 (AXI CID can be configured to CID5, 6, or 7) and NSEC (for unprotected accesses), whereas CM33 is CID2.
- RISAF region is configured as follows (identified by REGION ID 12):
- CID2 (CM33) and CID4 (LTDC AXI master) are listed in read list.
- CID2 (CM33) and CID4 (LTDC AXI master) are listed in write list.
- Nonsecure accesses are configured for this region.
| Refer to the STM32 MPU reference manuals for more details on CID, RISAF, RIFSC, and LTDC. |
- Refer to the changes below in the OP-TEE External device tree. (Note that these changes may be already present in your external device tree files.):
<EXTERNAL DT>/optee/stm32mp257f-ev1-ca35tdcid-ostl-m33-examples-rif.dtsi
&rifsc {
st,protreg = <
.
.
.
RIFPROT(STM32MP25_RIFSC_LTDC_L0L1_ID, RIF_UNUSED, RIF_UNLOCK, RIF_NSEC, RIF_PRIV, RIF_CID1, RIF_SEM_DIS, RIF_CFEN)
- RIFPROT(STM32MP25_RIFSC_LTDC_L2_ID, RIF_UNUSED, RIF_UNLOCK, RIF_NSEC, RIF_PRIV, RIF_CID1, RIF_SEM_DIS, RIF_CFEN)
+ RIFPROT(STM32MP25_RIFSC_LTDC_L2_ID, RIF_UNUSED, RIF_UNLOCK, RIF_NSEC, RIF_PRIV, RIF_CID2, RIF_SEM_DIS, RIF_CFEN)
RIFPROT(STM32MP25_RIFSC_LTDC_ROT_ID, RIF_UNUSED, RIF_UNLOCK, RIF_NSEC, RIF_PRIV, RIF_CID1, RIF_SEM_DIS, RIF_CFEN)
.
.
.
>;
};
&rifsc {
st,rimu = <
.
.
RIMUPROT(RIMU_ID(9), RIF_UNUSED, RIF_NSEC, RIF_PRIV, RIF_CIDSEL_P)
RIMUPROT(RIMU_ID(10), RIF_UNUSED, RIF_NSEC, RIF_PRIV, RIF_CIDSEL_P)
RIMUPROT(RIMU_ID(11), RIF_CID4, RIF_NSEC, RIF_PRIV, RIF_CIDSEL_M)
- RIMUPROT(RIMU_ID(12), RIF_CID4, RIF_SEC, RIF_PRIV, RIF_CIDSEL_M)
+ RIMUPROT(RIMU_ID(12), RIF_CID4, RIF_NSEC, RIF_PRIV, RIF_CIDSEL_M)
RIMUPROT(RIMU_ID(13), RIF_CID4, RIF_NSEC, RIF_PRIV, RIF_CIDSEL_M)
RIMUPROT(RIMU_ID(14), RIF_UNUSED, RIF_NSEC, RIF_PRIV, RIF_CIDSEL_P)
RIMUPROT(RIMU_ID(15), RIF_UNUSED, RIF_NSEC, RIF_PRIV, RIF_CIDSEL_P)
.
.
>;
};
<dc_m33_layer {
st,protreg = <RISAFPROT(RISAF_REG_ID(12), RIF_CID2_BF|RIF_CID4_BF, RIF_CID2_BF|RIF_CID4_BF, RIF_UNUSED, RIF_NSEC, RIF_ENC_DIS, RIF_BREN_EN)>;
};
&risaf4 {
- memory-region= <&tfm_code>, <&cm33_cube_fw>, <&tfm_data>, <&cm33_cube_data>, <&ipc_shmem>, <&spare1>, <&bl31_context>, <&op_tee>, <&linuxkernel1>, <&gpu_reserved>, <<dc_sec_layer>, <<dc_sec_rotation>, <&linuxkernel2>;
+ memory-region= <&tfm_code>, <&cm33_cube_fw>, <&tfm_data>, <&cm33_cube_data>, <&ipc_shmem>, <&spare1>, <&bl31_context>, <&op_tee>, <&linuxkernel1>, <&gpu_reserved>, <<dc_m33_layer>, <<dc_sec_layer>, <<dc_sec_rotation>, <&linuxkernel2>;
};
<EXTERNAL DT>/optee/stm32mp257f-ev1-ca35tdcid-ostl-m33-examples-resmem.dtsi
reserved-memory {
#address-cells = <2>;
#size-cells = <2>;
ranges;
.
.
- spare1: spare1@81300000 {
- reg = <0x0 0x81300000 0x0 0xcc0000>;
- no-map;
- };
+ spare1: spare1@81700000 {
+ reg = <0x0 0x81700000 0x0 0x8c0000>;
+ no-map;
+ };
.
.
+ ltdc_m33_layer: ltdc-m33-layer@81300000 {
+ reg = <0x0 0x81300000 0x0 0x400000>;
+ no-map;
+ };
.
.
}
- Update the OP-TEE external dt reference: How to configure OP-TEE
- Compile OP-TEE image: How to configure OP-TEE
- Copy existing FIP binary to <OPTEE>/out/arm-plat-stm32mp2/core (for example: optee_os/out/stm32mp257f-ev1-ca35tdcid-ostl-m33-examples/core.
- Run the following commands to update binaries with
fiptool:
| Refer to the article How to configure TF-A FIP chapter Updating the FIP binary for more details about these commands. |
 cd <OPTEE>/out/arm-plat-stm32mp2/core
 ### Command for micro SD card
 fiptool update fip-stm32mp257f-ev1-ca35tdcid-ostl-m33-examples-optee-sdcard.bin --tos-fw tee-header_v2.bin --tos-fw-extra1 tee-pager_v2.bin --tos-fw-extra2 tee-pageable_v2.bin
 ### Or command for eMMC
 fiptool update fip-stm32mp257f-ev1-ca35tdcid-ostl-m33-examples-optee-emmc.bin --tos-fw tee-header_v2.bin --tos-fw-extra1 tee-pager_v2.bin --tos-fw-extra2 tee-pageable_v2.bin
- Copy FIP binary into the target device inside the folder /home/root/:
| Refer to the article How to configure TF-A FIP chapter Updating the software on board for more details about these commands. |
 ### Command for micro SD card (where mmcblk0p5 - mmcblk<MMC_INSTANCE>p<FIP_IMAGE_PARTITION_NUM>):
 dd if=fip-stm32mp257f-ev1-ca35tdcid-ostl-m33-examples-optee-sdcard.bin  of=/dev/mmcblk0p5 conv=fdatasync
 ### Or command for eMMC (where mmcblk1p3 - mmcblk<MMC_INSTANCE>p<FIP_IMAGE_PARTITION_NUM>):
 dd if=fip-stm32mp257f-ev1-ca35tdcid-ostl-m33-examples-optee-emmc.bin  of=/dev/mmcblk1p3 conv=fdatasync
- Reboot the target device.
- Run the example.
5. How to run STM32Cube MPU example[edit | edit source]
To run the example on the STM32MP257x-EV1 Evaluation board ![]() , perform the following steps:
, perform the following steps:
- Open the project folder containing the example at the following path <CubePackage>/Projects/STM32MP257F-EV1/Examples/LTDC and double-click on file .project to open the Eclipse STM32CubeIDE.
| You can browse this example source code in <CubePackage>/Projects/STM32MP257F-EV1/Examples/LTDC |
.
- Build with the configuration CA35TDCID_m33_ns_sign.
- Create the example firmware directory on the target and copy the example signed firmware and its related script with the commands:
 ssh root@192.168.7.1 'mkdir -p /home/root/LTDC_Display_3rdLayer/lib/firmware'
 scp LTDC_Display_3rdLayer_CM33_NonSecure_sign.bin root@192.168.7.1:/home/root/LTDC_Display_3rdLayer/lib/firmware
- Go to the CubePackage folder and run the following command:
scp Utilities/scripts/fw_cortex_m33.sh root@192.168.7.1:/home/root/LTDC_Display_3rdLayer/
- To run the example on the target shell, run following commands:
 cd /home/root/LTDC_Display_3rdLayer
 ./fw_cortex_m33.sh start
6. How to go further[edit | edit source]
You may be interested in the following related articles:


