1. Article purpose[edit source]
The purpose of this article is to explain how to integrate Amazon Web Service (AWS) IoT Greengrass [1] on top of OpenSTLinux, included the security part with the connection to a Hardware Security Module (a TPMv2.0).
This article explains step by step how to add the yocto "meta-demo-aws" on top of OpenSTLinux distribution, to configure build and install the image, to execute the AWS greengrass certification testing and to configure the target for a secure connection with the AWS cloud.
2. Prerequisites[edit source]
You need some knowledge of the AWS IoT Greengrass, and to configure your AWS cloud account, follow the process described in "AWS amazon site"[2]
2.1. Hardware prerequisites[edit source]
The process has been verified withe the board STM32MP157C-DK2 Discovery kit ![]() and STM32MP157F-DK2 Discovery kit
and STM32MP157F-DK2 Discovery kit ![]() .
.
- STM32MP157C-DK2
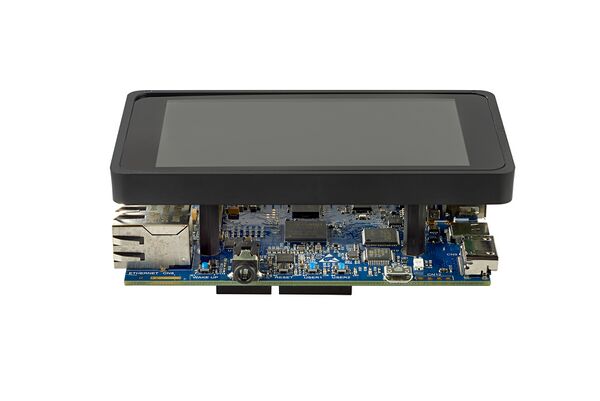
For more information about the STM32 discovery board and how to start it up, jump to this section Getting started with STM32MP157x-DK2
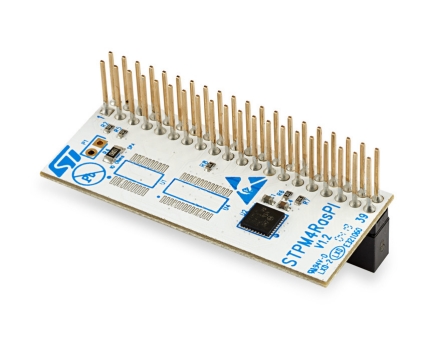
- STPM4RasPI expansion board[3]
The STPM4RasPI is an official extension board to connect the ST33 TPM products to the Raspberry Pi® device. It is designed for development, proof of concept or demonstration activities. The board is shipped with one trusted platform module soldered. The ST33 TPM device soldered is the ST33TPHF20SPI, it is a TPM V2.0 specification implementation.
2.2. Software prerequisites[edit source]
The STM32MP1 Distribution Package must be installed on your host. The process has been verified with the delivery ecosystem release v2.0.0 of the OpenSTlinux distribution.
3. Software update with meta-st-demo-aws[edit source]
1.Clone following git repository into ([your STM32MP1 Distribution path]/layers/meta-st/)
  PC $>git clone ssh://${USER}@gerrit.st.com:29418/stm32mpuapp/meta/meta-st-stm32mpu-app-aws.git t
  PC $>cd meta-st-stm32mpu-app-aws
  PC $>git checkout MMDV_V200
2.Enable TPM build
Apply the following patch in the file ([your STM32MP1 Distribution path]/layers/meta-st/meta-st-openstlinux/conf/distro/include/openstlinux.in)
DISTRO_FEATURES_append = " tpm2 "
3.Add Virtualization (docker) in the OpenSTLinux distribution
Executes the command, on the host :
cd [your STM32MP1 Distribution path]/layers
git clone git://git.yoctoproject.org/meta-virtualization
git checkout remotes/origin/dunfell
bitbake add-layer [your STM32MP1 Distribution path]/layers/meta-virtualization
Update the file ([your STM32MP1 Distribution path]/layers/meta-st/meta-st-openstlinux/conf/distro/openstlinux-weston.conf)
DISTRO_FEATURES_append = "virtualization"
4.Add Java-jdk
Follow the install process define in the article How to install JAVA JDK article.
5.Increase the Rootfs partition size
Update the file ([your STM32MP1 Distribution path]/ layers/meta-st/meta-st-stm32mp/conf/machine/include/st-machine-common-stm32mp.inc)
#IMAGE_ROOTFS_MAXSIZE ?= "763904"
IMAGE_ROOTFS_MAXSIZE = "2097152"
6.Setup the build environment
Executes the command, on the host :
cd [your STM32MP1 Distribution path]
DISTRO=openstlinux-weston MACHINE=stm32mp1-demo-aws source layers/meta-st/scripts/envsetup.sh
7.Build the image
In the folder ([your STM32MP1 Distribution path]/build-openstlinuxweston-stm32mp1-demo-aws) Executes the command :
bitbake st-image-demo-aws
8.Flash the sdcard
Use the programmer tool STM32CubeProgrammer
For example, the tsv file (FlashLayout_sdcard_ stm32mp157c-demo-aws-mx-trusted.tsv) is located in ([your STM32MP1 Distribution path]/build-openstlinuxweston-stm32mp1-demo-aws/tmp-glibc/deploy/images/stm32mp1-demo-aws/flashlayout_st-image-demo-aws)
4. AWS greengrass target initialization[edit source]
1.Configuration of the target
Run the scripts for some extra configuration on the target (to execute only one time after the first boot).
source /greengrass/tpm_update.sh
If the image has been configured for the execution of the AWS greengrass certification testing.
source /greengrass/awsgreengrass_certif.sh
2.TPM token initialization
Note : if something goes wrong, you can reset the TPM and PKCS11 store with the following commands :
cd /usr/bin
./tpm2_clear -Q
rm -rf /usr/local/pkcs11_tpm/*
Executes the commands, on the target :
cd /tools
./tpm2_ptool init --primary-auth=123456 --path=$TPM2_PKCS11_STORE
./tpm2_ptool addtoken --pid=1 --sopin=123456 --userpin=123456 --label=greengrass --path $TPM2_PKCS11_STORE
./tpm2_ptool addkey --algorithm=rsa2048 --label="greengrass" --userpin=123456 --key-label=greenkey --path=$TPM2_PKCS11_STORE
OPTIONAL : Verifications with pkcs11-tool
Executes this command on the target to verify the token created.
pkcs11-tool --module /usr/lib/libtpm2_pkcs11.so.0 -L
Example of output expected :
Available slots:
   Slot 0 (0x1): greengrass STMicro
     token label        : greengrass
     token manufacturer : STMicro
     token model        :
    token flags        : login required, rng, token initialized, PIN initialized
     hardware version   : 1.38
     firmware version   : 74.8
     serial num         : 0000000000000000
     pin min/max        : 5/128
AT THIS STEP, THE CONFIGURATION OF THE BOARD IS COMPLETED TO BE USED :
- With AWS IoT Device Tester to perform the AWS greengrass certification testing, see the paragraph Process to execute the AWS Greengrass certification testing
- For a secure connection with AWS cloud, see the paragraph Process to create a Certificat Signature Request using the hardware-protected private key
5. Process to execute the AWS Greengrass certification testing[edit source]
1.Install the AWS IoT Device Tester.
Go to the AWS Amazon site to [AWS IoT Device Tester for AWS IoT Greengrass Versions] [4]
2.Configure your ssh connection (ssh keys)
Go to the AWS Amazon site to [Configure Your Host Computer to Access Your Device Under Test][5]
3.Configure the IDT
  Example of the install config folder for Windows.
  C:\devicetester_greengrass_win\devicetester_greengrass_win\configs\
Go to the AWS Amazon site [Setting Configuration to Run the AWS IoT Greengrass Qualification Suite][6]
  There is a  IDT configuration file example installed on your Host :
  /[your STM32MP1 Distribution path]/layers/meta-st/meta-st-demo-aws/recipes-aws/greengrasstests/greengrasstests/device-hsm.json
Note : With this example the certification tests are performed in Root.
4.Execute the tests
Go to the AWS Amazon site to [Running Tests][7]
6. Process to create a Certificat Signature Request using the hardware-protected private key[edit source]
1.Install the tool openssl on the target.
The packages are stored on your Host : (/[your STM32MP1 Distribution path]/build-openstlinuxweston-stm32mp1-demo-aws/tmp-glibc/deploy/deb/cortexa7t2hf-neon-vfpv4)
package openssl-bin_1.1.1a-r0_armhf.deb (usr/bin/openssl)
package openssl_1.1.1a-r0_armhf.deb (usr/lib/ssl-1.1/openssl.cnf ....; etc/ssl/certs and private folder)
package openssl-conf_1.1.1a-r0_armhf.deb (/etc/ssl/openssl.cnf)
Execute the commands, on the Host (the board is connected to your internet network) :
 scp openssl-bin_1.1.1a-r0_armhf.deb root@IP address of the board://root
 scp openssl_1.1.1a-r0_armhf.deb root@IP address of the board://root
 scp openssl-conf_1.1.1a-r0_armhf.deb root@IP address of the board://root
Execute the commands, on the target:
 cd /root
 dpkg -i openssl-bin_1.1.1a-r0_armhf.deb
 dpkg -i openssl-conf_1.1.1a-r0_armhf.deb
 dpkg -i openssl_1.1.1a-r0_armhf.deb
 sync
2.Update openssl configuration to use module tpm2_pkcs11
add the following lines in /etc/ssl/openssl.cnf :
openssl_conf = openssl_init
[openssl_init]
engines=engine_section
[engine_section]
pkcs11 = pkcs11_section
[pkcs11_section]
engine_id = pkcs11
dynamic_path = /usr/lib/engines-1.1/pkcs11.so
MODULE_PATH = /usr/lib/libtpm2_pkcs11.so.0
init = 0
3. How to create a CSR "Certificat Signature Request" with openssl (Prerequisite : openssl installed) Executes the command, on target :
openssl req -engine pkcs11 -new -key "pkcs11:token=greengrass;object=greenkey;type=private;pin-value=123456" -keyform engine -out /usr/local/req.csr
This CSR "/usr/local/req.csr" is used to create clients certificats on the AWS amazon Cloud to store on the board.
There is a greengrass configuration file example to update with your AWS account parameter and certificats created, on the target : /greengrass/config/config_secu_example.json
You need also to download the root CA on Amazon site and stored it on the target greengrass/certs/root.ca.pem.
For more information about HSM (Hardware Secure Module) integration for AWS greengrass, go to AWS Amazon site [Hardware Security Integration][8]
4.Connection to Amazon cloud
Before starting the greengrass core on the target you need to set the TPM2_PKCS11_STORE environment variable.
Executes the commands on the target :
export TPM2_PKCS11_STORE=/usr/local/pkcs11_tpm
cd /greengrass/ggc/core/
./greengrassd start
7. References[edit source]
- ↑ https://aws.amazon.com/fr/greengrass/
- ↑ https://docs.aws.amazon.com/greengrass/latest/developerguide/what-is-gg.html
- ↑ STPM4RasPI expansion board
- ↑ https://docs.aws.amazon.com/greengrass/latest/developerguide/dev-test-versions.html
- ↑ https://docs.aws.amazon.com/greengrass/latest/developerguide/device-config-setup.html#configure-host
- ↑ https://docs.aws.amazon.com/greengrass/latest/developerguide/set-config.html
- ↑ https://docs.aws.amazon.com/greengrass/latest/developerguide/run-tests.html
- ↑ https://docs.aws.amazon.com/greengrass/latest/developerguide/hardware-security.html