1. Article purpose[edit source]
This article gives an example of high-rate transfers of data chunks from the Arm® Cortex®-M core to the Arm® Cortex®-A core.
2. Introduction[edit source]
Relying on a logic analyzer sample, this article describes the mechanism and the software implemented to perform high-rate transfers. In this example, the Cortex-M core is used to perform continuously:
- real-time operations
- simple data algorithm (masking bit)
- transfer of the resulting data to the cortex-A
Depending on the frequency sampling, the data is transferred using:
- either direct buffer exchange mode
- TTY RPMsg channel for control and data transfer
- sampling frequency is less than or equal to 5MHz
- or indirect buffer exchange mode
- transfer using DDR buffers requiring:
- contiguous memory allocation in DDR memory
- Cortex-M awareness of the physical address and size of the memory buffers
- mmaping of buffers to enable Linux® user land application access to them
- rpmsg_sdb (shared data buffer) Linux driver, developed to take care of DDR constraints. For details on this buffer exchange mechanisms, refer to the how to exchange large data buffers with the coprocessor - principle article
- TTY RPMsg channel for control
- sampling frequency is more than 5MHz
- transfer using DDR buffers requiring:
3. Example of context description[edit source]
Let us implement a logic analyzer running on the STM32MP1 discovery kit.
From the user interface, press the START button to start the logic analyzer sampling. The logic analyzer samples GPIO PORT E bits 8 to 14, which are present on the Arduino connector. They correspond to 7 bits. The 8th bit will be reset by M4 algorithm.
The number of received data is displayed on the screen as bytes and megabytes.
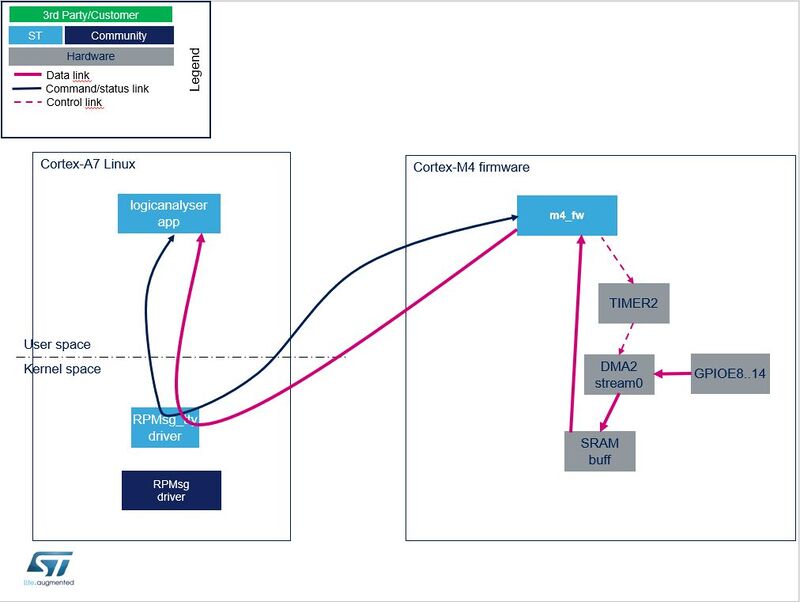
4. Example of static architecture for exchanging large data buffers[edit source]
The example of large data buffer exchange includes:
- A Cortex-M firmware
- A Linux user land application
- A Linux rpmsg_tty driver
- A Linux rpmsg_sdb (shared data buffer) driver
Note that the there is a direct correspondence between the sampling frequency and the data flow rate: thus, a sampling frequency of 8MHz means a data flow rate of 8MB/s (megabytes per second).
Data flow when sampling frequency is less than or equal to 5MHz:
Data flow when sampling frequency is more than 5MHz:

5. Cortex-M firmware[edit source]
The Cortex-M firmware is responsible for:
- receiving a command giving of the number of DDR buffers through the TTY RPMsg channel, from the Linux application.
- receiving messages containing the physical address and size of DDR buffer(s), from the Linux rpmsg_sdb driver; These DDR buffers are always allocated, during the initialisation step, even if they are only used when the frequency sampling is more than 5MHz (see below).
- receiving a command Start/Stop sampling (including sampling frequency) through the TTY RPMsg channel, from the Linux application
- On start request:
- sampling the data at the requested sampling frequency thanks to DMA2 stream0 from GPIOE to SRAM buffers
- masking and transferring data buffers from SRAM to Linux application
- thanks to TTY over RPMSG buffer by packet of 256 bytes if the frequency is less than or equal to 5MHz
- thanks to copy to DDR buffer by packet of 1024 bytes, if the frequency sampling is more than 5MHz, and informing the Cortex-A user interface (through the SDB RPMsg channel) when a DDR buffer of 1 Mbyte is filled, and roll to next DDR buffer.
6. Linux user land application[edit source]
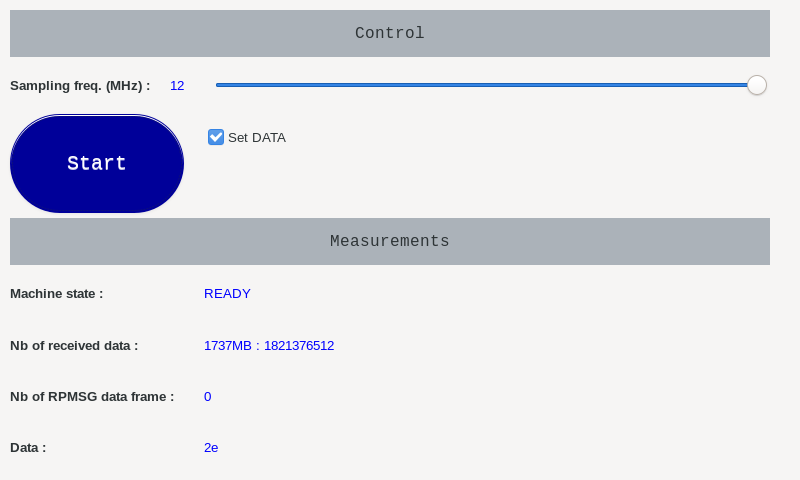
The Cortex-A Linux application includes a GTK user interface.
It allows controlling:
- the sampling frequency
- the start / stop of the sampling.
- the data to be sampled thanks to "Set data" notch UI widget
The user interface displays :
- statistics : the number of data received by the user interface, as bytes and Mbytes
- the first data of every new received megabyte
7. Linux drivers[edit source]
- The rpmsg_tty driver (drivers/rpmsg/rpmsg_tty.c ) is used to communicate (transport commands and status/events) between the Cortex-M firmware and the Cortex-A user land application.
- The rpmsg_sdb Linux driver is responsible for the DDR shared buffers management.
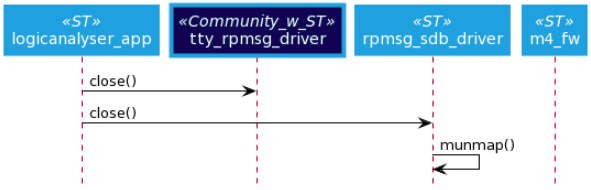
8. Dynamic view[edit source]
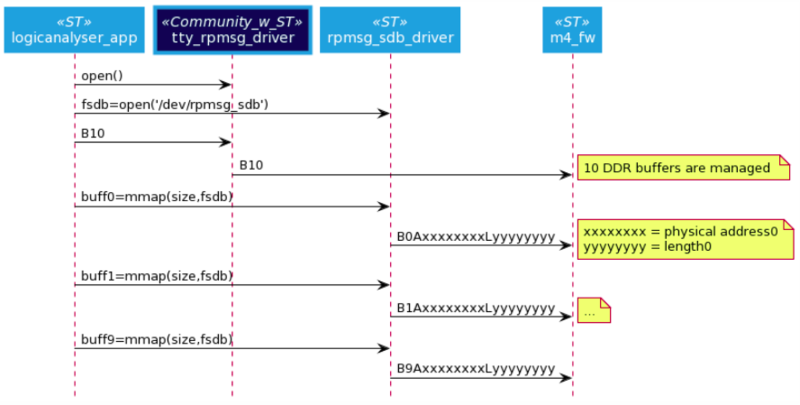
At startup, the Linux application performs the following actions:
- It loads the rpmsg_sdb.ko module.
- It loads the Cortex-M firmware, then starts it.
- It opens a rpmsg_tty channel for Cortex-M firmware control.
- It opens a rpmsg_tty channel for Cortex-M firmware trace debug.
- It opens the rpmsg_sdb driver, then uses rpmsg_sdb IOCTL interface to allocate and mmap 10 buffers of 1Mbyte in DDR memory.
When the user presses User button2, the Linux application starts.
When the START button is pressed, the application sends the sampling command to the Cortex-M firmware (including the sampling frequency).
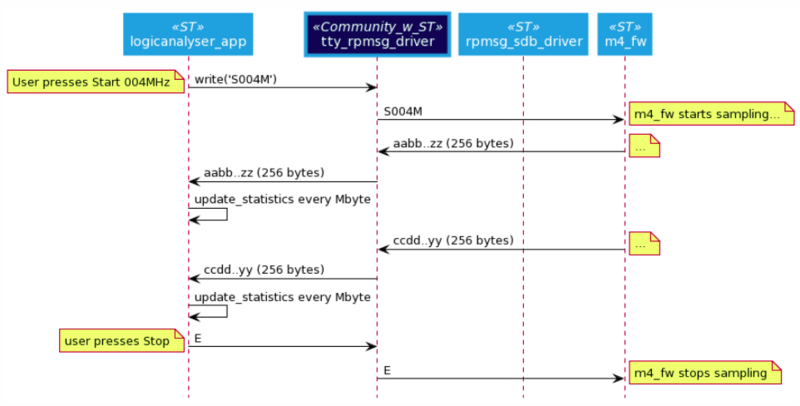
Case 1: user selects a frequency sampling of 4MHz => case of TTY buffers (frequency scaling less than or equal to 5MHz)
When the Linux application receives a data buffer over TTY it checks if a new MByte has been fully received, and in this case it updates the statistics information.
Case 2: user selects a frequency sampling of 8MHz => case of copy to DDR buffers (frequency scaling more than 5MHz)
When the Cortex-M firmware sends a "buffer full" signal via the rpmsg_sdb driver, Linux application updates the statistics information.
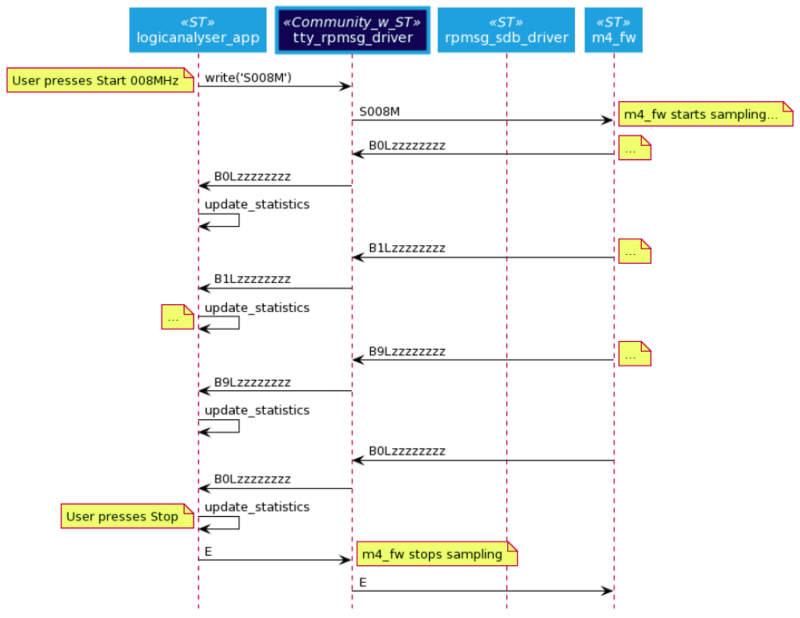
When the STOP button is pressed, the application sends the stop command to the Cortex-M firmware.
When the user presses User button2, the Linux application stops.
9. Results[edit source]
The Cortex-M CPU performs a mask and copy data operation on 1024 bytes within 75.4µs; This implies a maximum frequency sampling of: 1 / (75.4e-6 / 1024) => 13.58MHz. This corresponds to the maximum frequency sampling that can be achieved. In order to let a margin, the maximum frequency sampling implemented in this example is set to 12MHz.
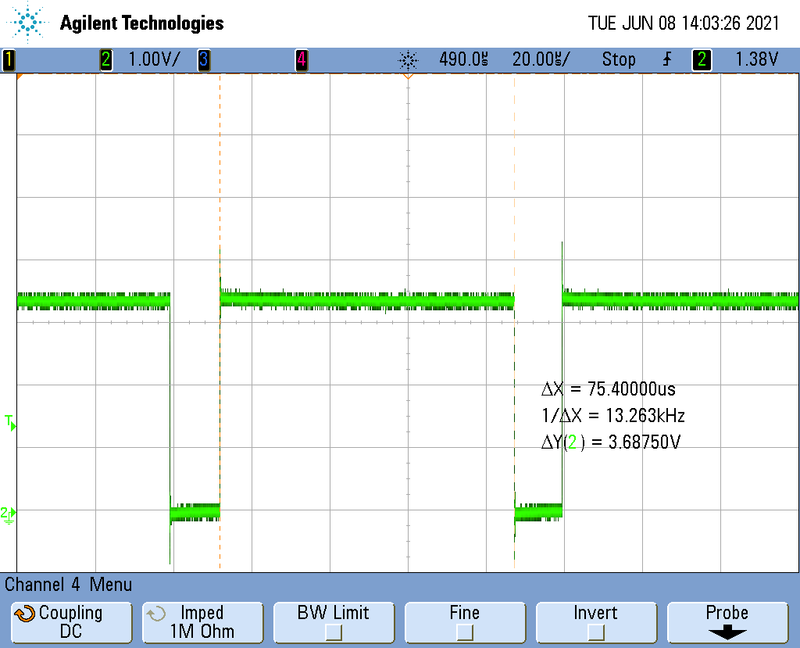
On this oscilloscope snapshot, a GPIO is set at the beginning of the data masking and copying algorithm, and reset at the end of the algorithm. So, 75.4 µs are spent to mask and copy 1024 bytes of data in DDR.
10. Source code[edit source]
The source code corresponding to this use case is available as a Yocto layer at:
The firmware is included in the Yocto layer as an .elf file.
The source code of the Cortex-M firmware is available at:
For firmware compilation, please have a look into: Developer Package for STM32CubeMP1
In the source code example, 10 buffers of 1MByte each are allocated for the exchange. 3 buffers is the minimum to guarantee the real time behavior of the application. If the number of buffer needs to be increased (more than 10), then rpmsg_sdb_driver, M4 firmware, and Linux application must be modified, as the messaging relies on a single digit for the buffer index "BxLyyyyyyyy" => "BxxLyyyyyyyy".
11. Key messages[edit source]
Cortex-M is capable to perform basic algorithm on high data flow. If a more complex data treatment is needed, the data rate must be adapted to be able to treat it on Cortex-M.
Code instrumentation and GPIO set/reset to measure data algorithm timing are highly recommended to check real time of the full system.
For a data rate less than or equal to 5MB/s, TTY over RPMSG should be the preferred solution.
It is not recommended to use several DMA2 streams to deal with high data rates: using a second DMA stream to transfer data to DDR does not work if both streams work at same high rate (trials at 6MHz proved this); in this case a DMA stream0 error occurs.
12. Usage[edit source]
Please follow README.md of the Yocto layer to perform installation.
The logicanalyser application is launched/stopped by pressing User2 button of the STM32MP1 Discovery board.
Select the sampling frequency and click on Start to start the use case.
Snapshot view of user interface :
Arm® is a registered trademark of Arm Limited (or its subsidiaries) in the US and/or elsewhere. ![]()