This article describes how to obtain and use the Distribution Package for Android of the STM32MPU Embedded Software for any STM32MP1 family (STM32MP15 boards) development platform, in order to modify or add pieces of software, and to create the right Android distribution for the targeted product.
It lists some prerequisites in terms of knowledge and development environment, and gives step-by-step instructions to download and install the STM32MPU Embedded Software packages for this Package.
1. Distribution Package content[edit source]
If you are not familiar with the STM32MPU Embedded Software for Android distribution and its Packages, please read the following articles:
- Which STM32MPU Embedded Software Package for Android better suits your needs (and especially the Distribution Package chapter)
- STM32MPU Embedded Software distribution for Android
In summary, this Distribution Package provides:
- an Android build framework (aka distribution builder)
- for the STM32MPU distribution for Android (development on Arm Cortex-A processor):
- the BSP (Linux kernel, U-Boot, TF-A, optionally OP-TEE) pieces in binary (prebuilt). Several scripts are provided to load source code and re-build them.
- the application frameworks (including hardware abstraction code) pieces in source code.
- for the STM32Cube MPU Package (development on Arm Cortex-M processor), all pieces of software in source code: BSP, HAL, middlewares and applications
- a toolset to tune the system for your needs, and to handle the built image (for example STM32CubeProgrammer to install the built image on the board)
2. Checking the prerequisites[edit source]
2.1. Knowledges[edit source]
The STM32MP1 Distribution Package aims at creating an Android distribution for the targeted product: solid knowledge of Linux and Android are recommended to make the most of this Package.
The STM32MPU distribution for Android is an Android distribution based on the Android build framework: a short introduction about Android is available in AOSP[1].
Reading the STM32MPU Embedded Software for Android architecture overview is also highly recommended.
2.2. Development setup[edit source]
The recommended setup for the development PC (host) is specified in the following article: PC prerequisites.
Whatever the development platform (board) and development PC (host) used, the range of possible development setups is illustrated by the picture below.
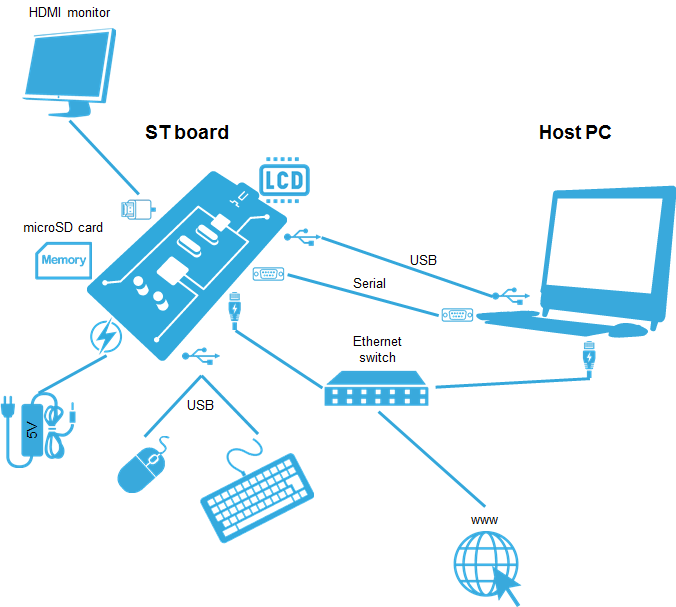
The following components are mandatory:
- Host PC for cross-compilation and cross-debugging, installed as specified above
- Board assembled and configured as specified in the associated Starter Package article
- Mass storage device (for example, microSD card) to load and update the software images (binaries)
The following components are optional, but recommended:
- A serial link between the host PC (through Terminal program) and the board for traces (even early boot traces), and access to the board from the remote PC (command lines)
- An Ethernet link between the host PC and the board for cross-development and cross-debugging through a local network. This is an alternative or a complement to the serial (or USB) link
- A display connected to the board, depending on the technologies available on the board: DSI LCD display, HDMI monitor (or TV) and so on
- A mouse and a keyboard connected through USB ports
Additional optional components can be added by means of the connectivity capabilities of the board: cameras, displays, JTAG, sensors, actuators, and much more.
3. Installing the STM32MPU distribution for Android[edit source]
| Delivery for Android coming soon (Q4 2019) |
In order to install the STM32MPU distribution for Android you need to have access to the ST git.
First you need to install the repo tool[2].
 mkdir ~/bin
 PATH=~/bin:$PATH
 curl https://storage.googleapis.com/git-repo-downloads/repo > ~/bin/repo
 chmod a+x ~/bin/repo
This tool looks like a git but it is able to manage multiple git at the same time, more information available in the repo documentation[3].
Initialize your local reposirtory. To do so create a folder:
 mkdir myDistribution
 cd myDistribution
Then launch repo:
repo init -u <git_url>
This will automaticaly download the default.xml file located in the git project given by the option -u.
This file is the manifest containing all projects reference.
Now you need to download all sources attach to each projects:
repo sync
This may take several hours.
3.1. Use local mirror[edit source]
For further loads, it can be interesting to create a local mirror of the different repositories used.
A helper script cachesetup is available for that purpose which will create / update the mirrors based on the configuration file device/stm/<STM32Series>/scripts/cache/android_cache.config.
Update cache configuration file (android_cache.config) depending on your needs. Two possible kind of cache:
- REPO mirror: mirror of list of modules in repositories based on provided manifest (ex: Android AOSP)
- GIT mirror: mirror of one module (ex: Linux kernel)
Be careful: if you change environment variable name, you’ll have to adapt associated scripts load_xxxx available in device/stm/<STM32Series>-xxxx/source directory.
Create the mirrors executing the following commands:
 source build/envsetup.sh
 cachesetup --new
From this stage, it's possible to regularly update your mirror executing
cachesetup
For more information on how to use the command look at the cachesetup usage:
Usage: cachesetup [Options] <cache option>
Setup (create or update) Git cache based on configuration file android_cache.config

Options:
  -h/--help: get current help
  -v/--version: get script version
  or
  -u/--update: update cache (default)
  or
  -f/--force: create cache (force)
  -n/--new: create cache (only create non-existing cache)

<cache option>:
    all (default)
  or select list of required cache within the following options:
    aosp
    android
    kernel
    tf-a
    u-boot
From this stage, you can use the local mirror instead of the remote repository adding --reference=$CACHE_DIR) to the repo init commands (CACHE_DIR environment variable name is set in android_cache.config file):
repo init --reference=$CACHE_DIR -u <repo_url> -b <version>
This will copy all necessary files define by the manifest from the mirror instead of downloading it.
3.2. Use packages[edit source]
If you have been provided with an archive, for example stm32mpuDistribution.tar.gz you need to follow those steps:
- Download the official AOSP version compatible with the archive (with or without mirror):
 mdkir myDistribution
 cd myDistribution
 repo init -u https://android.googlesource.com/platform/manifest -b android-<version>
 repo sync
For more info on available version please have a look in the official page[4].
- Extract the archive inside
myDistribution:
tar -xzf stm32mpuDistribution.tar.gz
This will put all custom ST files at the right location.
4. Building the STM32MPU distribution for Android[edit source]
When the installation is completed, please refer to the How to build STM32MPU distribution for Android page to learn how to build it.
5. Flashing the built image[edit source]
When the distribution has been built, please refer to the How to populate boards for Android page to learn how to flash your device.
6. References[edit source]
Arm® is a registered trademark of Arm Limited (or its subsidiaries) in the US and/or elsewhere. ![]()