UART and new board introduction![]() 34min
34min
Target description
Following this tutorial, you will:
- get familiar with the L475 IoT Node Discovery board,
- learn how to program and use a RS232 serial link on:
- the previously used NUCLEO-L476RG board
- the L475 IoT Node Discovery board (B-L475E-IOT01A ).
- the previously used NUCLEO-L476RG board
Prerequisites
- Previous Tutorials:
Hardware
The hardware requirements to start the application are the following:
- NUCLEO-L476RG[1] board (64-pin)
- STM32L4 Discovery kit IoT node[2] (B-L475E-IOT01A )
- USB cables Type-A to Mini-B and Type-A to Micro-B
1 Introduction to the UART I/F on NUCLEO-L476RG
![]() 12min
12min
Create NUCLEO-L476RG UART project using STM32CubeMX
- Create a new project using STM32CubeMX.
- Select NUCLEO-L476RG board using Board Selector.
- Answer Yes to Initialize all peripherals with their default mode ? popup.
- In Pinout view tab, check that USART2 mode is configured to Asynchronous, PA2 is connected to USART2_TX and PA3 is connected to USART2_RX.
- Click on USART2 button in Configuration tab and set Word Length to 8 Bits.
- Make sure that the settings are as in the screenshot below:
- Disable all other USARTs.
- Switch to the Project Manager tab and select STM32CubeIDE as Toolchain / IDE and give a name to your project.
- Click on Generate Code and accept to open your project in STM32CubeIDE.
Edit and compile the NUCLEO-L476RG UART project using STM32CubeIDE
- Open main.c in Project Explorer / myproject / Src / main.c.
- Insert the following lines between /* USER CODE BEGIN 3 */ and /* USER CODE END 3 */:
uint8_t Test[] = "Hello World !!!\r\n"; //Data to send
HAL_UART_Transmit(&huart2,Test,sizeof(Test),10);// Sending in normal mode
HAL_Delay(1000);
- Click on Build button
 to compile the project.
 - Click in Debug button
 to run the software.
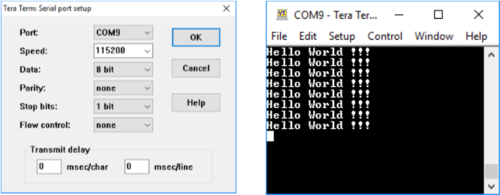
 - Open a console emulator such as TeraTerm[3]. Configure the console baud rate and data bits length. the COM Port name may differ on your PC.
- STM32CubeIDE opens Debug perspective. Click on Resume button
 to execute your code.
 - TeraTerm[3] displays Hello World !!! string confirming you were able to program and use RS232.
2 Introduction to the UART I/F on B-L475E-IOT01A (IoT Node)
![]() 22min
22min
Quick view
The B-L475E-IOT01A Discovery kit[2] for IoT node allows the users to develop applications with direct connection to cloud servers.
Key features
The Discovery kit enables a wide diversity of applications by exploiting low-power communication, multiway sensing and Arm® Cortex®-M4 core-based STM32L4 Series features.
Create B-L475E-IOT01A UART project using STM32CubeMX
- Create a new project using STM32CubeMX.
- Select B-L475E-IOT01A board using Board selector.
- Answer Yes to Initialize all peripherals with their default Mode ? popup.
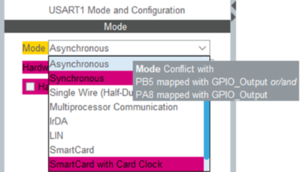
- Verify in Pinout tab that USART1 mode is configured to Asynchronous.
- USART1 conflicts can be solved by (1) disabling all unnecessary features (I2C, LCD, SAI, SPI, UART, USART2) and (2) setting the pins PA9 and PB7 to reset state.
- Click on USART1 button in Configuration tab and set Word Length to 8 Bits, baud rate to 115200 Bits/s, Parity to None and Stop Bits to 1 as shown below.
- Switch to the Project Manager tab and select STM32CubeIDE as Toolchain / IDE and give a name to your project.
- Click on Generate Code and accept to open the project in STM32CubeIDE.
Edit and compile B-L475E-IOT01A UART project using STM32CubeIDE
- Open main.c in Project Explorer / myproject / Src / main.com.
- Insert the following lines between /* USER CODE BEGIN 3 */ and /* USER CODE END 3 */:
uint8_t Test[] = "Hello World !!!\r\n"; //Data to send
HAL_UART_Transmit(&huart1,Test,sizeof(Test),10);// Sending in normal mode
HAL_Delay(1000);
- Click on Build button
 to compile the project.
 - Click on Debug button
 to run the software.
 - Open a console emulator such as TeraTerm[3]. Configure the console baud rate and data bits length. The COM Port name may differ on your PC.
- STM32CubeIDE opens Debug perspective. Click on Resume
 button to execute your code.
 - TeraTerm[3] displays Hello World !!! string confirming you were able to program and use RS232.
Now you are able to:
- use the UART I/F on NUCLEO-L476RG
- use the L475 IoT Node Discovery board
- use the UART I/F on L475 IoT Node Discovery board
3 References


