1 Test purpose
The received signal strength indicator (RSSI) is a measurement of the received radio signal power level.
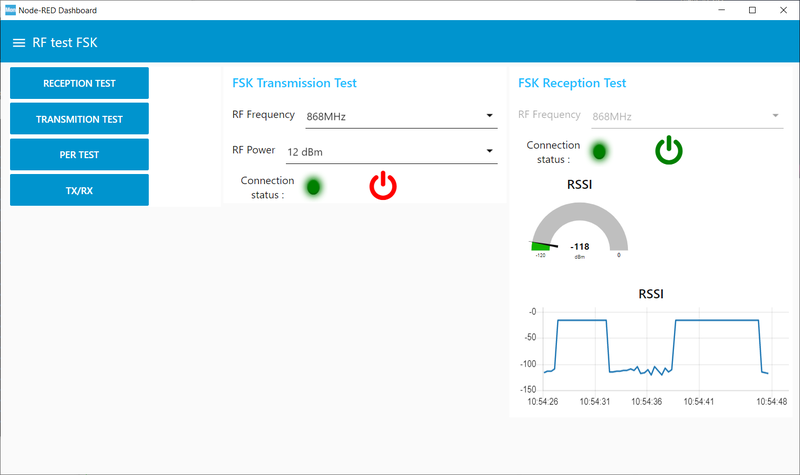
The TX/RX page enables transmitting a continuous RF wave signal and in same time receiving the signal and displaying dynamically the RSSI value in a chart.
2 Dashboard overview
The TX/RX dashboard is divided into three areas:
- The left part is dedicated to TX transmission. It enables the selection of the RF frequency and the emission power level (between –9 to 22 dBm). The user can start and stop the emission using the corresponding buttons. The LED is green when the board is connected. The signal indicator is green when a transmission is ongoing.
- The right part is dedicated to RX reception. It enables the selection of the RF frequency. The user can start and stop the reception. The signal icon is green when the reception has started.
- The bottom area shows the RSSI level in a gauge as well as a chart that is refreshed each 250 ms when the reception has started.
3 Flow overview
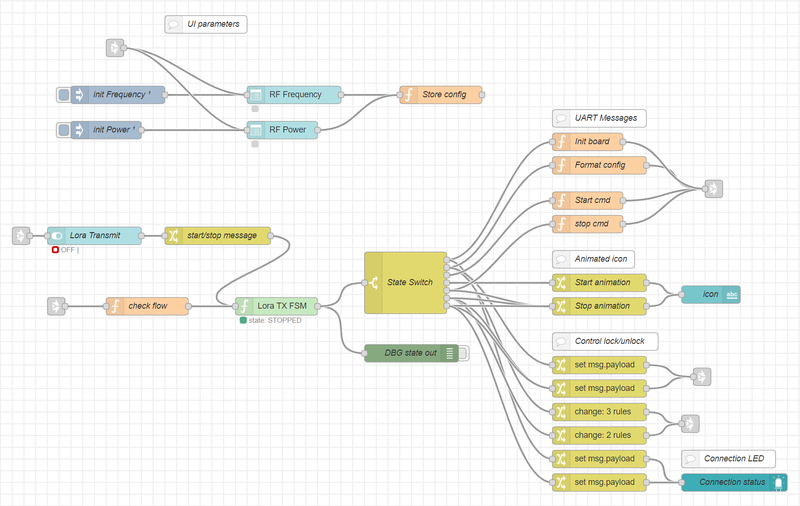
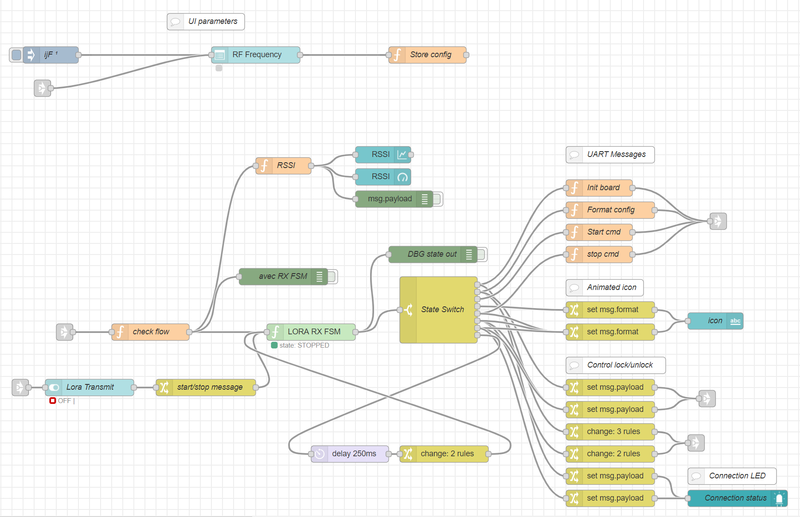
The TX/RX flow is a combination of TX and RX flows. The TX flow and RX flows handle the emission and reception of the signal, respectively.
The emitter must be connected to serial Port A and the receiver to serial Port B.
3.1 TX flow
The TX flow handles the sequence of AT commands sent to the emitter. A finite state machine (FSM) is used to manage the sequence of AT commands and the target responses. The RF frequency and TX power parameters are stored in flow variables and can be edited. The FSM status and transitions correspond to the normal sequence of AT commands. Abnormal responses from the target are also handled. The sequence steps configure the board with the stored parameters and start the transmission. When the stop button is pressed, the board is stopped and the FSM goes to STOPPED state. The LED indicating that the TX board is connected to the application is also managed by this flow.
3.2 RX flow
The RX flow handles the sequence of AT commands sent to the receiver. An FSM is used to manage the sequence and the target responses. The FSM configures the board and starts a first RSSI measurement. After each measurement, the flow waits for 250 ms and starts a new measurement (the time period between measurements can be configured in the flow through the delay node). The LED indicating that the RX board is connected to the application is also managed by this flow. The measurement results are decoded and displayed in the "RSSI" gauge and the "RSSI" chart.
4 AT commands for TX/RX flow
The AT commands listed below are used by the emitter and receiver flows.
4.1 Emitter :
ATZ Resets the emitter board
AT+TCONF=freq:pow:bw:sf:cr:lna:pa:modulation:payloadLen:fskDeviation:lowDrOpt:BTproduct. Applies the RF test configuration.
For example : AT+TCONF=868000000:14:4:12:4/6:0:0:1:16:25000:2:3
AT+TTONE Starts the TX transmission
AT+TOFF Stops the TX transmission
4.2 Receiver:
AT+Z Resets the receiver board
AT+TCONF=freq:pow:bw:sf:cr:lna:pa:modulation:payloadLen:fskDeviation:lowDrOpt:BTproduct. Applies the RF test configuration.
For example : AT+TCONF=868000000:14:4:12:4/6:0:0:1:16:25000:2:3
AT+TRRSSI Starts the RX reception and RSSI measurement
AT+TOFF Stops the RX reception


